Add custom claims for JWT access tokens with Logto to boost your authorization
In this article, we will introduce how to use Logto custom JWT claims feature to improve the flexibility of authorization and the performance of the service provider through a real-world example.

Developer

In previous articles, we mentioned that more and more systems are using JWT-format access tokens for user authentication and access control. One of the important reasons for this is that JWT can contain some useful information, such as user roles and permissions. This information can help us pass user identity information between the server and client, thereby achieving user authentication and access control.
Usually, the information contained in JWT is determined by the authentication server. According to the OAuth 2.0 protocol, JWT usually contains fields such as sub (subject), aud (audience), and exp (expiration time), which are commonly referred to as claims. These claims can help verify the validity of the access token.
However, there are countless scenarios where JWT is used for verification, and common JWT claims may often not meet user needs. People often think that since JWT can contain some information, can we add some information to it to make authorization easier?
The answer is YES, we can add custom claims to JWT, such as the current user's scope and subscription level. In this way, we can pass user identity information between the client and the server (here refers to the server that provides various different services, also called service provider), to achieve user authentication and access control.
For standard JWT claims, please refer to RFC7519. Logto, as an identity solution that supports both authentication and authorization, has extended the resource and scope claims on this basis to support standard RBAC. Although Logto's RBAC implementation is standard, it is not simple and flexible enough to fit all use cases.
Based on this, Logto launched a new feature of customizing JWT claims, which allows users to customize additional JWT claims, so that user authentication and access control can be implemented more flexibly.
How does Logto custom JWT claims work?
You can come to the Custom JWT listing page by clicking on the "JWT claims" button on the sidebar.
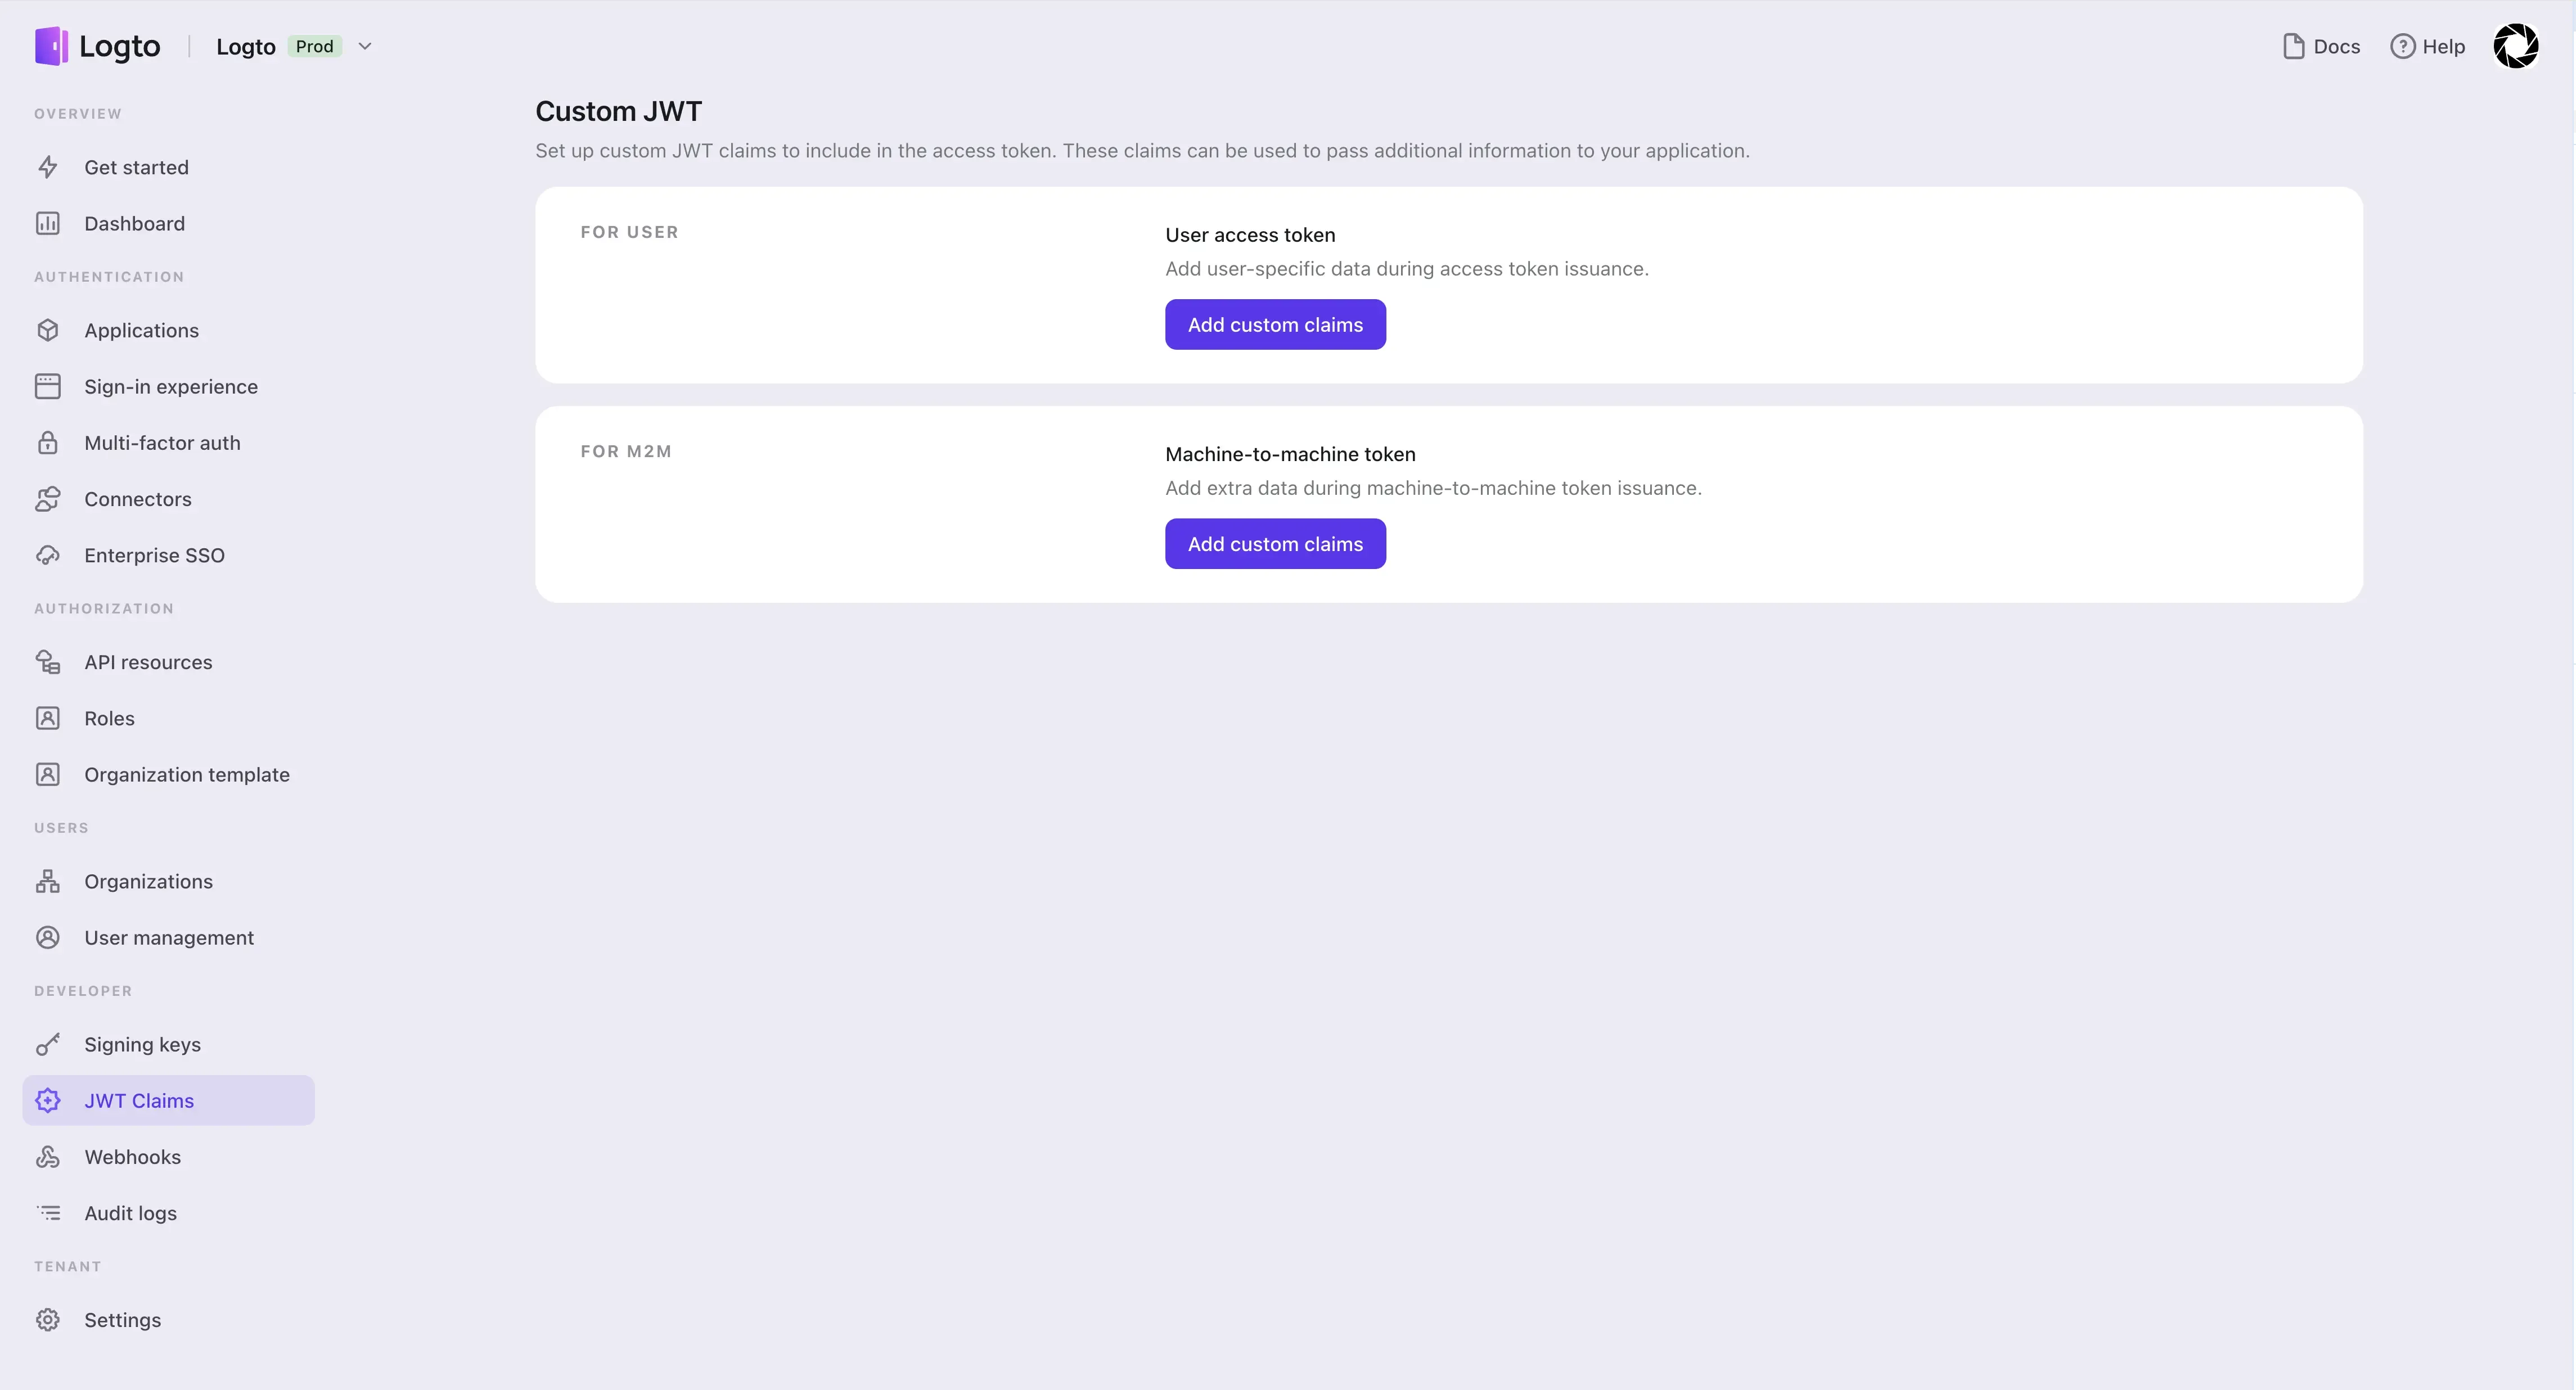
Let's start from adding custom claims for end-users.
In the editor on the left, you can customize your getCustomJwtClaims function. This method has three input parameters: token, data, and envVariables.
tokenis the raw access token payload obtained based on the current end-user's credentials and your system configuration, and the user's access-related information in Logtodatais all the information about the user in Logto, including all the user's roles, social sign-in identities, SSO identities, organization memberships, etc.envVariablesare the environment variables you configured in Logto for the current end-user access token usage scenario, such as API key(s) of the required external APIs, etc.
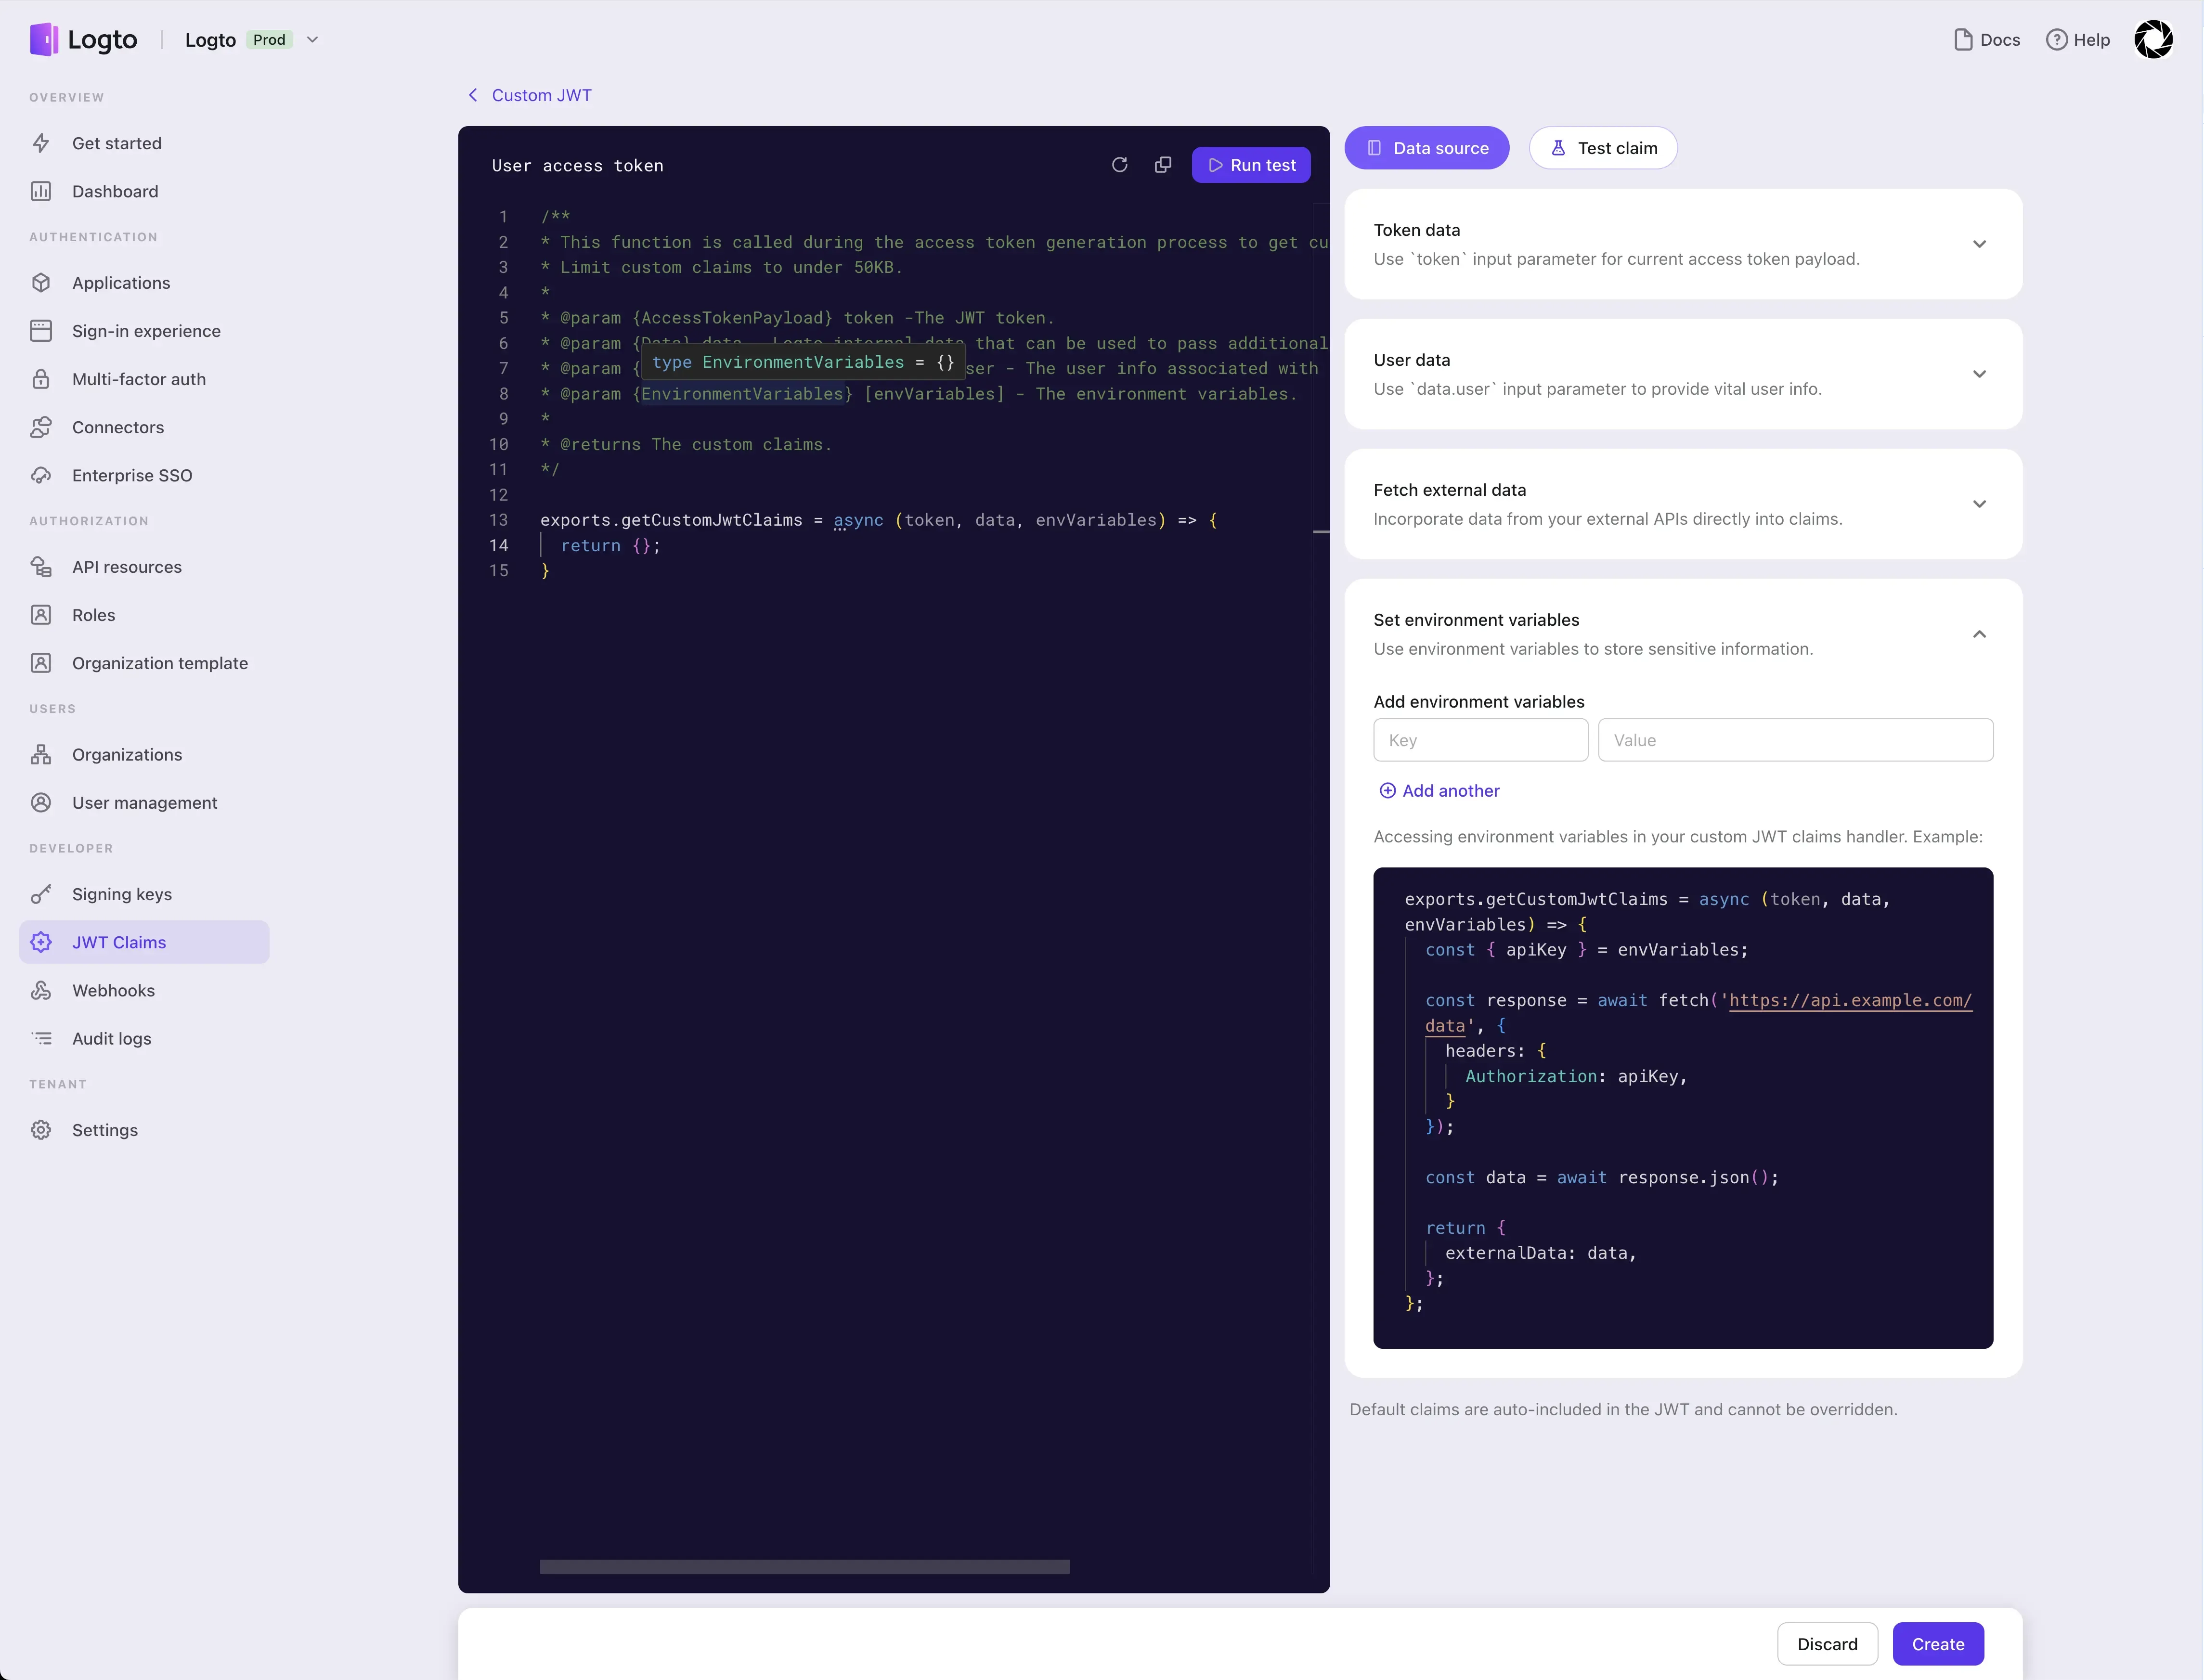
The cards on the right can be expanded to show the introduction of the corresponding parameters, and you also can set the environment variables for the current scenario here.
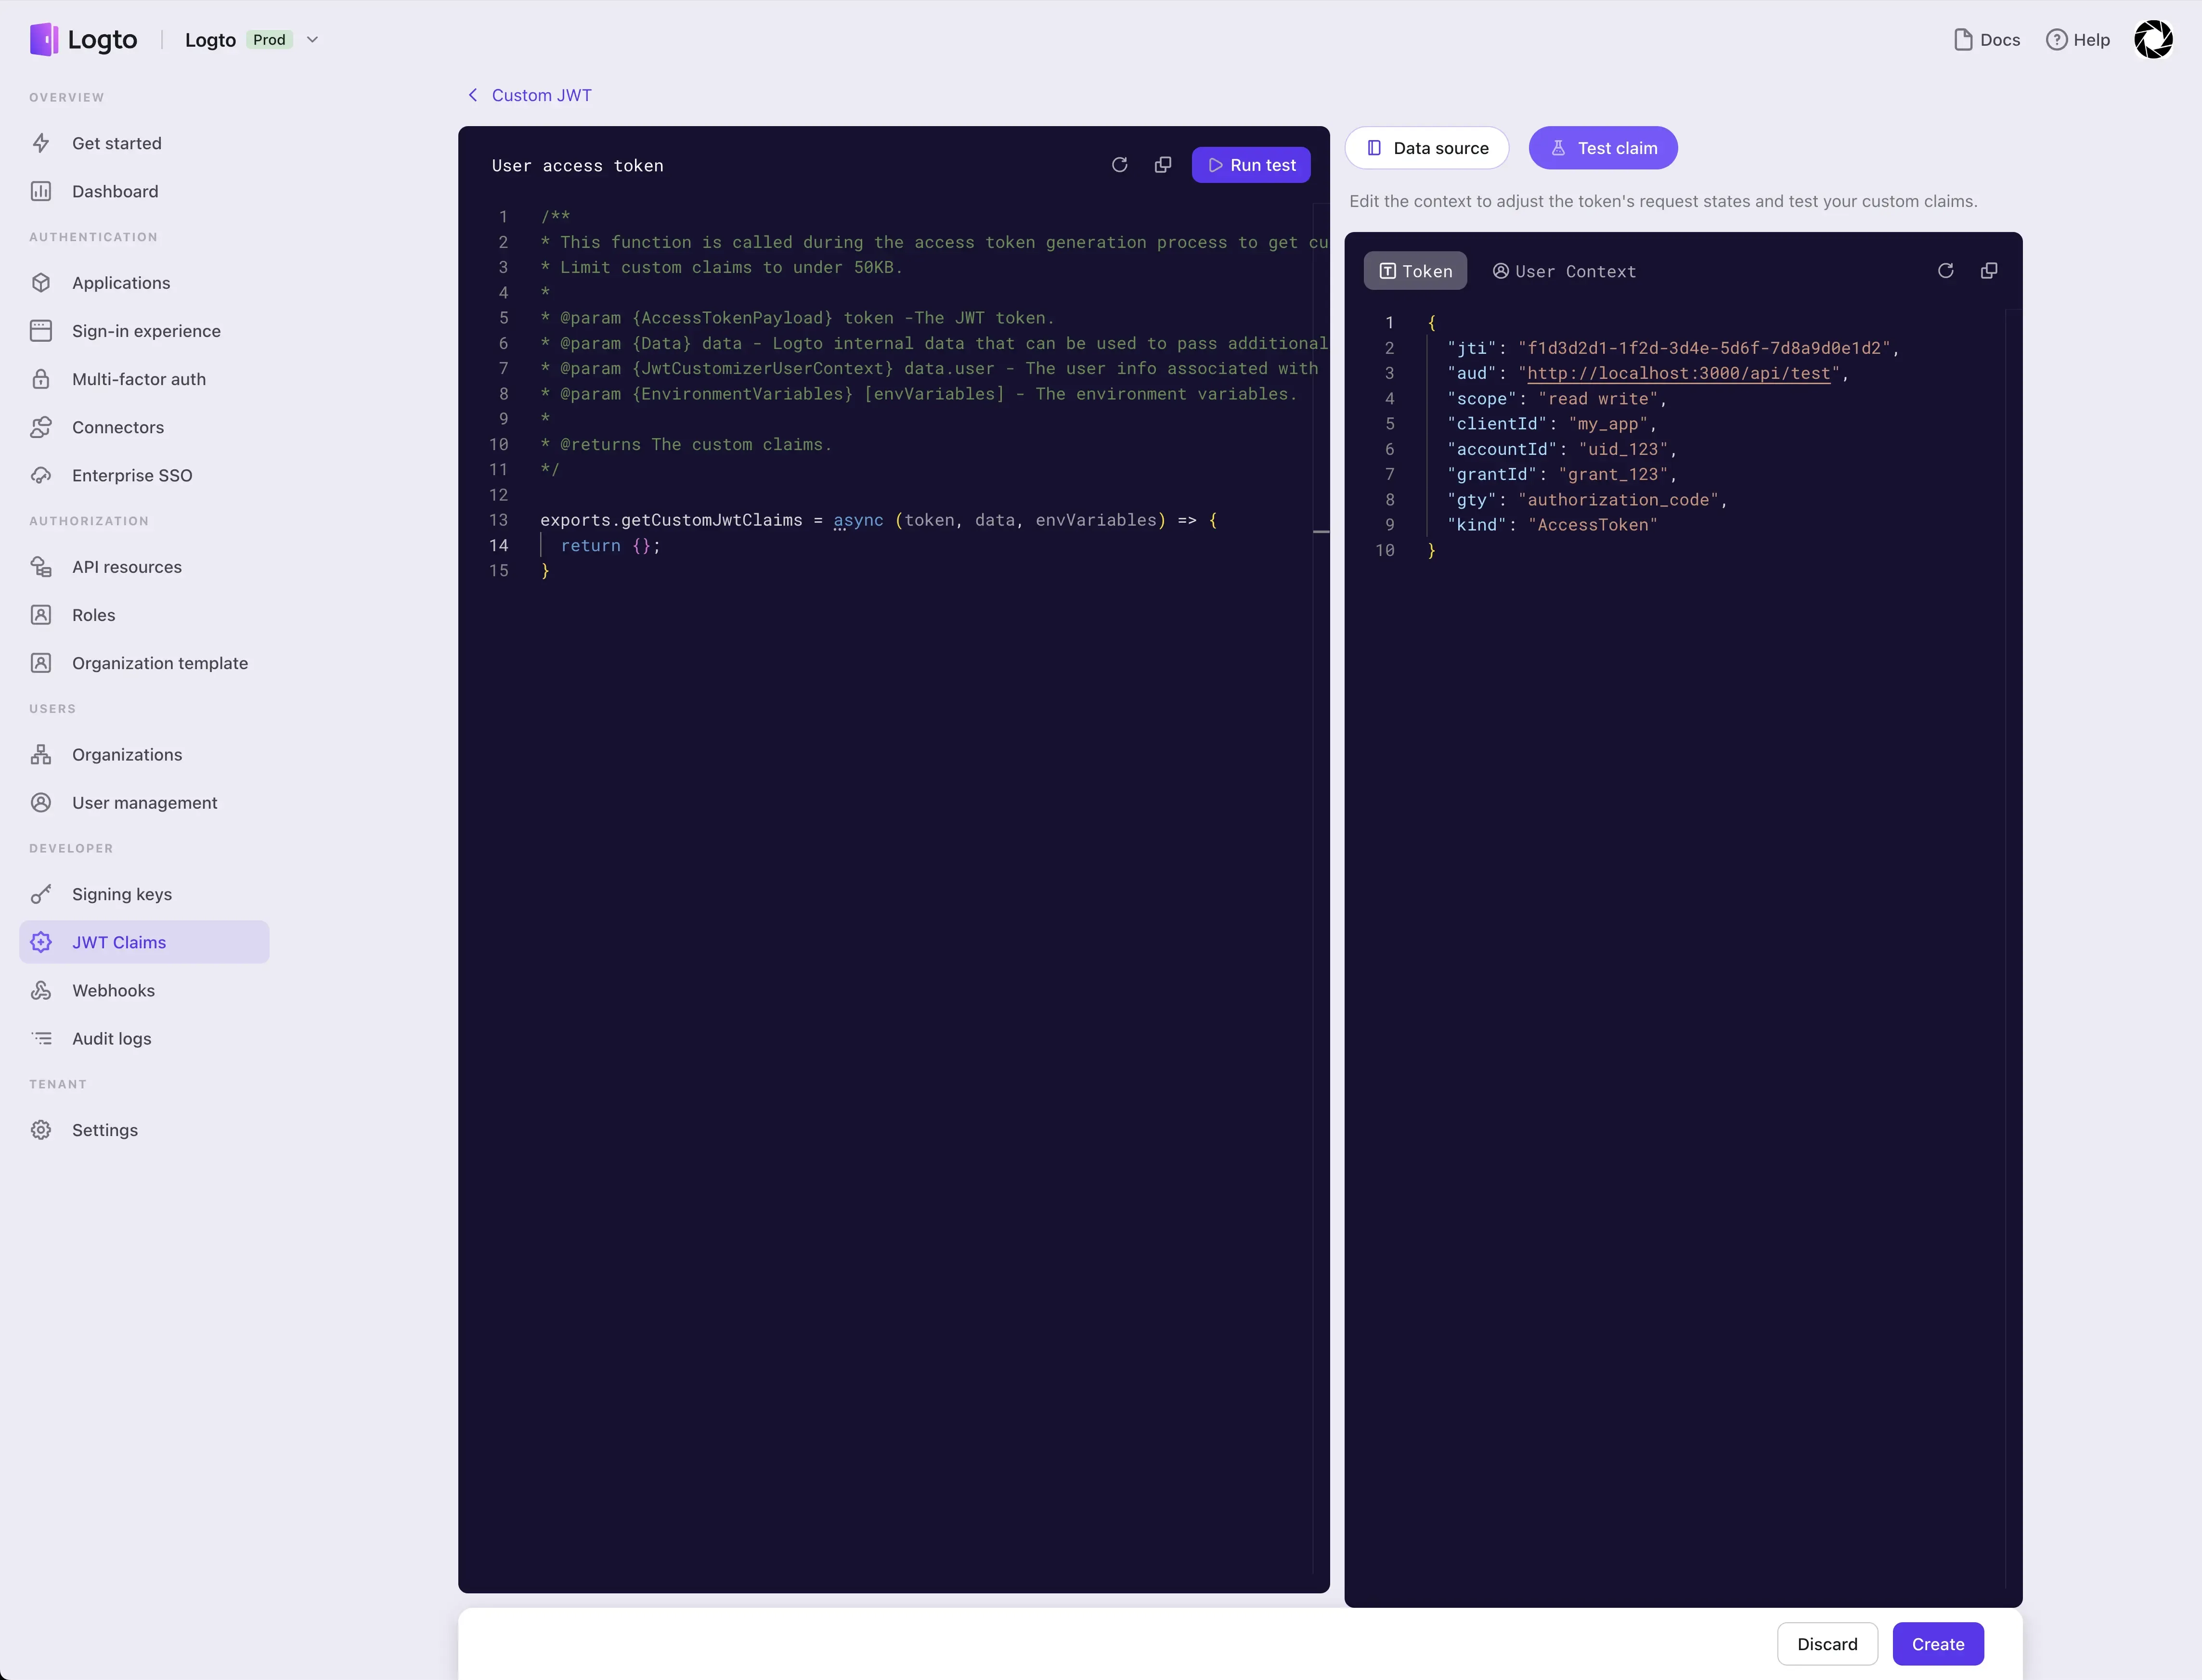
After reading the introductions of all the cards on the right, you can switch to the test mode, where you can edit test data and use the edited test data to check whether the behavior of the script you wrote in the code editor on the left meets your expectations.
This is a sequence diagram showing the execution process of the getCustomJwtClaims function when an end user initiates an authentication request to Logto and eventually obtains the JWT-format access token returned by Logto.
If the Custom JWT feature is not enabled, step 3 in the figure will be skipped and step 4 will be executed right after step 2 ends. At this time, Logto will assume the return value of getCustomJwtClaims to be an empty object, and then continue to go through subsequent steps.
' y='210' x='161.5'/%3e%3cg%3e%3crect class='actor actor-bottom' ry='3' rx='3' name='SP' height='65' width='150' stroke='%23666' fill='%23eaeaea' y='753' x='557.5'/%3e%3ctext style='text-anchor: middle%3b font-size: 16px%3b font-weight: 400%3b font-family: arial%2c sans-serif%3b' class='actor actor-box' alignment-baseline='central' dominant-baseline='central' y='785.5' x='632.5'%3e%3ctspan dy='0' x='632.5'%3eService Provider%3c/tspan%3e%3c/text%3e%3c/g%3e%3cg%3e%3crect class='actor actor-bottom' ry='3' rx='3' name='IdP' height='65' width='188' stroke='%23666' fill='%23eaeaea' y='753' x='275.5'/%3e%3ctext style='text-anchor: middle%3b font-size: 16px%3b font-weight: 400%3b font-family: arial%2c sans-serif%3b' class='actor actor-box' alignment-baseline='central' dominant-baseline='central' y='785.5' x='369.5'%3e%3ctspan dy='0' x='369.5'%3eLogto (identity provider)%3c/tspan%3e%3c/text%3e%3c/g%3e%3cg%3e%3crect class='actor actor-bottom' ry='3' rx='3' name='U' height='65' width='153' stroke='%23666' fill='%23eaeaea' y='753' x='0'/%3e%3ctext style='text-anchor: middle%3b font-size: 16px%3b font-weight: 400%3b font-family: arial%2c sans-serif%3b' class='actor actor-box' alignment-baseline='central' dominant-baseline='central' y='785.5' x='76.5'%3e%3ctspan dy='0' x='76.5'%3eUser or user agent%3c/tspan%3e%3c/text%3e%3c/g%3e%3cg%3e%3cline name='SP' stroke='%23999' stroke-width='0.5px' class='actor-line 200' y2='753' x2='632.5' y1='65' x1='632.5' id='actor2'/%3e%3cg id='root-2'%3e%3crect class='actor actor-top' ry='3' rx='3' name='SP' height='65' width='150' stroke='%23666' fill='%23eaeaea' y='0' x='557.5'/%3e%3ctext style='text-anchor: middle%3b font-size: 16px%3b font-weight: 400%3b font-family: arial%2c sans-serif%3b' class='actor actor-box' alignment-baseline='central' dominant-baseline='central' y='32.5' x='632.5'%3e%3ctspan dy='0' x='632.5'%3eService Provider%3c/tspan%3e%3c/text%3e%3c/g%3e%3c/g%3e%3cg%3e%3cline name='IdP' stroke='%23999' stroke-width='0.5px' class='actor-line 200' y2='753' x2='369.5' y1='65' x1='369.5' id='actor1'/%3e%3cg id='root-1'%3e%3crect class='actor actor-top' ry='3' rx='3' name='IdP' height='65' width='188' stroke='%23666' fill='%23eaeaea' y='0' x='275.5'/%3e%3ctext style='text-anchor: middle%3b font-size: 16px%3b font-weight: 400%3b font-family: arial%2c sans-serif%3b' class='actor actor-box' alignment-baseline='central' dominant-baseline='central' y='32.5' x='369.5'%3e%3ctspan dy='0' x='369.5'%3eLogto (identity provider)%3c/tspan%3e%3c/text%3e%3c/g%3e%3c/g%3e%3cg%3e%3cline name='U' stroke='%23999' stroke-width='0.5px' class='actor-line 200' y2='753' x2='76.5' y1='65' x1='76.5' id='actor0'/%3e%3cg id='root-0'%3e%3crect class='actor actor-top' ry='3' rx='3' name='U' height='65' width='153' stroke='%23666' fill='%23eaeaea' y='0' x='0'/%3e%3ctext style='text-anchor: middle%3b font-size: 16px%3b font-weight: 400%3b font-family: arial%2c sans-serif%3b' class='actor actor-box' alignment-baseline='central' dominant-baseline='central' y='32.5' x='76.5'%3e%3ctspan dy='0' x='76.5'%3eUser or user agent%3c/tspan%3e%3c/text%3e%3c/g%3e%3c/g%3e%3cstyle%3e%23mermaid-0%7bfont-family:arial%2csans-serif%3bfont-size:16px%3bfill:%23333%3b%7d%23mermaid-0 .error-icon%7bfill:%23552222%3b%7d%23mermaid-0 .error-text%7bfill:%23552222%3bstroke:%23552222%3b%7d%23mermaid-0 .edge-thickness-normal%7bstroke-width:1px%3b%7d%23mermaid-0 .edge-thickness-thick%7bstroke-width:3.5px%3b%7d%23mermaid-0 .edge-pattern-solid%7bstroke-dasharray:0%3b%7d%23mermaid-0 .edge-thickness-invisible%7bstroke-width:0%3bfill:none%3b%7d%23mermaid-0 .edge-pattern-dashed%7bstroke-dasharray:3%3b%7d%23mermaid-0 .edge-pattern-dotted%7bstroke-dasharray:2%3b%7d%23mermaid-0 .marker%7bfill:%23333333%3bstroke:%23333333%3b%7d%23mermaid-0 .marker.cross%7bstroke:%23333333%3b%7d%23mermaid-0 svg%7bfont-family:arial%2csans-serif%3bfont-size:16px%3b%7d%23mermaid-0 p%7bmargin:0%3b%7d%23mermaid-0 .actor%7bstroke:hsl(259.6261682243%2c 59.7765363128%25%2c 87.9019607843%25)%3bfill:%23ECECFF%3b%7d%23mermaid-0 text.actor%26gt%3btspan%7bfill:black%3bstroke:none%3b%7d%23mermaid-0 .actor-line%7bstroke:hsl(259.6261682243%2c 59.7765363128%25%2c 87.9019607843%25)%3b%7d%23mermaid-0 .messageLine0%7bstroke-width:1.5%3bstroke-dasharray:none%3bstroke:%23333%3b%7d%23mermaid-0 .messageLine1%7bstroke-width:1.5%3bstroke-dasharray:2%2c2%3bstroke:%23333%3b%7d%23mermaid-0 %23arrowhead path%7bfill:%23333%3bstroke:%23333%3b%7d%23mermaid-0 .sequenceNumber%7bfill:white%3b%7d%23mermaid-0 %23sequencenumber%7bfill:%23333%3b%7d%23mermaid-0 %23crosshead path%7bfill:%23333%3bstroke:%23333%3b%7d%23mermaid-0 .messageText%7bfill:%23333%3bstroke:none%3b%7d%23mermaid-0 .labelBox%7bstroke:hsl(259.6261682243%2c 59.7765363128%25%2c 87.9019607843%25)%3bfill:%23ECECFF%3b%7d%23mermaid-0 .labelText%2c%23mermaid-0 .labelText%26gt%3btspan%7bfill:black%3bstroke:none%3b%7d%23mermaid-0 .loopText%2c%23mermaid-0 .loopText%26gt%3btspan%7bfill:black%3bstroke:none%3b%7d%23mermaid-0 .loopLine%7bstroke-width:2px%3bstroke-dasharray:2%2c2%3bstroke:hsl(259.6261682243%2c 59.7765363128%25%2c 87.9019607843%25)%3bfill:hsl(259.6261682243%2c 59.7765363128%25%2c 87.9019607843%25)%3b%7d%23mermaid-0 .note%7bstroke:%23aaaa33%3bfill:%23fff5ad%3b%7d%23mermaid-0 .noteText%2c%23mermaid-0 .noteText%26gt%3btspan%7bfill:black%3bstroke:none%3b%7d%23mermaid-0 .activation0%7bfill:%23f4f4f4%3bstroke:%23666%3b%7d%23mermaid-0 .activation1%7bfill:%23f4f4f4%3bstroke:%23666%3b%7d%23mermaid-0 .activation2%7bfill:%23f4f4f4%3bstroke:%23666%3b%7d%23mermaid-0 .actorPopupMenu%7bposition:absolute%3b%7d%23mermaid-0 .actorPopupMenuPanel%7bposition:absolute%3bfill:%23ECECFF%3bbox-shadow:0px 8px 16px 0px rgba(0%2c0%2c0%2c0.2)%3bfilter:drop-shadow(3px 5px 2px rgb(0 0 0 / 0.4))%3b%7d%23mermaid-0 .actor-man line%7bstroke:hsl(259.6261682243%2c 59.7765363128%25%2c 87.9019607843%25)%3bfill:%23ECECFF%3b%7d%23mermaid-0 .actor-man circle%2c%23mermaid-0 line%7bstroke:hsl(259.6261682243%2c 59.7765363128%25%2c 87.9019607843%25)%3bfill:%23ECECFF%3bstroke-width:2px%3b%7d%23mermaid-0 :root%7b--mermaid-font-family:arial%2csans-serif%3b%7d%3c/style%3e%3cg/%3e%3cdefs%3e%3csymbol height='24' width='24' id='computer'%3e%3cpath d='M2 2v13h20v-13h-20zm18 11h-16v-9h16v9zm-10.228 6l.466-1h3.524l.467 1h-4.457zm14.228 3h-24l2-6h2.104l-1.33 4h18.45l-1.297-4h2.073l2 6zm-5-10h-14v-7h14v7z' transform='scale(.5)'/%3e%3c/symbol%3e%3c/defs%3e%3cdefs%3e%3csymbol clip-rule='evenodd' fill-rule='evenodd' id='database'%3e%3cpath d='M12.258.001l.256.004.255.005.253.008.251.01.249.012.247.015.246.016.242.019.241.02.239.023.236.024.233.027.231.028.229.031.225.032.223.034.22.036.217.038.214.04.211.041.208.043.205.045.201.046.198.048.194.05.191.051.187.053.183.054.18.056.175.057.172.059.168.06.163.061.16.063.155.064.15.066.074.033.073.033.071.034.07.034.069.035.068.035.067.035.066.035.064.036.064.036.062.036.06.036.06.037.058.037.058.037.055.038.055.038.053.038.052.038.051.039.05.039.048.039.047.039.045.04.044.04.043.04.041.04.04.041.039.041.037.041.036.041.034.041.033.042.032.042.03.042.029.042.027.042.026.043.024.043.023.043.021.043.02.043.018.044.017.043.015.044.013.044.012.044.011.045.009.044.007.045.006.045.004.045.002.045.001.045v17l-.001.045-.002.045-.004.045-.006.045-.007.045-.009.044-.011.045-.012.044-.013.044-.015.044-.017.043-.018.044-.02.043-.021.043-.023.043-.024.043-.026.043-.027.042-.029.042-.03.042-.032.042-.033.042-.034.041-.036.041-.037.041-.039.041-.04.041-.041.04-.043.04-.044.04-.045.04-.047.039-.048.039-.05.039-.051.039-.052.038-.053.038-.055.038-.055.038-.058.037-.058.037-.06.037-.06.036-.062.036-.064.036-.064.036-.066.035-.067.035-.068.035-.069.035-.07.034-.071.034-.073.033-.074.033-.15.066-.155.064-.16.063-.163.061-.168.06-.172.059-.175.057-.18.056-.183.054-.187.053-.191.051-.194.05-.198.048-.201.046-.205.045-.208.043-.211.041-.214.04-.217.038-.22.036-.223.034-.225.032-.229.031-.231.028-.233.027-.236.024-.239.023-.241.02-.242.019-.246.016-.247.015-.249.012-.251.01-.253.008-.255.005-.256.004-.258.001-.258-.001-.256-.004-.255-.005-.253-.008-.251-.01-.249-.012-.247-.015-.245-.016-.243-.019-.241-.02-.238-.023-.236-.024-.234-.027-.231-.028-.228-.031-.226-.032-.223-.034-.22-.036-.217-.038-.214-.04-.211-.041-.208-.043-.204-.045-.201-.046-.198-.048-.195-.05-.19-.051-.187-.053-.184-.054-.179-.056-.176-.057-.172-.059-.167-.06-.164-.061-.159-.063-.155-.064-.151-.066-.074-.033-.072-.033-.072-.034-.07-.034-.069-.035-.068-.035-.067-.035-.066-.035-.064-.036-.063-.036-.062-.036-.061-.036-.06-.037-.058-.037-.057-.037-.056-.038-.055-.038-.053-.038-.052-.038-.051-.039-.049-.039-.049-.039-.046-.039-.046-.04-.044-.04-.043-.04-.041-.04-.04-.041-.039-.041-.037-.041-.036-.041-.034-.041-.033-.042-.032-.042-.03-.042-.029-.042-.027-.042-.026-.043-.024-.043-.023-.043-.021-.043-.02-.043-.018-.044-.017-.043-.015-.044-.013-.044-.012-.044-.011-.045-.009-.044-.007-.045-.006-.045-.004-.045-.002-.045-.001-.045v-17l.001-.045.002-.045.004-.045.006-.045.007-.045.009-.044.011-.045.012-.044.013-.044.015-.044.017-.043.018-.044.02-.043.021-.043.023-.043.024-.043.026-.043.027-.042.029-.042.03-.042.032-.042.033-.042.034-.041.036-.041.037-.041.039-.041.04-.041.041-.04.043-.04.044-.04.046-.04.046-.039.049-.039.049-.039.051-.039.052-.038.053-.038.055-.038.056-.038.057-.037.058-.037.06-.037.061-.036.062-.036.063-.036.064-.036.066-.035.067-.035.068-.035.069-.035.07-.034.072-.034.072-.033.074-.033.151-.066.155-.064.159-.063.164-.061.167-.06.172-.059.176-.057.179-.056.184-.054.187-.053.19-.051.195-.05.198-.048.201-.046.204-.045.208-.043.211-.041.214-.04.217-.038.22-.036.223-.034.226-.032.228-.031.231-.028.234-.027.236-.024.238-.023.241-.02.243-.019.245-.016.247-.015.249-.012.251-.01.253-.008.255-.005.256-.004.258-.001.258.001zm-9.258 20.499v.01l.001.021.003.021.004.022.005.021.006.022.007.022.009.023.01.022.011.023.012.023.013.023.015.023.016.024.017.023.018.024.019.024.021.024.022.025.023.024.024.025.052.049.056.05.061.051.066.051.07.051.075.051.079.052.084.052.088.052.092.052.097.052.102.051.105.052.11.052.114.051.119.051.123.051.127.05.131.05.135.05.139.048.144.049.147.047.152.047.155.047.16.045.163.045.167.043.171.043.176.041.178.041.183.039.187.039.19.037.194.035.197.035.202.033.204.031.209.03.212.029.216.027.219.025.222.024.226.021.23.02.233.018.236.016.24.015.243.012.246.01.249.008.253.005.256.004.259.001.26-.001.257-.004.254-.005.25-.008.247-.011.244-.012.241-.014.237-.016.233-.018.231-.021.226-.021.224-.024.22-.026.216-.027.212-.028.21-.031.205-.031.202-.034.198-.034.194-.036.191-.037.187-.039.183-.04.179-.04.175-.042.172-.043.168-.044.163-.045.16-.046.155-.046.152-.047.148-.048.143-.049.139-.049.136-.05.131-.05.126-.05.123-.051.118-.052.114-.051.11-.052.106-.052.101-.052.096-.052.092-.052.088-.053.083-.051.079-.052.074-.052.07-.051.065-.051.06-.051.056-.05.051-.05.023-.024.023-.025.021-.024.02-.024.019-.024.018-.024.017-.024.015-.023.014-.024.013-.023.012-.023.01-.023.01-.022.008-.022.006-.022.006-.022.004-.022.004-.021.001-.021.001-.021v-4.127l-.077.055-.08.053-.083.054-.085.053-.087.052-.09.052-.093.051-.095.05-.097.05-.1.049-.102.049-.105.048-.106.047-.109.047-.111.046-.114.045-.115.045-.118.044-.12.043-.122.042-.124.042-.126.041-.128.04-.13.04-.132.038-.134.038-.135.037-.138.037-.139.035-.142.035-.143.034-.144.033-.147.032-.148.031-.15.03-.151.03-.153.029-.154.027-.156.027-.158.026-.159.025-.161.024-.162.023-.163.022-.165.021-.166.02-.167.019-.169.018-.169.017-.171.016-.173.015-.173.014-.175.013-.175.012-.177.011-.178.01-.179.008-.179.008-.181.006-.182.005-.182.004-.184.003-.184.002h-.37l-.184-.002-.184-.003-.182-.004-.182-.005-.181-.006-.179-.008-.179-.008-.178-.01-.176-.011-.176-.012-.175-.013-.173-.014-.172-.015-.171-.016-.17-.017-.169-.018-.167-.019-.166-.02-.165-.021-.163-.022-.162-.023-.161-.024-.159-.025-.157-.026-.156-.027-.155-.027-.153-.029-.151-.03-.15-.03-.148-.031-.146-.032-.145-.033-.143-.034-.141-.035-.14-.035-.137-.037-.136-.037-.134-.038-.132-.038-.13-.04-.128-.04-.126-.041-.124-.042-.122-.042-.12-.044-.117-.043-.116-.045-.113-.045-.112-.046-.109-.047-.106-.047-.105-.048-.102-.049-.1-.049-.097-.05-.095-.05-.093-.052-.09-.051-.087-.052-.085-.053-.083-.054-.08-.054-.077-.054v4.127zm0-5.654v.011l.001.021.003.021.004.021.005.022.006.022.007.022.009.022.01.022.011.023.012.023.013.023.015.024.016.023.017.024.018.024.019.024.021.024.022.024.023.025.024.024.052.05.056.05.061.05.066.051.07.051.075.052.079.051.084.052.088.052.092.052.097.052.102.052.105.052.11.051.114.051.119.052.123.05.127.051.131.05.135.049.139.049.144.048.147.048.152.047.155.046.16.045.163.045.167.044.171.042.176.042.178.04.183.04.187.038.19.037.194.036.197.034.202.033.204.032.209.03.212.028.216.027.219.025.222.024.226.022.23.02.233.018.236.016.24.014.243.012.246.01.249.008.253.006.256.003.259.001.26-.001.257-.003.254-.006.25-.008.247-.01.244-.012.241-.015.237-.016.233-.018.231-.02.226-.022.224-.024.22-.025.216-.027.212-.029.21-.03.205-.032.202-.033.198-.035.194-.036.191-.037.187-.039.183-.039.179-.041.175-.042.172-.043.168-.044.163-.045.16-.045.155-.047.152-.047.148-.048.143-.048.139-.05.136-.049.131-.05.126-.051.123-.051.118-.051.114-.052.11-.052.106-.052.101-.052.096-.052.092-.052.088-.052.083-.052.079-.052.074-.051.07-.052.065-.051.06-.05.056-.051.051-.049.023-.025.023-.024.021-.025.02-.024.019-.024.018-.024.017-.024.015-.023.014-.023.013-.024.012-.022.01-.023.01-.023.008-.022.006-.022.006-.022.004-.021.004-.022.001-.021.001-.021v-4.139l-.077.054-.08.054-.083.054-.085.052-.087.053-.09.051-.093.051-.095.051-.097.05-.1.049-.102.049-.105.048-.106.047-.109.047-.111.046-.114.045-.115.044-.118.044-.12.044-.122.042-.124.042-.126.041-.128.04-.13.039-.132.039-.134.038-.135.037-.138.036-.139.036-.142.035-.143.033-.144.033-.147.033-.148.031-.15.03-.151.03-.153.028-.154.028-.156.027-.158.026-.159.025-.161.024-.162.023-.163.022-.165.021-.166.02-.167.019-.169.018-.169.017-.171.016-.173.015-.173.014-.175.013-.175.012-.177.011-.178.009-.179.009-.179.007-.181.007-.182.005-.182.004-.184.003-.184.002h-.37l-.184-.002-.184-.003-.182-.004-.182-.005-.181-.007-.179-.007-.179-.009-.178-.009-.176-.011-.176-.012-.175-.013-.173-.014-.172-.015-.171-.016-.17-.017-.169-.018-.167-.019-.166-.02-.165-.021-.163-.022-.162-.023-.161-.024-.159-.025-.157-.026-.156-.027-.155-.028-.153-.028-.151-.03-.15-.03-.148-.031-.146-.033-.145-.033-.143-.033-.141-.035-.14-.036-.137-.036-.136-.037-.134-.038-.132-.039-.13-.039-.128-.04-.126-.041-.124-.042-.122-.043-.12-.043-.117-.044-.116-.044-.113-.046-.112-.046-.109-.046-.106-.047-.105-.048-.102-.049-.1-.049-.097-.05-.095-.051-.093-.051-.09-.051-.087-.053-.085-.052-.083-.054-.08-.054-.077-.054v4.139zm0-5.666v.011l.001.02.003.022.004.021.005.022.006.021.007.022.009.023.01.022.011.023.012.023.013.023.015.023.016.024.017.024.018.023.019.024.021.025.022.024.023.024.024.025.052.05.056.05.061.05.066.051.07.051.075.052.079.051.084.052.088.052.092.052.097.052.102.052.105.051.11.052.114.051.119.051.123.051.127.05.131.05.135.05.139.049.144.048.147.048.152.047.155.046.16.045.163.045.167.043.171.043.176.042.178.04.183.04.187.038.19.037.194.036.197.034.202.033.204.032.209.03.212.028.216.027.219.025.222.024.226.021.23.02.233.018.236.017.24.014.243.012.246.01.249.008.253.006.256.003.259.001.26-.001.257-.003.254-.006.25-.008.247-.01.244-.013.241-.014.237-.016.233-.018.231-.02.226-.022.224-.024.22-.025.216-.027.212-.029.21-.03.205-.032.202-.033.198-.035.194-.036.191-.037.187-.039.183-.039.179-.041.175-.042.172-.043.168-.044.163-.045.16-.045.155-.047.152-.047.148-.048.143-.049.139-.049.136-.049.131-.051.126-.05.123-.051.118-.052.114-.051.11-.052.106-.052.101-.052.096-.052.092-.052.088-.052.083-.052.079-.052.074-.052.07-.051.065-.051.06-.051.056-.05.051-.049.023-.025.023-.025.021-.024.02-.024.019-.024.018-.024.017-.024.015-.023.014-.024.013-.023.012-.023.01-.022.01-.023.008-.022.006-.022.006-.022.004-.022.004-.021.001-.021.001-.021v-4.153l-.077.054-.08.054-.083.053-.085.053-.087.053-.09.051-.093.051-.095.051-.097.05-.1.049-.102.048-.105.048-.106.048-.109.046-.111.046-.114.046-.115.044-.118.044-.12.043-.122.043-.124.042-.126.041-.128.04-.13.039-.132.039-.134.038-.135.037-.138.036-.139.036-.142.034-.143.034-.144.033-.147.032-.148.032-.15.03-.151.03-.153.028-.154.028-.156.027-.158.026-.159.024-.161.024-.162.023-.163.023-.165.021-.166.02-.167.019-.169.018-.169.017-.171.016-.173.015-.173.014-.175.013-.175.012-.177.01-.178.01-.179.009-.179.007-.181.006-.182.006-.182.004-.184.003-.184.001-.185.001-.185-.001-.184-.001-.184-.003-.182-.004-.182-.006-.181-.006-.179-.007-.179-.009-.178-.01-.176-.01-.176-.012-.175-.013-.173-.014-.172-.015-.171-.016-.17-.017-.169-.018-.167-.019-.166-.02-.165-.021-.163-.023-.162-.023-.161-.024-.159-.024-.157-.026-.156-.027-.155-.028-.153-.028-.151-.03-.15-.03-.148-.032-.146-.032-.145-.033-.143-.034-.141-.034-.14-.036-.137-.036-.136-.037-.134-.038-.132-.039-.13-.039-.128-.041-.126-.041-.124-.041-.122-.043-.12-.043-.117-.044-.116-.044-.113-.046-.112-.046-.109-.046-.106-.048-.105-.048-.102-.048-.1-.05-.097-.049-.095-.051-.093-.051-.09-.052-.087-.052-.085-.053-.083-.053-.08-.054-.077-.054v4.153zm8.74-8.179l-.257.004-.254.005-.25.008-.247.011-.244.012-.241.014-.237.016-.233.018-.231.021-.226.022-.224.023-.22.026-.216.027-.212.028-.21.031-.205.032-.202.033-.198.034-.194.036-.191.038-.187.038-.183.04-.179.041-.175.042-.172.043-.168.043-.163.045-.16.046-.155.046-.152.048-.148.048-.143.048-.139.049-.136.05-.131.05-.126.051-.123.051-.118.051-.114.052-.11.052-.106.052-.101.052-.096.052-.092.052-.088.052-.083.052-.079.052-.074.051-.07.052-.065.051-.06.05-.056.05-.051.05-.023.025-.023.024-.021.024-.02.025-.019.024-.018.024-.017.023-.015.024-.014.023-.013.023-.012.023-.01.023-.01.022-.008.022-.006.023-.006.021-.004.022-.004.021-.001.021-.001.021.001.021.001.021.004.021.004.022.006.021.006.023.008.022.01.022.01.023.012.023.013.023.014.023.015.024.017.023.018.024.019.024.02.025.021.024.023.024.023.025.051.05.056.05.06.05.065.051.07.052.074.051.079.052.083.052.088.052.092.052.096.052.101.052.106.052.11.052.114.052.118.051.123.051.126.051.131.05.136.05.139.049.143.048.148.048.152.048.155.046.16.046.163.045.168.043.172.043.175.042.179.041.183.04.187.038.191.038.194.036.198.034.202.033.205.032.21.031.212.028.216.027.22.026.224.023.226.022.231.021.233.018.237.016.241.014.244.012.247.011.25.008.254.005.257.004.26.001.26-.001.257-.004.254-.005.25-.008.247-.011.244-.012.241-.014.237-.016.233-.018.231-.021.226-.022.224-.023.22-.026.216-.027.212-.028.21-.031.205-.032.202-.033.198-.034.194-.036.191-.038.187-.038.183-.04.179-.041.175-.042.172-.043.168-.043.163-.045.16-.046.155-.046.152-.048.148-.048.143-.048.139-.049.136-.05.131-.05.126-.051.123-.051.118-.051.114-.052.11-.052.106-.052.101-.052.096-.052.092-.052.088-.052.083-.052.079-.052.074-.051.07-.052.065-.051.06-.05.056-.05.051-.05.023-.025.023-.024.021-.024.02-.025.019-.024.018-.024.017-.023.015-.024.014-.023.013-.023.012-.023.01-.023.01-.022.008-.022.006-.023.006-.021.004-.022.004-.021.001-.021.001-.021-.001-.021-.001-.021-.004-.021-.004-.022-.006-.021-.006-.023-.008-.022-.01-.022-.01-.023-.012-.023-.013-.023-.014-.023-.015-.024-.017-.023-.018-.024-.019-.024-.02-.025-.021-.024-.023-.024-.023-.025-.051-.05-.056-.05-.06-.05-.065-.051-.07-.052-.074-.051-.079-.052-.083-.052-.088-.052-.092-.052-.096-.052-.101-.052-.106-.052-.11-.052-.114-.052-.118-.051-.123-.051-.126-.051-.131-.05-.136-.05-.139-.049-.143-.048-.148-.048-.152-.048-.155-.046-.16-.046-.163-.045-.168-.043-.172-.043-.175-.042-.179-.041-.183-.04-.187-.038-.191-.038-.194-.036-.198-.034-.202-.033-.205-.032-.21-.031-.212-.028-.216-.027-.22-.026-.224-.023-.226-.022-.231-.021-.233-.018-.237-.016-.241-.014-.244-.012-.247-.011-.25-.008-.254-.005-.257-.004-.26-.001-.26.001z' transform='scale(.5)'/%3e%3c/symbol%3e%3c/defs%3e%3cdefs%3e%3csymbol height='24' width='24' id='clock'%3e%3cpath d='M12 2c5.514 0 10 4.486 10 10s-4.486 10-10 10-10-4.486-10-10 4.486-10 10-10zm0-2c-6.627 0-12 5.373-12 12s5.373 12 12 12 12-5.373 12-12-5.373-12-12-12zm5.848 12.459c.202.038.202.333.001.372-1.907.361-6.045 1.111-6.547 1.111-.719 0-1.301-.582-1.301-1.301 0-.512.77-5.447 1.125-7.445.034-.192.312-.181.343.014l.985 6.238 5.394 1.011z' transform='scale(.5)'/%3e%3c/symbol%3e%3c/defs%3e%3cdefs%3e%3cmarker orient='auto-start-reverse' markerHeight='12' markerWidth='12' markerUnits='userSpaceOnUse' refY='5' refX='7.9' id='arrowhead'%3e%3cpath d='M -1 0 L 10 5 L 0 10 z'/%3e%3c/marker%3e%3c/defs%3e%3cdefs%3e%3cmarker refY='4.5' refX='4' orient='auto' markerHeight='8' markerWidth='15' id='crosshead'%3e%3cpath style='stroke-dasharray: 0%2c 0%3b' d='M 1%2c2 L 6%2c7 M 6%2c2 L 1%2c7' stroke-width='1pt' stroke='black' fill='none'/%3e%3c/marker%3e%3c/defs%3e%3cdefs%3e%3cmarker orient='auto' markerHeight='28' markerWidth='20' refY='7' refX='15.5' id='filled-head'%3e%3cpath d='M 18%2c7 L9%2c13 L14%2c7 L9%2c1 Z'/%3e%3c/marker%3e%3c/defs%3e%3cdefs%3e%3cmarker orient='auto' markerHeight='40' markerWidth='60' refY='15' refX='15' id='sequencenumber'%3e%3ccircle r='6' cy='15' cx='15'/%3e%3c/marker%3e%3c/defs%3e%3cg%3e%3crect class='activation0' height='437' width='10' stroke='%23666' fill='%23EDF2AE' y='109' x='364.5'/%3e%3c/g%3e%3cg%3e%3crect class='note' height='37' width='188' stroke='%23666' fill='%23EDF2AE' y='230' x='275.5'/%3e%3ctext style='font-family: arial%2c sans-serif%3b font-size: 16px%3b font-weight: 400%3b' dy='1em' class='noteText' alignment-baseline='middle' dominant-baseline='middle' text-anchor='middle' y='235' x='370'%3e%3ctspan x='370'%3eCustom JWT%3c/tspan%3e%3c/text%3e%3c/g%3e%3cg%3e%3cline class='loopLine' y2='600' x2='643.5' y1='600' x1='65.5'/%3e%3cline class='loopLine' y2='733' x2='643.5' y1='600' x1='643.5'/%3e%3cline class='loopLine' y2='733' x2='643.5' y1='733' x1='65.5'/%3e%3cline class='loopLine' y2='733' x2='65.5' y1='600' x1='65.5'/%3e%3cpolygon class='labelBox' points='65.5%2c600 115.5%2c600 115.5%2c613 107.1%2c620 65.5%2c620'/%3e%3ctext style='font-family: arial%2c sans-serif%3b font-size: 16px%3b font-weight: 400%3b' class='labelText' alignment-baseline='middle' dominant-baseline='middle' text-anchor='middle' y='613' x='91'%3epar%3c/text%3e%3ctext style='font-family: arial%2c sans-serif%3b font-size: 16px%3b font-weight: 400%3b' class='loopText' text-anchor='middle' y='618' x='379.5'%3e%3ctspan x='379.5'%3e%5bGet service via API%5d%3c/tspan%3e%3c/text%3e%3c/g%3e%3ctext style='font-family: arial%2c sans-serif%3b font-size: 16px%3b font-weight: 400%3b' dy='1em' class='messageText' alignment-baseline='middle' dominant-baseline='middle' text-anchor='middle' y='80' x='222'%3eAuth request (with credentials)%3c/text%3e%3cline style='fill: none%3b' marker-start='url(%23sequencenumber)' marker-end='url(%23arrowhead)' stroke='none' stroke-width='2' class='messageLine0' y2='109' x2='365.5' y1='109' x1='77.5'/%3e%3ctext class='sequenceNumber' text-anchor='middle' font-size='12px' font-family='sans-serif' y='113' x='77.5'%3e1%3c/text%3e%3ctext style='font-family: arial%2c sans-serif%3b font-size: 16px%3b font-weight: 400%3b' dy='1em' class='messageText' alignment-baseline='middle' dominant-baseline='middle' text-anchor='middle' y='124' x='375'%3eValidate credentials %26amp%3b%3c/text%3e%3ctext style='font-family: arial%2c sans-serif%3b font-size: 16px%3b font-weight: 400%3b' dy='1em' class='messageText' alignment-baseline='middle' dominant-baseline='middle' text-anchor='middle' y='141' x='375'%3egenerate raw access token payload%3c/text%3e%3cpath style='stroke-dasharray: 3%2c 3%3b fill: none%3b' marker-start='url(%23sequencenumber)' marker-end='url(%23arrowhead)' stroke='none' stroke-width='2' class='messageLine1' d='M 374.5%2c170 C 434.5%2c160 434.5%2c200 374.5%2c190'/%3e%3ctext class='sequenceNumber' text-anchor='middle' font-size='12px' font-family='sans-serif' y='174' x='374.5'%3e2%3c/text%3e%3ctext style='font-family: arial%2c sans-serif%3b font-size: 16px%3b font-weight: 400%3b' dy='1em' class='messageText' alignment-baseline='middle' dominant-baseline='middle' text-anchor='middle' y='282' x='375'%3eRun custom JWT claims script (%60getCustomJwtClaims%60) %26amp%3b%3c/text%3e%3ctext style='font-family: arial%2c sans-serif%3b font-size: 16px%3b font-weight: 400%3b' dy='1em' class='messageText' alignment-baseline='middle' dominant-baseline='middle' text-anchor='middle' y='299' x='375'%3eget extra JWT claims%3c/text%3e%3cpath style='fill: none%3b' marker-start='url(%23sequencenumber)' marker-end='url(%23arrowhead)' stroke='none' stroke-width='2' class='messageLine0' d='M 374.5%2c328 C 434.5%2c318 434.5%2c358 374.5%2c348'/%3e%3ctext class='sequenceNumber' text-anchor='middle' font-size='12px' font-family='sans-serif' y='332' x='374.5'%3e3%3c/text%3e%3ctext style='font-family: arial%2c sans-serif%3b font-size: 16px%3b font-weight: 400%3b' dy='1em' class='messageText' alignment-baseline='middle' dominant-baseline='middle' text-anchor='middle' y='413' x='375'%3eMerge raw access token payload and extra JWT claims%3c/text%3e%3cpath style='stroke-dasharray: 3%2c 3%3b fill: none%3b' marker-start='url(%23sequencenumber)' marker-end='url(%23arrowhead)' stroke='none' stroke-width='2' class='messageLine1' d='M 374.5%2c442 C 434.5%2c432 434.5%2c472 374.5%2c462'/%3e%3ctext class='sequenceNumber' text-anchor='middle' font-size='12px' font-family='sans-serif' y='446' x='374.5'%3e4%3c/text%3e%3ctext style='font-family: arial%2c sans-serif%3b font-size: 16px%3b font-weight: 400%3b' dy='1em' class='messageText' alignment-baseline='middle' dominant-baseline='middle' text-anchor='middle' y='487' x='375'%3eSign %26amp%3b encrypt payload to get JWT access token%3c/text%3e%3cpath style='stroke-dasharray: 3%2c 3%3b fill: none%3b' marker-start='url(%23sequencenumber)' marker-end='url(%23arrowhead)' stroke='none' stroke-width='2' class='messageLine1' d='M 374.5%2c516 C 434.5%2c506 434.5%2c546 374.5%2c536'/%3e%3ctext class='sequenceNumber' text-anchor='middle' font-size='12px' font-family='sans-serif' y='520' x='374.5'%3e5%3c/text%3e%3ctext style='font-family: arial%2c sans-serif%3b font-size: 16px%3b font-weight: 400%3b' dy='1em' class='messageText' alignment-baseline='middle' dominant-baseline='middle' text-anchor='middle' y='561' x='225'%3eIssue JWT-format access token%3c/text%3e%3cline style='stroke-dasharray: 3%2c 3%3b fill: none%3b' marker-start='url(%23sequencenumber)' marker-end='url(%23arrowhead)' stroke='none' stroke-width='2' class='messageLine1' y2='590' x2='80.5' y1='590' x1='368.5'/%3e%3ctext class='sequenceNumber' text-anchor='middle' font-size='12px' font-family='sans-serif' y='594' x='368.5'%3e6%3c/text%3e%3ctext style='font-family: arial%2c sans-serif%3b font-size: 16px%3b font-weight: 400%3b' dy='1em' class='messageText' alignment-baseline='middle' dominant-baseline='middle' text-anchor='middle' y='650' x='353'%3eservice request (with JWT access token)%3c/text%3e%3cline style='fill: none%3b' marker-start='url(%23sequencenumber)' marker-end='url(%23arrowhead)' stroke='none' stroke-width='2' class='messageLine0' y2='679' x2='628.5' y1='679' x1='77.5'/%3e%3ctext class='sequenceNumber' text-anchor='middle' font-size='12px' font-family='sans-serif' y='683' x='77.5'%3e7%3c/text%3e%3ctext style='font-family: arial%2c sans-serif%3b font-size: 16px%3b font-weight: 400%3b' dy='1em' class='messageText' alignment-baseline='middle' dominant-baseline='middle' text-anchor='middle' y='694' x='356'%3eservice response%3c/text%3e%3cline style='stroke-dasharray: 3%2c 3%3b fill: none%3b' marker-start='url(%23sequencenumber)' marker-end='url(%23arrowhead)' stroke='none' stroke-width='2' class='messageLine1' y2='723' x2='80.5' y1='723' x1='631.5'/%3e%3ctext class='sequenceNumber' text-anchor='middle' font-size='12px' font-family='sans-serif' y='727' x='631.5'%3e8%3c/text%3e%3c/svg%3e)
Boost your authorization with custom JWT claims: a practical example
In the previous section, we introduced the working principle of the Logto custom JWT. In this part, we will show you how to use Logto custom JWT claims to improve the flexibility of authorization and the performance of the service provider through a real-world example.
Scenario setup
John's team developed an AI Assistant App that allows users to converse with AI robots to obtain various services.
The AI robot services are divided into free and paid services. Free services include special airfare recommendations, while paid services include stock predictions.
The AI Assistant App uses Logto to manage all users, which are divided into three types: free users, pre-paid users, and premium users. Free users can only use free services, pre-paid users can use all services (charged by usage), and premium users can use all services (but have rate limits to prevent malicious use).
In addition, the AI Assistant App uses Stripe to manage user payments and has its own log service to record user operation logs.
Logto configurations
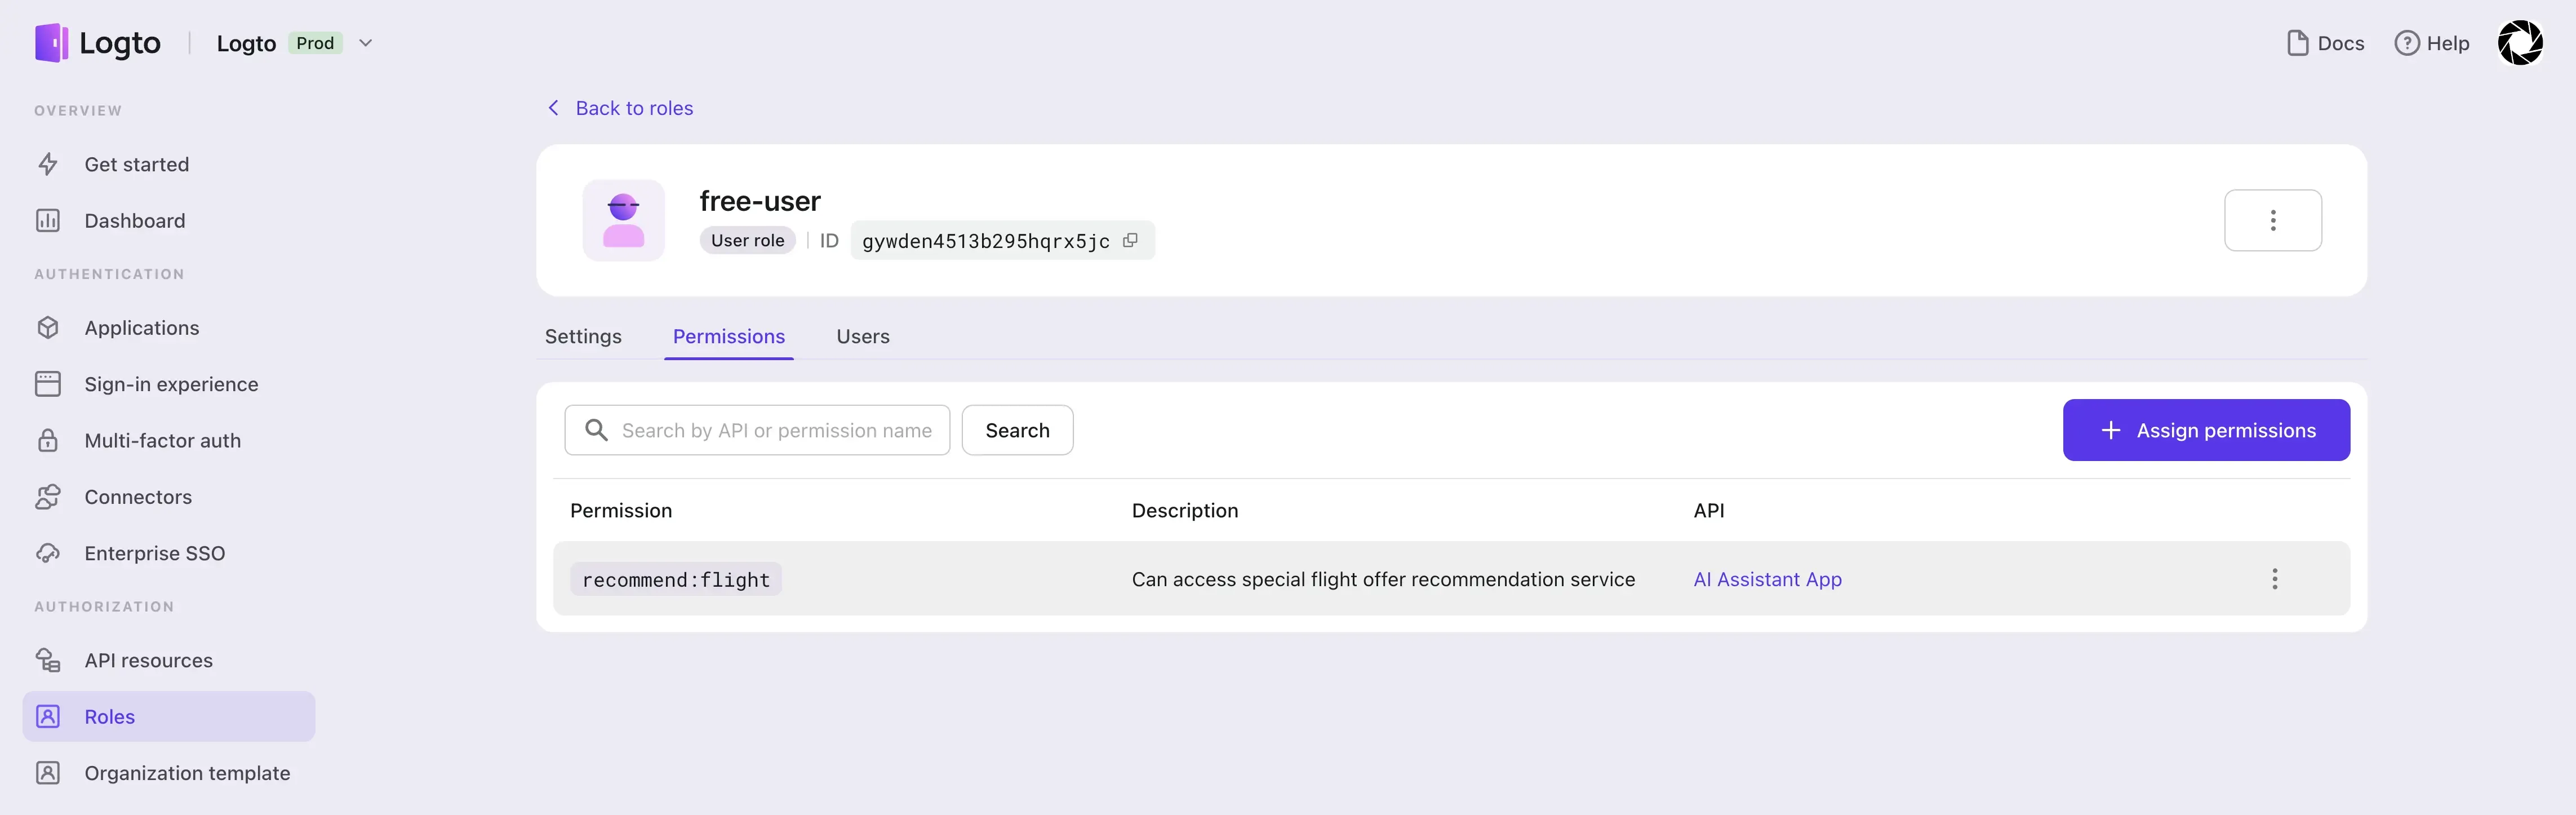
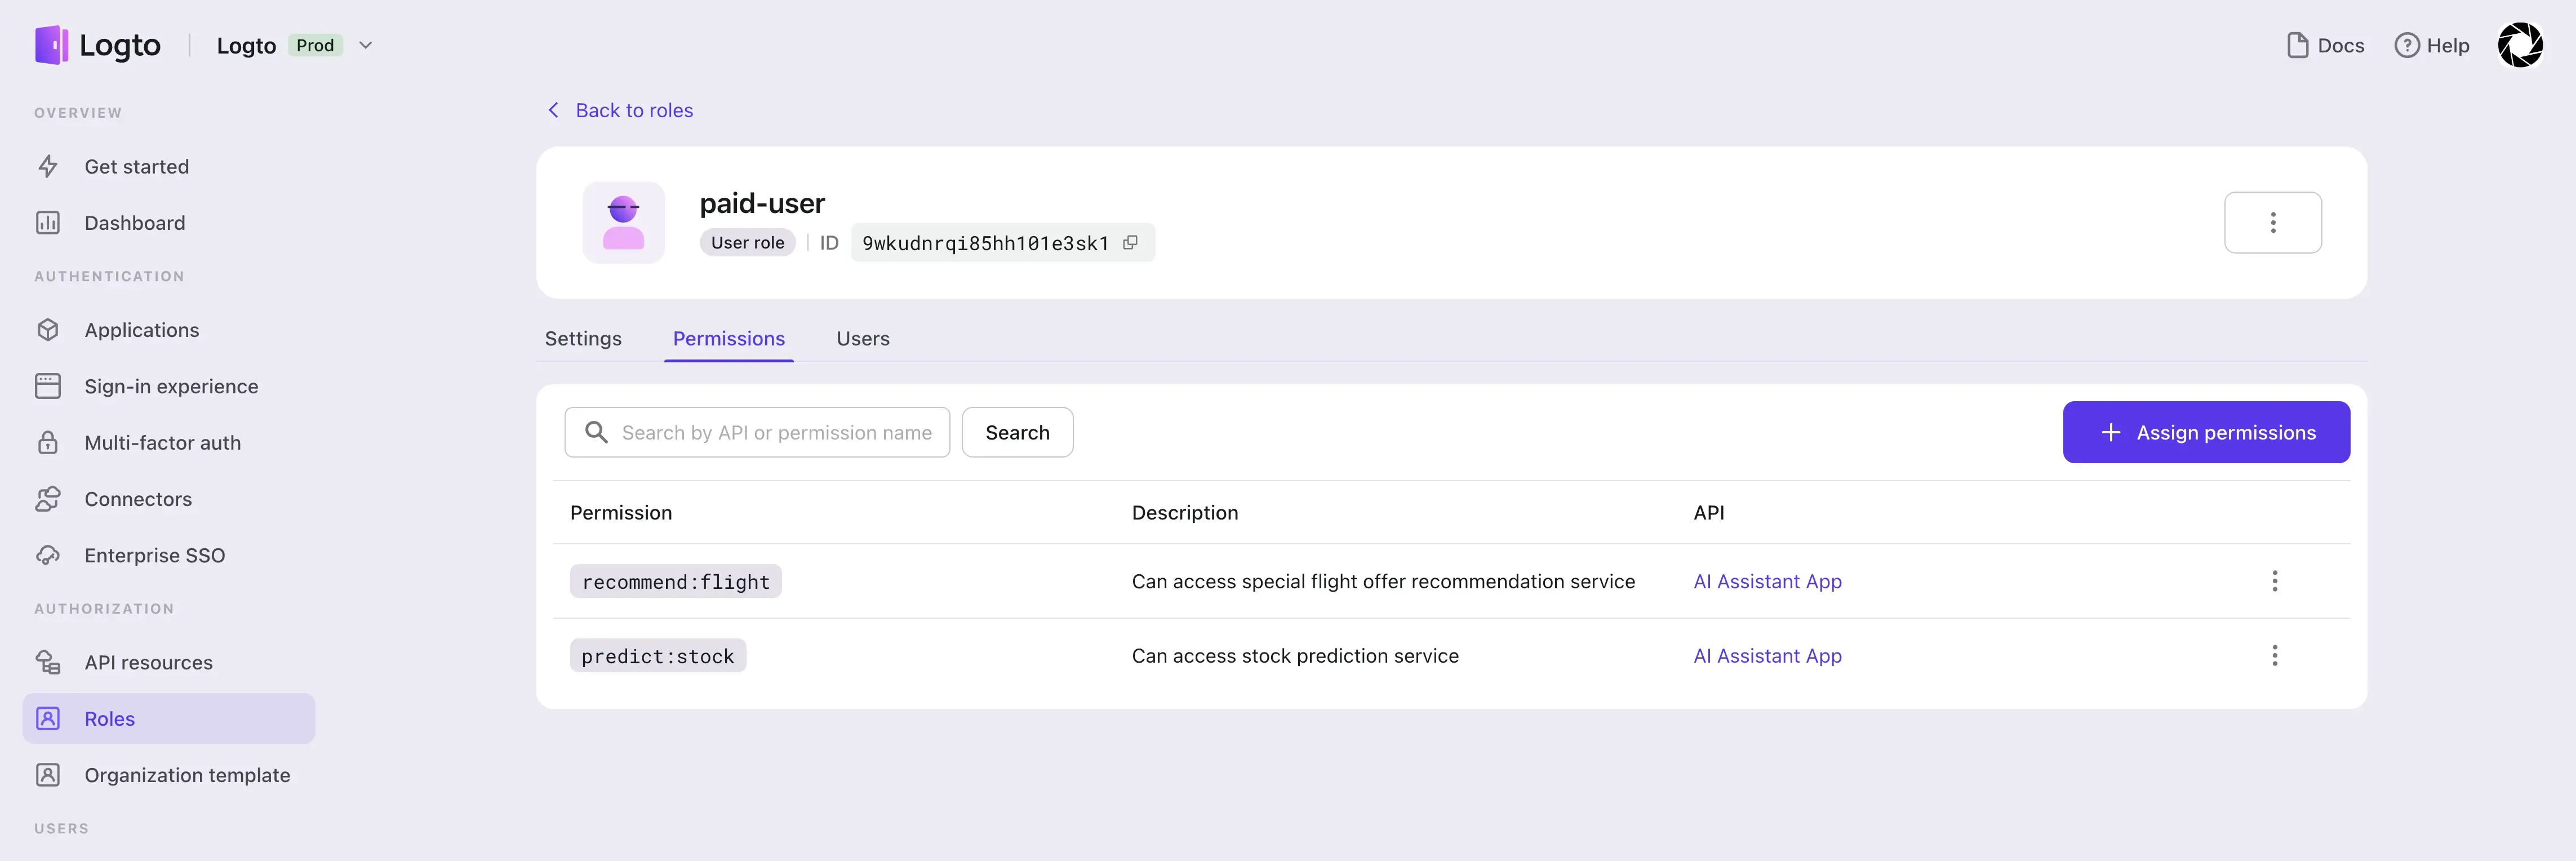
We first create API resources for the AI Assistant App service and create two scopes, recommend:flight and predict:stock.
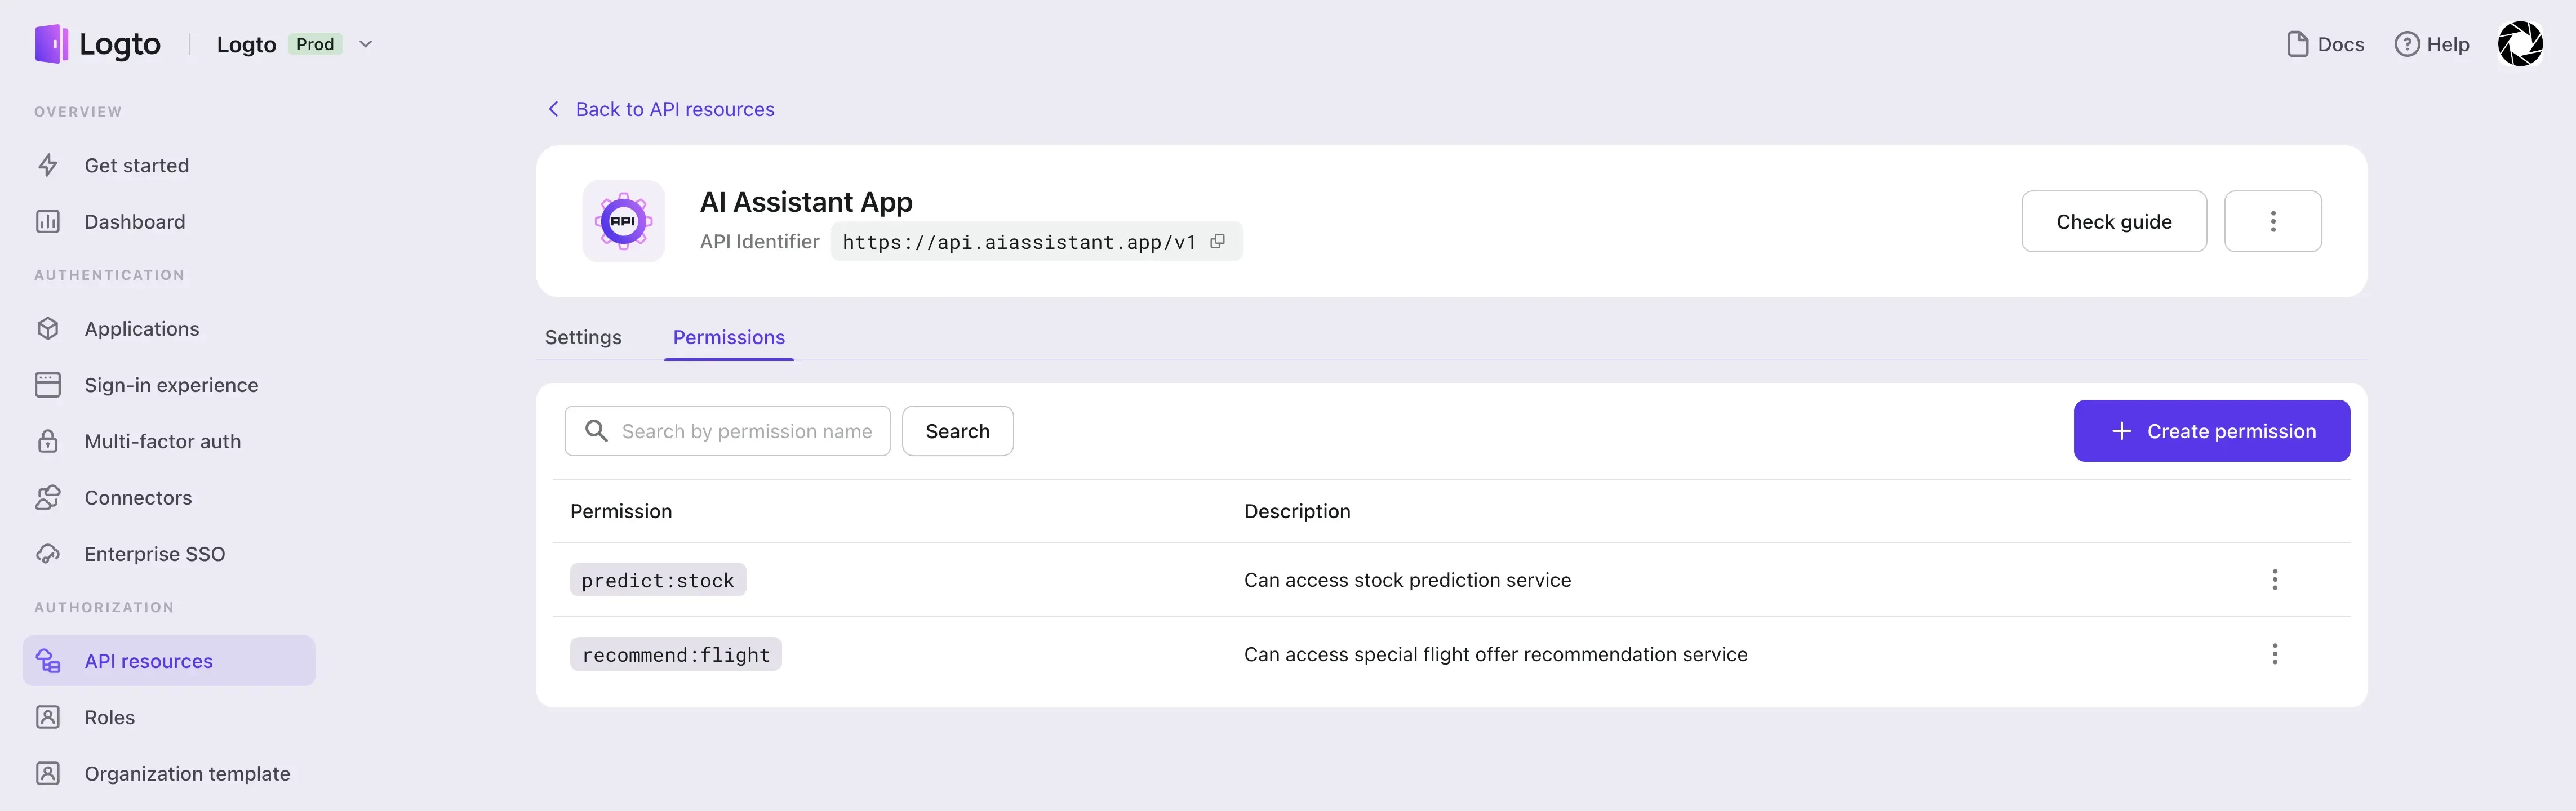
Then we create two roles, free-user and paid-user, and assign the corresponding scopes:
- Assign the
recommend:flightscope to thefree-userrole. - Assign both
recommend:flightandpredict:stockscopes to thepaid-userrole.
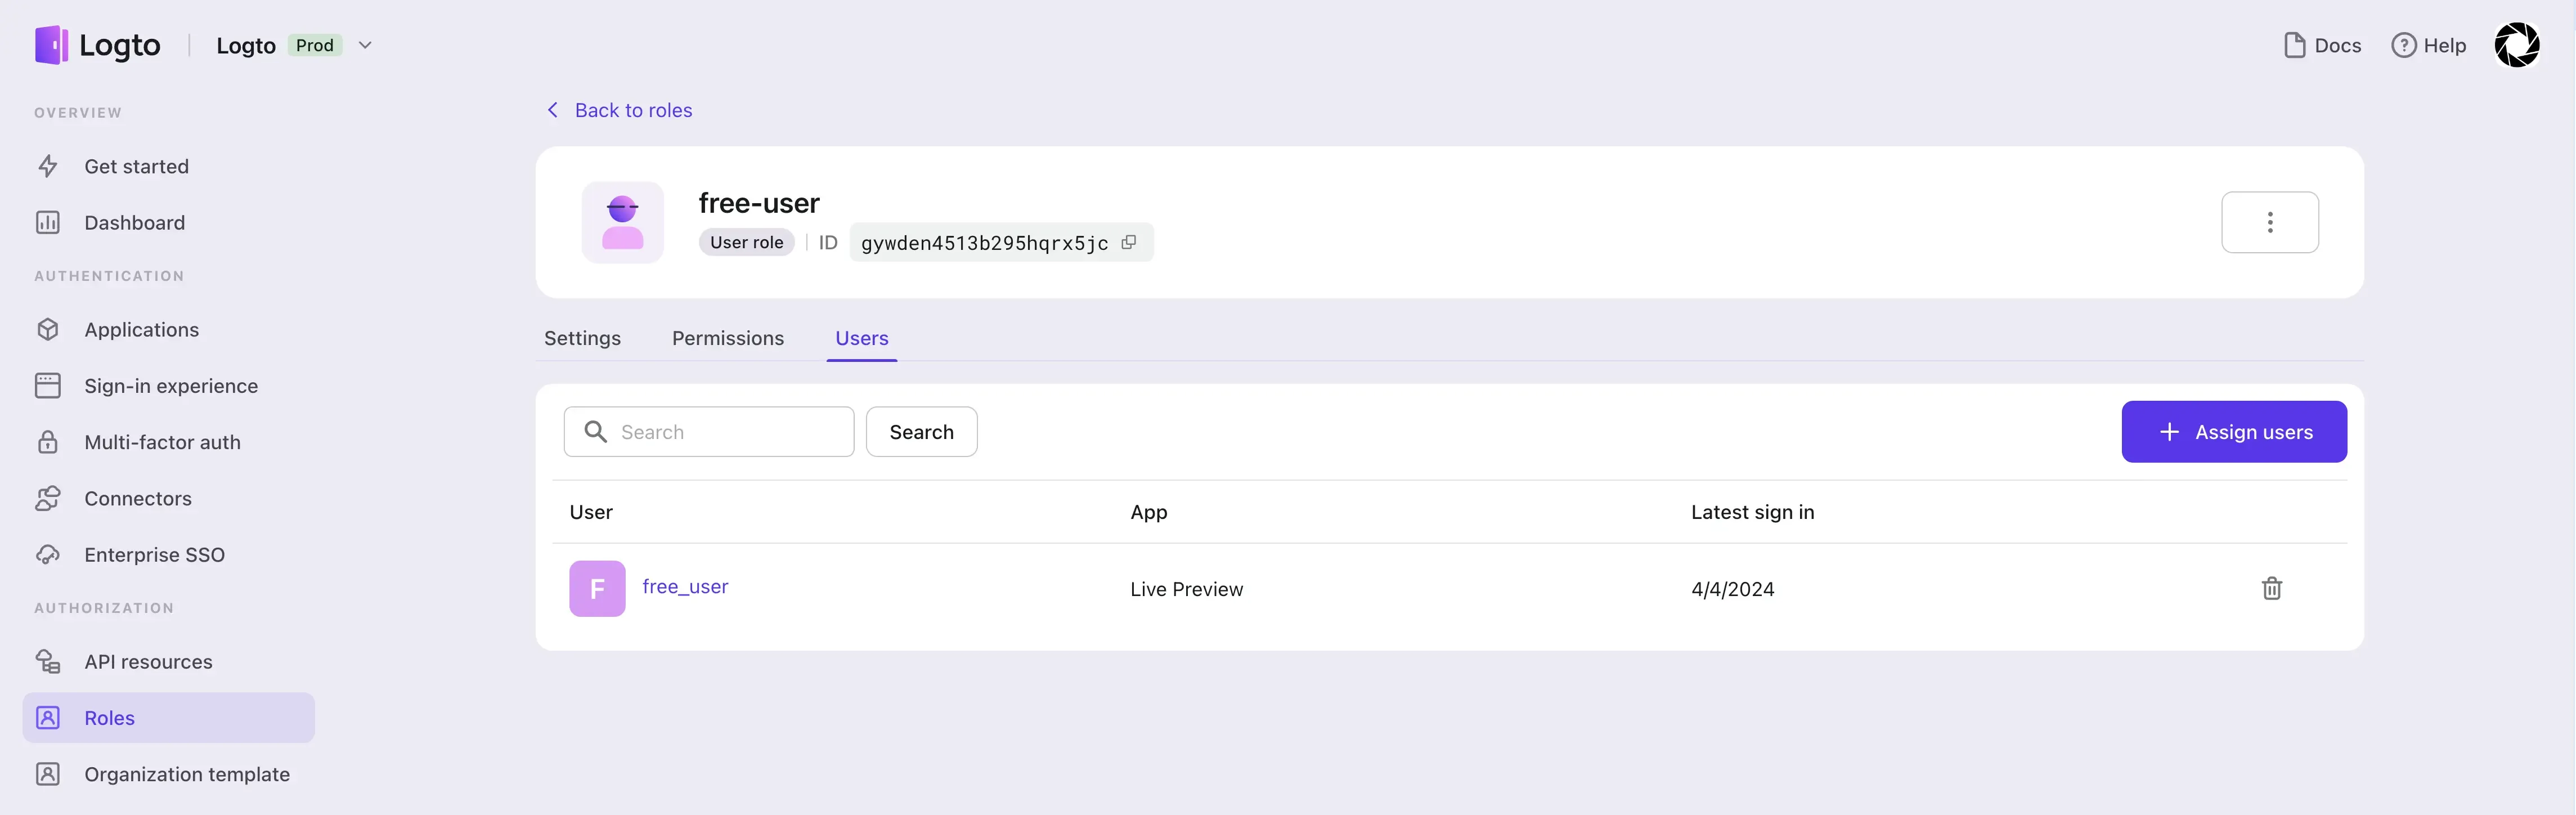
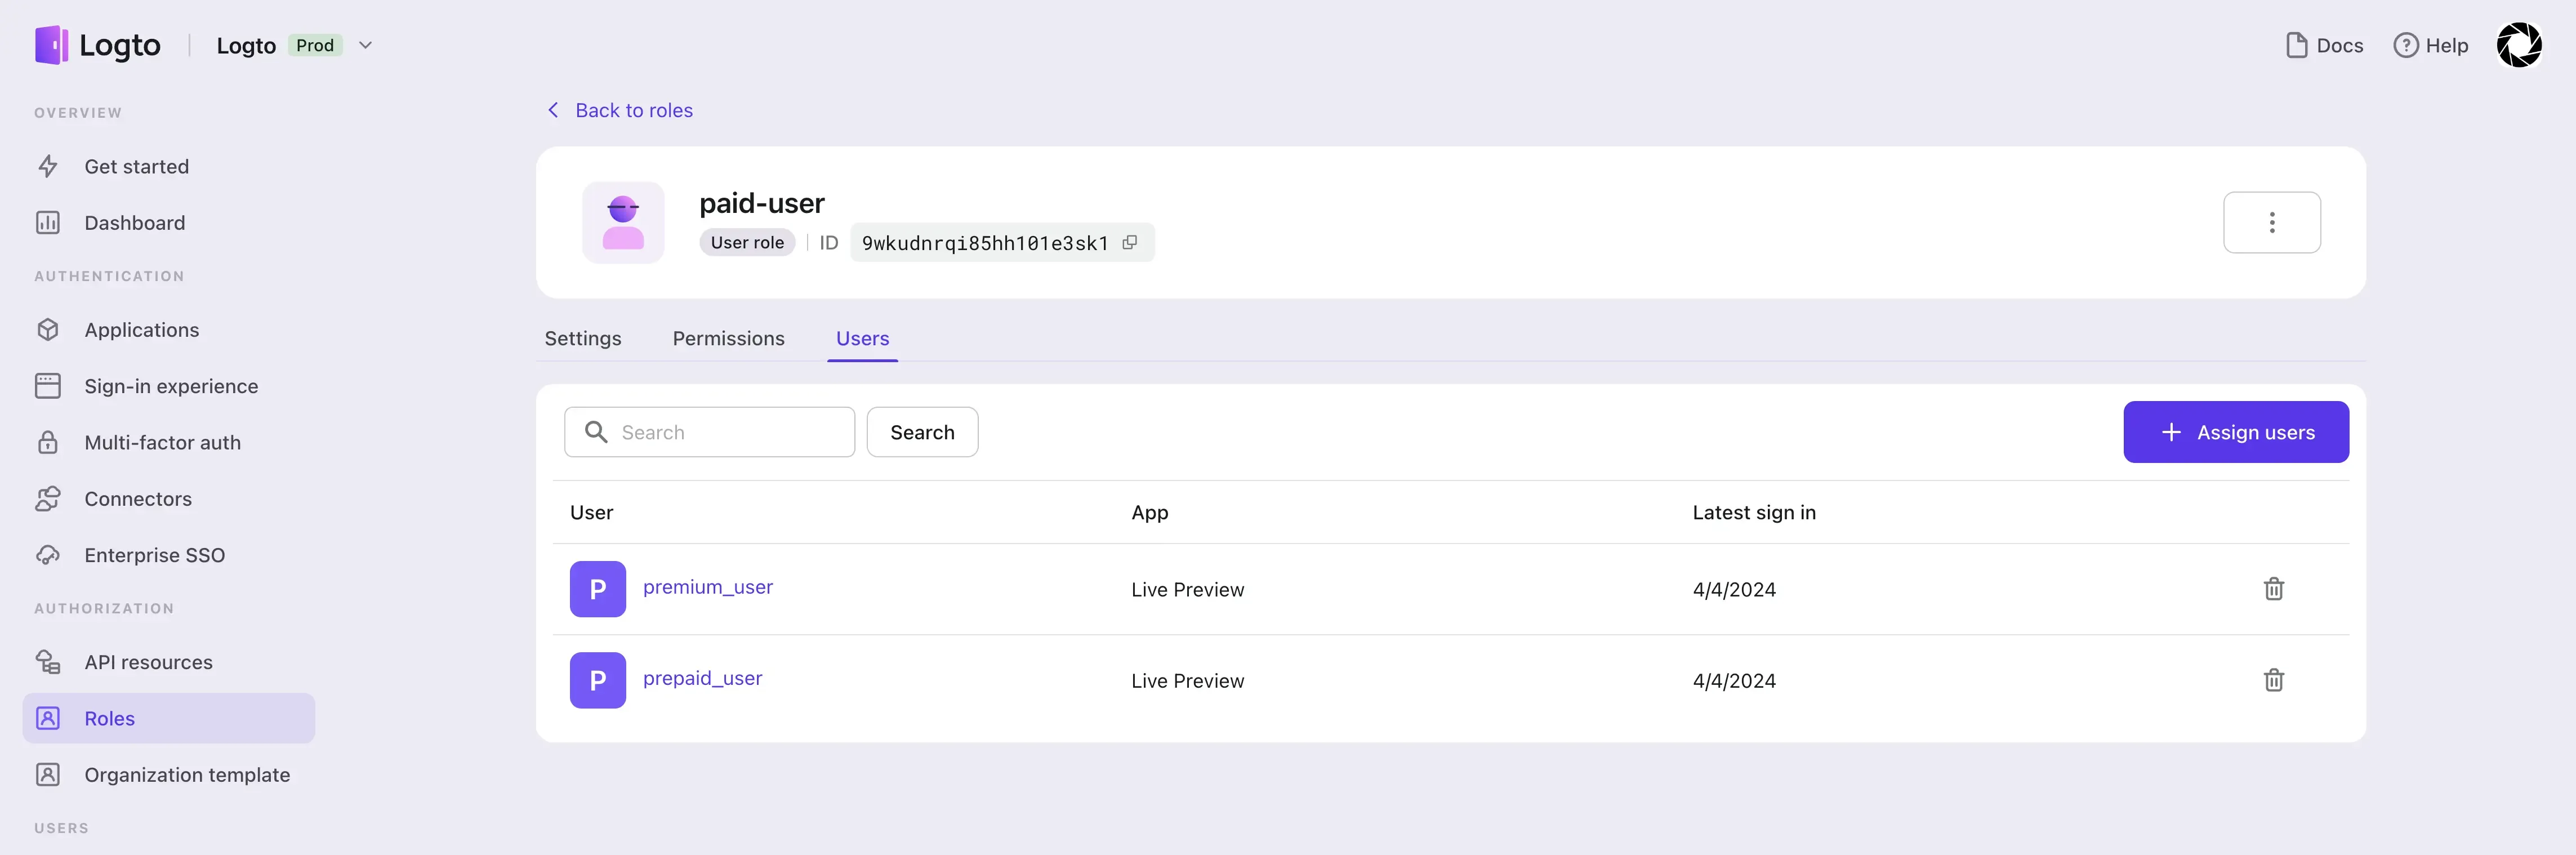
Finally, we create three users, free-user, prepaid-user, and premium-user, and assign the corresponding roles:
- Assign the
free-userrole to userfree-user. - Assign the
paid-userrole to usersprepaid-userandpremium-user.
As shown in the following figure, in order to implement the authorization information required for the scenario described above, we hope to include the roles, balance and numOfCallsToday information of the currently logged-in user in the JWT. When verifying the access token in the AI Assistant App, these information can be used to quickly perform permission verification.
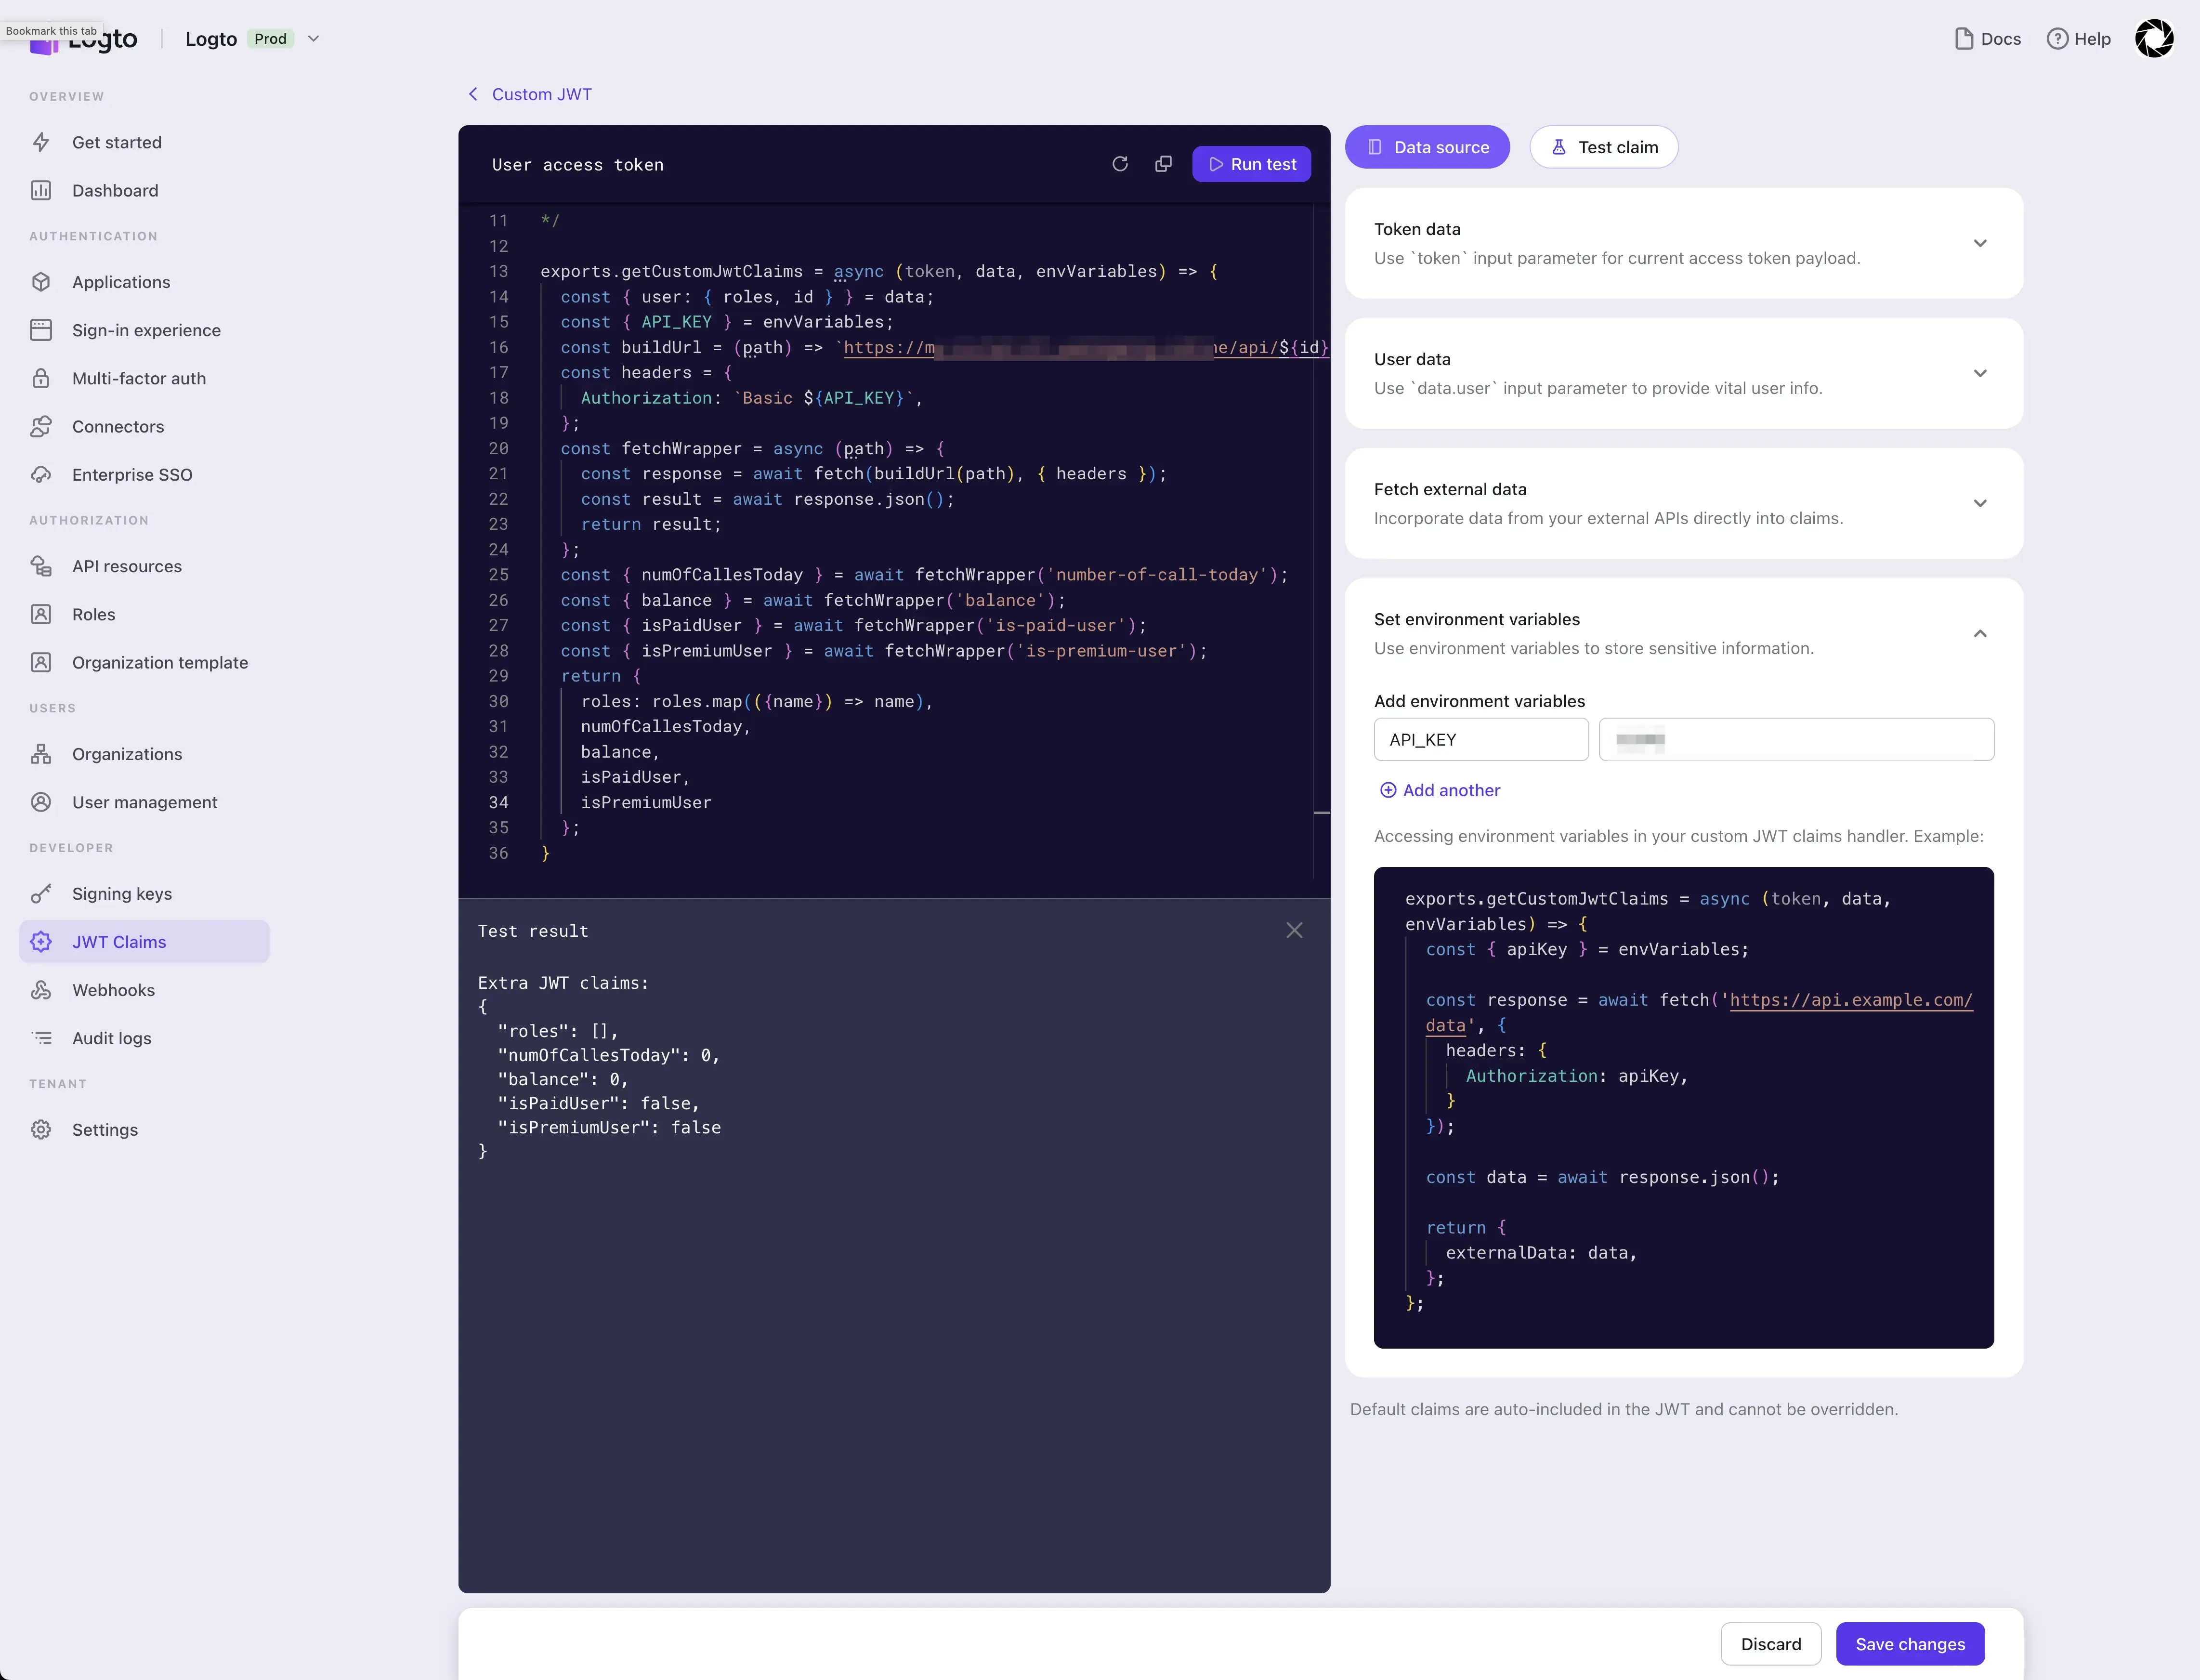
After configuring the envVariables, we implement the getCustomJwtClaims function and click the "Run test" button to see the result of the extra JWT claims based on the current test data.
Since we have not configured the test data for data.user.roles , the roles shown in the result is an empty array.
Check whether the custom JWT feature kicks in
According to the Logto configuration above, we got the corresponding results in the test. Next, we will use the sample app provided by Logto to verify whether our custom JWT is effective. Find the SDK you are familiar with at Logto SDKs and deploy a sample app according to the documentation and the corresponding GitHub repo.
Based on the configuration we described above, taking the React SDK as an example, we need to update the corresponding configuration in LogtoConfig:
After signing in user free_user to the sample app that simulates the AI Assistant App, we can see the roles, balance, numOfCallsToday, isPaidUser and isPremiumUser information we added by viewing the payload part of the JWT access token.
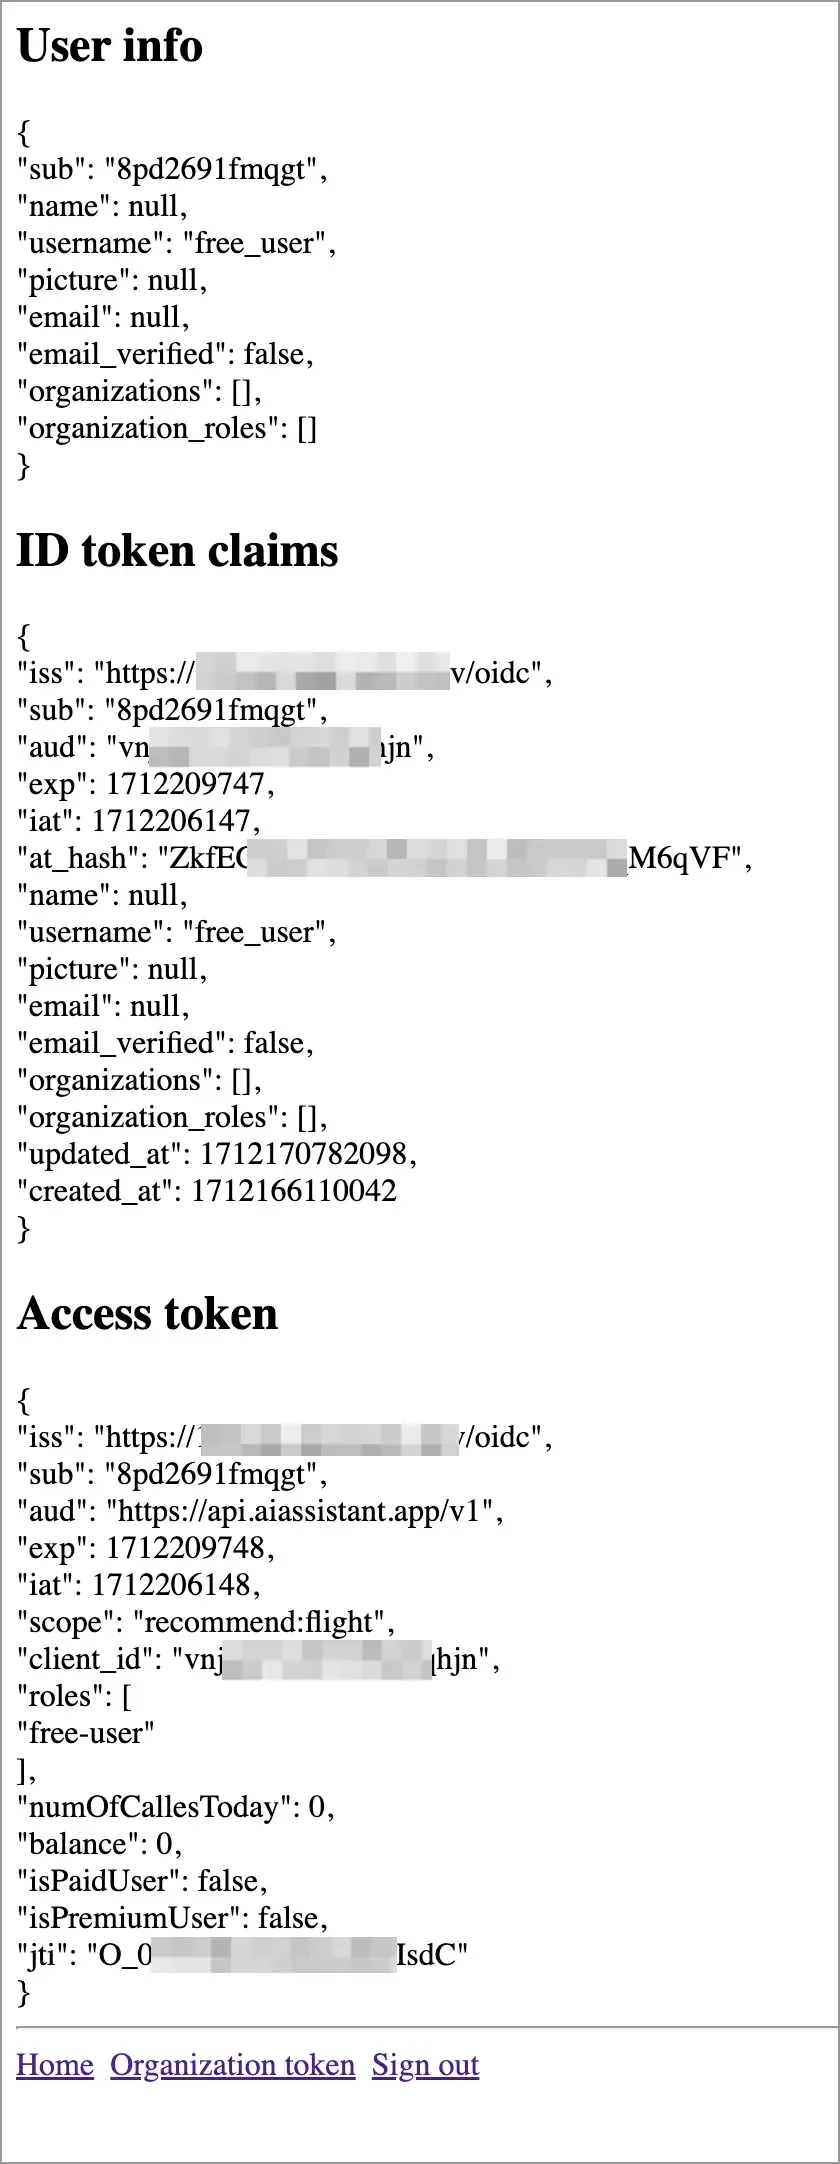
The values of balance, numOfCallsToday, isPaidUser and isPremiumUser are consistent with previous test, and roles equals ["free-user"]. This is because in the actual end-user login process, we will obtain all the accessible data of the user and process it accordingly.
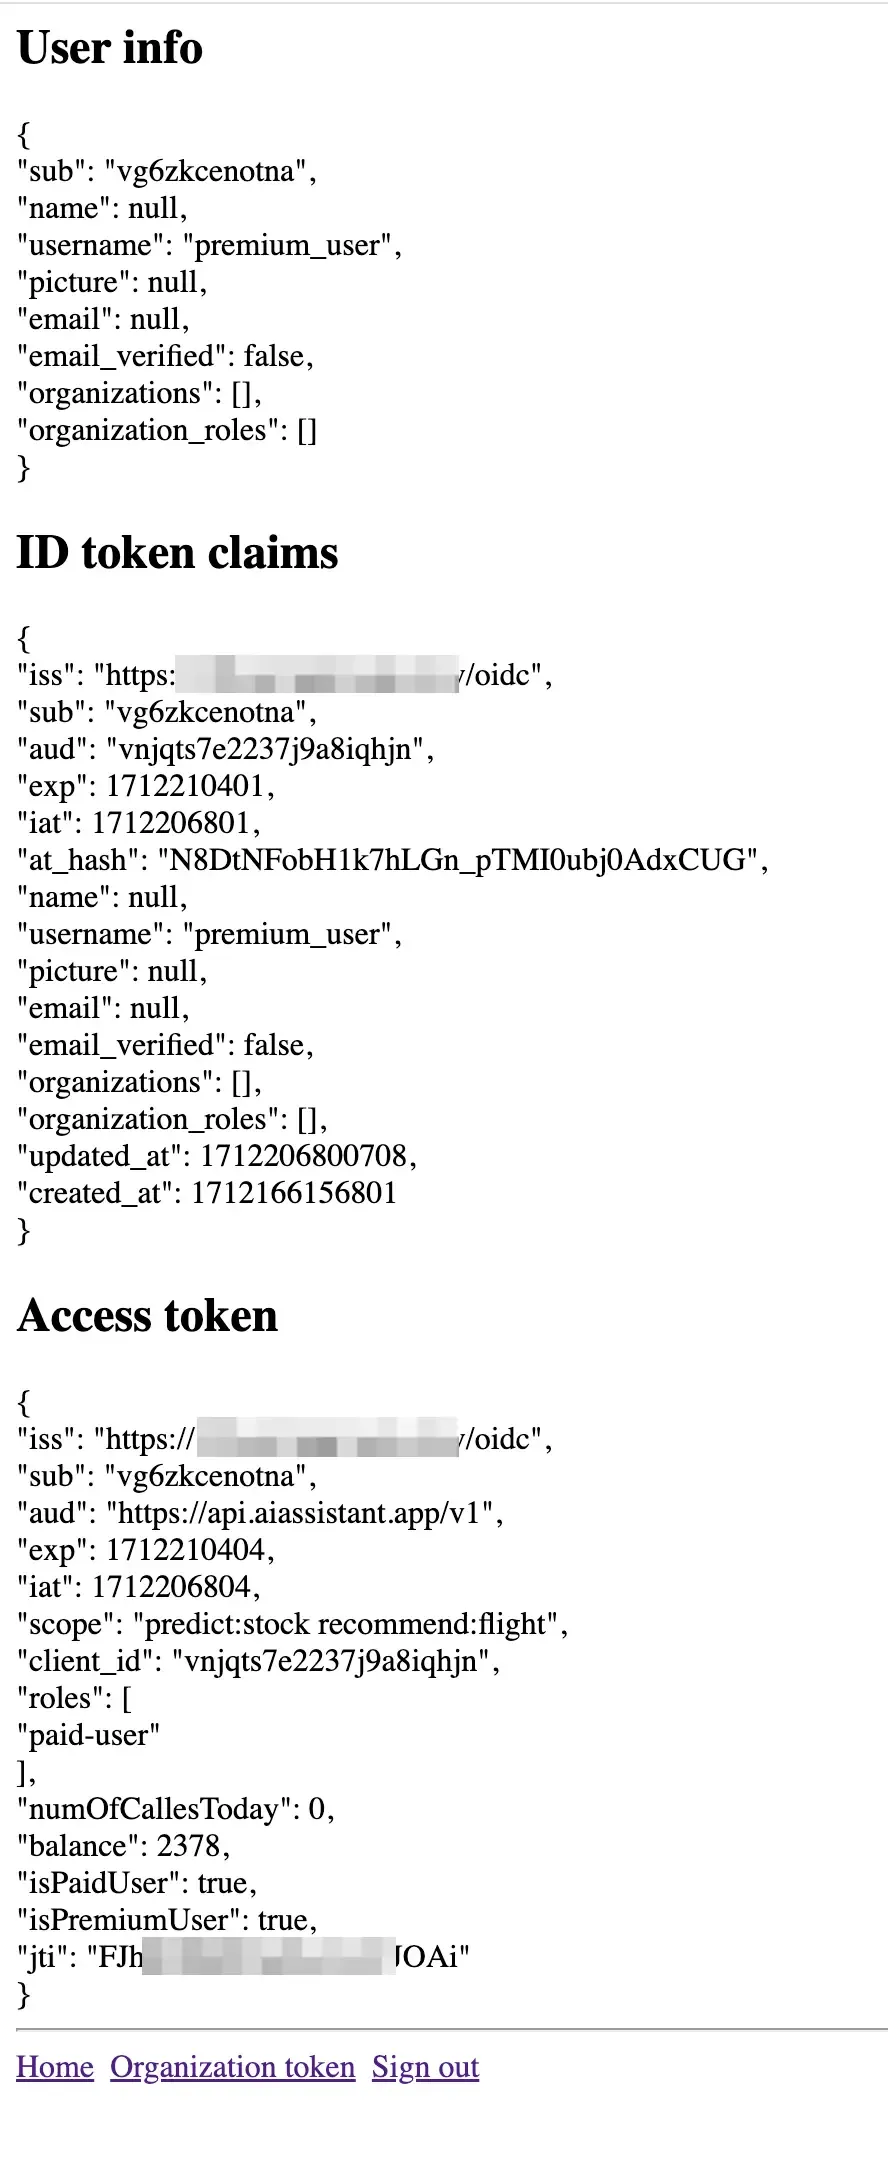
For premium users, we can see that roles is ["paid-user"] and both isPaidUser and isPremiumUser are true.
Update service provider authorization logic
In the previous steps, we added custom claims based on business needs to the user access token. Next, we can use these claims to quickly perform authorization verification.
Here we provide the logic of Logto verifying JWT access tokens on the API side. The complete code implementation can be found in the GitHub repo:
You can refer to the logic of Logto API for verifying access tokens and customize it according to your own business logic. For example, for the AI Assistant App scenario described here, you can add verification logic for custom claims such as roles, balance, numOfCallsToday, isPaidUser and isPremiumUser in the verifyBearerTokenFromRequest function.
The above example is for the scenario where it affects the end-user login and obtaining the JWT access token. If your use case is machine-to-machine (M2M), you can also configure custom JWT claims for M2M apps separately.
Configuring custom JWT for users will not affect the result of M2M apps obtaining access tokens, and vice versa.
Due to the generality of M2M connections, Logto does not currently provide the function of the getCustomJwtClaims method of M2M apps to accept internal data from Logto. In other aspects, the configuration method of custom JWT for M2M apps is the same as that of user apps. This article will not elaborate on it. You can use Logto's custom JWT function to get started.
Why use custom JWT claims?
We have provided the AI Assistant App scenario for John and how to use Logto's Custom JWT feature to achieve more flexible authorization verification. In this process, we can see the advantages of the Custom JWT feature:
- Without the Custom JWT feature, users need to request an external API (such as what you do in
getCustomJwtClaims) every time they check permissions. For the service provider that provides this API, this may increase the extra burden. With the Custom JWT feature, these information can be put directly into the JWT, reducing the frequent calls to the external API. - For service providers, the Custom JWT feature can help them verify user permissions faster, especially when the client calls the service provider frequently, improving service performance.
- The Custom JWT feature can help you quickly implement additional authorization information required by the business, and the information can be passed between the client and the service provider in a secure manner since JWT is self-contained and could be envrypted so that it is hard to be forged.
At the same time, since getCustomJwtClaims is executed every time a user needs Logto to issue an access token, it is necessary to avoid executing overly complex logic and external API requests with high bandwidth requirements. Otherwise, it may take too long for end-users to wait for the result of getCustomJwtClaims during the sign-in process. If your getCustomJwtClaims returns an empty object, we strongly recommend that you temporarily delete this configuration item until you actually need to use it.
Conclusion
In this article, Logto has extended the basic JWT access token and extended the function of extra JWT claims to allow users to put additional end-user information into the JWT access token according to their business needs, so that after the user logs in, the user's permissions can be quickly verified.
We provide the scenario of John's AI Assistant App and demonstrate how to use Logto's Custom JWT feature to achieve more flexible authorization verification. We also point out some key points of using custom JWT. In combination with actual business scenarios, users can put various user-related information into the JWT access token according to their business needs, so that the service provider can quickly verify the user's permissions.