Build a multi-tenant SaaS application: A complete guide from design to implementation
Learn how to efficiently build a multi-tenant SaaS application with robust authentication, organization management, and role-based access control in just a few hours.
YijunDeveloper
Stop wasting weeks on user auth
Launch secure apps faster with Logto. Integrate user auth in minutes, and focus on your core product.
How are apps like Notion, Slack, or Figma built? These multi-tenant SaaS applications look simple to use, but building one yourself? That's a different story.
When I first thought about building such a complex beast, my mind exploded:
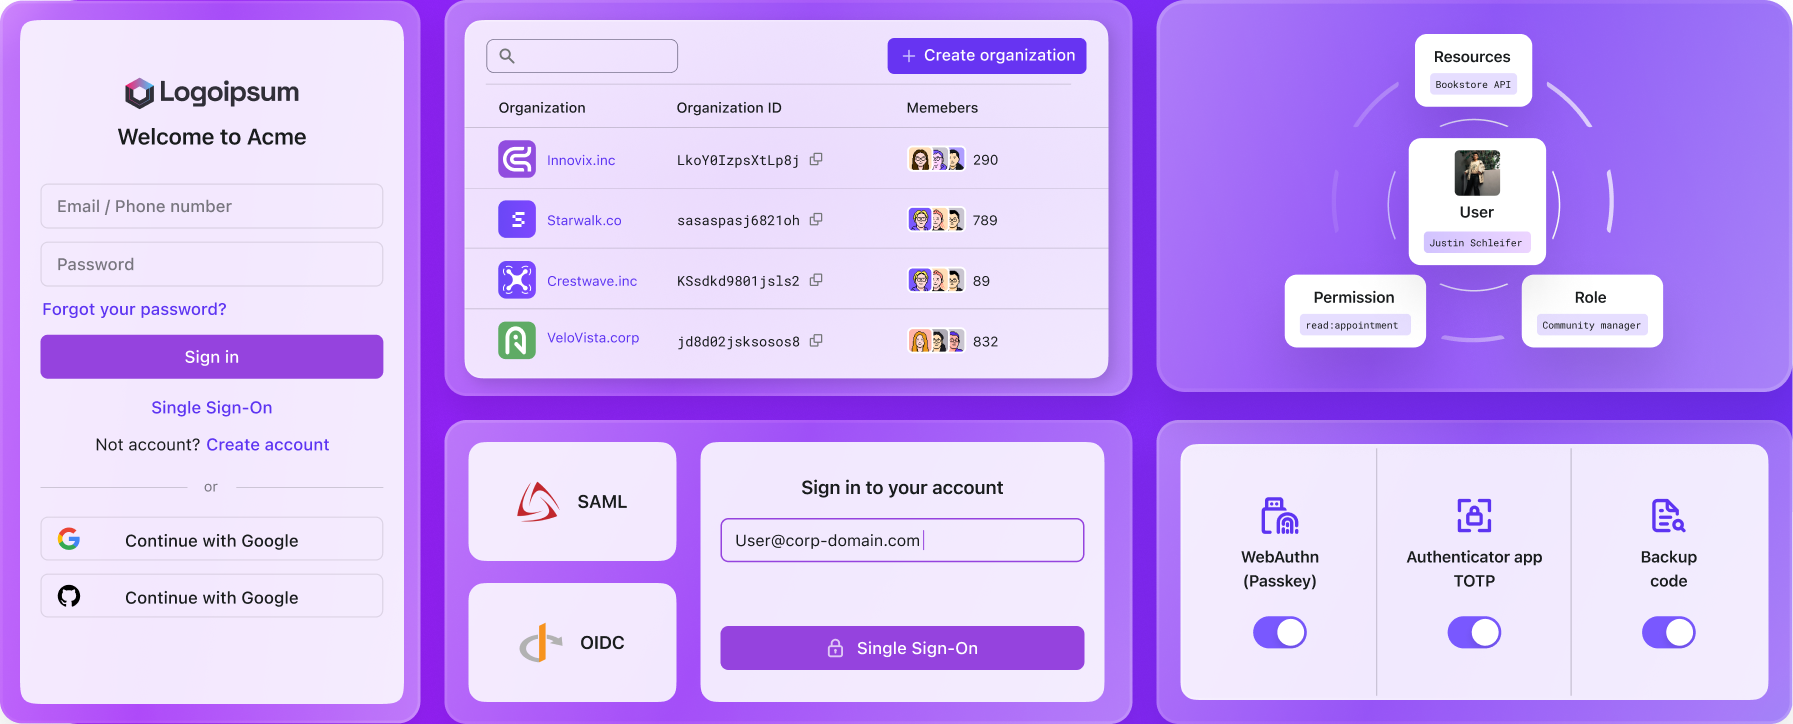
Users need multiple sign-in options (email, Google, GitHub)
Each user can create and belong to multiple organizations
Different permission levels within each organization
Enterprise organizations requiring auto-join for specific email domains
MFA requirements for sensitive operations
...
"Boss, let's talk about product design in two weeks. I'm stuck in the mud right now."
But when I actually started working on it, I find that it's not as daunting as it seems.
I just built a system with all these features in LESS THAN 2 HOUR!
I'll show you exactly how to design and implement such a system from the ground up - and you'll be amazed at how simple it really is in 2025 with modern tools and the right architectural approach.
The complete source code is available in this Github Repo. Let's dive in!
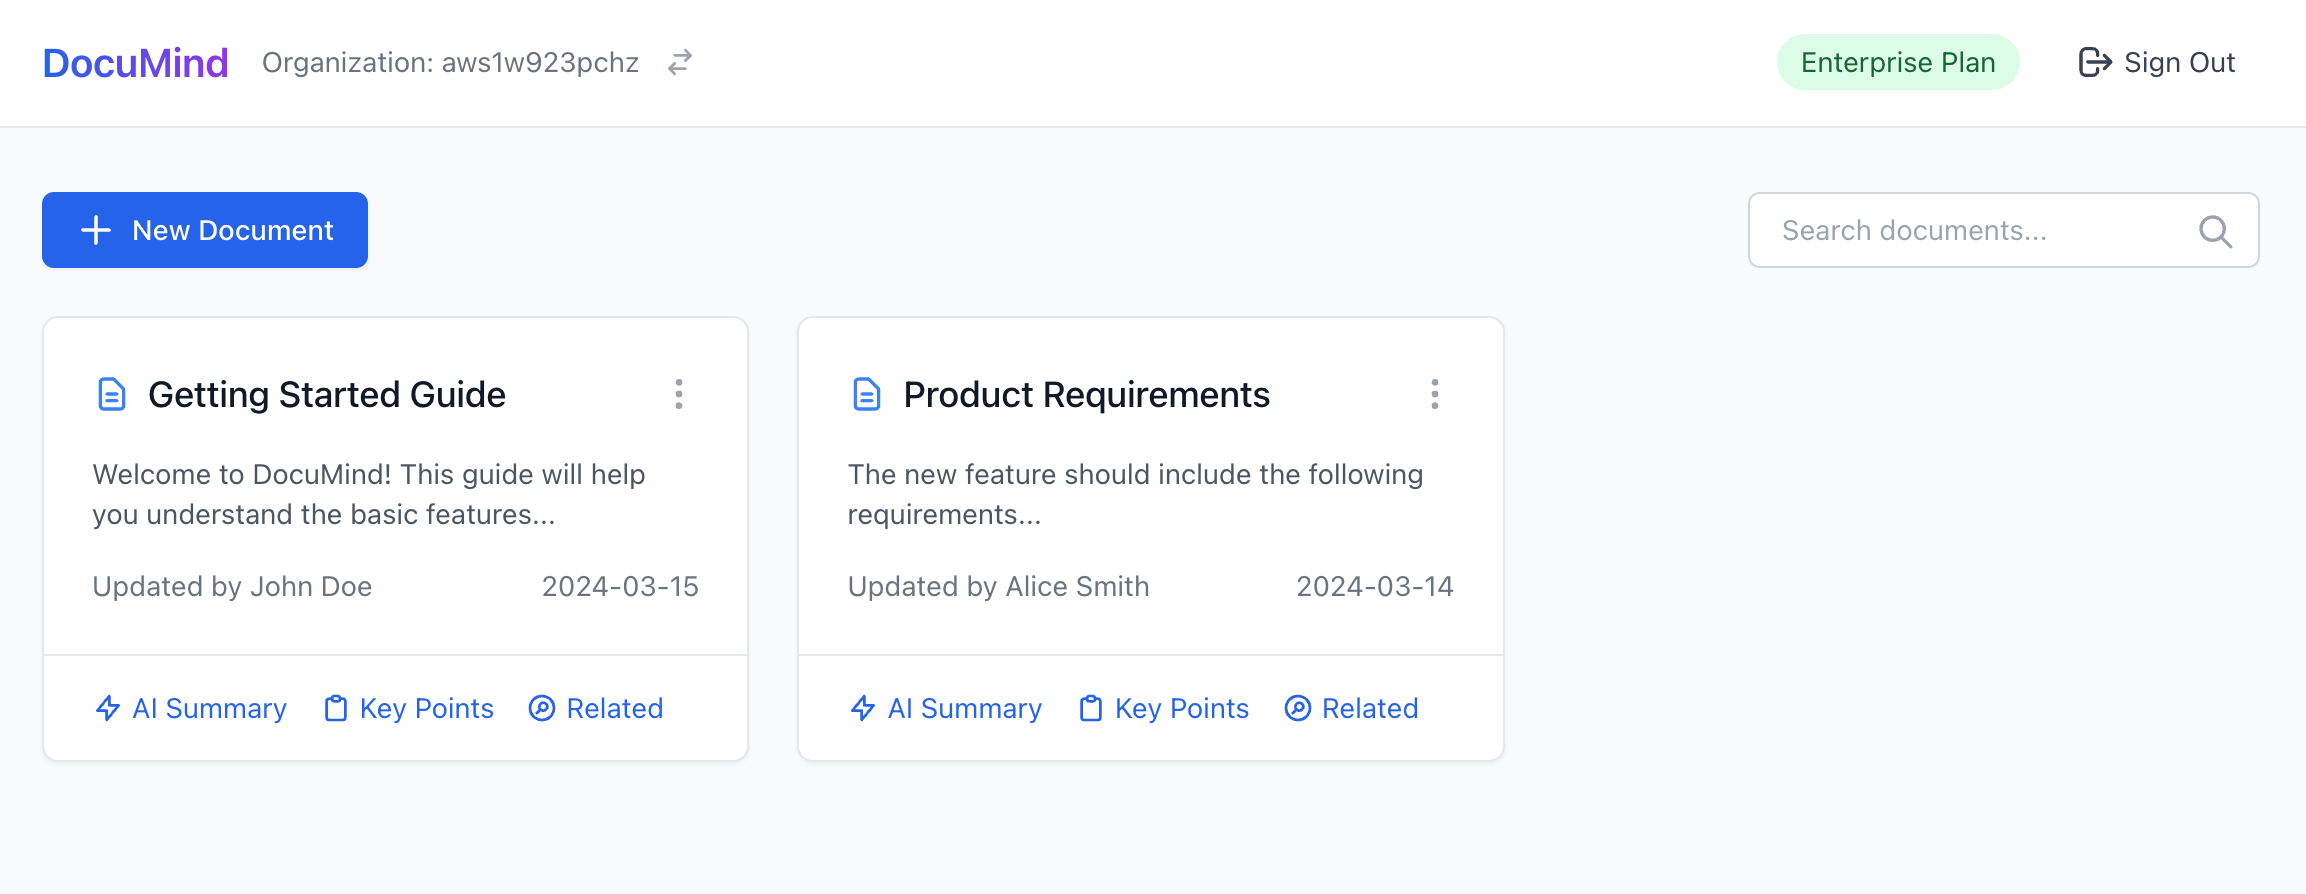
We'll start with an AI documentation SaaS product called DocuMind.
DocuMind is an AI documentation SaaS product designed with a multi-tenant model to support individual users, small businesses, and enterprises.
The platform provides powerful AI capabilities for document management, including automatic summary generation, key point extraction, and intelligent content recommendations within organizations.
What features are required for SaaS authentication and authorization?#
First, let’s review the necessary requirements. What features do you need?
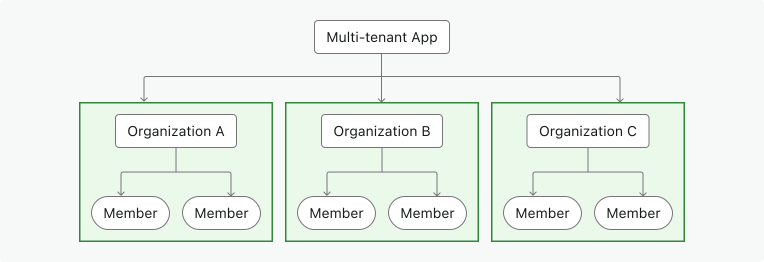
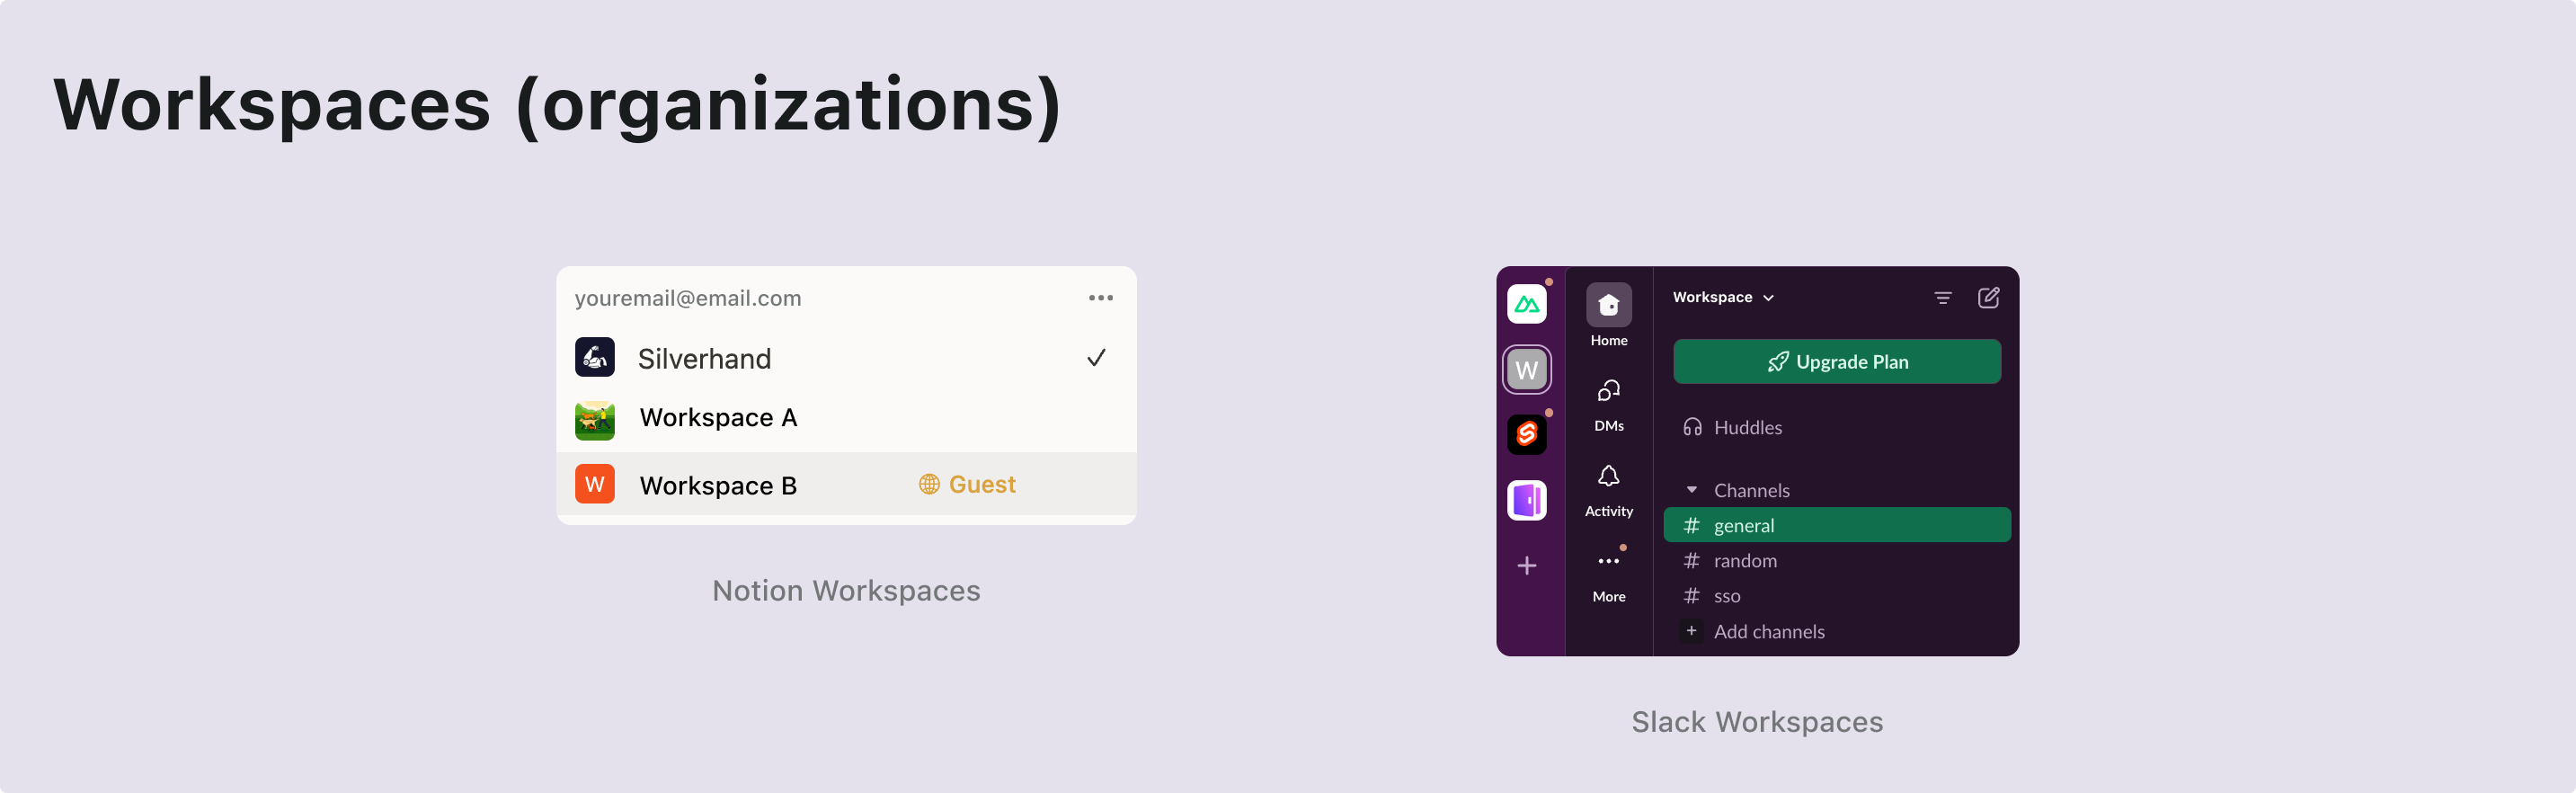
To enable a multi-tenant architecture, you’ll need an entity layer called organization. Imagine having a single pool of users who can access multiple workspaces. Each organization represents a workspace, and users maintain a single identity while accessing different workspaces (organizations) based on their assigned roles.
It’s a widely used feature in authentication providers. An organization in an identity management system corresponds to your SaaS app’s workspace, project, or tenant.
A member is a temporary concept used to indicate an identity’s membership status within an organization.
For example, Sarah signs up for your app using her email, [email protected]. She can belong to different workspaces. If Sarah is part of Workspace A but not Workspace B, she is considered a member of Workspace A but not Workspace B.
In a multi-tenant architecture, users need roles with specific permissions to access their tenant resources.
Permissions are detailed access controls that define specific actions, such as read: order or write: order. They determine what actions can be performed on particular resources.
Roles are a set of permissions assigned to members in a multi-tenant environment.
You’ll need to define these roles and permissions, then assign roles to users, and sometimes it may include automated processes. For example:
Users who join an organization automatically get the member role.
The first user to create a workspace is automatically assigned the admin role.
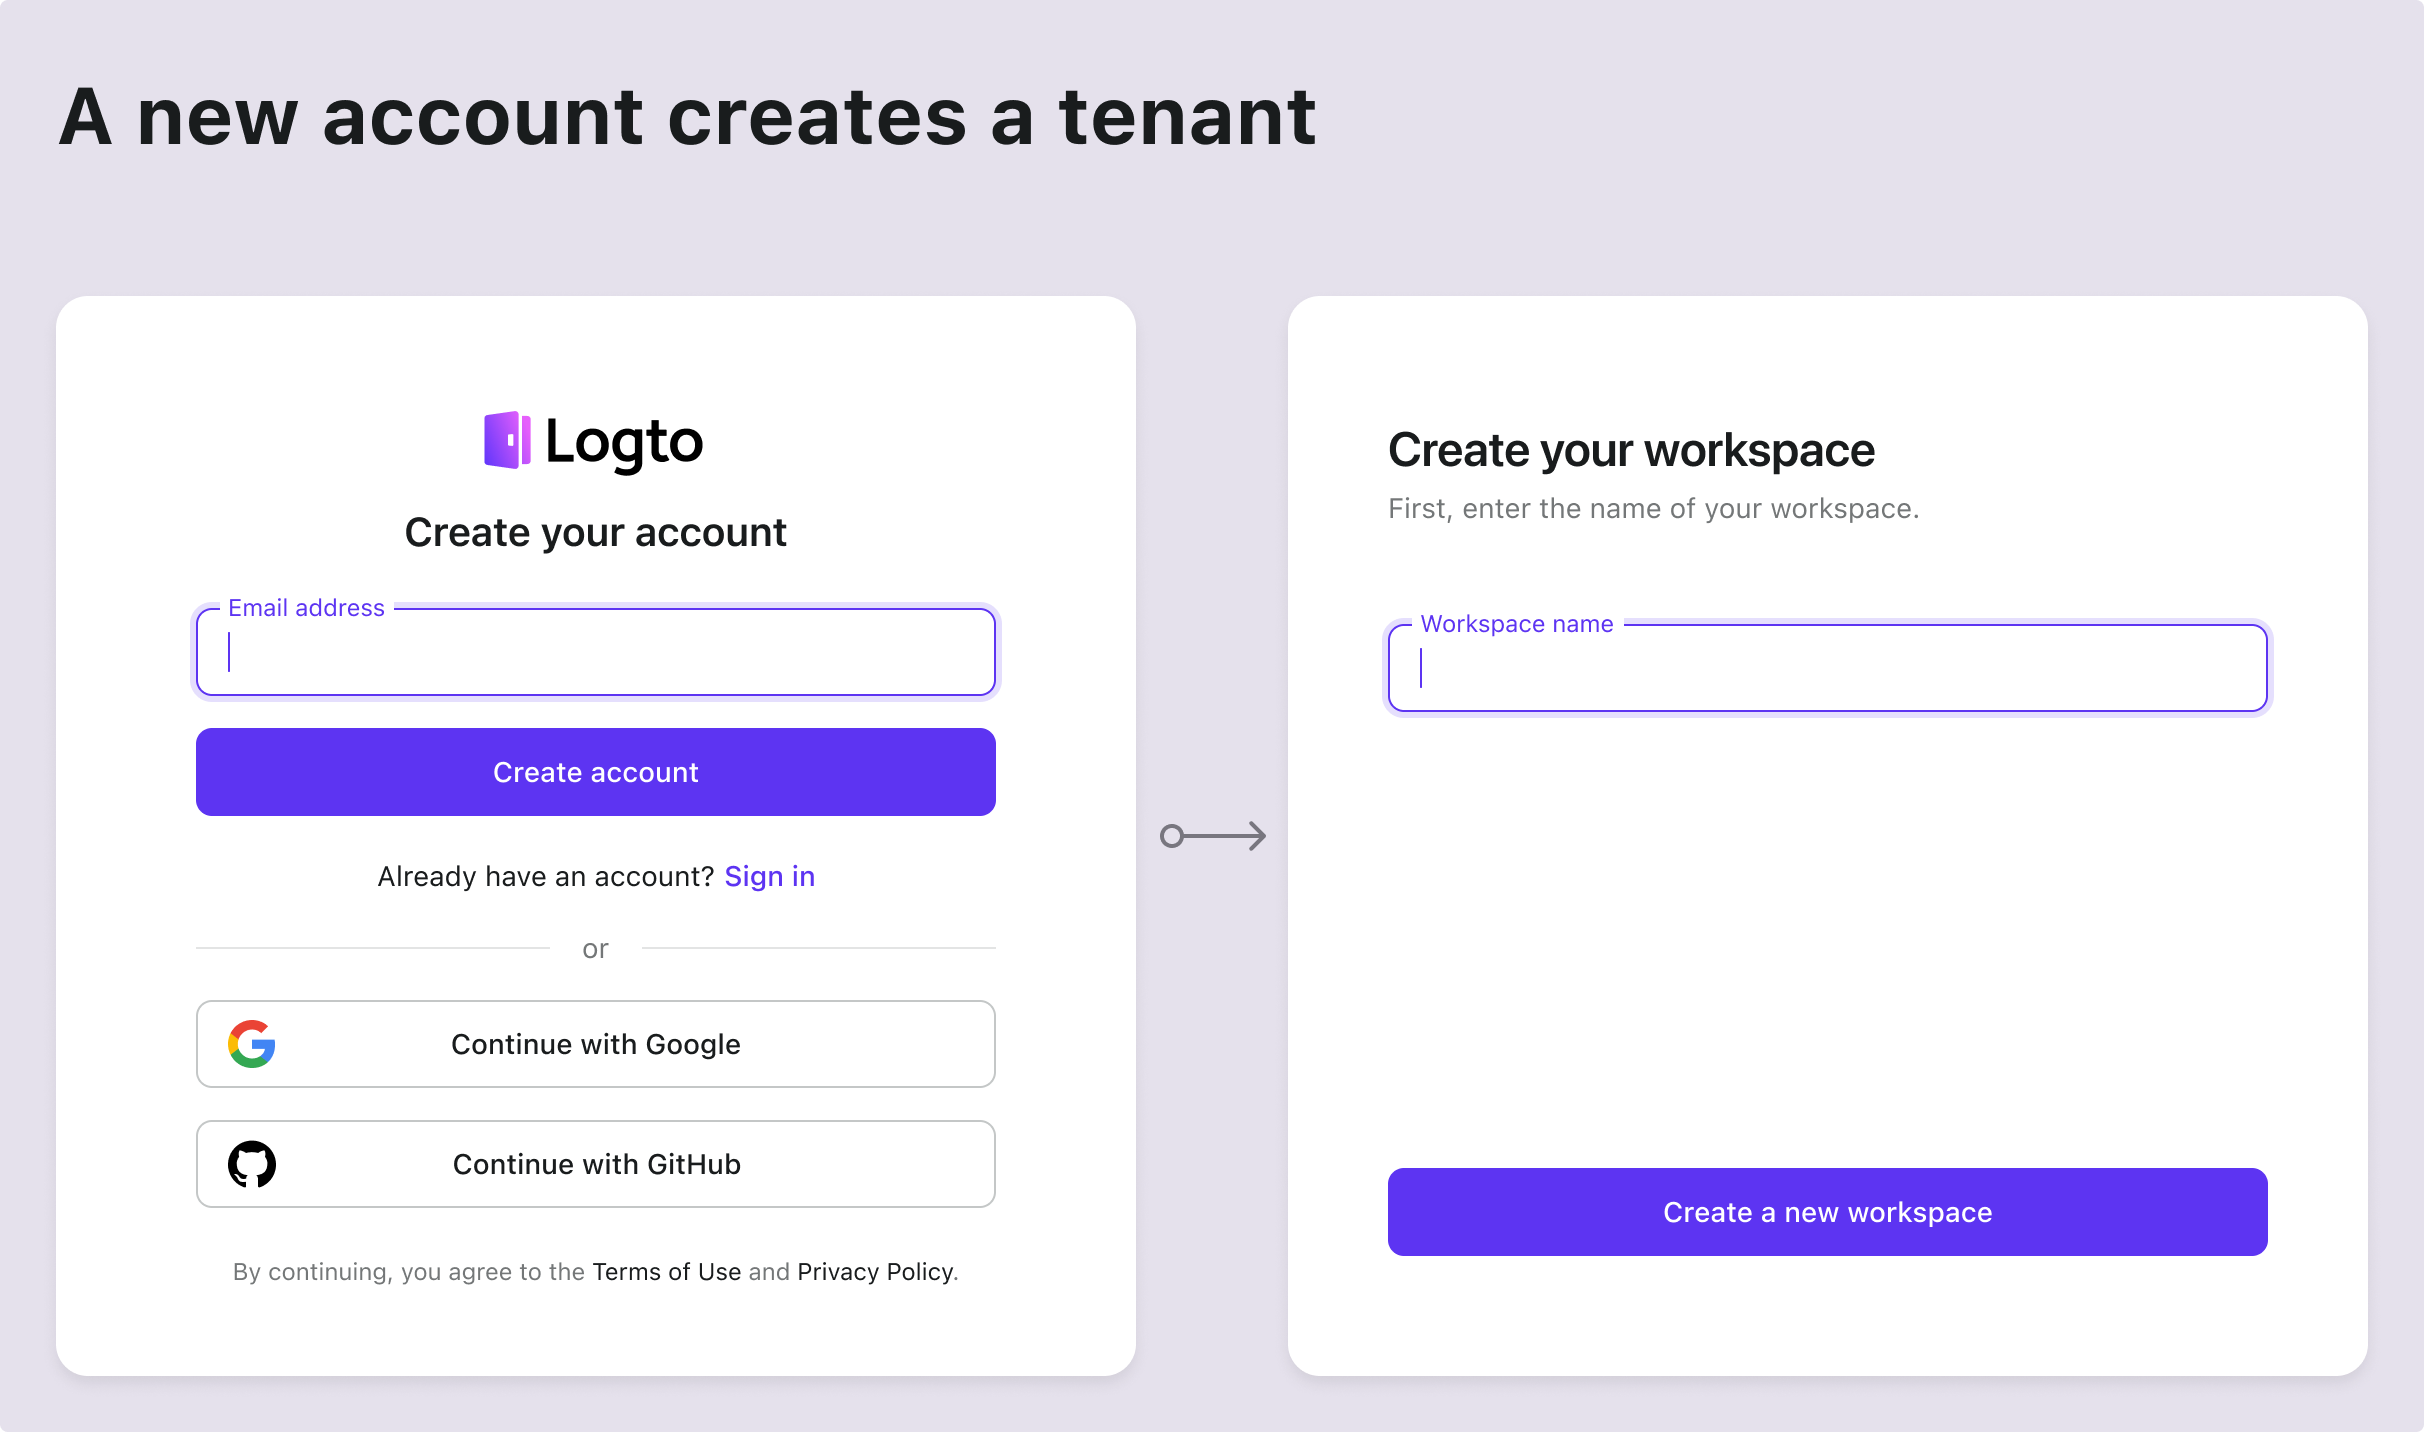
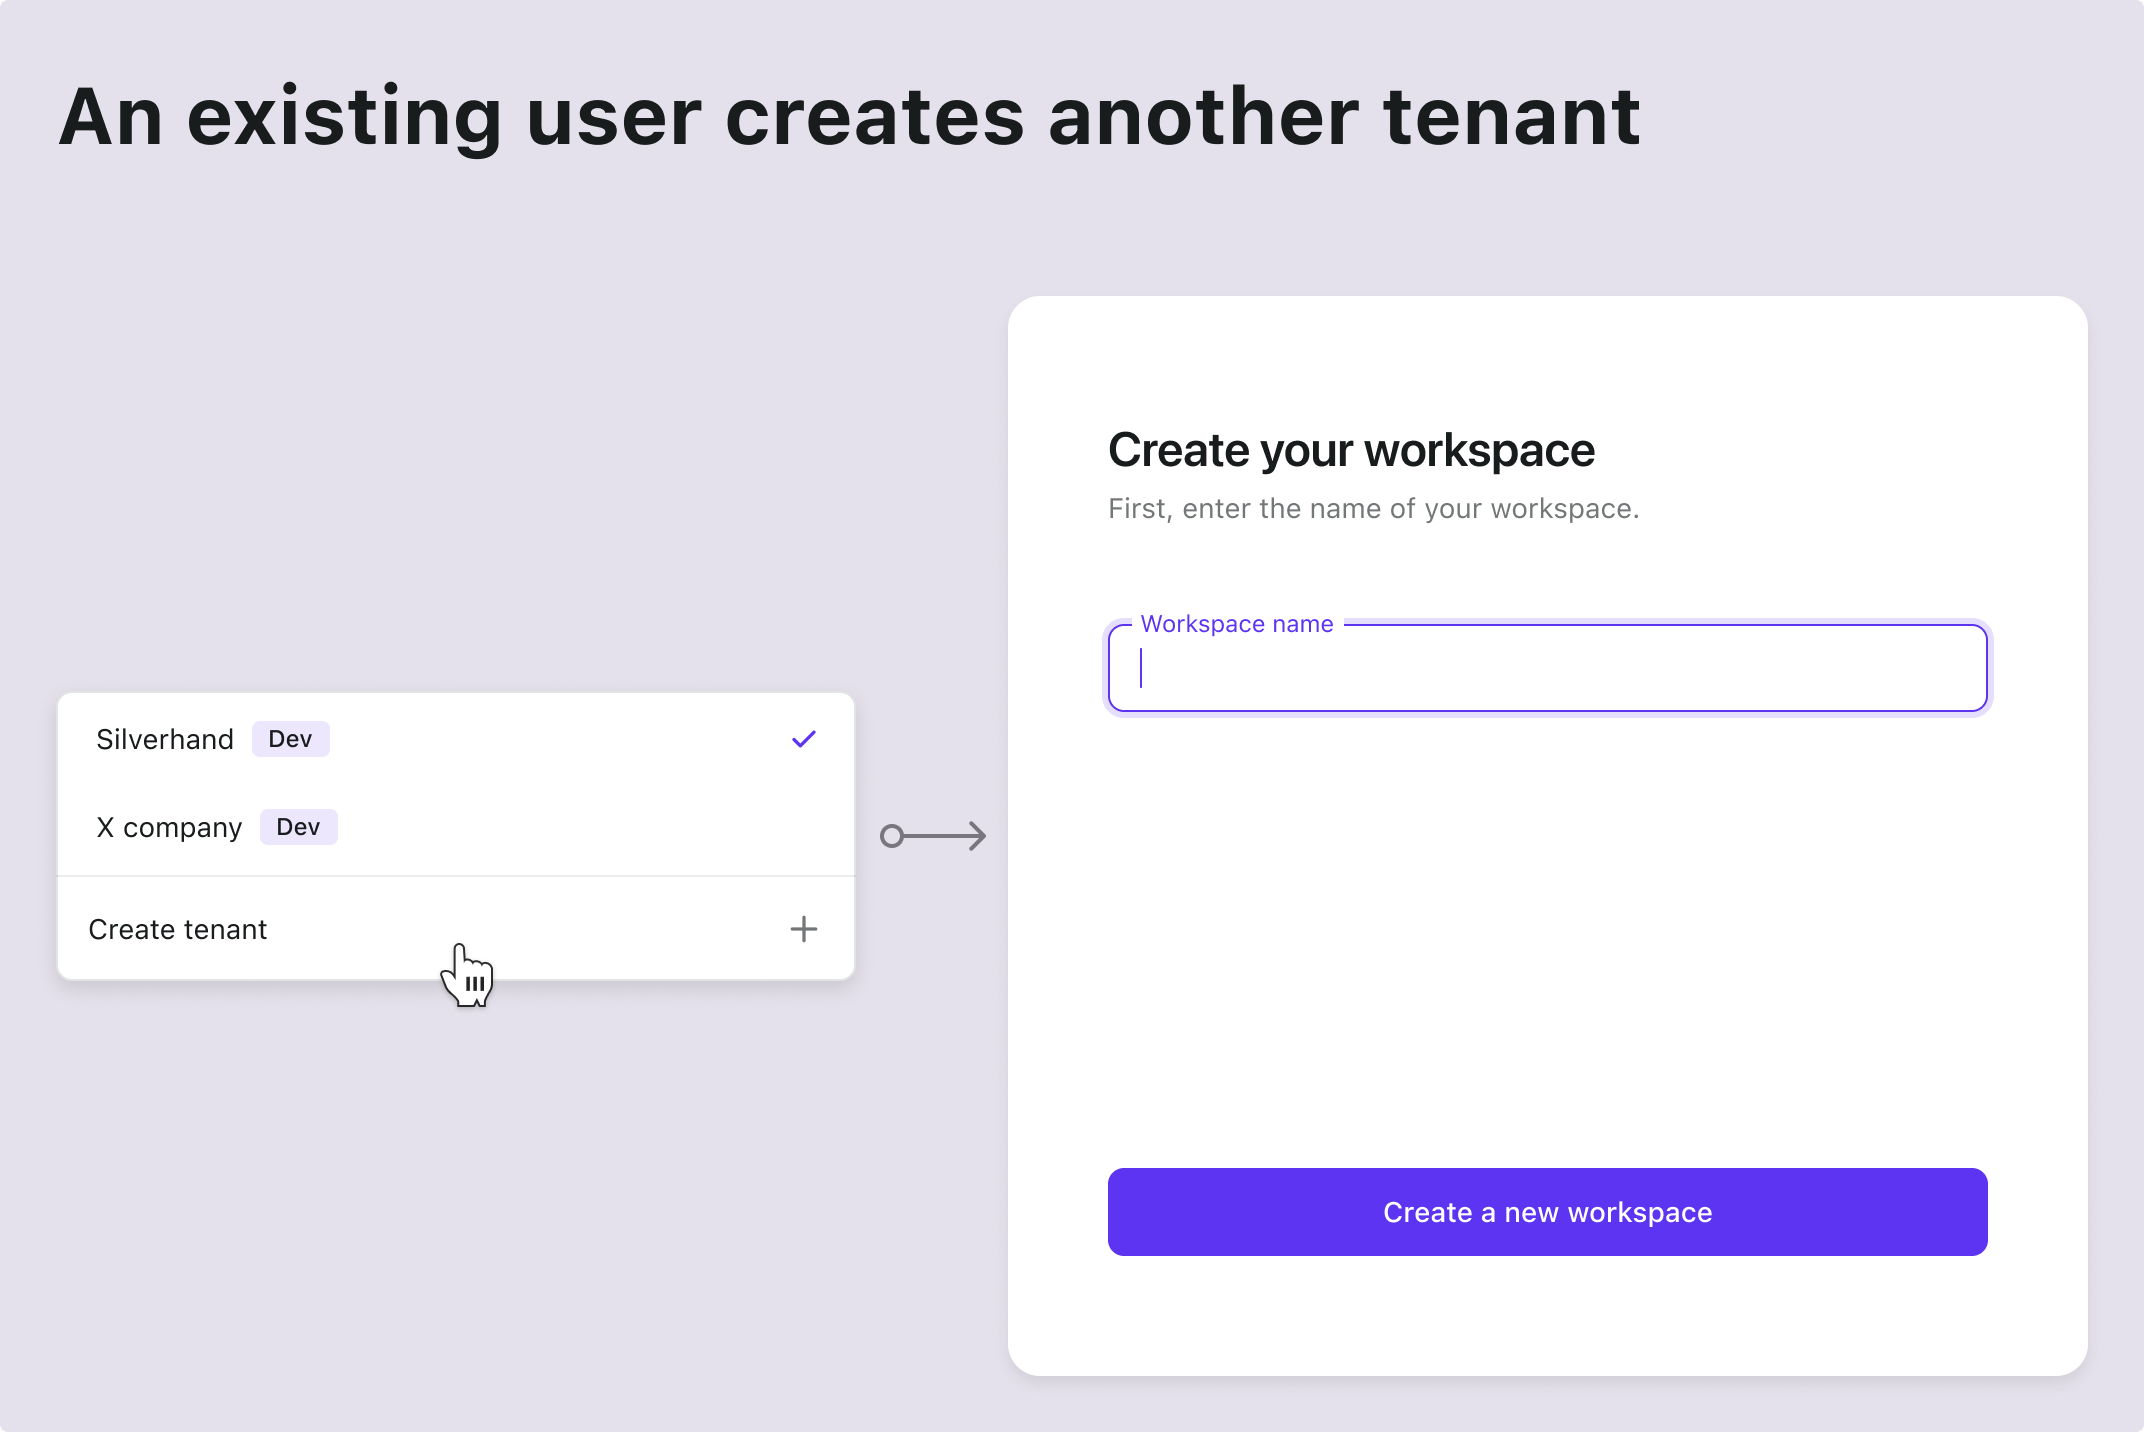
In a multi-tenant SaaS app, a key difference in the user flow is the need to support tenant creation and member invitations. This process requires careful planning and execution as it plays a key role in product activation and growth.
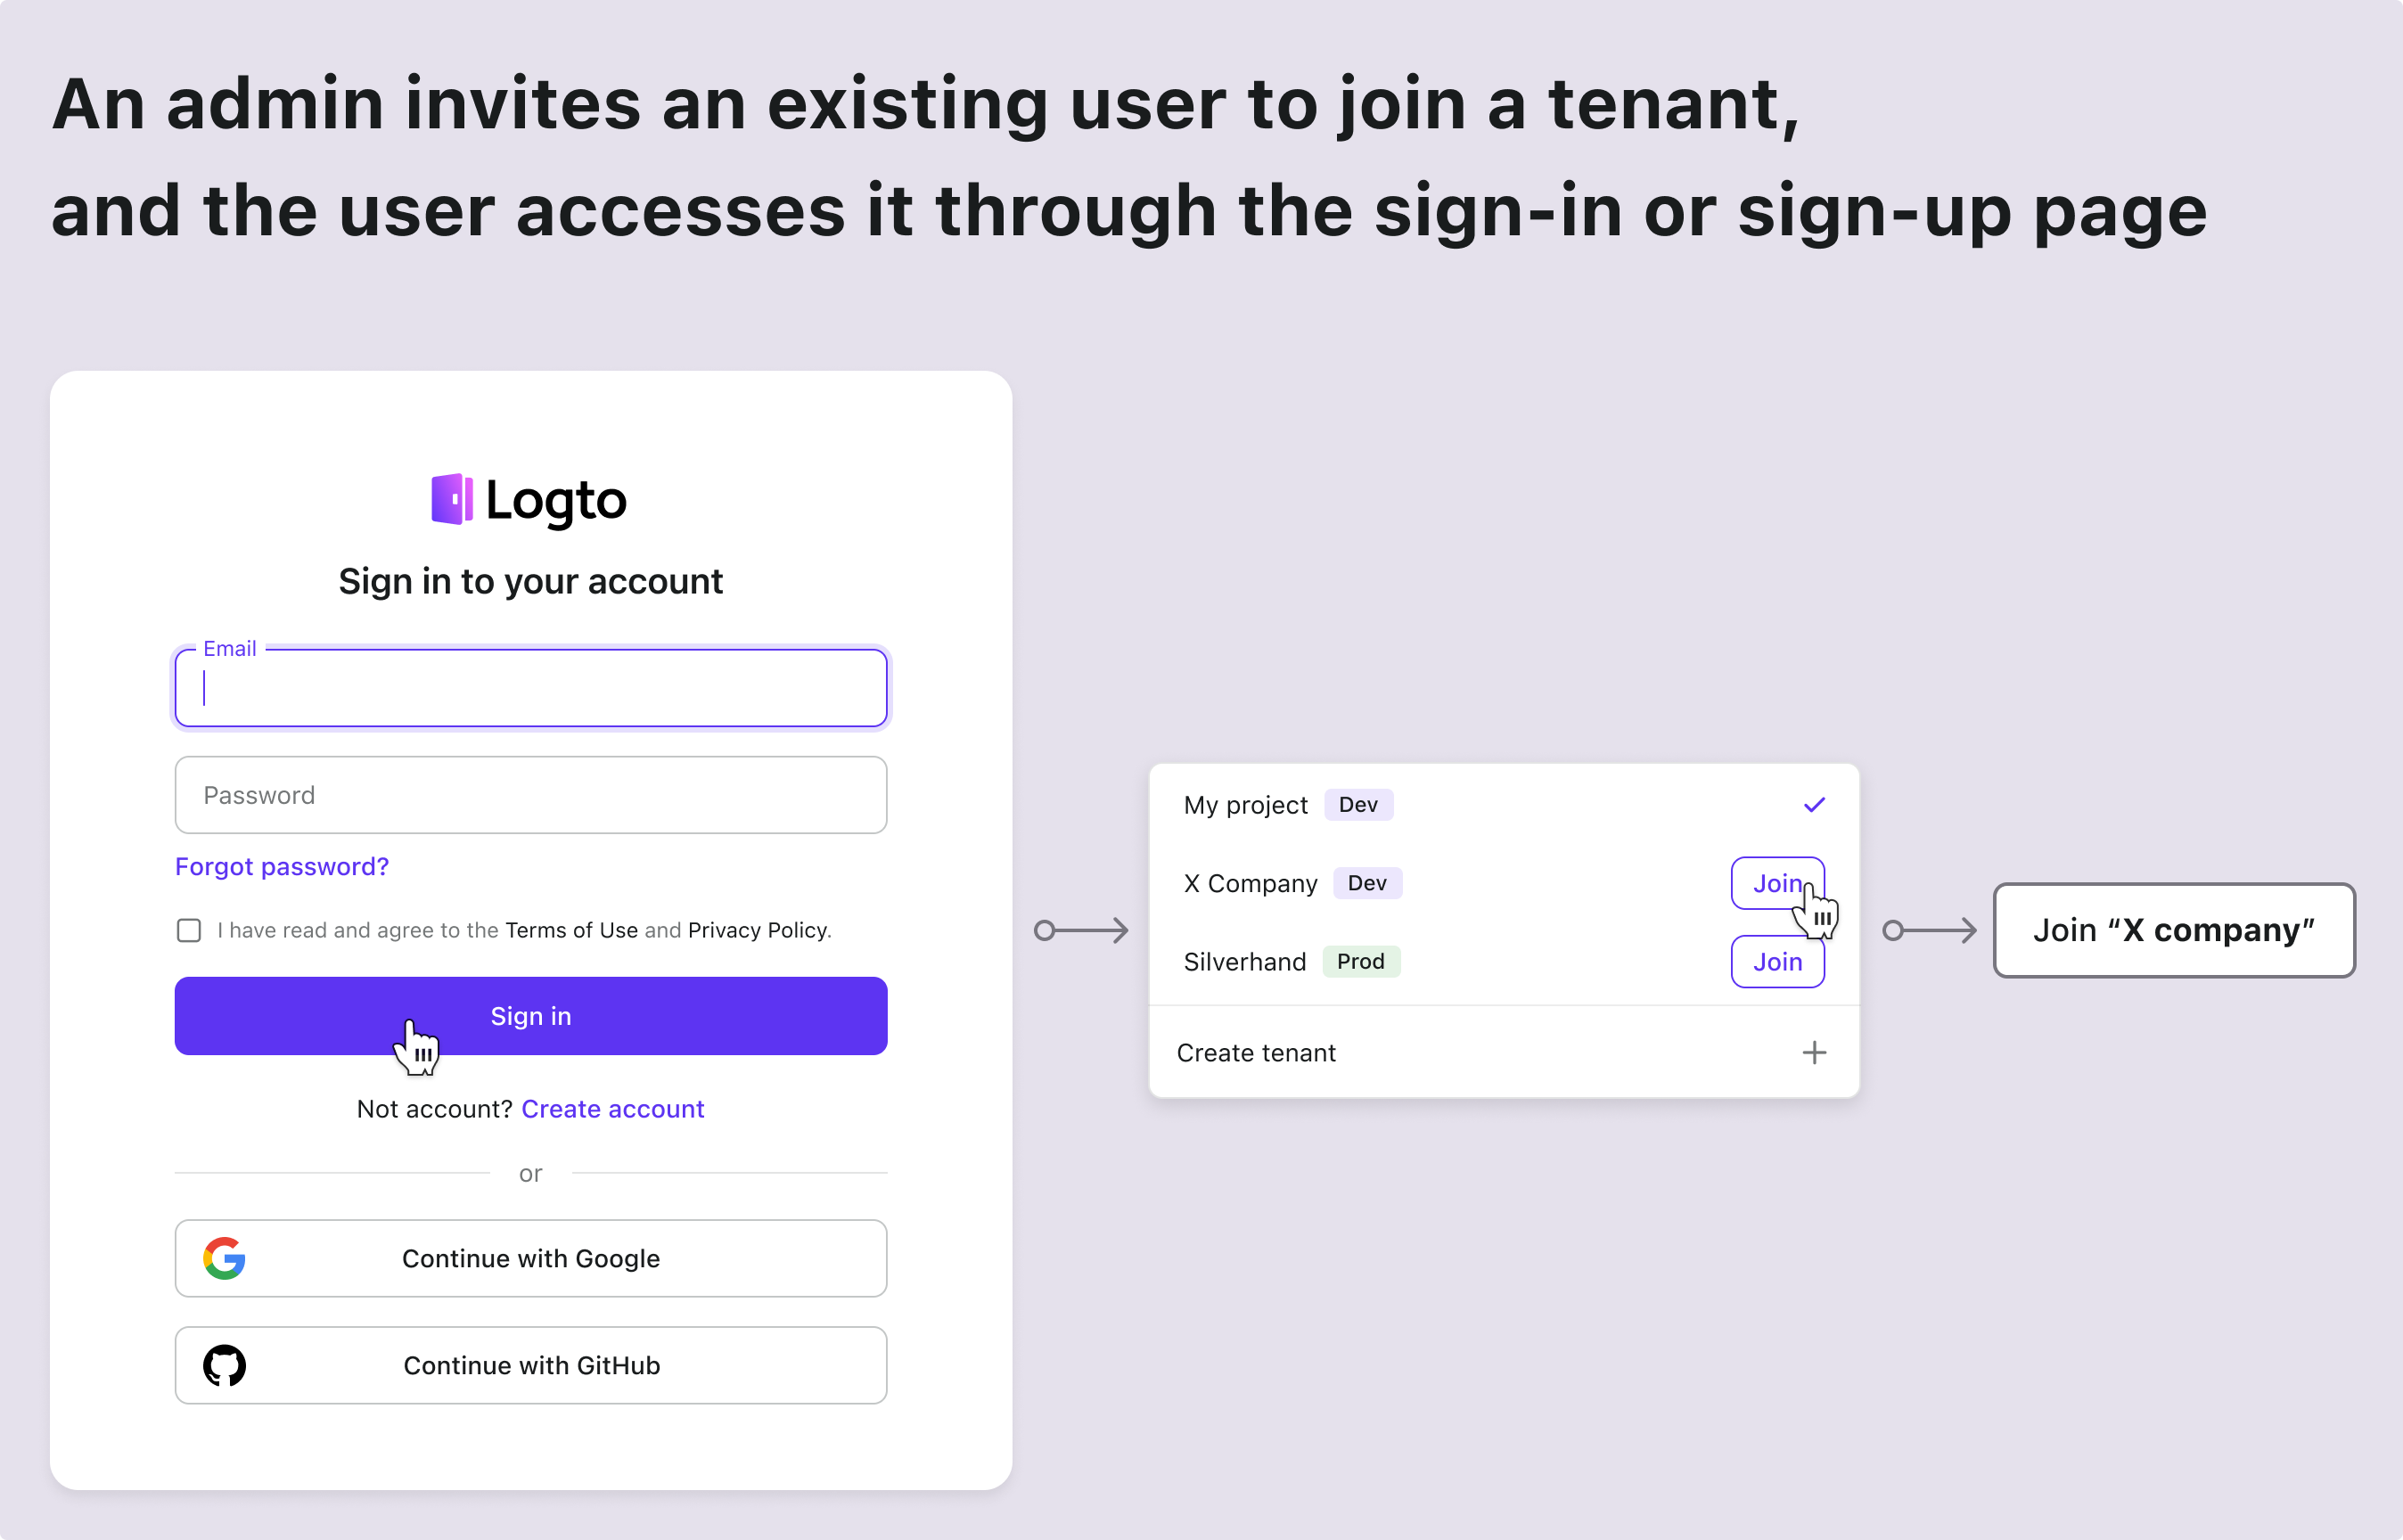
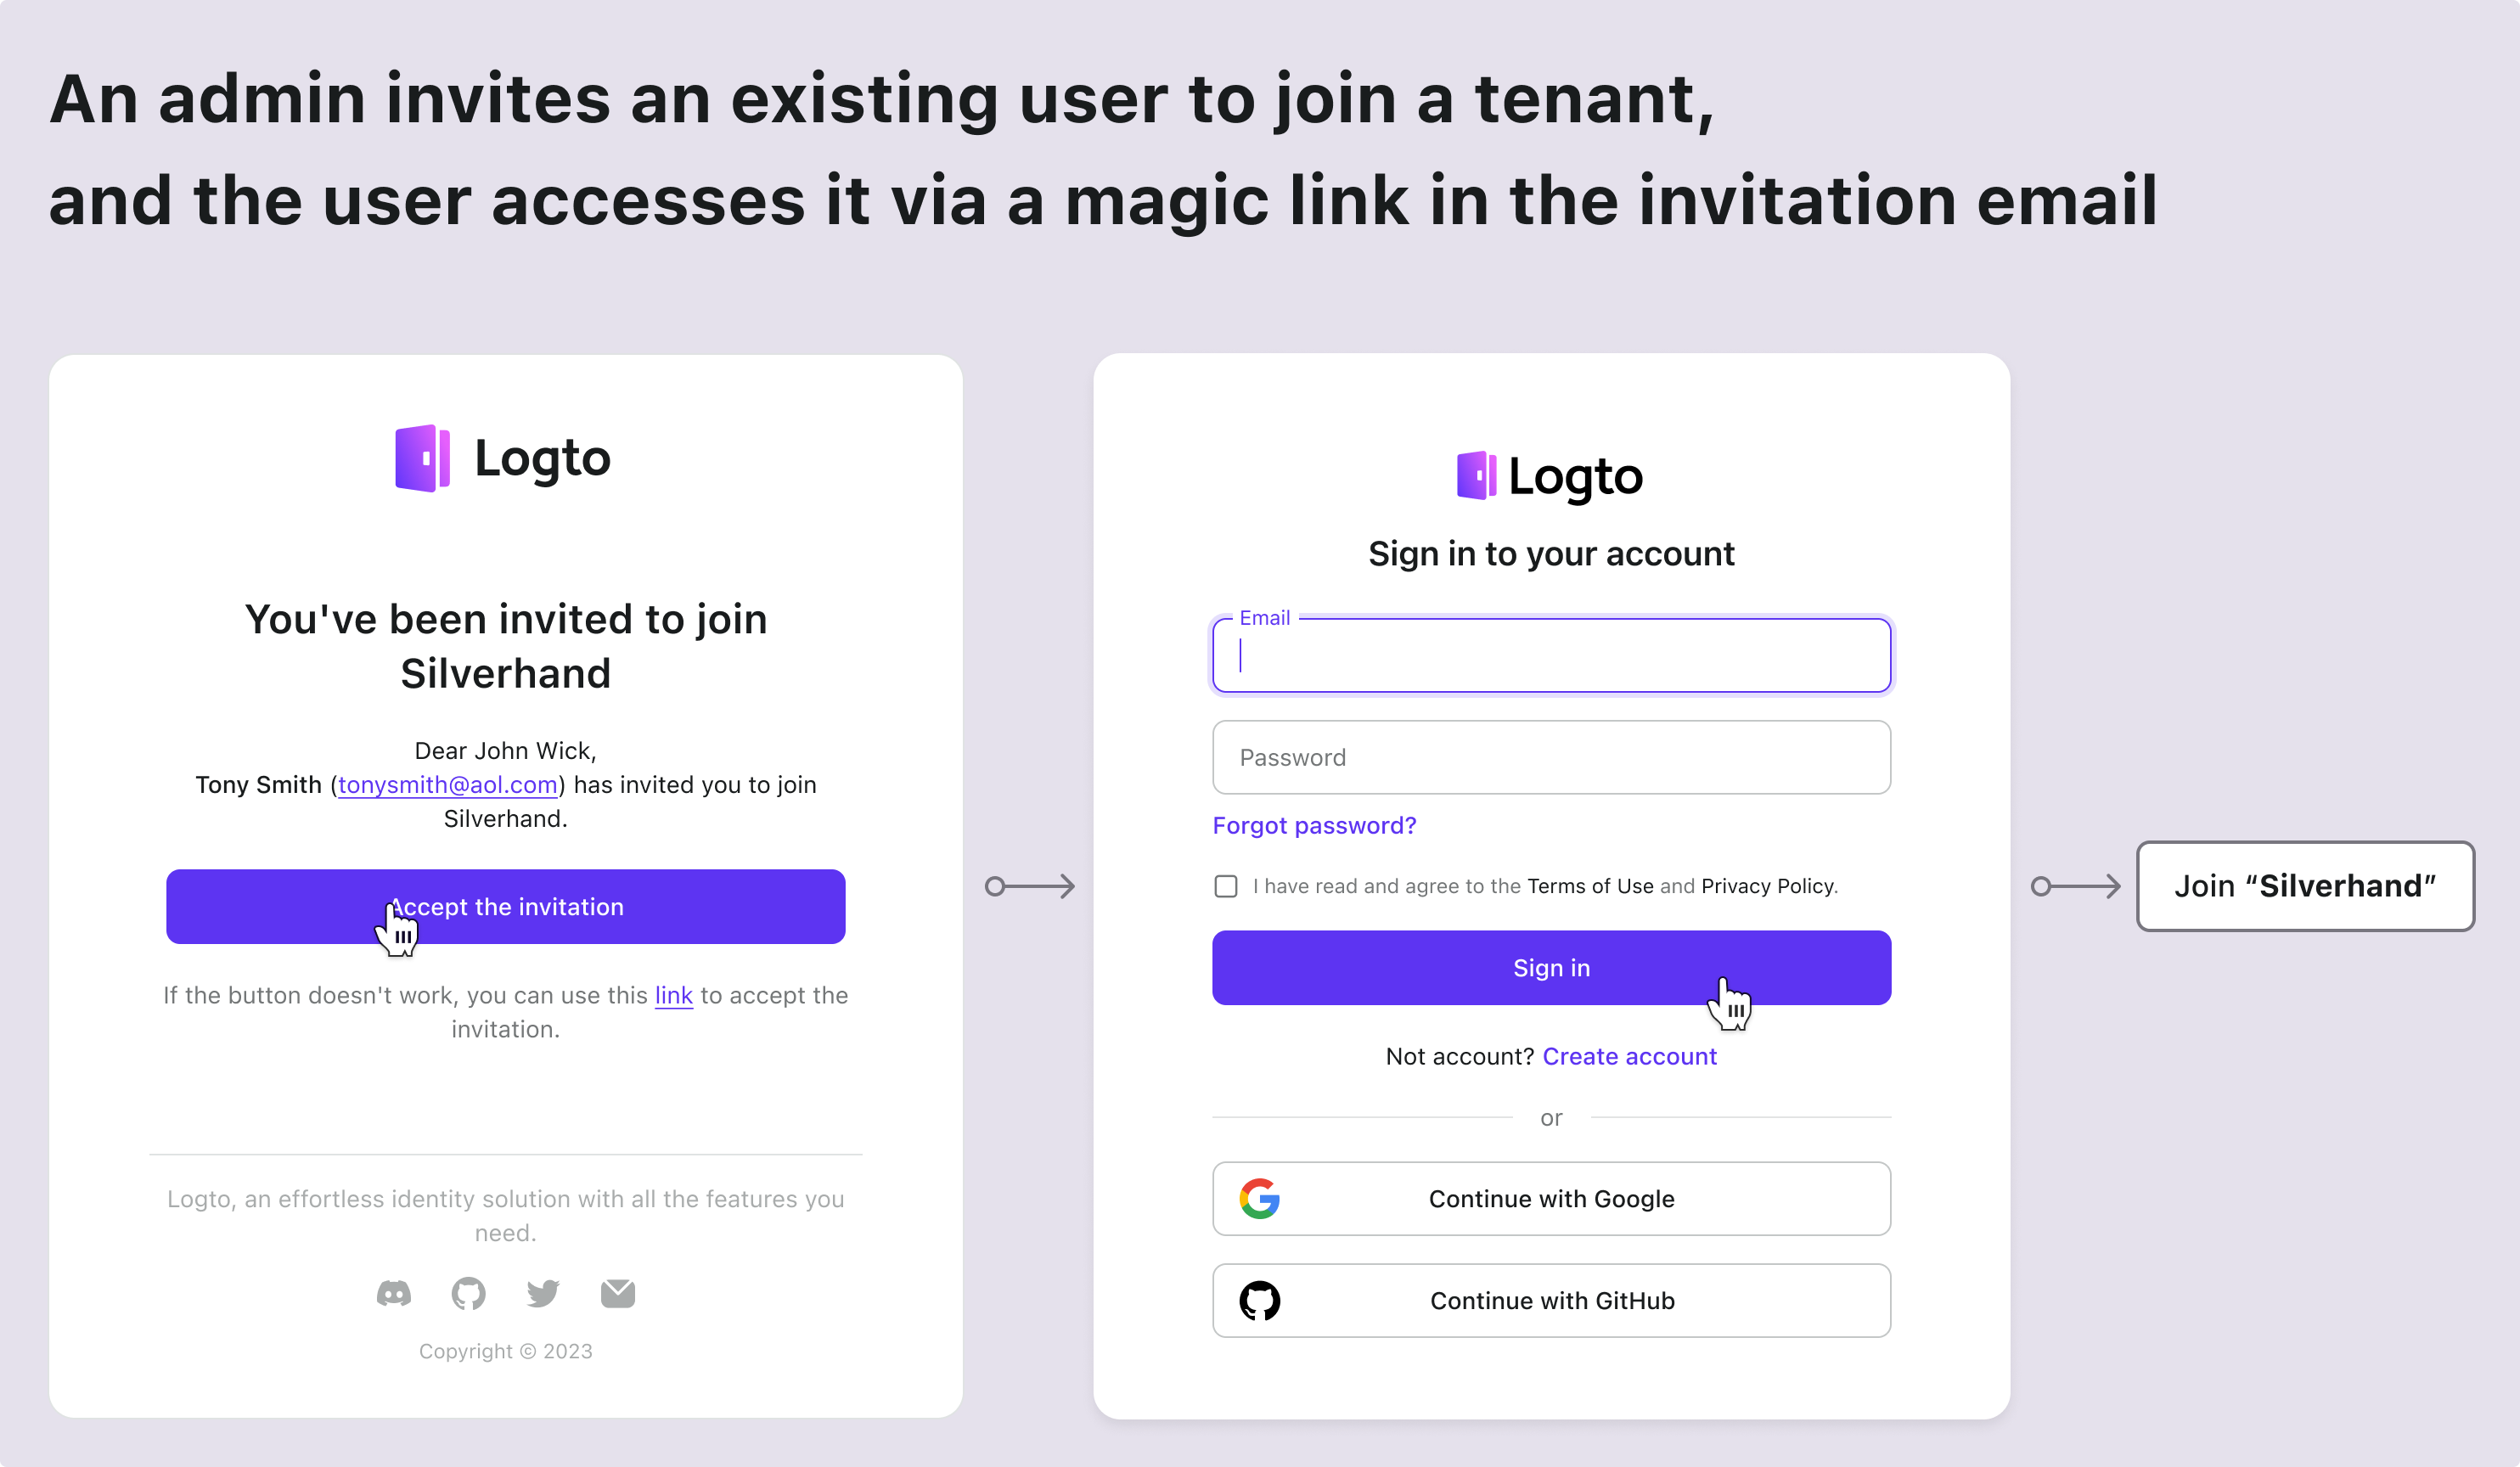
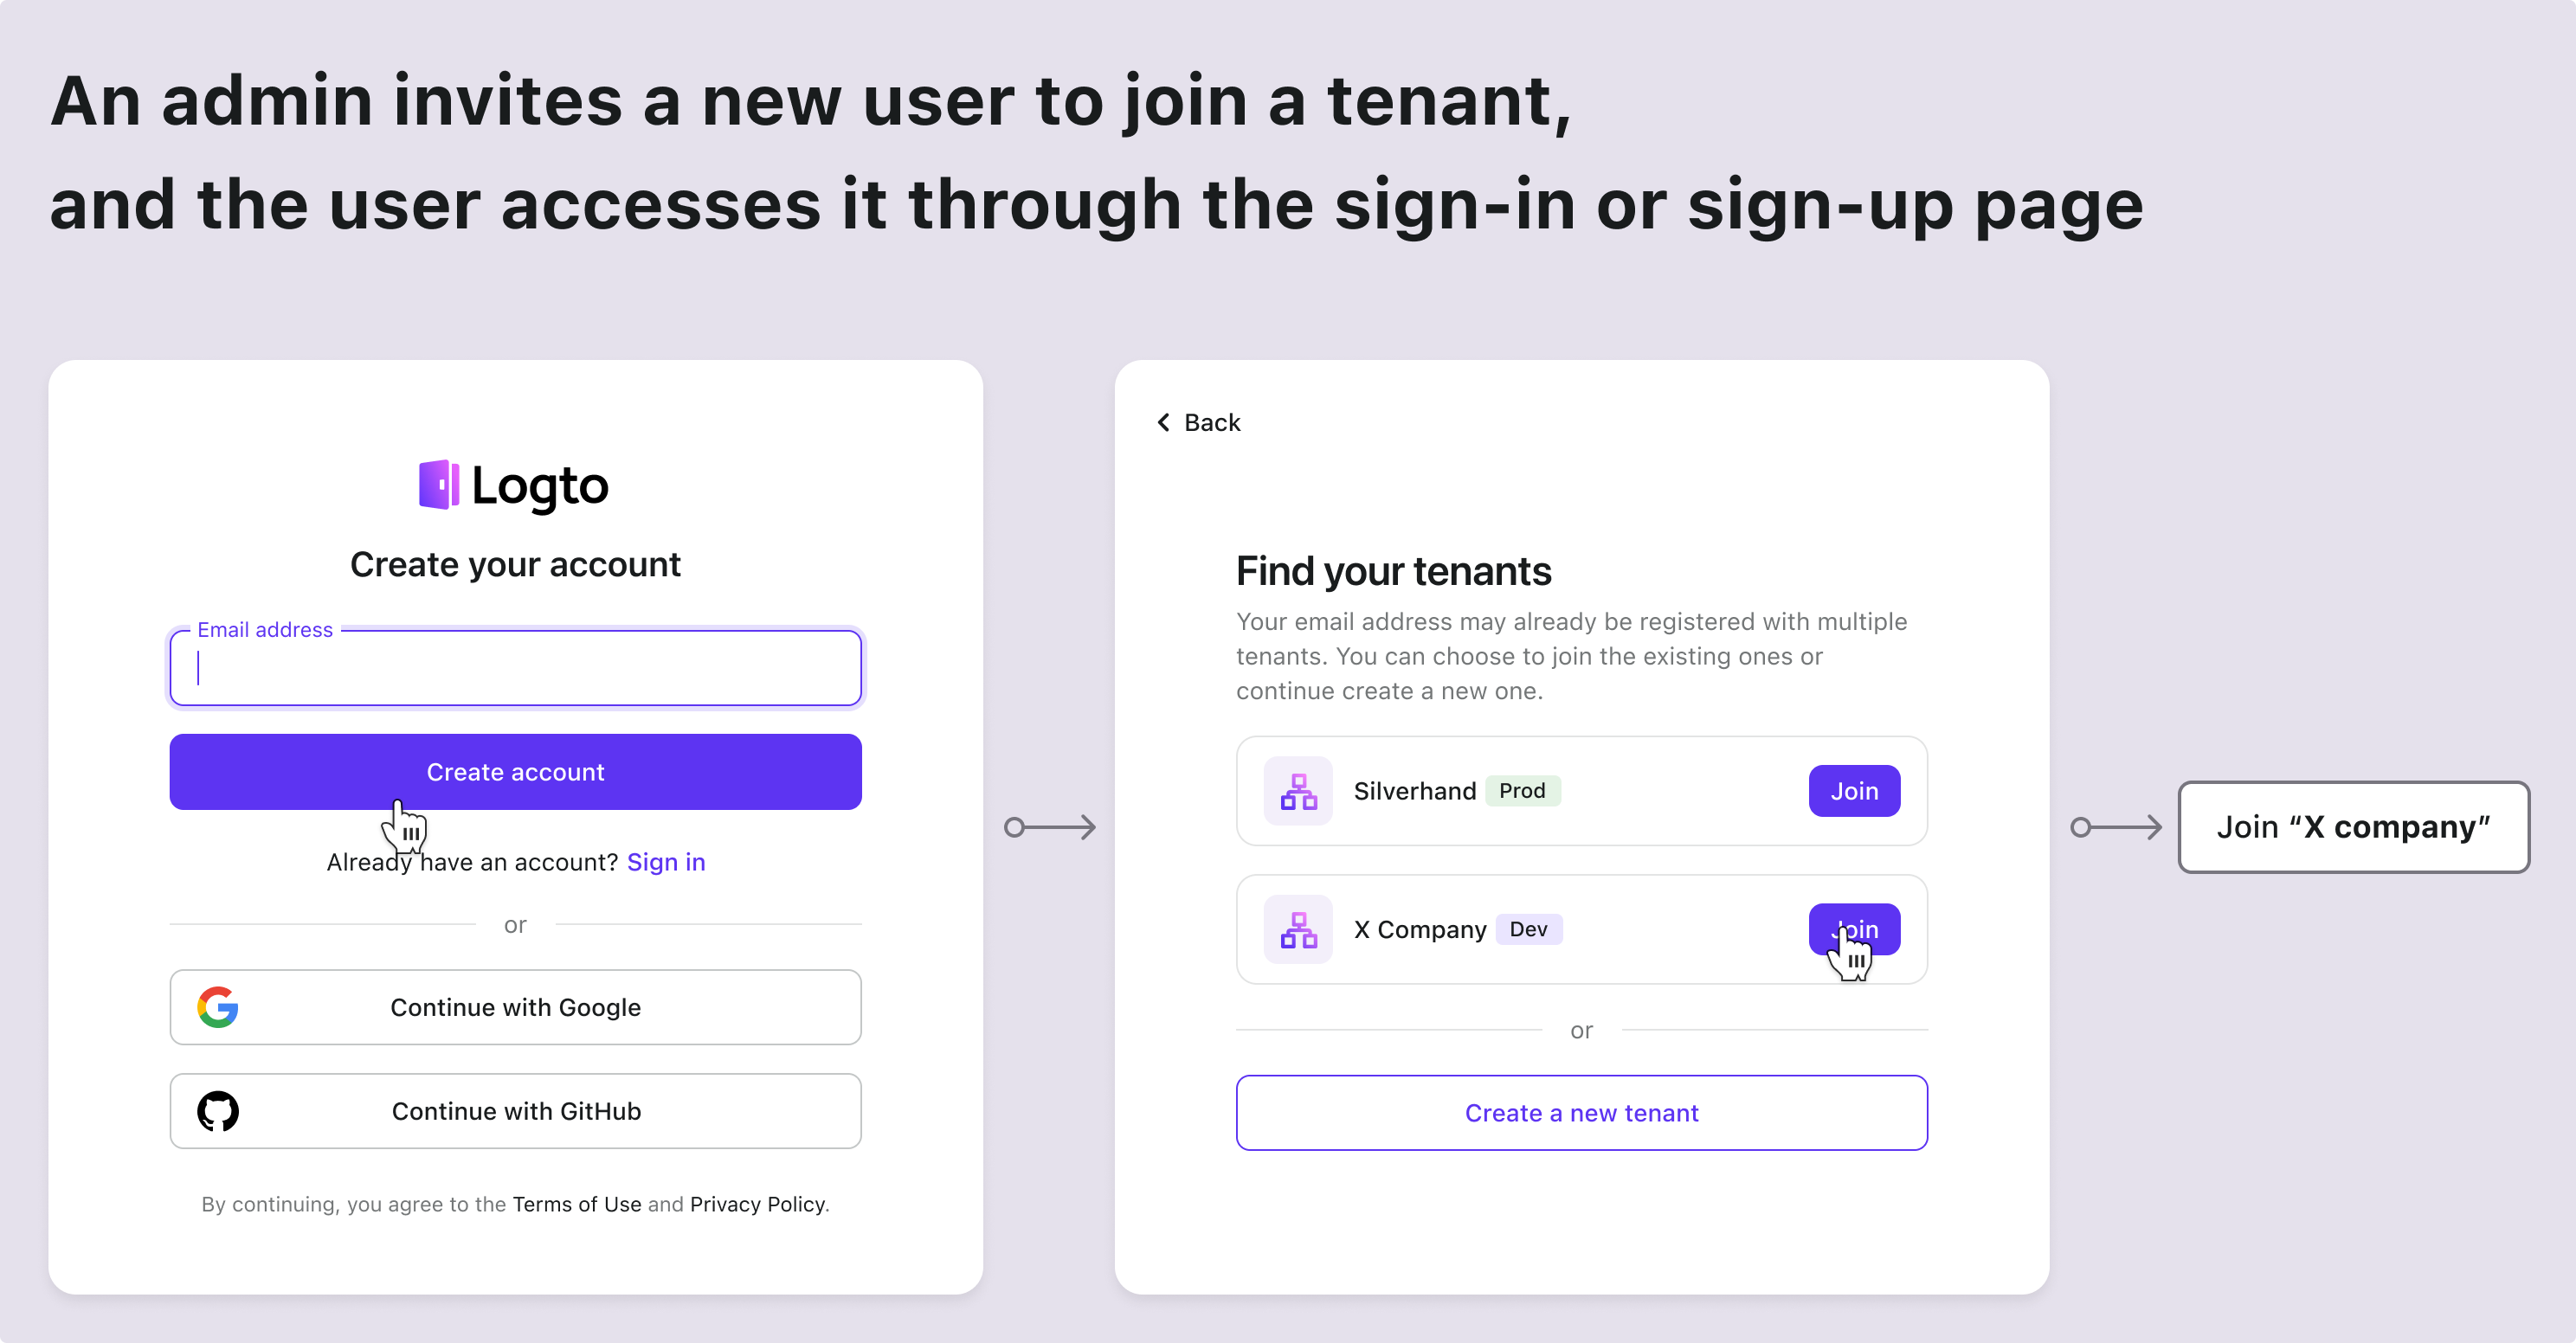
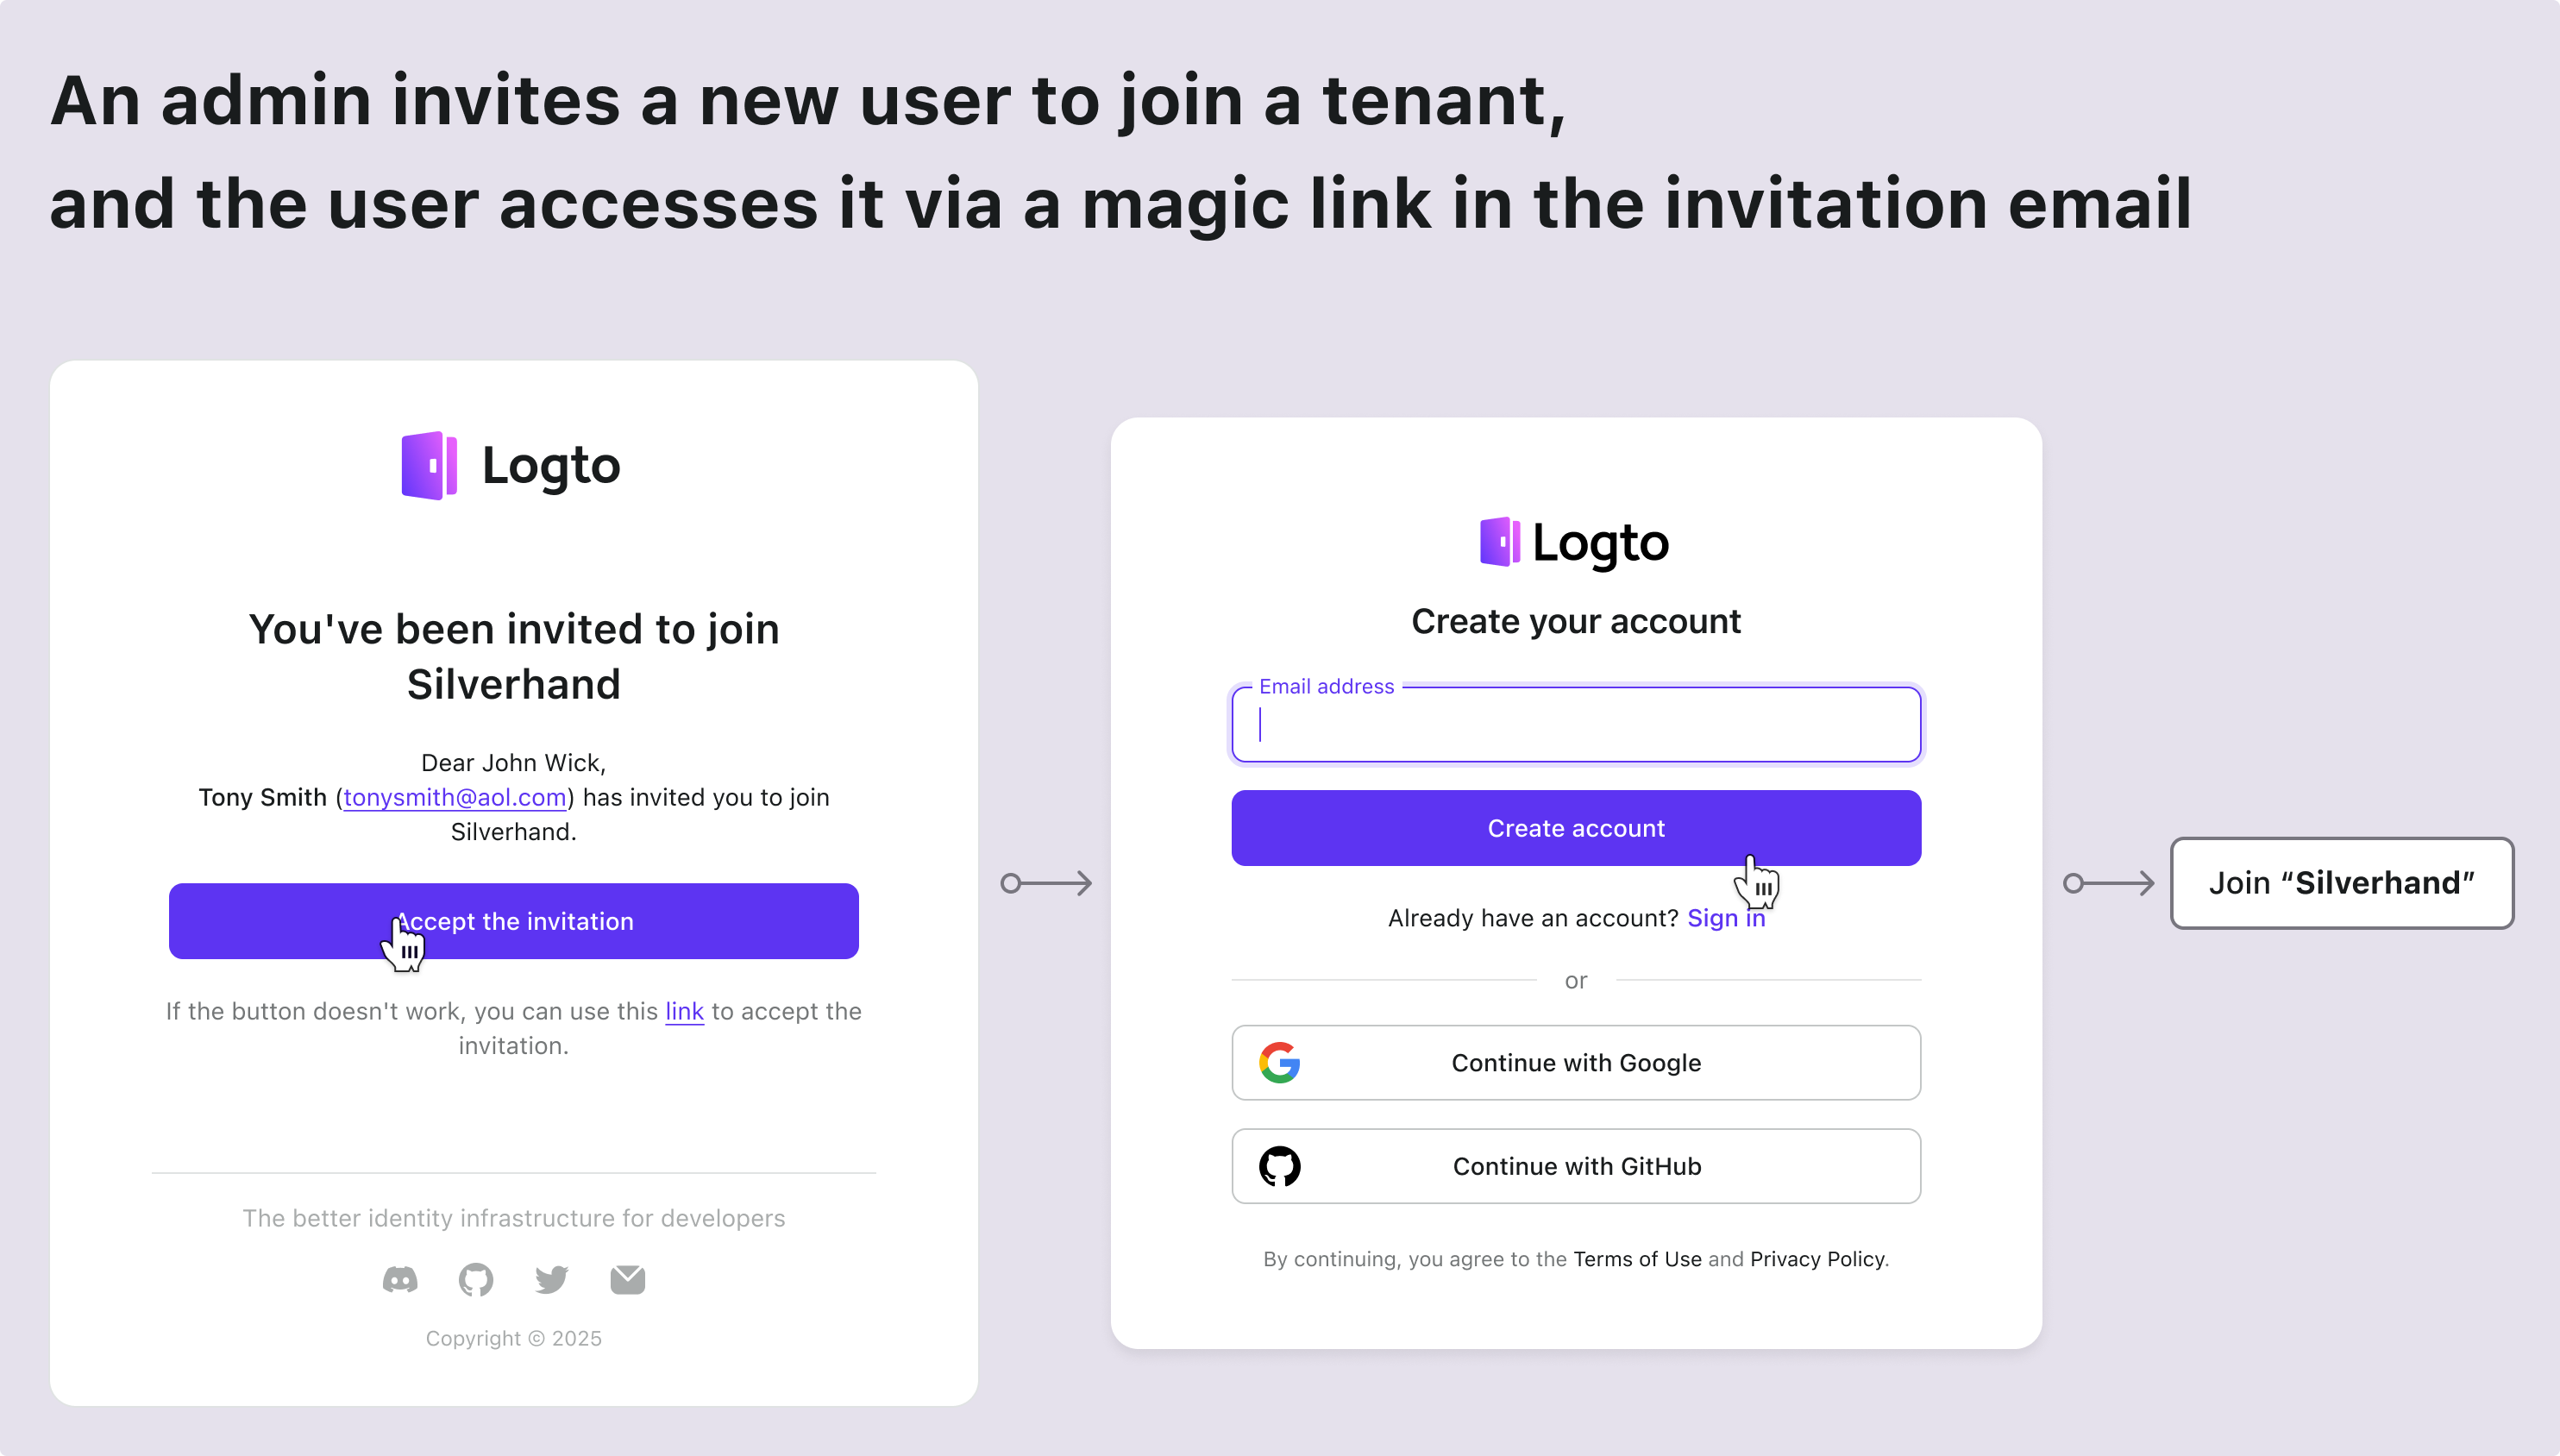
Here are a few typical use flows you need to consider:
User type
Entry point
New account
Enter from sign in and sign up page to create a new tenant
Existing account
Create another tenant inside the product
The existing account got a new tenant invitation
Enter from sign in and sign up page
The existing account got a new tenant invitation
Enter from the invitation email
The new account got a new tenant invitation
Enter from sign in and sign up page
The new account got a new tenant invitation
Enter from the invitation email
Here are some common scenarios found in almost every SaaS app. Use these as a reference to inspire your product and design team, and feel free to create your own flows as needed.
Implementing just these basic features could take weeks of development.
But now, we don't need to build ANY of this ourselves!
Modern auth providers (I will choose Logto this time) have packaged all these features for us. The authentication flow is straightforward:
From weeks of development to 15 minutes of setup, Logto handles all the complex flows for us! We'll cover the integration steps in the implementation section later. Now we can focus on building DocuMind core features!
Role-Based Access Control (RBAC) is important for ensuring security and scalability in multi-tenant SaaS applications.
In a multi-tenant app, the design of permissions and roles is usually consistent, as it stems from the product design. For example, in multiple workspaces, there’s typically an admin role and a member role. Logto as an auth provider has the following organization-level role-based access control design:
Unified permission definitions: Permissions are defined at the system level and apply consistently across all organizations, ensuring maintainable and consistent permission management
Organization templates: Pre-defined role and permission combinations through organization templates, simplifying organization initialization
The permission relationship looks like this:
Since each user needs their own role(s) within each organization, the relationship between roles and organizations must reflect the roles assigned to each user:
We've designed the organization system and access control system, and now we can start building our product!
Frontend: React (easily transferable to Vue/Angular/Svelte)
Backend: Express (simple, intuitive API)
Why separate frontend and backend?Because it has a clear architecture, easy to learn and simple to switch stacks. And for auth providers, I use Logto as an example.
And for the following guides, its patterns here work with: Any frontend, any backend and any auth system.
This is the easiest step. We just need to integrate Logto into our project. Then we can configure user login/registration methods in the Logto Console based on our needs.
First, log into Logto Cloud. You can sign up for a free account if you don't have one. Create a Development Tenant for testing.
In the Tenant Console, click the "Application" button on the left. Then select React to start building our application.
Follow the guide on the page. You can complete the Logto integration in about 5 minutes!
Here's my integration code:
Here's a useful trick: Our login page has both Sign in and Register buttons. The Register button leads directly to Logto's registration page. This works through Logto's first screen feature. It determines which step of the auth flow users see first.
You can default to the registration page when your product expects many new users.
After clicking login, you'll go to the Logto login page. Upon successful login (or registration), congratulations! Your app has its first user (you)!
And call the signOut function from the useLogto hook to sign out the user when you want to.
In the Logto Console, click "Sign-in Experience" on the left menu. Then click the "Sign-up and sign-in" tab.
On this page, follow the instructions to configure Logto's login/registration methods.
With Logto, enabling MFA is simple. Just click the "Multi-factor auth" button in the Logto Console. Then enable it on the Multi-factor authentication page.
And the MFA flow will look like this:
Everything is so simple! We've set up a complex user authentication system in just a few minutes!
To get a user's organization information from Logto, follow these two steps:
Declare organization information access in the Logto Config. This is done by setting the appropriate scopes and resources.
Use Logto's fetchUserInfo method to get user information, including organization data.
After completing these steps, you need to sign out and sign in again. This is necessary because we modified the requested scope and resource.
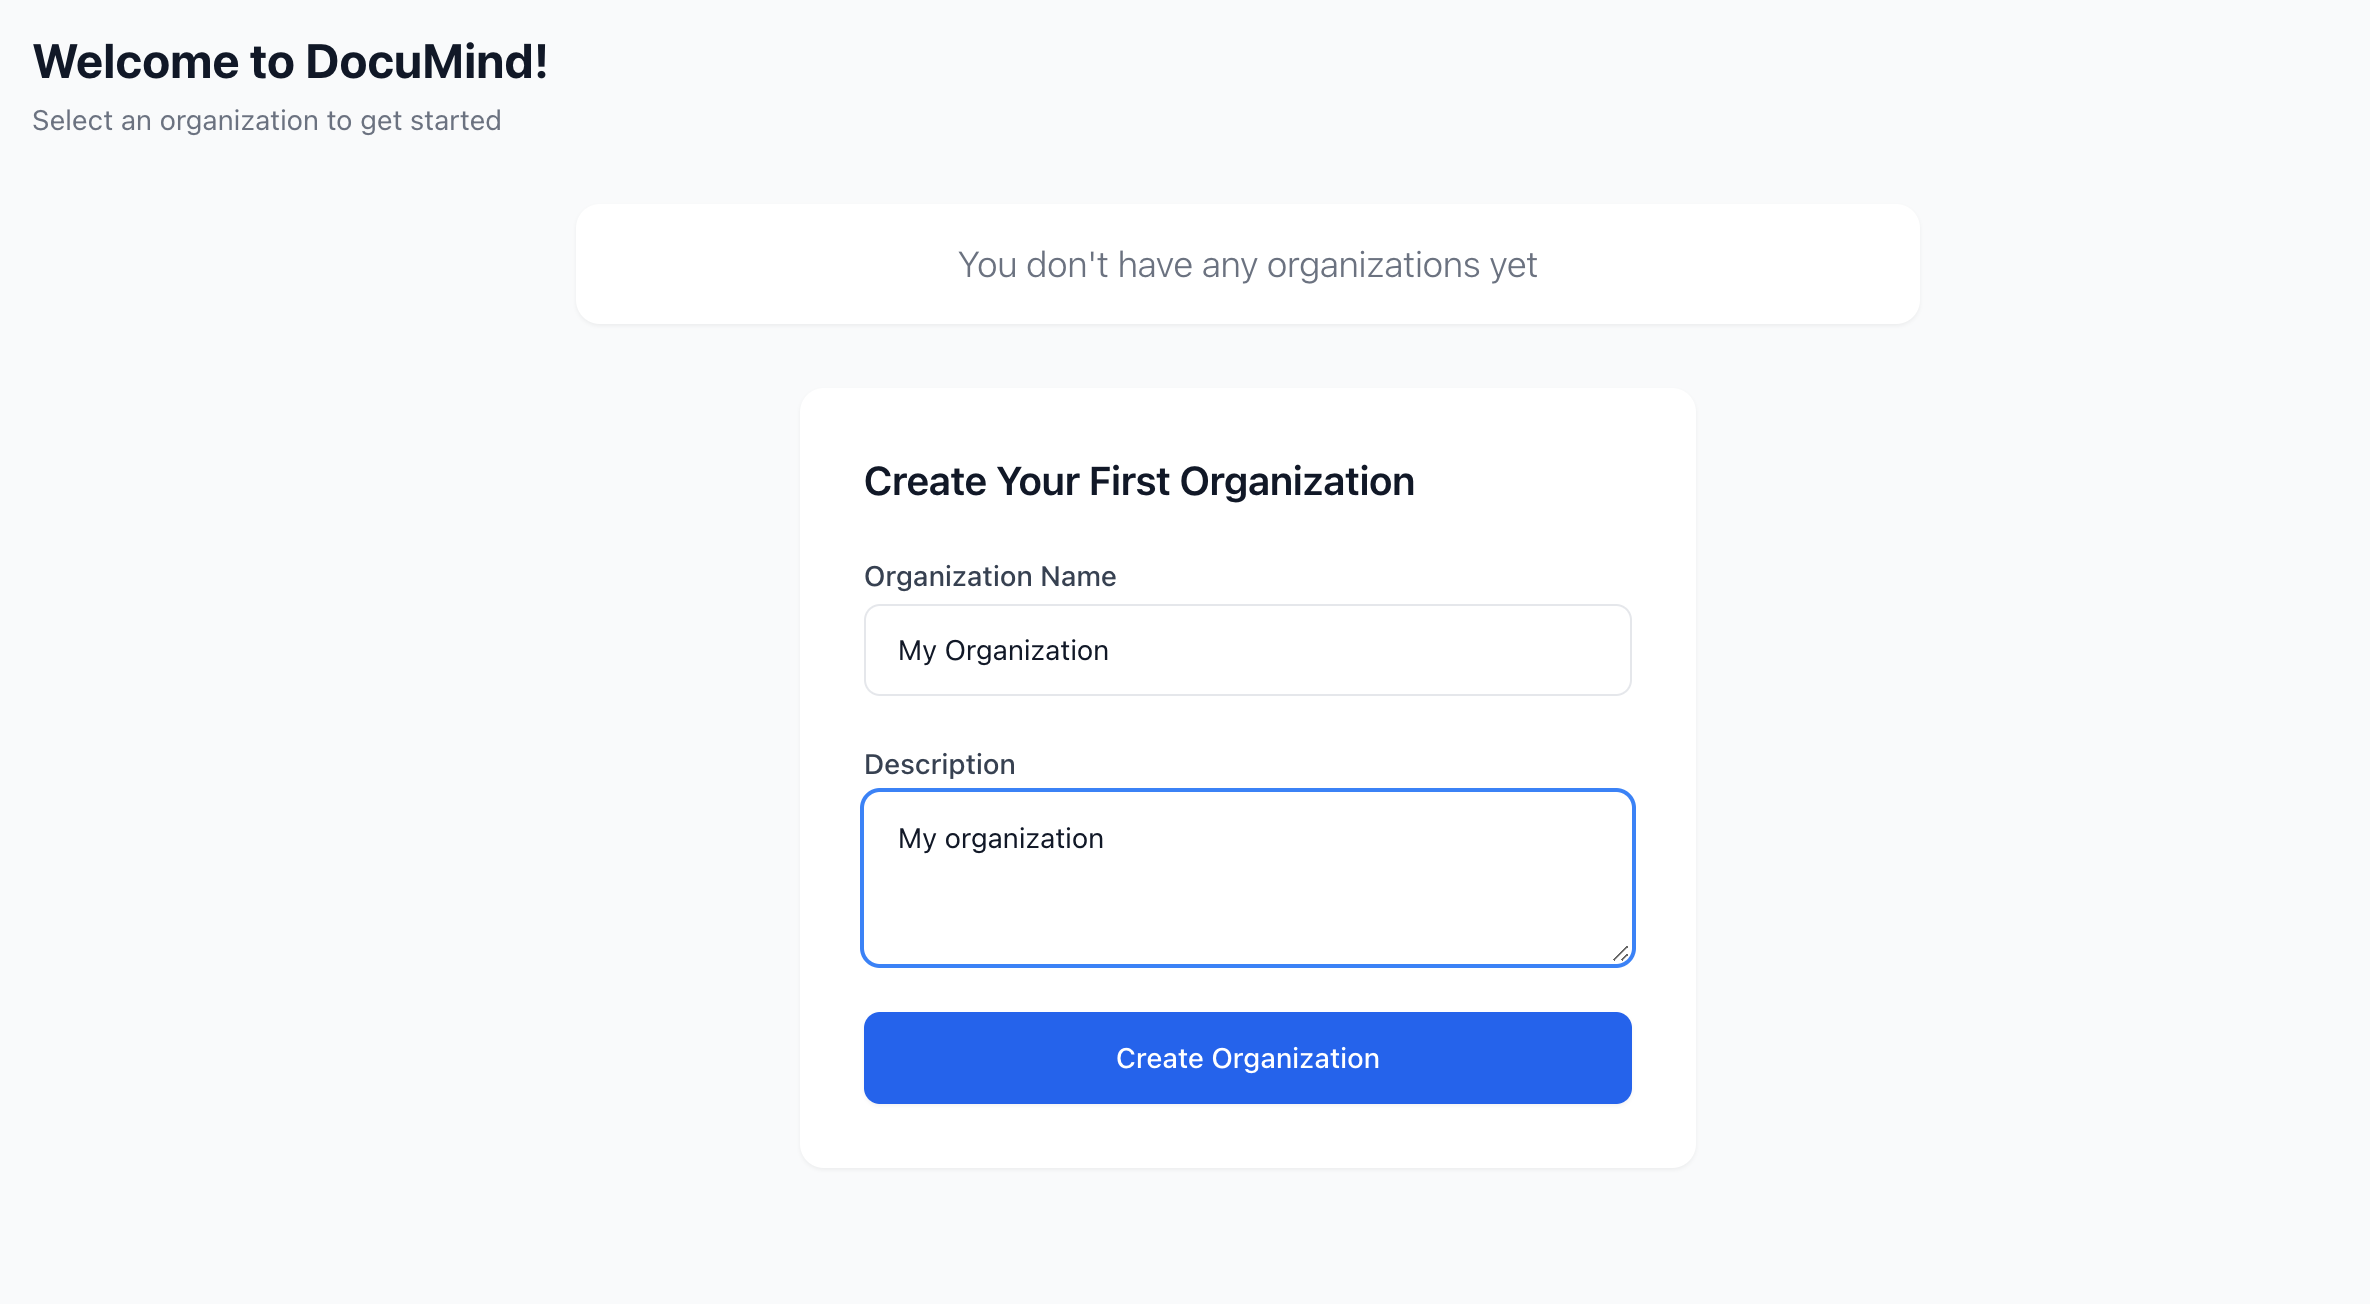
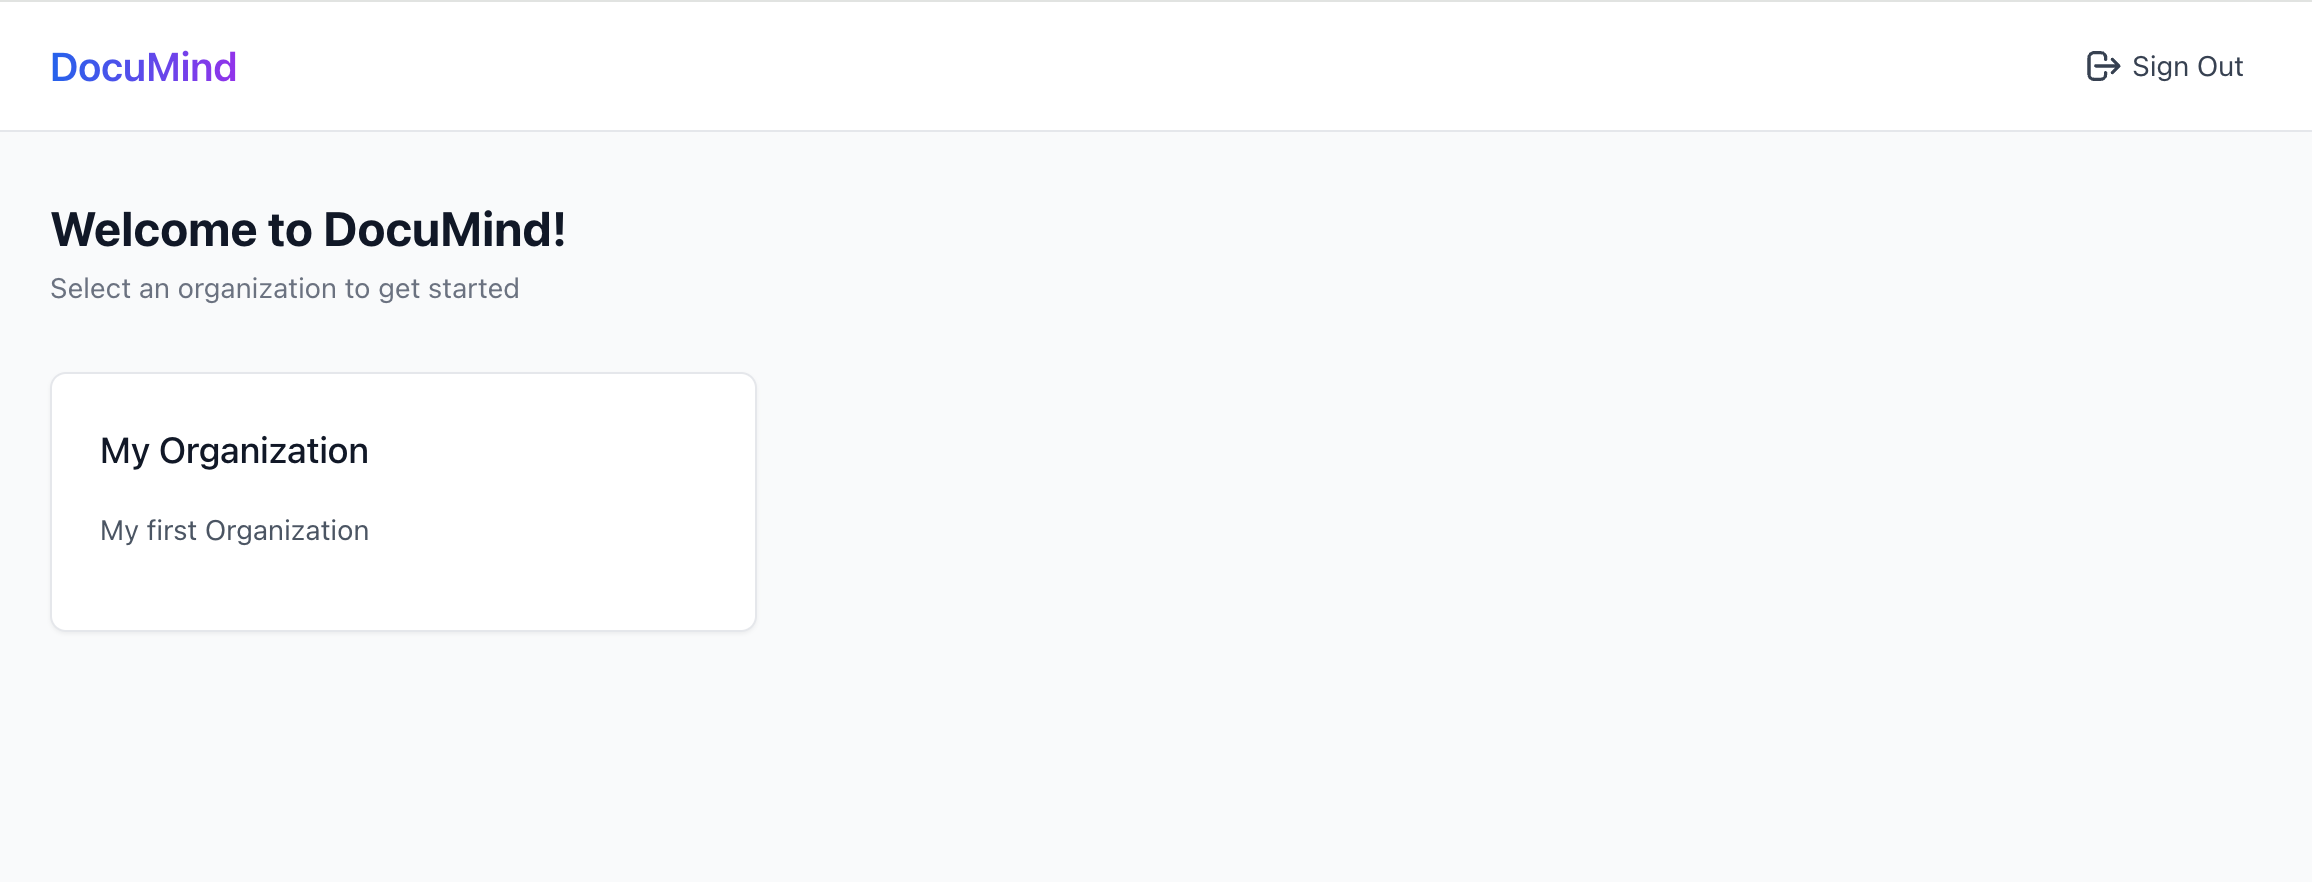
Right now, you haven't created any organizations. The user hasn't joined any organizations either. The dashboard will show "You don’t have any organization yet".
Next, we’ll create an organization for our users and add them to it.
Thanks to Logto, we don't need to build complex organization relationships. We just need to create an organization in Logto and add users to it. Logto handles all the complexity for us. There are two ways to create Organizations:
Manually create organizations through the Logto Console
Use the Logto Management API to create organizations, especially when designing a SaaS flow that lets users create their own organizations (workspaces).
Click the "Organizations" menu button on the left side of the Logto Console. Create an organization.
Now you have your first organization.
Next, let's add the user to this organization.
Go to the organization details page. Switch to the Members tab. Click the "+ Add member" button. Select your login user from the left list. Click the "Add members" button in the bottom right. Now you've successfully added the user to this organization.
Refresh your APP page. You'll see the user now belongs to an organization!
Creating an organization in the console is not enough. Your SaaS app needs a flow that allows end users to easily create and manage their own workspaces. To implement this functionality, use the Logto Management API.
First, let's create an API endpoint in our backend service for creating organizations.
Our backend service API only allows authenticated users. We need to use Logto to protect our API. We also need to know the current user's information (like user ID).
In Logto's concept (and OAuth 2.0), our backend service acts as a resource server. Users access DocuMind resource server with an Access token from the frontend. The resource server verifies this token. If valid, it returns the requested resources.
Let's create an API Resource to represent our backend service.
Go to the Logto Console.
Click the "API resources" button on the right.
Click "Create API resource". Select Express in the popup.
Don't worry about this API identifier URL. It's just a unique identifier for your API in Logto. It's not related to your actual backend service URL.
You'll see a tutorial for using the API resource. You can follow that tutorial or our steps below.
Let's create a requireAuth middleware to protect our POST /organizations endpoint.
To use this middleware, we need these environment variables:
LOGTO_JWKS_URL
LOGTO_ISSUER
Get these variables from your Logto tenant's OpenID Configuration endpoint. Visit https://<your-tenant-id>.logto.app/oidc/.well-known/openid-configuration. You'll find the needed information in the returned JSON:
Now use the requireAuth middleware in our POST /organizations endpoint.
This protects our POST /organizations endpoint. Only users with valid Logto access tokens can access it.
We can now get the token from Logto in our frontend. Users can create organizations through our backend service with this token. The middleware also gives us the user ID. This helps when adding users to organizations.
In the frontend code, declare this API resource in the Logto config. Add its identifier to the resources array.
Like before, users need to log in again after we update the Logto config.
In the Dashboard, get the Logto Access Token when creating an organization. Use this token to access our backend service API.
Now we can properly access DocuMind backend service API.
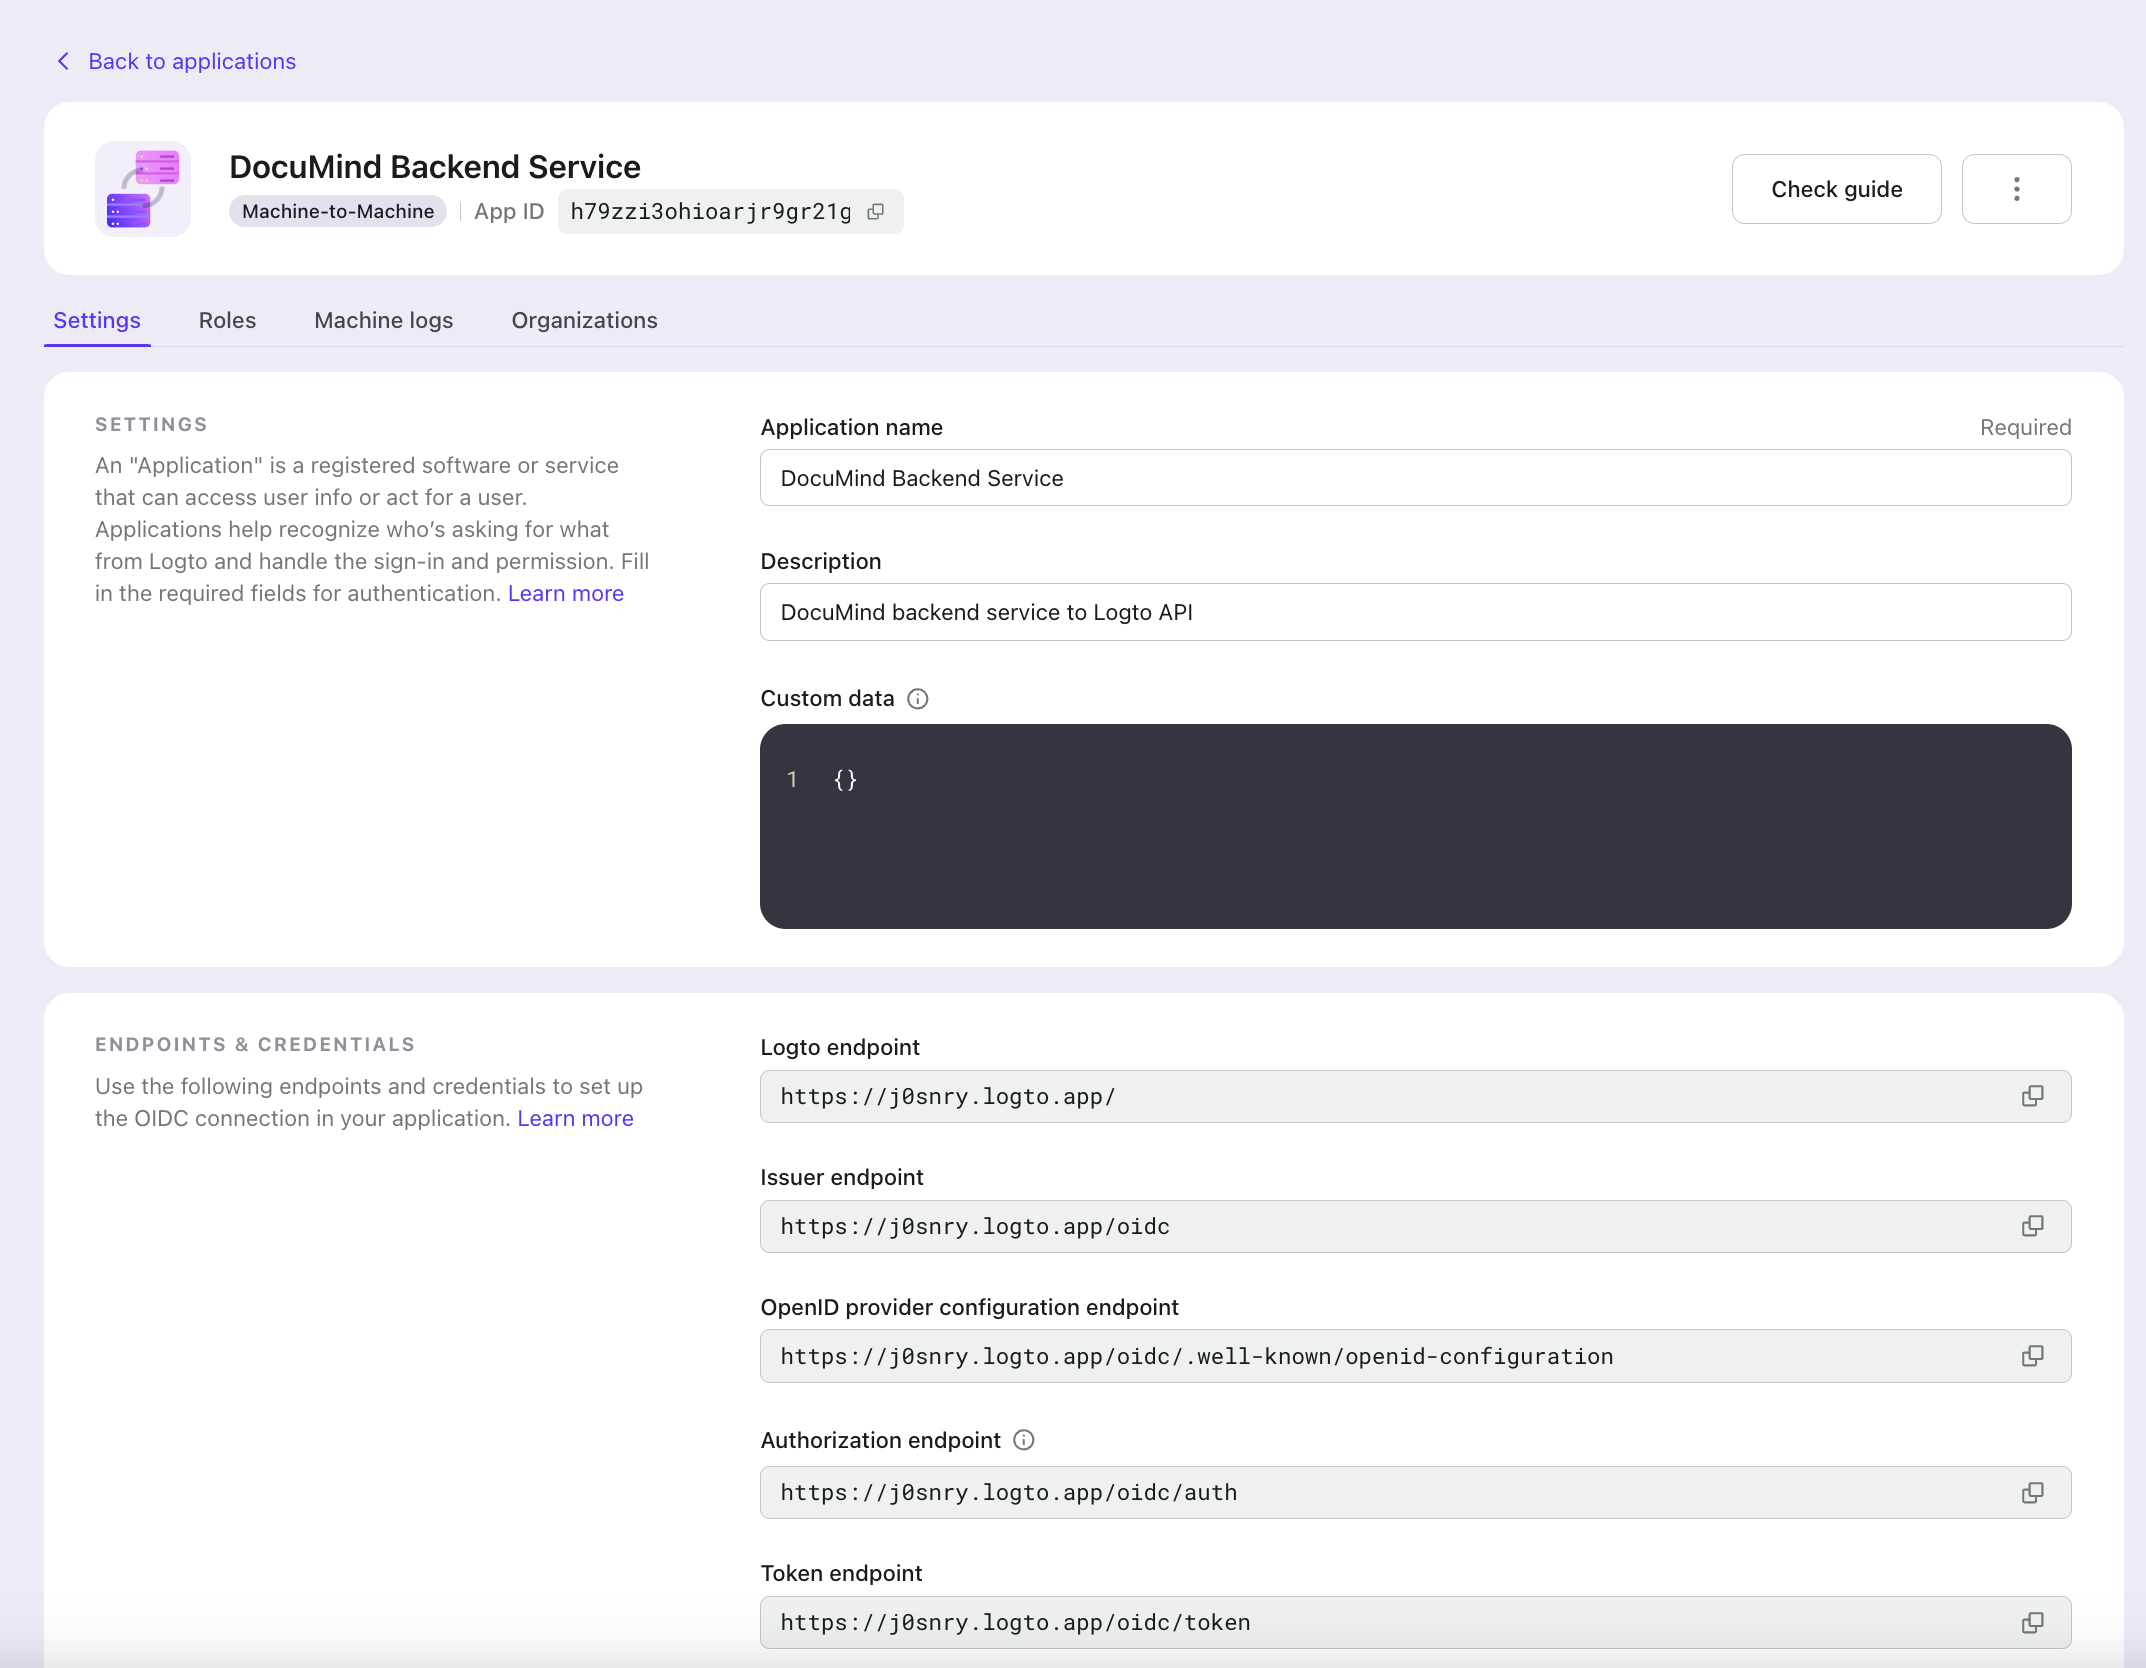
Go to the applications page in Logto Console. Create a Machine-to-Machine application. Assign the "Logto Management API access" role. Copy the Token endpoint, App ID, and App Secret. We'll use these for access tokens.
Now we can get Logto Management API access tokens through this M2M application.
Use this access token to call Logto Management API.
Implement access control to your multi-tenant app#
Now let's move on to organization access control.
We want to achieve:
Users can only access resources belonging to their own organizations: This can be done through Logto's organization token
Users have specific roles within organizations (containing different permissions) to perform authorized actions: This can be implemented through Logto's organization template feature
Similar to the Logto access token we mentioned earlier, Logto issues an access token corresponding to a specific resource, and users use this token to access protected resources in the backend service. Correspondingly, Logto issues an organization token corresponding to a specific organization, and users use this token to access protected organization resources in the backend service.
In the frontend application, we can use Logto's getOrganizationToken method to obtain a token for accessing a specific organization.
Here, organizationId is the id of the organization to which the user belongs.
Before using getOrganization or any organization features, we need to ensure that urn:logto:scope:organizations scope and urn:logto:resource:organization resource are included in the Logto config. Since we've already declared these earlier, we won't repeat it.
In our organization page, we use the organization token to fetch documents within the organization.
There are two important points to note in this implementation:
If the organizationId passed to getOrganizationToken is not an organization id that belongs to the current user, this method won't be able to get a token, thus ensuring users can only access their own organizations.
When requesting organization resources, we use the organization token instead of the access token because for resources belonging to an organization, we want to use organization permission control rather than user permission control (you'll better understand this when we implement the GET /documents API later).
Next, we create a GET /documents API in our backend service. Similar to how we use API resource to protect the POST /organizations API, we use organization-specific resource indicators to protect the GET /documents API.
First, let's create a requireOrganizationAccess middleware to protect Organization resources.
Then we use the requireOrganizationAccess middleware to protect the GET /documents API.
This way, we've implemented using organization tokens to access organization resources. In the backend service, you can retrieve corresponding resources from the database based on the organization id.
Implement organization-level role-based access control design#
We've implemented using organization tokens to access organization resources. Next, we'll implement user permission control within organizations using RBAC.
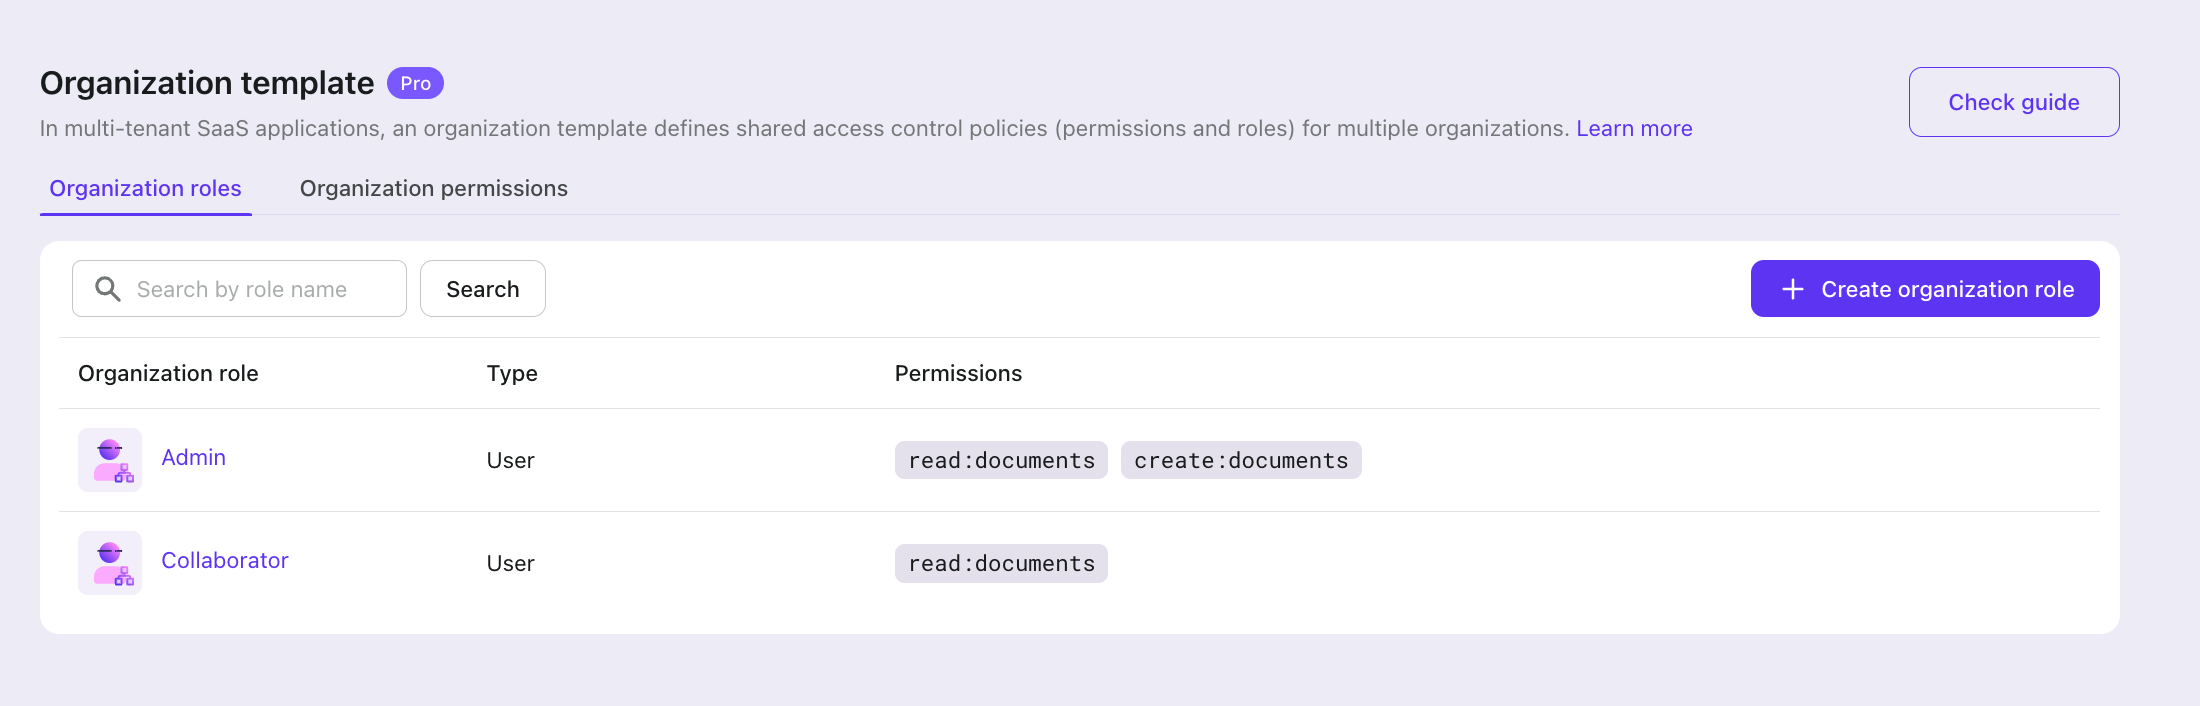
Let's assume DocuMind has two roles: Admin and Collaborator.
Admins can create and access documents, while Collaborators can only access documents.
Therefore, our Organization needs to have these two roles: Admin and Collaborator.
Admin has both read:documents and create:documents permissions, while Collaborator has only the read:documents permission.
Admin
read:documents
create:documents
Collaborator
read:documents
This is where Logto's organization template feature comes in.
An organization template is a blueprint of the access control model for every organization: it defines the roles and permissions that apply to all organizations.
Why organization template?
Because scalability is one of the most important requirements for SaaS products. In other words, what works for one client should work for all clients.
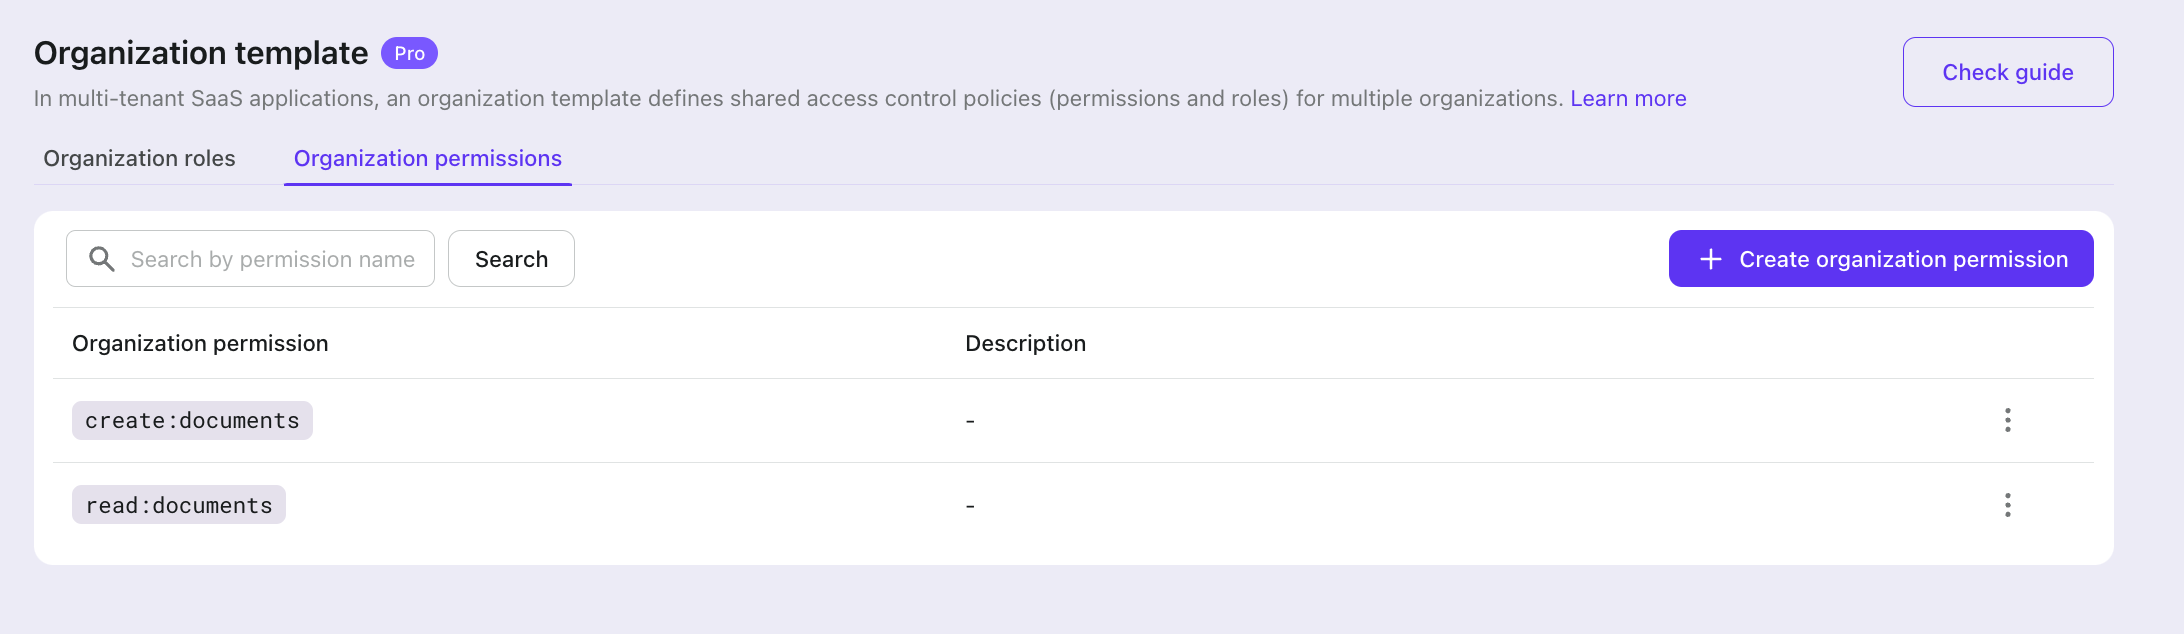
Let's go to Logto Console > Organization Templates > Organization permissions and create two permissions: read:documents and create:documents.
Then go to the organization roles tab to create two user roles: Admin and Collaborator, and assign corresponding permissions to these roles.
This way, we've created an RBAC permission model for each organization.
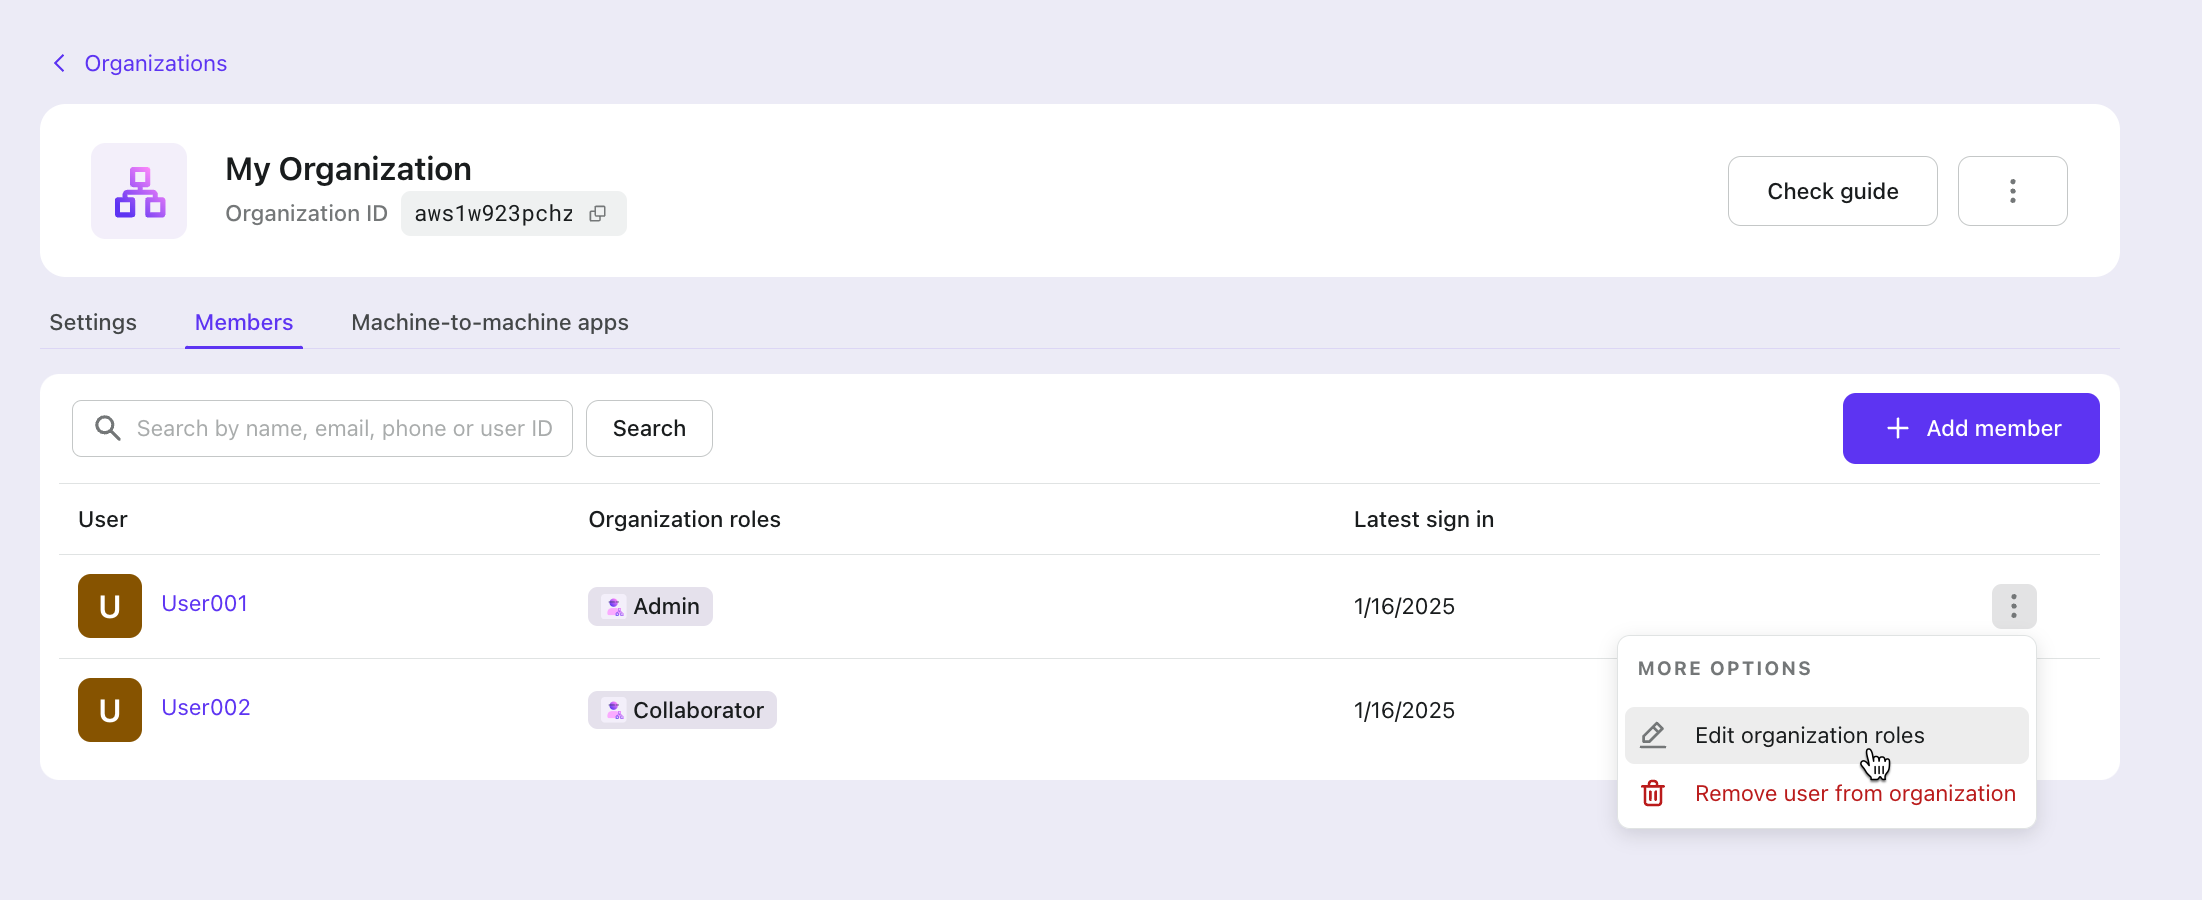
Next, we go to our Organization details page to assign appropriate roles to our members.
Now our organization users have roles!
You can achieve these steps via Logto Management API:
Now we can implement user permission control by checking their permissions.
In our code, we need to make the user's organization token carry permission information, and then verify these permissions in the backend.
In the frontend code's Logto config, we need to declare the permissions users need to request within the organization. Let's add read:documents and create:documents permissions to the scopes.
As usual, log in again with your user to make these configurations take effect.
Then in the backend's requireOrganizationAccess middleware, we add verification for user permissions.
Then create a POST /documents API, and use the requireOrganizationAccess middleware with requiredScopes configuration to protect this API and the previous GET /documents API.
This way, we've implemented user permission control by checking user permissions.
In the frontend, you can get user permission information by decoding the organization token or calling Logto's getOrganizationTokenClaims method.
Control page elements based on user permissions by checking the scopes in the claims.
So far, we've implemented the basic user and organization features in a multi-tenant SaaS system! However, there are still some features we haven't covered, such as customizing login page branding for each Organization, automatically adding users with specific domain emails to certain organizations, and integrating enterprise-level SSO functionality.
These are all out-of-the-box features, and you can find more information about these features in the Logto documentation.
Remember how overwhelming it felt at the beginning? Users, organizations, permissions, enterprise features... it seemed like an endless mountain to climb.
But look at what we've accomplished:
A complete authentication system with multiple sign-in options and MFA support
A flexible organization system that supports multiple memberships
Role-based access control within organizations
And the best part? We didn't have to reinvent the wheel. By leveraging modern tools like Logto, we transformed what could have been months of development into a matter of hours.
This is the power of modern development in 2025 - we can focus on building unique product features instead of wrestling with infrastructure. Now it's your turn to build something amazing!
Explore all of Logto’s features, from Logto Cloud to Logto OSS, on the Logto website or sign up Logto cloud today.


%3bfill:%23ECECFF%3b%7d%23mermaid-0 text.actor%26gt%3btspan%7bfill:black%3bstroke:none%3b%7d%23mermaid-0 .actor-line%7bstroke:hsl(259.6261682243%2c 59.7765363128%25%2c 87.9019607843%25)%3b%7d%23mermaid-0 .messageLine0%7bstroke-width:1.5%3bstroke-dasharray:none%3bstroke:%23333%3b%7d%23mermaid-0 .messageLine1%7bstroke-width:1.5%3bstroke-dasharray:2%2c2%3bstroke:%23333%3b%7d%23mermaid-0 %23arrowhead path%7bfill:%23333%3bstroke:%23333%3b%7d%23mermaid-0 .sequenceNumber%7bfill:white%3b%7d%23mermaid-0 %23sequencenumber%7bfill:%23333%3b%7d%23mermaid-0 %23crosshead path%7bfill:%23333%3bstroke:%23333%3b%7d%23mermaid-0 .messageText%7bfill:%23333%3bstroke:none%3b%7d%23mermaid-0 .labelBox%7bstroke:hsl(259.6261682243%2c 59.7765363128%25%2c 87.9019607843%25)%3bfill:%23ECECFF%3b%7d%23mermaid-0 .labelText%2c%23mermaid-0 .labelText%26gt%3btspan%7bfill:black%3bstroke:none%3b%7d%23mermaid-0 .loopText%2c%23mermaid-0 .loopText%26gt%3btspan%7bfill:black%3bstroke:none%3b%7d%23mermaid-0 .loopLine%7bstroke-width:2px%3bstroke-dasharray:2%2c2%3bstroke:hsl(259.6261682243%2c 59.7765363128%25%2c 87.9019607843%25)%3bfill:hsl(259.6261682243%2c 59.7765363128%25%2c 87.9019607843%25)%3b%7d%23mermaid-0 .note%7bstroke:%23aaaa33%3bfill:%23fff5ad%3b%7d%23mermaid-0 .noteText%2c%23mermaid-0 .noteText%26gt%3btspan%7bfill:black%3bstroke:none%3b%7d%23mermaid-0 .activation0%7bfill:%23f4f4f4%3bstroke:%23666%3b%7d%23mermaid-0 .activation1%7bfill:%23f4f4f4%3bstroke:%23666%3b%7d%23mermaid-0 .activation2%7bfill:%23f4f4f4%3bstroke:%23666%3b%7d%23mermaid-0 .actorPopupMenu%7bposition:absolute%3b%7d%23mermaid-0 .actorPopupMenuPanel%7bposition:absolute%3bfill:%23ECECFF%3bbox-shadow:0px 8px 16px 0px rgba(0%2c0%2c0%2c0.2)%3bfilter:drop-shadow(3px 5px 2px rgb(0 0 0 / 0.4))%3b%7d%23mermaid-0 .actor-man line%7bstroke:hsl(259.6261682243%2c 59.7765363128%25%2c 87.9019607843%25)%3bfill:%23ECECFF%3b%7d%23mermaid-0 .actor-man circle%2c%23mermaid-0 line%7bstroke:hsl(259.6261682243%2c 59.7765363128%25%2c 87.9019607843%25)%3bfill:%23ECECFF%3bstroke-width:2px%3b%7d%23mermaid-0 :root%7b--mermaid-font-family:arial%2csans-serif%3b%7d%3c/style%3e%3cg/%3e%3cdefs%3e%3csymbol height='24' width='24' id='computer'%3e%3cpath d='M2 2v13h20v-13h-20zm18 11h-16v-9h16v9zm-10.228 6l.466-1h3.524l.467 1h-4.457zm14.228 3h-24l2-6h2.104l-1.33 4h18.45l-1.297-4h2.073l2 6zm-5-10h-14v-7h14v7z' transform='scale(.5)'/%3e%3c/symbol%3e%3c/defs%3e%3cdefs%3e%3csymbol clip-rule='evenodd' fill-rule='evenodd' id='database'%3e%3cpath d='M12.258.001l.256.004.255.005.253.008.251.01.249.012.247.015.246.016.242.019.241.02.239.023.236.024.233.027.231.028.229.031.225.032.223.034.22.036.217.038.214.04.211.041.208.043.205.045.201.046.198.048.194.05.191.051.187.053.183.054.18.056.175.057.172.059.168.06.163.061.16.063.155.064.15.066.074.033.073.033.071.034.07.034.069.035.068.035.067.035.066.035.064.036.064.036.062.036.06.036.06.037.058.037.058.037.055.038.055.038.053.038.052.038.051.039.05.039.048.039.047.039.045.04.044.04.043.04.041.04.04.041.039.041.037.041.036.041.034.041.033.042.032.042.03.042.029.042.027.042.026.043.024.043.023.043.021.043.02.043.018.044.017.043.015.044.013.044.012.044.011.045.009.044.007.045.006.045.004.045.002.045.001.045v17l-.001.045-.002.045-.004.045-.006.045-.007.045-.009.044-.011.045-.012.044-.013.044-.015.044-.017.043-.018.044-.02.043-.021.043-.023.043-.024.043-.026.043-.027.042-.029.042-.03.042-.032.042-.033.042-.034.041-.036.041-.037.041-.039.041-.04.041-.041.04-.043.04-.044.04-.045.04-.047.039-.048.039-.05.039-.051.039-.052.038-.053.038-.055.038-.055.038-.058.037-.058.037-.06.037-.06.036-.062.036-.064.036-.064.036-.066.035-.067.035-.068.035-.069.035-.07.034-.071.034-.073.033-.074.033-.15.066-.155.064-.16.063-.163.061-.168.06-.172.059-.175.057-.18.056-.183.054-.187.053-.191.051-.194.05-.198.048-.201.046-.205.045-.208.043-.211.041-.214.04-.217.038-.22.036-.223.034-.225.032-.229.031-.231.028-.233.027-.236.024-.239.023-.241.02-.242.019-.246.016-.247.015-.249.012-.251.01-.253.008-.255.005-.256.004-.258.001-.258-.001-.256-.004-.255-.005-.253-.008-.251-.01-.249-.012-.247-.015-.245-.016-.243-.019-.241-.02-.238-.023-.236-.024-.234-.027-.231-.028-.228-.031-.226-.032-.223-.034-.22-.036-.217-.038-.214-.04-.211-.041-.208-.043-.204-.045-.201-.046-.198-.048-.195-.05-.19-.051-.187-.053-.184-.054-.179-.056-.176-.057-.172-.059-.167-.06-.164-.061-.159-.063-.155-.064-.151-.066-.074-.033-.072-.033-.072-.034-.07-.034-.069-.035-.068-.035-.067-.035-.066-.035-.064-.036-.063-.036-.062-.036-.061-.036-.06-.037-.058-.037-.057-.037-.056-.038-.055-.038-.053-.038-.052-.038-.051-.039-.049-.039-.049-.039-.046-.039-.046-.04-.044-.04-.043-.04-.041-.04-.04-.041-.039-.041-.037-.041-.036-.041-.034-.041-.033-.042-.032-.042-.03-.042-.029-.042-.027-.042-.026-.043-.024-.043-.023-.043-.021-.043-.02-.043-.018-.044-.017-.043-.015-.044-.013-.044-.012-.044-.011-.045-.009-.044-.007-.045-.006-.045-.004-.045-.002-.045-.001-.045v-17l.001-.045.002-.045.004-.045.006-.045.007-.045.009-.044.011-.045.012-.044.013-.044.015-.044.017-.043.018-.044.02-.043.021-.043.023-.043.024-.043.026-.043.027-.042.029-.042.03-.042.032-.042.033-.042.034-.041.036-.041.037-.041.039-.041.04-.041.041-.04.043-.04.044-.04.046-.04.046-.039.049-.039.049-.039.051-.039.052-.038.053-.038.055-.038.056-.038.057-.037.058-.037.06-.037.061-.036.062-.036.063-.036.064-.036.066-.035.067-.035.068-.035.069-.035.07-.034.072-.034.072-.033.074-.033.151-.066.155-.064.159-.063.164-.061.167-.06.172-.059.176-.057.179-.056.184-.054.187-.053.19-.051.195-.05.198-.048.201-.046.204-.045.208-.043.211-.041.214-.04.217-.038.22-.036.223-.034.226-.032.228-.031.231-.028.234-.027.236-.024.238-.023.241-.02.243-.019.245-.016.247-.015.249-.012.251-.01.253-.008.255-.005.256-.004.258-.001.258.001zm-9.258 20.499v.01l.001.021.003.021.004.022.005.021.006.022.007.022.009.023.01.022.011.023.012.023.013.023.015.023.016.024.017.023.018.024.019.024.021.024.022.025.023.024.024.025.052.049.056.05.061.051.066.051.07.051.075.051.079.052.084.052.088.052.092.052.097.052.102.051.105.052.11.052.114.051.119.051.123.051.127.05.131.05.135.05.139.048.144.049.147.047.152.047.155.047.16.045.163.045.167.043.171.043.176.041.178.041.183.039.187.039.19.037.194.035.197.035.202.033.204.031.209.03.212.029.216.027.219.025.222.024.226.021.23.02.233.018.236.016.24.015.243.012.246.01.249.008.253.005.256.004.259.001.26-.001.257-.004.254-.005.25-.008.247-.011.244-.012.241-.014.237-.016.233-.018.231-.021.226-.021.224-.024.22-.026.216-.027.212-.028.21-.031.205-.031.202-.034.198-.034.194-.036.191-.037.187-.039.183-.04.179-.04.175-.042.172-.043.168-.044.163-.045.16-.046.155-.046.152-.047.148-.048.143-.049.139-.049.136-.05.131-.05.126-.05.123-.051.118-.052.114-.051.11-.052.106-.052.101-.052.096-.052.092-.052.088-.053.083-.051.079-.052.074-.052.07-.051.065-.051.06-.051.056-.05.051-.05.023-.024.023-.025.021-.024.02-.024.019-.024.018-.024.017-.024.015-.023.014-.024.013-.023.012-.023.01-.023.01-.022.008-.022.006-.022.006-.022.004-.022.004-.021.001-.021.001-.021v-4.127l-.077.055-.08.053-.083.054-.085.053-.087.052-.09.052-.093.051-.095.05-.097.05-.1.049-.102.049-.105.048-.106.047-.109.047-.111.046-.114.045-.115.045-.118.044-.12.043-.122.042-.124.042-.126.041-.128.04-.13.04-.132.038-.134.038-.135.037-.138.037-.139.035-.142.035-.143.034-.144.033-.147.032-.148.031-.15.03-.151.03-.153.029-.154.027-.156.027-.158.026-.159.025-.161.024-.162.023-.163.022-.165.021-.166.02-.167.019-.169.018-.169.017-.171.016-.173.015-.173.014-.175.013-.175.012-.177.011-.178.01-.179.008-.179.008-.181.006-.182.005-.182.004-.184.003-.184.002h-.37l-.184-.002-.184-.003-.182-.004-.182-.005-.181-.006-.179-.008-.179-.008-.178-.01-.176-.011-.176-.012-.175-.013-.173-.014-.172-.015-.171-.016-.17-.017-.169-.018-.167-.019-.166-.02-.165-.021-.163-.022-.162-.023-.161-.024-.159-.025-.157-.026-.156-.027-.155-.027-.153-.029-.151-.03-.15-.03-.148-.031-.146-.032-.145-.033-.143-.034-.141-.035-.14-.035-.137-.037-.136-.037-.134-.038-.132-.038-.13-.04-.128-.04-.126-.041-.124-.042-.122-.042-.12-.044-.117-.043-.116-.045-.113-.045-.112-.046-.109-.047-.106-.047-.105-.048-.102-.049-.1-.049-.097-.05-.095-.05-.093-.052-.09-.051-.087-.052-.085-.053-.083-.054-.08-.054-.077-.054v4.127zm0-5.654v.011l.001.021.003.021.004.021.005.022.006.022.007.022.009.022.01.022.011.023.012.023.013.023.015.024.016.023.017.024.018.024.019.024.021.024.022.024.023.025.024.024.052.05.056.05.061.05.066.051.07.051.075.052.079.051.084.052.088.052.092.052.097.052.102.052.105.052.11.051.114.051.119.052.123.05.127.051.131.05.135.049.139.049.144.048.147.048.152.047.155.046.16.045.163.045.167.044.171.042.176.042.178.04.183.04.187.038.19.037.194.036.197.034.202.033.204.032.209.03.212.028.216.027.219.025.222.024.226.022.23.02.233.018.236.016.24.014.243.012.246.01.249.008.253.006.256.003.259.001.26-.001.257-.003.254-.006.25-.008.247-.01.244-.012.241-.015.237-.016.233-.018.231-.02.226-.022.224-.024.22-.025.216-.027.212-.029.21-.03.205-.032.202-.033.198-.035.194-.036.191-.037.187-.039.183-.039.179-.041.175-.042.172-.043.168-.044.163-.045.16-.045.155-.047.152-.047.148-.048.143-.048.139-.05.136-.049.131-.05.126-.051.123-.051.118-.051.114-.052.11-.052.106-.052.101-.052.096-.052.092-.052.088-.052.083-.052.079-.052.074-.051.07-.052.065-.051.06-.05.056-.051.051-.049.023-.025.023-.024.021-.025.02-.024.019-.024.018-.024.017-.024.015-.023.014-.023.013-.024.012-.022.01-.023.01-.023.008-.022.006-.022.006-.022.004-.021.004-.022.001-.021.001-.021v-4.139l-.077.054-.08.054-.083.054-.085.052-.087.053-.09.051-.093.051-.095.051-.097.05-.1.049-.102.049-.105.048-.106.047-.109.047-.111.046-.114.045-.115.044-.118.044-.12.044-.122.042-.124.042-.126.041-.128.04-.13.039-.132.039-.134.038-.135.037-.138.036-.139.036-.142.035-.143.033-.144.033-.147.033-.148.031-.15.03-.151.03-.153.028-.154.028-.156.027-.158.026-.159.025-.161.024-.162.023-.163.022-.165.021-.166.02-.167.019-.169.018-.169.017-.171.016-.173.015-.173.014-.175.013-.175.012-.177.011-.178.009-.179.009-.179.007-.181.007-.182.005-.182.004-.184.003-.184.002h-.37l-.184-.002-.184-.003-.182-.004-.182-.005-.181-.007-.179-.007-.179-.009-.178-.009-.176-.011-.176-.012-.175-.013-.173-.014-.172-.015-.171-.016-.17-.017-.169-.018-.167-.019-.166-.02-.165-.021-.163-.022-.162-.023-.161-.024-.159-.025-.157-.026-.156-.027-.155-.028-.153-.028-.151-.03-.15-.03-.148-.031-.146-.033-.145-.033-.143-.033-.141-.035-.14-.036-.137-.036-.136-.037-.134-.038-.132-.039-.13-.039-.128-.04-.126-.041-.124-.042-.122-.043-.12-.043-.117-.044-.116-.044-.113-.046-.112-.046-.109-.046-.106-.047-.105-.048-.102-.049-.1-.049-.097-.05-.095-.051-.093-.051-.09-.051-.087-.053-.085-.052-.083-.054-.08-.054-.077-.054v4.139zm0-5.666v.011l.001.02.003.022.004.021.005.022.006.021.007.022.009.023.01.022.011.023.012.023.013.023.015.023.016.024.017.024.018.023.019.024.021.025.022.024.023.024.024.025.052.05.056.05.061.05.066.051.07.051.075.052.079.051.084.052.088.052.092.052.097.052.102.052.105.051.11.052.114.051.119.051.123.051.127.05.131.05.135.05.139.049.144.048.147.048.152.047.155.046.16.045.163.045.167.043.171.043.176.042.178.04.183.04.187.038.19.037.194.036.197.034.202.033.204.032.209.03.212.028.216.027.219.025.222.024.226.021.23.02.233.018.236.017.24.014.243.012.246.01.249.008.253.006.256.003.259.001.26-.001.257-.003.254-.006.25-.008.247-.01.244-.013.241-.014.237-.016.233-.018.231-.02.226-.022.224-.024.22-.025.216-.027.212-.029.21-.03.205-.032.202-.033.198-.035.194-.036.191-.037.187-.039.183-.039.179-.041.175-.042.172-.043.168-.044.163-.045.16-.045.155-.047.152-.047.148-.048.143-.049.139-.049.136-.049.131-.051.126-.05.123-.051.118-.052.114-.051.11-.052.106-.052.101-.052.096-.052.092-.052.088-.052.083-.052.079-.052.074-.052.07-.051.065-.051.06-.051.056-.05.051-.049.023-.025.023-.025.021-.024.02-.024.019-.024.018-.024.017-.024.015-.023.014-.024.013-.023.012-.023.01-.022.01-.023.008-.022.006-.022.006-.022.004-.022.004-.021.001-.021.001-.021v-4.153l-.077.054-.08.054-.083.053-.085.053-.087.053-.09.051-.093.051-.095.051-.097.05-.1.049-.102.048-.105.048-.106.048-.109.046-.111.046-.114.046-.115.044-.118.044-.12.043-.122.043-.124.042-.126.041-.128.04-.13.039-.132.039-.134.038-.135.037-.138.036-.139.036-.142.034-.143.034-.144.033-.147.032-.148.032-.15.03-.151.03-.153.028-.154.028-.156.027-.158.026-.159.024-.161.024-.162.023-.163.023-.165.021-.166.02-.167.019-.169.018-.169.017-.171.016-.173.015-.173.014-.175.013-.175.012-.177.01-.178.01-.179.009-.179.007-.181.006-.182.006-.182.004-.184.003-.184.001-.185.001-.185-.001-.184-.001-.184-.003-.182-.004-.182-.006-.181-.006-.179-.007-.179-.009-.178-.01-.176-.01-.176-.012-.175-.013-.173-.014-.172-.015-.171-.016-.17-.017-.169-.018-.167-.019-.166-.02-.165-.021-.163-.023-.162-.023-.161-.024-.159-.024-.157-.026-.156-.027-.155-.028-.153-.028-.151-.03-.15-.03-.148-.032-.146-.032-.145-.033-.143-.034-.141-.034-.14-.036-.137-.036-.136-.037-.134-.038-.132-.039-.13-.039-.128-.041-.126-.041-.124-.041-.122-.043-.12-.043-.117-.044-.116-.044-.113-.046-.112-.046-.109-.046-.106-.048-.105-.048-.102-.048-.1-.05-.097-.049-.095-.051-.093-.051-.09-.052-.087-.052-.085-.053-.083-.053-.08-.054-.077-.054v4.153zm8.74-8.179l-.257.004-.254.005-.25.008-.247.011-.244.012-.241.014-.237.016-.233.018-.231.021-.226.022-.224.023-.22.026-.216.027-.212.028-.21.031-.205.032-.202.033-.198.034-.194.036-.191.038-.187.038-.183.04-.179.041-.175.042-.172.043-.168.043-.163.045-.16.046-.155.046-.152.048-.148.048-.143.048-.139.049-.136.05-.131.05-.126.051-.123.051-.118.051-.114.052-.11.052-.106.052-.101.052-.096.052-.092.052-.088.052-.083.052-.079.052-.074.051-.07.052-.065.051-.06.05-.056.05-.051.05-.023.025-.023.024-.021.024-.02.025-.019.024-.018.024-.017.023-.015.024-.014.023-.013.023-.012.023-.01.023-.01.022-.008.022-.006.023-.006.021-.004.022-.004.021-.001.021-.001.021.001.021.001.021.004.021.004.022.006.021.006.023.008.022.01.022.01.023.012.023.013.023.014.023.015.024.017.023.018.024.019.024.02.025.021.024.023.024.023.025.051.05.056.05.06.05.065.051.07.052.074.051.079.052.083.052.088.052.092.052.096.052.101.052.106.052.11.052.114.052.118.051.123.051.126.051.131.05.136.05.139.049.143.048.148.048.152.048.155.046.16.046.163.045.168.043.172.043.175.042.179.041.183.04.187.038.191.038.194.036.198.034.202.033.205.032.21.031.212.028.216.027.22.026.224.023.226.022.231.021.233.018.237.016.241.014.244.012.247.011.25.008.254.005.257.004.26.001.26-.001.257-.004.254-.005.25-.008.247-.011.244-.012.241-.014.237-.016.233-.018.231-.021.226-.022.224-.023.22-.026.216-.027.212-.028.21-.031.205-.032.202-.033.198-.034.194-.036.191-.038.187-.038.183-.04.179-.041.175-.042.172-.043.168-.043.163-.045.16-.046.155-.046.152-.048.148-.048.143-.048.139-.049.136-.05.131-.05.126-.051.123-.051.118-.051.114-.052.11-.052.106-.052.101-.052.096-.052.092-.052.088-.052.083-.052.079-.052.074-.051.07-.052.065-.051.06-.05.056-.05.051-.05.023-.025.023-.024.021-.024.02-.025.019-.024.018-.024.017-.023.015-.024.014-.023.013-.023.012-.023.01-.023.01-.022.008-.022.006-.023.006-.021.004-.022.004-.021.001-.021.001-.021-.001-.021-.001-.021-.004-.021-.004-.022-.006-.021-.006-.023-.008-.022-.01-.022-.01-.023-.012-.023-.013-.023-.014-.023-.015-.024-.017-.023-.018-.024-.019-.024-.02-.025-.021-.024-.023-.024-.023-.025-.051-.05-.056-.05-.06-.05-.065-.051-.07-.052-.074-.051-.079-.052-.083-.052-.088-.052-.092-.052-.096-.052-.101-.052-.106-.052-.11-.052-.114-.052-.118-.051-.123-.051-.126-.051-.131-.05-.136-.05-.139-.049-.143-.048-.148-.048-.152-.048-.155-.046-.16-.046-.163-.045-.168-.043-.172-.043-.175-.042-.179-.041-.183-.04-.187-.038-.191-.038-.194-.036-.198-.034-.202-.033-.205-.032-.21-.031-.212-.028-.216-.027-.22-.026-.224-.023-.226-.022-.231-.021-.233-.018-.237-.016-.241-.014-.244-.012-.247-.011-.25-.008-.254-.005-.257-.004-.26-.001-.26.001z' transform='scale(.5)'/%3e%3c/symbol%3e%3c/defs%3e%3cdefs%3e%3csymbol height='24' width='24' id='clock'%3e%3cpath d='M12 2c5.514 0 10 4.486 10 10s-4.486 10-10 10-10-4.486-10-10 4.486-10 10-10zm0-2c-6.627 0-12 5.373-12 12s5.373 12 12 12 12-5.373 12-12-5.373-12-12-12zm5.848 12.459c.202.038.202.333.001.372-1.907.361-6.045 1.111-6.547 1.111-.719 0-1.301-.582-1.301-1.301 0-.512.77-5.447 1.125-7.445.034-.192.312-.181.343.014l.985 6.238 5.394 1.011z' transform='scale(.5)'/%3e%3c/symbol%3e%3c/defs%3e%3cdefs%3e%3cmarker orient='auto-start-reverse' markerHeight='12' markerWidth='12' markerUnits='userSpaceOnUse' refY='5' refX='7.9' id='arrowhead'%3e%3cpath d='M -1 0 L 10 5 L 0 10 z'/%3e%3c/marker%3e%3c/defs%3e%3cdefs%3e%3cmarker refY='4.5' refX='4' orient='auto' markerHeight='8' markerWidth='15' id='crosshead'%3e%3cpath style='stroke-dasharray: 0%2c 0%3b' d='M 1%2c2 L 6%2c7 M 6%2c2 L 1%2c7' stroke-width='1pt' stroke='black' fill='none'/%3e%3c/marker%3e%3c/defs%3e%3cdefs%3e%3cmarker orient='auto' markerHeight='28' markerWidth='20' refY='7' refX='15.5' id='filled-head'%3e%3cpath d='M 18%2c7 L9%2c13 L14%2c7 L9%2c1 Z'/%3e%3c/marker%3e%3c/defs%3e%3cdefs%3e%3cmarker orient='auto' markerHeight='40' markerWidth='60' refY='15' refX='15' id='sequencenumber'%3e%3ccircle r='6' cy='15' cx='15'/%3e%3c/marker%3e%3c/defs%3e%3cg name='u' class='actor-man actor-top'%3e%3cline y2='45' x2='75' y1='25' x1='75' id='actor-man-torso0'/%3e%3cline y2='33' x2='93' y1='33' x1='57' id='actor-man-arms0'/%3e%3cline y2='45' x2='75' y1='60' x1='57'/%3e%3cline y2='60' x2='91' y1='45' x1='75'/%3e%3ccircle height='65' width='150' r='15' cy='10' cx='75'/%3e%3ctext style='text-anchor: middle%3b font-size: 16px%3b font-weight: 400%3b font-family: arial%2c sans-serif%3b' class='actor actor-man' alignment-baseline='central' dominant-baseline='central' y='67.5' x='75'%3e%3ctspan dy='0' x='75'%3eUser%3c/tspan%3e%3c/text%3e%3c/g%3e%3ctext style='font-family: arial%2c sans-serif%3b font-size: 16px%3b font-weight: 400%3b' dy='1em' class='messageText' alignment-baseline='middle' dominant-baseline='middle' text-anchor='middle' y='80' x='174'%3eClick 'Sign In'%3c/text%3e%3cline style='fill: none%3b' marker-end='url(%23arrowhead)' stroke='none' stroke-width='2' class='messageLine0' y2='109' x2='271' y1='109' x1='76'/%3e%3ctext style='font-family: arial%2c sans-serif%3b font-size: 16px%3b font-weight: 400%3b' dy='1em' class='messageText' alignment-baseline='middle' dominant-baseline='middle' text-anchor='middle' y='124' x='385'%3eRedirect to auth page%3c/text%3e%3cline style='fill: none%3b' marker-end='url(%23arrowhead)' stroke='none' stroke-width='2' class='messageLine0' y2='153' x2='494' y1='153' x1='276'/%3e%3ctext style='font-family: arial%2c sans-serif%3b font-size: 16px%3b font-weight: 400%3b' dy='1em' class='messageText' alignment-baseline='middle' dominant-baseline='middle' text-anchor='middle' y='168' x='288'%3eShow sign-in page%3c/text%3e%3cline style='fill: none%3b' marker-end='url(%23arrowhead)' stroke='none' stroke-width='2' class='messageLine0' y2='197' x2='79' y1='197' x1='497'/%3e%3ctext style='font-family: arial%2c sans-serif%3b font-size: 16px%3b font-weight: 400%3b' dy='1em' class='messageText' alignment-baseline='middle' dominant-baseline='middle' text-anchor='middle' y='212' x='285'%3eEnter credentials%3c/text%3e%3cline style='fill: none%3b' marker-end='url(%23arrowhead)' stroke='none' stroke-width='2' class='messageLine0' y2='241' x2='494' y1='241' x1='76'/%3e%3ctext style='font-family: arial%2c sans-serif%3b font-size: 16px%3b font-weight: 400%3b' dy='1em' class='messageText' alignment-baseline='middle' dominant-baseline='middle' text-anchor='middle' y='256' x='388'%3eRedirect with token%3c/text%3e%3cline style='fill: none%3b' marker-end='url(%23arrowhead)' stroke='none' stroke-width='2' class='messageLine0' y2='285' x2='279' y1='285' x1='497'/%3e%3ctext style='font-family: arial%2c sans-serif%3b font-size: 16px%3b font-weight: 400%3b' dy='1em' class='messageText' alignment-baseline='middle' dominant-baseline='middle' text-anchor='middle' y='300' x='177'%3eSign in success%3c/text%3e%3cline style='fill: none%3b' marker-end='url(%23arrowhead)' stroke='none' stroke-width='2' class='messageLine0' y2='329' x2='79' y1='329' x1='274'/%3e%3cg name='u' class='actor-man actor-bottom'%3e%3cline y2='394' x2='75' y1='374' x1='75' id='actor-man-torso2'/%3e%3cline y2='382' x2='93' y1='382' x1='57' id='actor-man-arms2'/%3e%3cline y2='394' x2='75' y1='409' x1='57'/%3e%3cline y2='409' x2='91' y1='394' x1='75'/%3e%3ccircle height='65' width='150' r='15' cy='359' cx='75'/%3e%3ctext style='text-anchor: middle%3b font-size: 16px%3b font-weight: 400%3b font-family: arial%2c sans-serif%3b' class='actor actor-man' alignment-baseline='central' dominant-baseline='central' y='416.5' x='75'%3e%3ctspan dy='0' x='75'%3eUser%3c/tspan%3e%3c/text%3e%3c/g%3e%3c/svg%3e)
%3bopacity:0.7%3bbackground-color:hsl(80%2c 100%25%2c 96.2745098039%25)%3b%7d%23mermaid-1 .relationshipLabelBox rect%7bopacity:0.5%3b%7d%23mermaid-1 .relationshipLine%7bstroke:%23333333%3b%7d%23mermaid-1 .entityTitleText%7btext-anchor:middle%3bfont-size:18px%3bfill:%23333%3b%7d%23mermaid-1 %23MD_PARENT_START%7bfill:%23f5f5f5!important%3bstroke:%23333333!important%3bstroke-width:1%3b%7d%23mermaid-1 %23MD_PARENT_END%7bfill:%23f5f5f5!important%3bstroke:%23333333!important%3bstroke-width:1%3b%7d%23mermaid-1 :root%7b--mermaid-font-family:arial%2csans-serif%3b%7d%3c/style%3e%3cg/%3e%3cdefs%3e%3cmarker orient='auto' markerHeight='240' markerWidth='190' refY='7' refX='0' id='MD_PARENT_START'%3e%3cpath d='M 18%2c7 L9%2c13 L1%2c7 L9%2c1 Z'/%3e%3c/marker%3e%3c/defs%3e%3cdefs%3e%3cmarker orient='auto' markerHeight='28' markerWidth='20' refY='7' refX='19' id='MD_PARENT_END'%3e%3cpath d='M 18%2c7 L9%2c13 L1%2c7 L9%2c1 Z'/%3e%3c/marker%3e%3c/defs%3e%3cdefs%3e%3cmarker orient='auto' markerHeight='18' markerWidth='18' refY='9' refX='0' id='ONLY_ONE_START'%3e%3cpath d='M9%2c0 L9%2c18 M15%2c0 L15%2c18' fill='none' stroke='gray'/%3e%3c/marker%3e%3c/defs%3e%3cdefs%3e%3cmarker orient='auto' markerHeight='18' markerWidth='18' refY='9' refX='18' id='ONLY_ONE_END'%3e%3cpath d='M3%2c0 L3%2c18 M9%2c0 L9%2c18' fill='none' stroke='gray'/%3e%3c/marker%3e%3c/defs%3e%3cdefs%3e%3cmarker orient='auto' markerHeight='18' markerWidth='30' refY='9' refX='0' id='ZERO_OR_ONE_START'%3e%3ccircle r='6' cy='9' cx='21' fill='white' stroke='gray'/%3e%3cpath d='M9%2c0 L9%2c18' fill='none' stroke='gray'/%3e%3c/marker%3e%3c/defs%3e%3cdefs%3e%3cmarker orient='auto' markerHeight='18' markerWidth='30' refY='9' refX='30' id='ZERO_OR_ONE_END'%3e%3ccircle r='6' cy='9' cx='9' fill='white' stroke='gray'/%3e%3cpath d='M21%2c0 L21%2c18' fill='none' stroke='gray'/%3e%3c/marker%3e%3c/defs%3e%3cdefs%3e%3cmarker orient='auto' markerHeight='36' markerWidth='45' refY='18' refX='18' id='ONE_OR_MORE_START'%3e%3cpath d='M0%2c18 Q 18%2c0 36%2c18 Q 18%2c36 0%2c18 M42%2c9 L42%2c27' fill='none' stroke='gray'/%3e%3c/marker%3e%3c/defs%3e%3cdefs%3e%3cmarker orient='auto' markerHeight='36' markerWidth='45' refY='18' refX='27' id='ONE_OR_MORE_END'%3e%3cpath d='M3%2c9 L3%2c27 M9%2c18 Q27%2c0 45%2c18 Q27%2c36 9%2c18' fill='none' stroke='gray'/%3e%3c/marker%3e%3c/defs%3e%3cdefs%3e%3cmarker orient='auto' markerHeight='36' markerWidth='57' refY='18' refX='18' id='ZERO_OR_MORE_START'%3e%3ccircle r='6' cy='18' cx='48' fill='white' stroke='gray'/%3e%3cpath d='M0%2c18 Q18%2c0 36%2c18 Q18%2c36 0%2c18' fill='none' stroke='gray'/%3e%3c/marker%3e%3c/defs%3e%3cdefs%3e%3cmarker orient='auto' markerHeight='36' markerWidth='57' refY='18' refX='39' id='ZERO_OR_MORE_END'%3e%3ccircle r='6' cy='18' cx='9' fill='white' stroke='gray'/%3e%3cpath d='M21%2c18 Q39%2c0 57%2c18 Q39%2c36 21%2c18' fill='none' stroke='gray'/%3e%3c/marker%3e%3c/defs%3e%3cpath style='stroke: gray%3b fill: none%3b' marker-start='url(%23ONLY_ONE_START)' marker-end='url(%23ZERO_OR_MORE_END)' d='M70%2c107L70%2c115.333C70%2c123.667%2c70%2c140.333%2c80.04%2c157C90.08%2c173.667%2c110.161%2c190.333%2c120.201%2c198.667L130.241%2c207' class='er relationshipLine'/%3e%3cpath style='stroke: gray%3b fill: none%3b' marker-start='url(%23ONLY_ONE_START)' marker-end='url(%23ZERO_OR_MORE_END)' d='M270%2c107L270%2c115.333C270%2c123.667%2c270%2c140.333%2c259.96%2c157C249.92%2c173.667%2c229.839%2c190.333%2c219.799%2c198.667L209.759%2c207' class='er relationshipLine'/%3e%3cg transform='translate(20%2c20 )' id='entity-User-818c511a-4a32-5484-ba70-875d765a9175'%3e%3crect height='87' width='100' y='0' x='0' class='er entityBox'/%3e%3ctext style='dominant-baseline: middle%3b text-anchor: middle%3b font-family: arial%2c sans-serif%3b font-size: 12px%3b' transform='translate(50%2c12)' y='0' x='0' id='text-entity-User-818c511a-4a32-5484-ba70-875d765a9175' class='er entityLabel'%3eUser%3c/text%3e%3crect height='21' width='49.71397399902344' y='24' x='0' class='er attributeBoxOdd'/%3e%3ctext style='dominant-baseline: middle%3b font-family: arial%2c sans-serif%3b font-size: 10.2px%3b' transform='translate(5%2c34.5)' y='0' x='0' id='text-entity-User-818c511a-4a32-5484-ba70-875d765a9175-attr-1-type' class='er entityLabel'%3euuid%3c/text%3e%3crect height='21' width='50.28602600097656' y='24' x='49.71397399902344' class='er attributeBoxOdd'/%3e%3ctext style='dominant-baseline: middle%3b font-family: arial%2c sans-serif%3b font-size: 10.2px%3b' transform='translate(54.71397399902344%2c34.5)' y='0' x='0' id='text-entity-User-818c511a-4a32-5484-ba70-875d765a9175-attr-1-name' class='er entityLabel'%3eid%3c/text%3e%3crect height='21' width='49.71397399902344' y='45' x='0' class='er attributeBoxEven'/%3e%3ctext style='dominant-baseline: middle%3b font-family: arial%2c sans-serif%3b font-size: 10.2px%3b' transform='translate(5%2c55.5)' y='0' x='0' id='text-entity-User-818c511a-4a32-5484-ba70-875d765a9175-attr-2-type' class='er entityLabel'%3estring%3c/text%3e%3crect height='21' width='50.28602600097656' y='45' x='49.71397399902344' class='er attributeBoxEven'/%3e%3ctext style='dominant-baseline: middle%3b font-family: arial%2c sans-serif%3b font-size: 10.2px%3b' transform='translate(54.71397399902344%2c55.5)' y='0' x='0' id='text-entity-User-818c511a-4a32-5484-ba70-875d765a9175-attr-2-name' class='er entityLabel'%3eemail%3c/text%3e%3crect height='21' width='49.71397399902344' y='66' x='0' class='er attributeBoxOdd'/%3e%3ctext style='dominant-baseline: middle%3b font-family: arial%2c sans-serif%3b font-size: 10.2px%3b' transform='translate(5%2c76.5)' y='0' x='0' id='text-entity-User-818c511a-4a32-5484-ba70-875d765a9175-attr-3-type' class='er entityLabel'%3estring%3c/text%3e%3crect height='21' width='50.28602600097656' y='66' x='49.71397399902344' class='er attributeBoxOdd'/%3e%3ctext style='dominant-baseline: middle%3b font-family: arial%2c sans-serif%3b font-size: 10.2px%3b' transform='translate(54.71397399902344%2c76.5)' y='0' x='0' id='text-entity-User-818c511a-4a32-5484-ba70-875d765a9175-attr-3-name' class='er entityLabel'%3ename%3c/text%3e%3c/g%3e%3cg transform='translate(98.96875%2c207 )' id='entity-OrganizationMember-d4b0eec2-0a5d-5412-8014-ac825f4d2a38'%3e%3crect height='66' width='142.0625' y='0' x='0' class='er entityBox'/%3e%3ctext style='dominant-baseline: middle%3b text-anchor: middle%3b font-family: arial%2c sans-serif%3b font-size: 12px%3b' transform='translate(71.03125%2c12)' y='0' x='0' id='text-entity-OrganizationMember-d4b0eec2-0a5d-5412-8014-ac825f4d2a38' class='er entityLabel'%3eOrganizationMember%3c/text%3e%3crect height='21' width='48.661529541015625' y='24' x='0' class='er attributeBoxOdd'/%3e%3ctext style='dominant-baseline: middle%3b font-family: arial%2c sans-serif%3b font-size: 10.2px%3b' transform='translate(5%2c34.5)' y='0' x='0' id='text-entity-OrganizationMember-d4b0eec2-0a5d-5412-8014-ac825f4d2a38-attr-1-type' class='er entityLabel'%3euuid%3c/text%3e%3crect height='21' width='93.40097045898438' y='24' x='48.661529541015625' class='er attributeBoxOdd'/%3e%3ctext style='dominant-baseline: middle%3b font-family: arial%2c sans-serif%3b font-size: 10.2px%3b' transform='translate(53.661529541015625%2c34.5)' y='0' x='0' id='text-entity-OrganizationMember-d4b0eec2-0a5d-5412-8014-ac825f4d2a38-attr-1-name' class='er entityLabel'%3euserId%3c/text%3e%3crect height='21' width='48.661529541015625' y='45' x='0' class='er attributeBoxEven'/%3e%3ctext style='dominant-baseline: middle%3b font-family: arial%2c sans-serif%3b font-size: 10.2px%3b' transform='translate(5%2c55.5)' y='0' x='0' id='text-entity-OrganizationMember-d4b0eec2-0a5d-5412-8014-ac825f4d2a38-attr-2-type' class='er entityLabel'%3euuid%3c/text%3e%3crect height='21' width='93.40097045898438' y='45' x='48.661529541015625' class='er attributeBoxEven'/%3e%3ctext style='dominant-baseline: middle%3b font-family: arial%2c sans-serif%3b font-size: 10.2px%3b' transform='translate(53.661529541015625%2c55.5)' y='0' x='0' id='text-entity-OrganizationMember-d4b0eec2-0a5d-5412-8014-ac825f4d2a38-attr-2-name' class='er entityLabel'%3eorganizationId%3c/text%3e%3c/g%3e%3cg transform='translate(220%2c20 )' id='entity-Organization-ef1721ab-1f62-5ef5-a525-a6c60c2f6032'%3e%3crect height='87' width='100' y='0' x='0' class='er entityBox'/%3e%3ctext style='dominant-baseline: middle%3b text-anchor: middle%3b font-family: arial%2c sans-serif%3b font-size: 12px%3b' transform='translate(50%2c12)' y='0' x='0' id='text-entity-Organization-ef1721ab-1f62-5ef5-a525-a6c60c2f6032' class='er entityLabel'%3eOrganization%3c/text%3e%3crect height='21' width='37.98228454589844' y='24' x='0' class='er attributeBoxOdd'/%3e%3ctext style='dominant-baseline: middle%3b font-family: arial%2c sans-serif%3b font-size: 10.2px%3b' transform='translate(5%2c34.5)' y='0' x='0' id='text-entity-Organization-ef1721ab-1f62-5ef5-a525-a6c60c2f6032-attr-1-type' class='er entityLabel'%3euuid%3c/text%3e%3crect height='21' width='62.01771545410156' y='24' x='37.98228454589844' class='er attributeBoxOdd'/%3e%3ctext style='dominant-baseline: middle%3b font-family: arial%2c sans-serif%3b font-size: 10.2px%3b' transform='translate(42.98228454589844%2c34.5)' y='0' x='0' id='text-entity-Organization-ef1721ab-1f62-5ef5-a525-a6c60c2f6032-attr-1-name' class='er entityLabel'%3eid%3c/text%3e%3crect height='21' width='37.98228454589844' y='45' x='0' class='er attributeBoxEven'/%3e%3ctext style='dominant-baseline: middle%3b font-family: arial%2c sans-serif%3b font-size: 10.2px%3b' transform='translate(5%2c55.5)' y='0' x='0' id='text-entity-Organization-ef1721ab-1f62-5ef5-a525-a6c60c2f6032-attr-2-type' class='er entityLabel'%3estring%3c/text%3e%3crect height='21' width='62.01771545410156' y='45' x='37.98228454589844' class='er attributeBoxEven'/%3e%3ctext style='dominant-baseline: middle%3b font-family: arial%2c sans-serif%3b font-size: 10.2px%3b' transform='translate(42.98228454589844%2c55.5)' y='0' x='0' id='text-entity-Organization-ef1721ab-1f62-5ef5-a525-a6c60c2f6032-attr-2-name' class='er entityLabel'%3ename%3c/text%3e%3crect height='21' width='37.98228454589844' y='66' x='0' class='er attributeBoxOdd'/%3e%3ctext style='dominant-baseline: middle%3b font-family: arial%2c sans-serif%3b font-size: 10.2px%3b' transform='translate(5%2c76.5)' y='0' x='0' id='text-entity-Organization-ef1721ab-1f62-5ef5-a525-a6c60c2f6032-attr-3-type' class='er entityLabel'%3estring%3c/text%3e%3crect height='21' width='62.01771545410156' y='66' x='37.98228454589844' class='er attributeBoxOdd'/%3e%3ctext style='dominant-baseline: middle%3b font-family: arial%2c sans-serif%3b font-size: 10.2px%3b' transform='translate(42.98228454589844%2c76.5)' y='0' x='0' id='text-entity-Organization-ef1721ab-1f62-5ef5-a525-a6c60c2f6032-attr-3-name' class='er entityLabel'%3edescription%3c/text%3e%3c/g%3e%3crect height='14' width='55.703125' y='157.9713592529297' x='57.701080322265625' class='er relationshipLabelBox'/%3e%3ctext style='text-anchor: middle%3b dominant-baseline: middle%3b font-family: arial%2c sans-serif%3b font-size: 12px%3b' y='164.9713592529297' x='85.55264282226562' id='rel1' class='er relationshipLabel'%3ebelongs to%3c/text%3e%3crect height='14' width='19.359375' y='157.9713592529297' x='244.76766967773438' class='er relationshipLabelBox'/%3e%3ctext style='text-anchor: middle%3b dominant-baseline: middle%3b font-family: arial%2c sans-serif%3b font-size: 12px%3b' y='164.9713592529297' x='254.44735717773438' id='rel2' class='er relationshipLabel'%3ehas%3c/text%3e%3c/svg%3e)
%3btext-align:center%3b%7d%23mermaid-2 .edgeLabel p%7bbackground-color:rgba(232%2c232%2c232%2c 0.8)%3b%7d%23mermaid-2 .edgeLabel rect%7bopacity:0.5%3bbackground-color:rgba(232%2c232%2c232%2c 0.8)%3bfill:rgba(232%2c232%2c232%2c 0.8)%3b%7d%23mermaid-2 .labelBkg%7bbackground-color:rgba(232%2c 232%2c 232%2c 0.5)%3b%7d%23mermaid-2 .cluster rect%7bfill:%23ffffde%3bstroke:%23aaaa33%3bstroke-width:1px%3b%7d%23mermaid-2 .cluster text%7bfill:%23333%3b%7d%23mermaid-2 .cluster span%7bcolor:%23333%3b%7d%23mermaid-2 div.mermaidTooltip%7bposition:absolute%3btext-align:center%3bmax-width:200px%3bpadding:2px%3bfont-family:arial%2csans-serif%3bfont-size:12px%3bbackground:hsl(80%2c 100%25%2c 96.2745098039%25)%3bborder:1px solid %23aaaa33%3bborder-radius:2px%3bpointer-events:none%3bz-index:100%3b%7d%23mermaid-2 .flowchartTitleText%7btext-anchor:middle%3bfont-size:18px%3bfill:%23333%3b%7d%23mermaid-2 rect.text%7bfill:none%3bstroke-width:0%3b%7d%23mermaid-2 .icon-shape%2c%23mermaid-2 .image-shape%7bbackground-color:rgba(232%2c232%2c232%2c 0.8)%3btext-align:center%3b%7d%23mermaid-2 .icon-shape p%2c%23mermaid-2 .image-shape p%7bbackground-color:rgba(232%2c232%2c232%2c 0.8)%3bpadding:2px%3b%7d%23mermaid-2 .icon-shape rect%2c%23mermaid-2 .image-shape rect%7bopacity:0.5%3bbackground-color:rgba(232%2c232%2c232%2c 0.8)%3bfill:rgba(232%2c232%2c232%2c 0.8)%3b%7d%23mermaid-2 :root%7b--mermaid-font-family:arial%2csans-serif%3b%7d%3c/style%3e%3cg%3e%3cmarker orient='auto' markerHeight='8' markerWidth='8' markerUnits='userSpaceOnUse' refY='5' refX='5' viewBox='0 0 10 10' class='marker flowchart-v2' id='mermaid-2_flowchart-v2-pointEnd'%3e%3cpath style='stroke-width: 1%3b stroke-dasharray: 1%2c 0%3b' class='arrowMarkerPath' d='M 0 0 L 10 5 L 0 10 z'/%3e%3c/marker%3e%3cmarker orient='auto' markerHeight='8' markerWidth='8' markerUnits='userSpaceOnUse' refY='5' refX='4.5' viewBox='0 0 10 10' class='marker flowchart-v2' id='mermaid-2_flowchart-v2-pointStart'%3e%3cpath style='stroke-width: 1%3b stroke-dasharray: 1%2c 0%3b' class='arrowMarkerPath' d='M 0 5 L 10 10 L 10 0 z'/%3e%3c/marker%3e%3cmarker orient='auto' markerHeight='11' markerWidth='11' markerUnits='userSpaceOnUse' refY='5' refX='11' viewBox='0 0 10 10' class='marker flowchart-v2' id='mermaid-2_flowchart-v2-circleEnd'%3e%3ccircle style='stroke-width: 1%3b stroke-dasharray: 1%2c 0%3b' class='arrowMarkerPath' r='5' cy='5' cx='5'/%3e%3c/marker%3e%3cmarker orient='auto' markerHeight='11' markerWidth='11' markerUnits='userSpaceOnUse' refY='5' refX='-1' viewBox='0 0 10 10' class='marker flowchart-v2' id='mermaid-2_flowchart-v2-circleStart'%3e%3ccircle style='stroke-width: 1%3b stroke-dasharray: 1%2c 0%3b' class='arrowMarkerPath' r='5' cy='5' cx='5'/%3e%3c/marker%3e%3cmarker orient='auto' markerHeight='11' markerWidth='11' markerUnits='userSpaceOnUse' refY='5.2' refX='12' viewBox='0 0 11 11' class='marker cross flowchart-v2' id='mermaid-2_flowchart-v2-crossEnd'%3e%3cpath style='stroke-width: 2%3b stroke-dasharray: 1%2c 0%3b' class='arrowMarkerPath' d='M 1%2c1 l 9%2c9 M 10%2c1 l -9%2c9'/%3e%3c/marker%3e%3cmarker orient='auto' markerHeight='11' markerWidth='11' markerUnits='userSpaceOnUse' refY='5.2' refX='-1' viewBox='0 0 11 11' class='marker cross flowchart-v2' id='mermaid-2_flowchart-v2-crossStart'%3e%3cpath style='stroke-width: 2%3b stroke-dasharray: 1%2c 0%3b' class='arrowMarkerPath' d='M 1%2c1 l 9%2c9 M 10%2c1 l -9%2c9'/%3e%3c/marker%3e%3cg class='root'%3e%3cg class='clusters'/%3e%3cg class='edgePaths'%3e%3cpath marker-end='url(%23mermaid-2_flowchart-v2-pointEnd)' style='' class='edge-thickness-normal edge-pattern-solid edge-thickness-normal edge-pattern-solid flowchart-link' id='L_App_O1_0' d='M179.578%2c57.657L164.654%2c62.547C149.729%2c67.438%2c119.88%2c77.219%2c104.956%2c85.609C90.031%2c94%2c90.031%2c101%2c90.031%2c104.5L90.031%2c108'/%3e%3cpath marker-end='url(%23mermaid-2_flowchart-v2-pointEnd)' style='' class='edge-thickness-normal edge-pattern-solid edge-thickness-normal edge-pattern-solid flowchart-link' id='L_App_O2_1' d='M317.859%2c57.657L332.784%2c62.547C347.708%2c67.438%2c377.557%2c77.219%2c392.482%2c85.609C407.406%2c94%2c407.406%2c101%2c407.406%2c104.5L407.406%2c108'/%3e%3cpath marker-end='url(%23mermaid-2_flowchart-v2-pointEnd)' style='' class='edge-thickness-normal edge-pattern-solid edge-thickness-normal edge-pattern-solid flowchart-link' id='L_O1_M1_2' d='M84.839%2c166L84.038%2c170.167C83.236%2c174.333%2c81.634%2c182.667%2c80.833%2c190.333C80.031%2c198%2c80.031%2c205%2c80.031%2c208.5L80.031%2c212'/%3e%3cpath marker-end='url(%23mermaid-2_flowchart-v2-pointEnd)' style='' class='edge-thickness-normal edge-pattern-solid edge-thickness-normal edge-pattern-solid flowchart-link' id='L_O1_M2_3' d='M133.825%2c166L140.583%2c170.167C147.342%2c174.333%2c160.858%2c182.667%2c173.027%2c190.618C185.196%2c198.569%2c196.018%2c206.138%2c201.429%2c209.923L206.839%2c213.707'/%3e%3cpath marker-end='url(%23mermaid-2_flowchart-v2-pointEnd)' style='' class='edge-thickness-normal edge-pattern-solid edge-thickness-normal edge-pattern-solid flowchart-link' id='L_O2_M2_4' d='M363.612%2c166L356.854%2c170.167C350.096%2c174.333%2c336.579%2c182.667%2c324.41%2c190.618C312.241%2c198.569%2c301.42%2c206.138%2c296.009%2c209.923L290.598%2c213.707'/%3e%3cpath marker-end='url(%23mermaid-2_flowchart-v2-pointEnd)' style='' class='edge-thickness-normal edge-pattern-solid edge-thickness-normal edge-pattern-solid flowchart-link' id='L_O2_M3_5' d='M412.599%2c166L413.4%2c170.167C414.201%2c174.333%2c415.804%2c182.667%2c416.605%2c190.333C417.406%2c198%2c417.406%2c205%2c417.406%2c208.5L417.406%2c212'/%3e%3c/g%3e%3cg class='edgeLabels'%3e%3cg class='edgeLabel'%3e%3cg transform='translate(0%2c 0)' class='label'%3e%3cforeignObject height='0' width='0'%3e%3cdiv style='display: table-cell%3b white-space: nowrap%3b line-height: 1.5%3b max-width: 200px%3b text-align: center%3b' class='labelBkg' xmlns='http://www.w3.org/1999/xhtml'%3e%3cspan class='edgeLabel'%3e%3c/span%3e%3c/div%3e%3c/foreignObject%3e%3c/g%3e%3c/g%3e%3cg class='edgeLabel'%3e%3cg transform='translate(0%2c 0)' class='label'%3e%3cforeignObject height='0' width='0'%3e%3cdiv style='display: table-cell%3b white-space: nowrap%3b line-height: 1.5%3b max-width: 200px%3b text-align: center%3b' class='labelBkg' xmlns='http://www.w3.org/1999/xhtml'%3e%3cspan class='edgeLabel'%3e%3c/span%3e%3c/div%3e%3c/foreignObject%3e%3c/g%3e%3c/g%3e%3cg class='edgeLabel'%3e%3cg transform='translate(0%2c 0)' class='label'%3e%3cforeignObject height='0' width='0'%3e%3cdiv style='display: table-cell%3b white-space: nowrap%3b line-height: 1.5%3b max-width: 200px%3b text-align: center%3b' class='labelBkg' xmlns='http://www.w3.org/1999/xhtml'%3e%3cspan class='edgeLabel'%3e%3c/span%3e%3c/div%3e%3c/foreignObject%3e%3c/g%3e%3c/g%3e%3cg class='edgeLabel'%3e%3cg transform='translate(0%2c 0)' class='label'%3e%3cforeignObject height='0' width='0'%3e%3cdiv style='display: table-cell%3b white-space: nowrap%3b line-height: 1.5%3b max-width: 200px%3b text-align: center%3b' class='labelBkg' xmlns='http://www.w3.org/1999/xhtml'%3e%3cspan class='edgeLabel'%3e%3c/span%3e%3c/div%3e%3c/foreignObject%3e%3c/g%3e%3c/g%3e%3cg class='edgeLabel'%3e%3cg transform='translate(0%2c 0)' class='label'%3e%3cforeignObject height='0' width='0'%3e%3cdiv style='display: table-cell%3b white-space: nowrap%3b line-height: 1.5%3b max-width: 200px%3b text-align: center%3b' class='labelBkg' xmlns='http://www.w3.org/1999/xhtml'%3e%3cspan class='edgeLabel'%3e%3c/span%3e%3c/div%3e%3c/foreignObject%3e%3c/g%3e%3c/g%3e%3cg class='edgeLabel'%3e%3cg transform='translate(0%2c 0)' class='label'%3e%3cforeignObject height='0' width='0'%3e%3cdiv style='display: table-cell%3b white-space: nowrap%3b line-height: 1.5%3b max-width: 200px%3b text-align: center%3b' class='labelBkg' xmlns='http://www.w3.org/1999/xhtml'%3e%3cspan class='edgeLabel'%3e%3c/span%3e%3c/div%3e%3c/foreignObject%3e%3c/g%3e%3c/g%3e%3c/g%3e%3cg class='nodes'%3e%3cg transform='translate(248.71875%2c 35)' id='flowchart-App-0' class='node default'%3e%3crect height='54' width='138.28125' y='-27' x='-69.140625' style='' class='basic label-container'/%3e%3cg transform='translate(-39.140625%2c -12)' style='' class='label'%3e%3crect/%3e%3cforeignObject height='24' width='78.28125'%3e%3cdiv style='display: table-cell%3b white-space: nowrap%3b line-height: 1.5%3b max-width: 200px%3b text-align: center%3b' xmlns='http://www.w3.org/1999/xhtml'%3e%3cspan class='nodeLabel'%3e%3cp%3eApplication%3c/p%3e%3c/span%3e%3c/div%3e%3c/foreignObject%3e%3c/g%3e%3c/g%3e%3cg transform='translate(90.03125%2c 139)' id='flowchart-O1-1' class='node default'%3e%3crect height='54' width='164.0625' y='-27' x='-82.03125' style='fill:%23e6ffe6 !important' class='basic label-container'/%3e%3cg transform='translate(-52.03125%2c -12)' style='' class='label'%3e%3crect/%3e%3cforeignObject height='24' width='104.0625'%3e%3cdiv style='display: table-cell%3b white-space: nowrap%3b line-height: 1.5%3b max-width: 200px%3b text-align: center%3b' xmlns='http://www.w3.org/1999/xhtml'%3e%3cspan class='nodeLabel'%3e%3cp%3eOrganization 1%3c/p%3e%3c/span%3e%3c/div%3e%3c/foreignObject%3e%3c/g%3e%3c/g%3e%3cg transform='translate(407.40625%2c 139)' id='flowchart-O2-2' class='node default'%3e%3crect height='54' width='164.0625' y='-27' x='-82.03125' style='fill:%23e6ffe6 !important' class='basic label-container'/%3e%3cg transform='translate(-52.03125%2c -12)' style='' class='label'%3e%3crect/%3e%3cforeignObject height='24' width='104.0625'%3e%3cdiv style='display: table-cell%3b white-space: nowrap%3b line-height: 1.5%3b max-width: 200px%3b text-align: center%3b' xmlns='http://www.w3.org/1999/xhtml'%3e%3cspan class='nodeLabel'%3e%3cp%3eOrganization 2%3c/p%3e%3c/span%3e%3c/div%3e%3c/foreignObject%3e%3c/g%3e%3c/g%3e%3cg transform='translate(80.03125%2c 243)' id='flowchart-M1-3' class='node default'%3e%3crect height='54' width='118.6875' y='-27' x='-59.34375' style='' class='basic label-container'/%3e%3cg transform='translate(-29.34375%2c -12)' style='' class='label'%3e%3crect/%3e%3cforeignObject height='24' width='58.6875'%3e%3cdiv style='display: table-cell%3b white-space: nowrap%3b line-height: 1.5%3b max-width: 200px%3b text-align: center%3b' xmlns='http://www.w3.org/1999/xhtml'%3e%3cspan class='nodeLabel'%3e%3cp%3eMember%3c/p%3e%3c/span%3e%3c/div%3e%3c/foreignObject%3e%3c/g%3e%3c/g%3e%3cg transform='translate(248.71875%2c 243)' id='flowchart-M2-4' class='node default'%3e%3crect height='54' width='118.6875' y='-27' x='-59.34375' style='' class='basic label-container'/%3e%3cg transform='translate(-29.34375%2c -12)' style='' class='label'%3e%3crect/%3e%3cforeignObject height='24' width='58.6875'%3e%3cdiv style='display: table-cell%3b white-space: nowrap%3b line-height: 1.5%3b max-width: 200px%3b text-align: center%3b' xmlns='http://www.w3.org/1999/xhtml'%3e%3cspan class='nodeLabel'%3e%3cp%3eMember%3c/p%3e%3c/span%3e%3c/div%3e%3c/foreignObject%3e%3c/g%3e%3c/g%3e%3cg transform='translate(417.40625%2c 243)' id='flowchart-M3-5' class='node default'%3e%3crect height='54' width='118.6875' y='-27' x='-59.34375' style='' class='basic label-container'/%3e%3cg transform='translate(-29.34375%2c -12)' style='' class='label'%3e%3crect/%3e%3cforeignObject height='24' width='58.6875'%3e%3cdiv style='display: table-cell%3b white-space: nowrap%3b line-height: 1.5%3b max-width: 200px%3b text-align: center%3b' xmlns='http://www.w3.org/1999/xhtml'%3e%3cspan class='nodeLabel'%3e%3cp%3eMember%3c/p%3e%3c/span%3e%3c/div%3e%3c/foreignObject%3e%3c/g%3e%3c/g%3e%3c/g%3e%3c/g%3e%3c/g%3e%3c/svg%3e)
%3btext-align:center%3b%7d%23mermaid-3 .edgeLabel p%7bbackground-color:rgba(232%2c232%2c232%2c 0.8)%3b%7d%23mermaid-3 .edgeLabel rect%7bopacity:0.5%3bbackground-color:rgba(232%2c232%2c232%2c 0.8)%3bfill:rgba(232%2c232%2c232%2c 0.8)%3b%7d%23mermaid-3 .labelBkg%7bbackground-color:rgba(232%2c 232%2c 232%2c 0.5)%3b%7d%23mermaid-3 .cluster rect%7bfill:%23ffffde%3bstroke:%23aaaa33%3bstroke-width:1px%3b%7d%23mermaid-3 .cluster text%7bfill:%23333%3b%7d%23mermaid-3 .cluster span%7bcolor:%23333%3b%7d%23mermaid-3 div.mermaidTooltip%7bposition:absolute%3btext-align:center%3bmax-width:200px%3bpadding:2px%3bfont-family:arial%2csans-serif%3bfont-size:12px%3bbackground:hsl(80%2c 100%25%2c 96.2745098039%25)%3bborder:1px solid %23aaaa33%3bborder-radius:2px%3bpointer-events:none%3bz-index:100%3b%7d%23mermaid-3 .flowchartTitleText%7btext-anchor:middle%3bfont-size:18px%3bfill:%23333%3b%7d%23mermaid-3 rect.text%7bfill:none%3bstroke-width:0%3b%7d%23mermaid-3 .icon-shape%2c%23mermaid-3 .image-shape%7bbackground-color:rgba(232%2c232%2c232%2c 0.8)%3btext-align:center%3b%7d%23mermaid-3 .icon-shape p%2c%23mermaid-3 .image-shape p%7bbackground-color:rgba(232%2c232%2c232%2c 0.8)%3bpadding:2px%3b%7d%23mermaid-3 .icon-shape rect%2c%23mermaid-3 .image-shape rect%7bopacity:0.5%3bbackground-color:rgba(232%2c232%2c232%2c 0.8)%3bfill:rgba(232%2c232%2c232%2c 0.8)%3b%7d%23mermaid-3 :root%7b--mermaid-font-family:arial%2csans-serif%3b%7d%3c/style%3e%3cg%3e%3cmarker orient='auto' markerHeight='8' markerWidth='8' markerUnits='userSpaceOnUse' refY='5' refX='5' viewBox='0 0 10 10' class='marker flowchart-v2' id='mermaid-3_flowchart-v2-pointEnd'%3e%3cpath style='stroke-width: 1%3b stroke-dasharray: 1%2c 0%3b' class='arrowMarkerPath' d='M 0 0 L 10 5 L 0 10 z'/%3e%3c/marker%3e%3cmarker orient='auto' markerHeight='8' markerWidth='8' markerUnits='userSpaceOnUse' refY='5' refX='4.5' viewBox='0 0 10 10' class='marker flowchart-v2' id='mermaid-3_flowchart-v2-pointStart'%3e%3cpath style='stroke-width: 1%3b stroke-dasharray: 1%2c 0%3b' class='arrowMarkerPath' d='M 0 5 L 10 10 L 10 0 z'/%3e%3c/marker%3e%3cmarker orient='auto' markerHeight='11' markerWidth='11' markerUnits='userSpaceOnUse' refY='5' refX='11' viewBox='0 0 10 10' class='marker flowchart-v2' id='mermaid-3_flowchart-v2-circleEnd'%3e%3ccircle style='stroke-width: 1%3b stroke-dasharray: 1%2c 0%3b' class='arrowMarkerPath' r='5' cy='5' cx='5'/%3e%3c/marker%3e%3cmarker orient='auto' markerHeight='11' markerWidth='11' markerUnits='userSpaceOnUse' refY='5' refX='-1' viewBox='0 0 10 10' class='marker flowchart-v2' id='mermaid-3_flowchart-v2-circleStart'%3e%3ccircle style='stroke-width: 1%3b stroke-dasharray: 1%2c 0%3b' class='arrowMarkerPath' r='5' cy='5' cx='5'/%3e%3c/marker%3e%3cmarker orient='auto' markerHeight='11' markerWidth='11' markerUnits='userSpaceOnUse' refY='5.2' refX='12' viewBox='0 0 11 11' class='marker cross flowchart-v2' id='mermaid-3_flowchart-v2-crossEnd'%3e%3cpath style='stroke-width: 2%3b stroke-dasharray: 1%2c 0%3b' class='arrowMarkerPath' d='M 1%2c1 l 9%2c9 M 10%2c1 l -9%2c9'/%3e%3c/marker%3e%3cmarker orient='auto' markerHeight='11' markerWidth='11' markerUnits='userSpaceOnUse' refY='5.2' refX='-1' viewBox='0 0 11 11' class='marker cross flowchart-v2' id='mermaid-3_flowchart-v2-crossStart'%3e%3cpath style='stroke-width: 2%3b stroke-dasharray: 1%2c 0%3b' class='arrowMarkerPath' d='M 1%2c1 l 9%2c9 M 10%2c1 l -9%2c9'/%3e%3c/marker%3e%3cg class='root'%3e%3cg class='clusters'/%3e%3cg class='edgePaths'/%3e%3cg class='edgeLabels'/%3e%3cg class='nodes'%3e%3cg transform='translate(0%2c 0)' class='root'%3e%3cg class='clusters'%3e%3cg data-look='classic' id='organization_template' class='cluster'%3e%3crect height='303' width='629.390625' y='8' x='8' style='fill:%23e6ffe6 !important'/%3e%3cg transform='translate(244.875%2c 8)' class='cluster-label'%3e%3cforeignObject height='24' width='155.640625'%3e%3cdiv style='display: table-cell%3b white-space: nowrap%3b line-height: 1.5%3b max-width: 200px%3b text-align: center%3b' xmlns='http://www.w3.org/1999/xhtml'%3e%3cspan class='nodeLabel'%3e%3cp%3eOrganizationTemplate%3c/p%3e%3c/span%3e%3c/div%3e%3c/foreignObject%3e%3c/g%3e%3c/g%3e%3c/g%3e%3cg class='edgePaths'/%3e%3cg class='edgeLabels'/%3e%3cg class='nodes'%3e%3cg transform='translate(35%2c 37.5)' class='root'%3e%3cg class='clusters'%3e%3cg data-look='classic' id='role_1' class='cluster'%3e%3crect height='228' width='254.25' y='8' x='8' style='fill:%23ffe6e6 !important'/%3e%3cg transform='translate(114.21875%2c 8)' class='cluster-label'%3e%3cforeignObject height='24' width='41.8125'%3e%3cdiv style='display: table-cell%3b white-space: nowrap%3b line-height: 1.5%3b max-width: 200px%3b text-align: center%3b' xmlns='http://www.w3.org/1999/xhtml'%3e%3cspan class='nodeLabel'%3e%3cp%3eRole1%3c/p%3e%3c/span%3e%3c/div%3e%3c/foreignObject%3e%3c/g%3e%3c/g%3e%3c/g%3e%3cg class='edgePaths'/%3e%3cg class='edgeLabels'/%3e%3cg class='nodes'%3e%3cg transform='translate(135.125%2c 70)' id='flowchart-permission_a-22' class='node default'%3e%3crect height='54' width='153.375' y='-27' x='-76.6875' style='' class='basic label-container'/%3e%3cg transform='translate(-46.6875%2c -12)' style='' class='label'%3e%3crect/%3e%3cforeignObject height='24' width='93.375'%3e%3cdiv style='display: table-cell%3b white-space: nowrap%3b line-height: 1.5%3b max-width: 200px%3b text-align: center%3b' xmlns='http://www.w3.org/1999/xhtml'%3e%3cspan class='nodeLabel'%3e%3cp%3ePermission A%3c/p%3e%3c/span%3e%3c/div%3e%3c/foreignObject%3e%3c/g%3e%3c/g%3e%3cg transform='translate(135.125%2c 174)' id='flowchart-permission_b-23' class='node default'%3e%3crect height='54' width='154.25' y='-27' x='-77.125' style='' class='basic label-container'/%3e%3cg transform='translate(-47.125%2c -12)' style='' class='label'%3e%3crect/%3e%3cforeignObject height='24' width='94.25'%3e%3cdiv style='display: table-cell%3b white-space: nowrap%3b line-height: 1.5%3b max-width: 200px%3b text-align: center%3b' xmlns='http://www.w3.org/1999/xhtml'%3e%3cspan class='nodeLabel'%3e%3cp%3ePermission B%3c/p%3e%3c/span%3e%3c/div%3e%3c/foreignObject%3e%3c/g%3e%3c/g%3e%3c/g%3e%3c/g%3e%3cg transform='translate(339.25%2c 37.5)' class='root'%3e%3cg class='clusters'%3e%3cg data-look='classic' id='role_2' class='cluster'%3e%3crect height='228' width='255.140625' y='8' x='8' style='fill:%23ffe6e6 !important'/%3e%3cg transform='translate(114.6640625%2c 8)' class='cluster-label'%3e%3cforeignObject height='24' width='41.8125'%3e%3cdiv style='display: table-cell%3b white-space: nowrap%3b line-height: 1.5%3b max-width: 200px%3b text-align: center%3b' xmlns='http://www.w3.org/1999/xhtml'%3e%3cspan class='nodeLabel'%3e%3cp%3eRole2%3c/p%3e%3c/span%3e%3c/div%3e%3c/foreignObject%3e%3c/g%3e%3c/g%3e%3c/g%3e%3cg class='edgePaths'/%3e%3cg class='edgeLabels'/%3e%3cg class='nodes'%3e%3cg transform='translate(135.5703125%2c 70)' id='flowchart-permission_c-20' class='node default'%3e%3crect height='54' width='155.140625' y='-27' x='-77.5703125' style='' class='basic label-container'/%3e%3cg transform='translate(-47.5703125%2c -12)' style='' class='label'%3e%3crect/%3e%3cforeignObject height='24' width='95.140625'%3e%3cdiv style='display: table-cell%3b white-space: nowrap%3b line-height: 1.5%3b max-width: 200px%3b text-align: center%3b' xmlns='http://www.w3.org/1999/xhtml'%3e%3cspan class='nodeLabel'%3e%3cp%3ePermission C%3c/p%3e%3c/span%3e%3c/div%3e%3c/foreignObject%3e%3c/g%3e%3c/g%3e%3cg transform='translate(135.5703125%2c 174)' id='flowchart-permission_d-21' class='node default'%3e%3crect height='54' width='155.140625' y='-27' x='-77.5703125' style='' class='basic label-container'/%3e%3cg transform='translate(-47.5703125%2c -12)' style='' class='label'%3e%3crect/%3e%3cforeignObject height='24' width='95.140625'%3e%3cdiv style='display: table-cell%3b white-space: nowrap%3b line-height: 1.5%3b max-width: 200px%3b text-align: center%3b' xmlns='http://www.w3.org/1999/xhtml'%3e%3cspan class='nodeLabel'%3e%3cp%3ePermission D%3c/p%3e%3c/span%3e%3c/div%3e%3c/foreignObject%3e%3c/g%3e%3c/g%3e%3c/g%3e%3c/g%3e%3c/g%3e%3c/g%3e%3c/g%3e%3c/g%3e%3c/g%3e%3c/svg%3e)
%3bopacity:0.7%3bbackground-color:hsl(80%2c 100%25%2c 96.2745098039%25)%3b%7d%23mermaid-4 .relationshipLabelBox rect%7bopacity:0.5%3b%7d%23mermaid-4 .relationshipLine%7bstroke:%23333333%3b%7d%23mermaid-4 .entityTitleText%7btext-anchor:middle%3bfont-size:18px%3bfill:%23333%3b%7d%23mermaid-4 %23MD_PARENT_START%7bfill:%23f5f5f5!important%3bstroke:%23333333!important%3bstroke-width:1%3b%7d%23mermaid-4 %23MD_PARENT_END%7bfill:%23f5f5f5!important%3bstroke:%23333333!important%3bstroke-width:1%3b%7d%23mermaid-4 :root%7b--mermaid-font-family:arial%2csans-serif%3b%7d%3c/style%3e%3cg/%3e%3cdefs%3e%3cmarker orient='auto' markerHeight='240' markerWidth='190' refY='7' refX='0' id='MD_PARENT_START'%3e%3cpath d='M 18%2c7 L9%2c13 L1%2c7 L9%2c1 Z'/%3e%3c/marker%3e%3c/defs%3e%3cdefs%3e%3cmarker orient='auto' markerHeight='28' markerWidth='20' refY='7' refX='19' id='MD_PARENT_END'%3e%3cpath d='M 18%2c7 L9%2c13 L1%2c7 L9%2c1 Z'/%3e%3c/marker%3e%3c/defs%3e%3cdefs%3e%3cmarker orient='auto' markerHeight='18' markerWidth='18' refY='9' refX='0' id='ONLY_ONE_START'%3e%3cpath d='M9%2c0 L9%2c18 M15%2c0 L15%2c18' fill='none' stroke='gray'/%3e%3c/marker%3e%3c/defs%3e%3cdefs%3e%3cmarker orient='auto' markerHeight='18' markerWidth='18' refY='9' refX='18' id='ONLY_ONE_END'%3e%3cpath d='M3%2c0 L3%2c18 M9%2c0 L9%2c18' fill='none' stroke='gray'/%3e%3c/marker%3e%3c/defs%3e%3cdefs%3e%3cmarker orient='auto' markerHeight='18' markerWidth='30' refY='9' refX='0' id='ZERO_OR_ONE_START'%3e%3ccircle r='6' cy='9' cx='21' fill='white' stroke='gray'/%3e%3cpath d='M9%2c0 L9%2c18' fill='none' stroke='gray'/%3e%3c/marker%3e%3c/defs%3e%3cdefs%3e%3cmarker orient='auto' markerHeight='18' markerWidth='30' refY='9' refX='30' id='ZERO_OR_ONE_END'%3e%3ccircle r='6' cy='9' cx='9' fill='white' stroke='gray'/%3e%3cpath d='M21%2c0 L21%2c18' fill='none' stroke='gray'/%3e%3c/marker%3e%3c/defs%3e%3cdefs%3e%3cmarker orient='auto' markerHeight='36' markerWidth='45' refY='18' refX='18' id='ONE_OR_MORE_START'%3e%3cpath d='M0%2c18 Q 18%2c0 36%2c18 Q 18%2c36 0%2c18 M42%2c9 L42%2c27' fill='none' stroke='gray'/%3e%3c/marker%3e%3c/defs%3e%3cdefs%3e%3cmarker orient='auto' markerHeight='36' markerWidth='45' refY='18' refX='27' id='ONE_OR_MORE_END'%3e%3cpath d='M3%2c9 L3%2c27 M9%2c18 Q27%2c0 45%2c18 Q27%2c36 9%2c18' fill='none' stroke='gray'/%3e%3c/marker%3e%3c/defs%3e%3cdefs%3e%3cmarker orient='auto' markerHeight='36' markerWidth='57' refY='18' refX='18' id='ZERO_OR_MORE_START'%3e%3ccircle r='6' cy='18' cx='48' fill='white' stroke='gray'/%3e%3cpath d='M0%2c18 Q18%2c0 36%2c18 Q18%2c36 0%2c18' fill='none' stroke='gray'/%3e%3c/marker%3e%3c/defs%3e%3cdefs%3e%3cmarker orient='auto' markerHeight='36' markerWidth='57' refY='18' refX='39' id='ZERO_OR_MORE_END'%3e%3ccircle r='6' cy='18' cx='9' fill='white' stroke='gray'/%3e%3cpath d='M21%2c18 Q39%2c0 57%2c18 Q39%2c36 21%2c18' fill='none' stroke='gray'/%3e%3c/marker%3e%3c/defs%3e%3cg transform='translate(20%2c20 )' id='entity-OrganizationMember-d4b0eec2-0a5d-5412-8014-ac825f4d2a38'%3e%3crect height='108' width='142.0625' y='0' x='0' class='er entityBox'/%3e%3ctext style='dominant-baseline: middle%3b text-anchor: middle%3b font-family: arial%2c sans-serif%3b font-size: 12px%3b' transform='translate(71.03125%2c12)' y='0' x='0' id='text-entity-OrganizationMember-d4b0eec2-0a5d-5412-8014-ac825f4d2a38' class='er entityLabel'%3eOrganizationMember%3c/text%3e%3crect height='21' width='58.56797790527344' y='24' x='0' class='er attributeBoxOdd'/%3e%3ctext style='dominant-baseline: middle%3b font-family: arial%2c sans-serif%3b font-size: 10.2px%3b' transform='translate(5%2c34.5)' y='0' x='0' id='text-entity-OrganizationMember-d4b0eec2-0a5d-5412-8014-ac825f4d2a38-attr-1-type' class='er entityLabel'%3euuid%3c/text%3e%3crect height='21' width='83.49452209472656' y='24' x='58.56797790527344' class='er attributeBoxOdd'/%3e%3ctext style='dominant-baseline: middle%3b font-family: arial%2c sans-serif%3b font-size: 10.2px%3b' transform='translate(63.56797790527344%2c34.5)' y='0' x='0' id='text-entity-OrganizationMember-d4b0eec2-0a5d-5412-8014-ac825f4d2a38-attr-1-name' class='er entityLabel'%3euserId%3c/text%3e%3crect height='21' width='58.56797790527344' y='45' x='0' class='er attributeBoxEven'/%3e%3ctext style='dominant-baseline: middle%3b font-family: arial%2c sans-serif%3b font-size: 10.2px%3b' transform='translate(5%2c55.5)' y='0' x='0' id='text-entity-OrganizationMember-d4b0eec2-0a5d-5412-8014-ac825f4d2a38-attr-2-type' class='er entityLabel'%3euuid%3c/text%3e%3crect height='21' width='83.49452209472656' y='45' x='58.56797790527344' class='er attributeBoxEven'/%3e%3ctext style='dominant-baseline: middle%3b font-family: arial%2c sans-serif%3b font-size: 10.2px%3b' transform='translate(63.56797790527344%2c55.5)' y='0' x='0' id='text-entity-OrganizationMember-d4b0eec2-0a5d-5412-8014-ac825f4d2a38-attr-2-name' class='er entityLabel'%3eorganizationId%3c/text%3e%3crect height='21' width='58.56797790527344' y='66' x='0' class='er attributeBoxOdd'/%3e%3ctext style='dominant-baseline: middle%3b font-family: arial%2c sans-serif%3b font-size: 10.2px%3b' transform='translate(5%2c76.5)' y='0' x='0' id='text-entity-OrganizationMember-d4b0eec2-0a5d-5412-8014-ac825f4d2a38-attr-3-type' class='er entityLabel'%3euuid%5b%5d%3c/text%3e%3crect height='21' width='83.49452209472656' y='66' x='58.56797790527344' class='er attributeBoxOdd'/%3e%3ctext style='dominant-baseline: middle%3b font-family: arial%2c sans-serif%3b font-size: 10.2px%3b' transform='translate(63.56797790527344%2c76.5)' y='0' x='0' id='text-entity-OrganizationMember-d4b0eec2-0a5d-5412-8014-ac825f4d2a38-attr-3-name' class='er entityLabel'%3eroleIds%3c/text%3e%3crect height='21' width='58.56797790527344' y='87' x='0' class='er attributeBoxEven'/%3e%3ctext style='dominant-baseline: middle%3b font-family: arial%2c sans-serif%3b font-size: 10.2px%3b' transform='translate(5%2c97.5)' y='0' x='0' id='text-entity-OrganizationMember-d4b0eec2-0a5d-5412-8014-ac825f4d2a38-attr-4-type' class='er entityLabel'%3edatetime%3c/text%3e%3crect height='21' width='83.49452209472656' y='87' x='58.56797790527344' class='er attributeBoxEven'/%3e%3ctext style='dominant-baseline: middle%3b font-family: arial%2c sans-serif%3b font-size: 10.2px%3b' transform='translate(63.56797790527344%2c97.5)' y='0' x='0' id='text-entity-OrganizationMember-d4b0eec2-0a5d-5412-8014-ac825f4d2a38-attr-4-name' class='er entityLabel'%3ejoinedAt%3c/text%3e%3c/g%3e%3c/svg%3e)
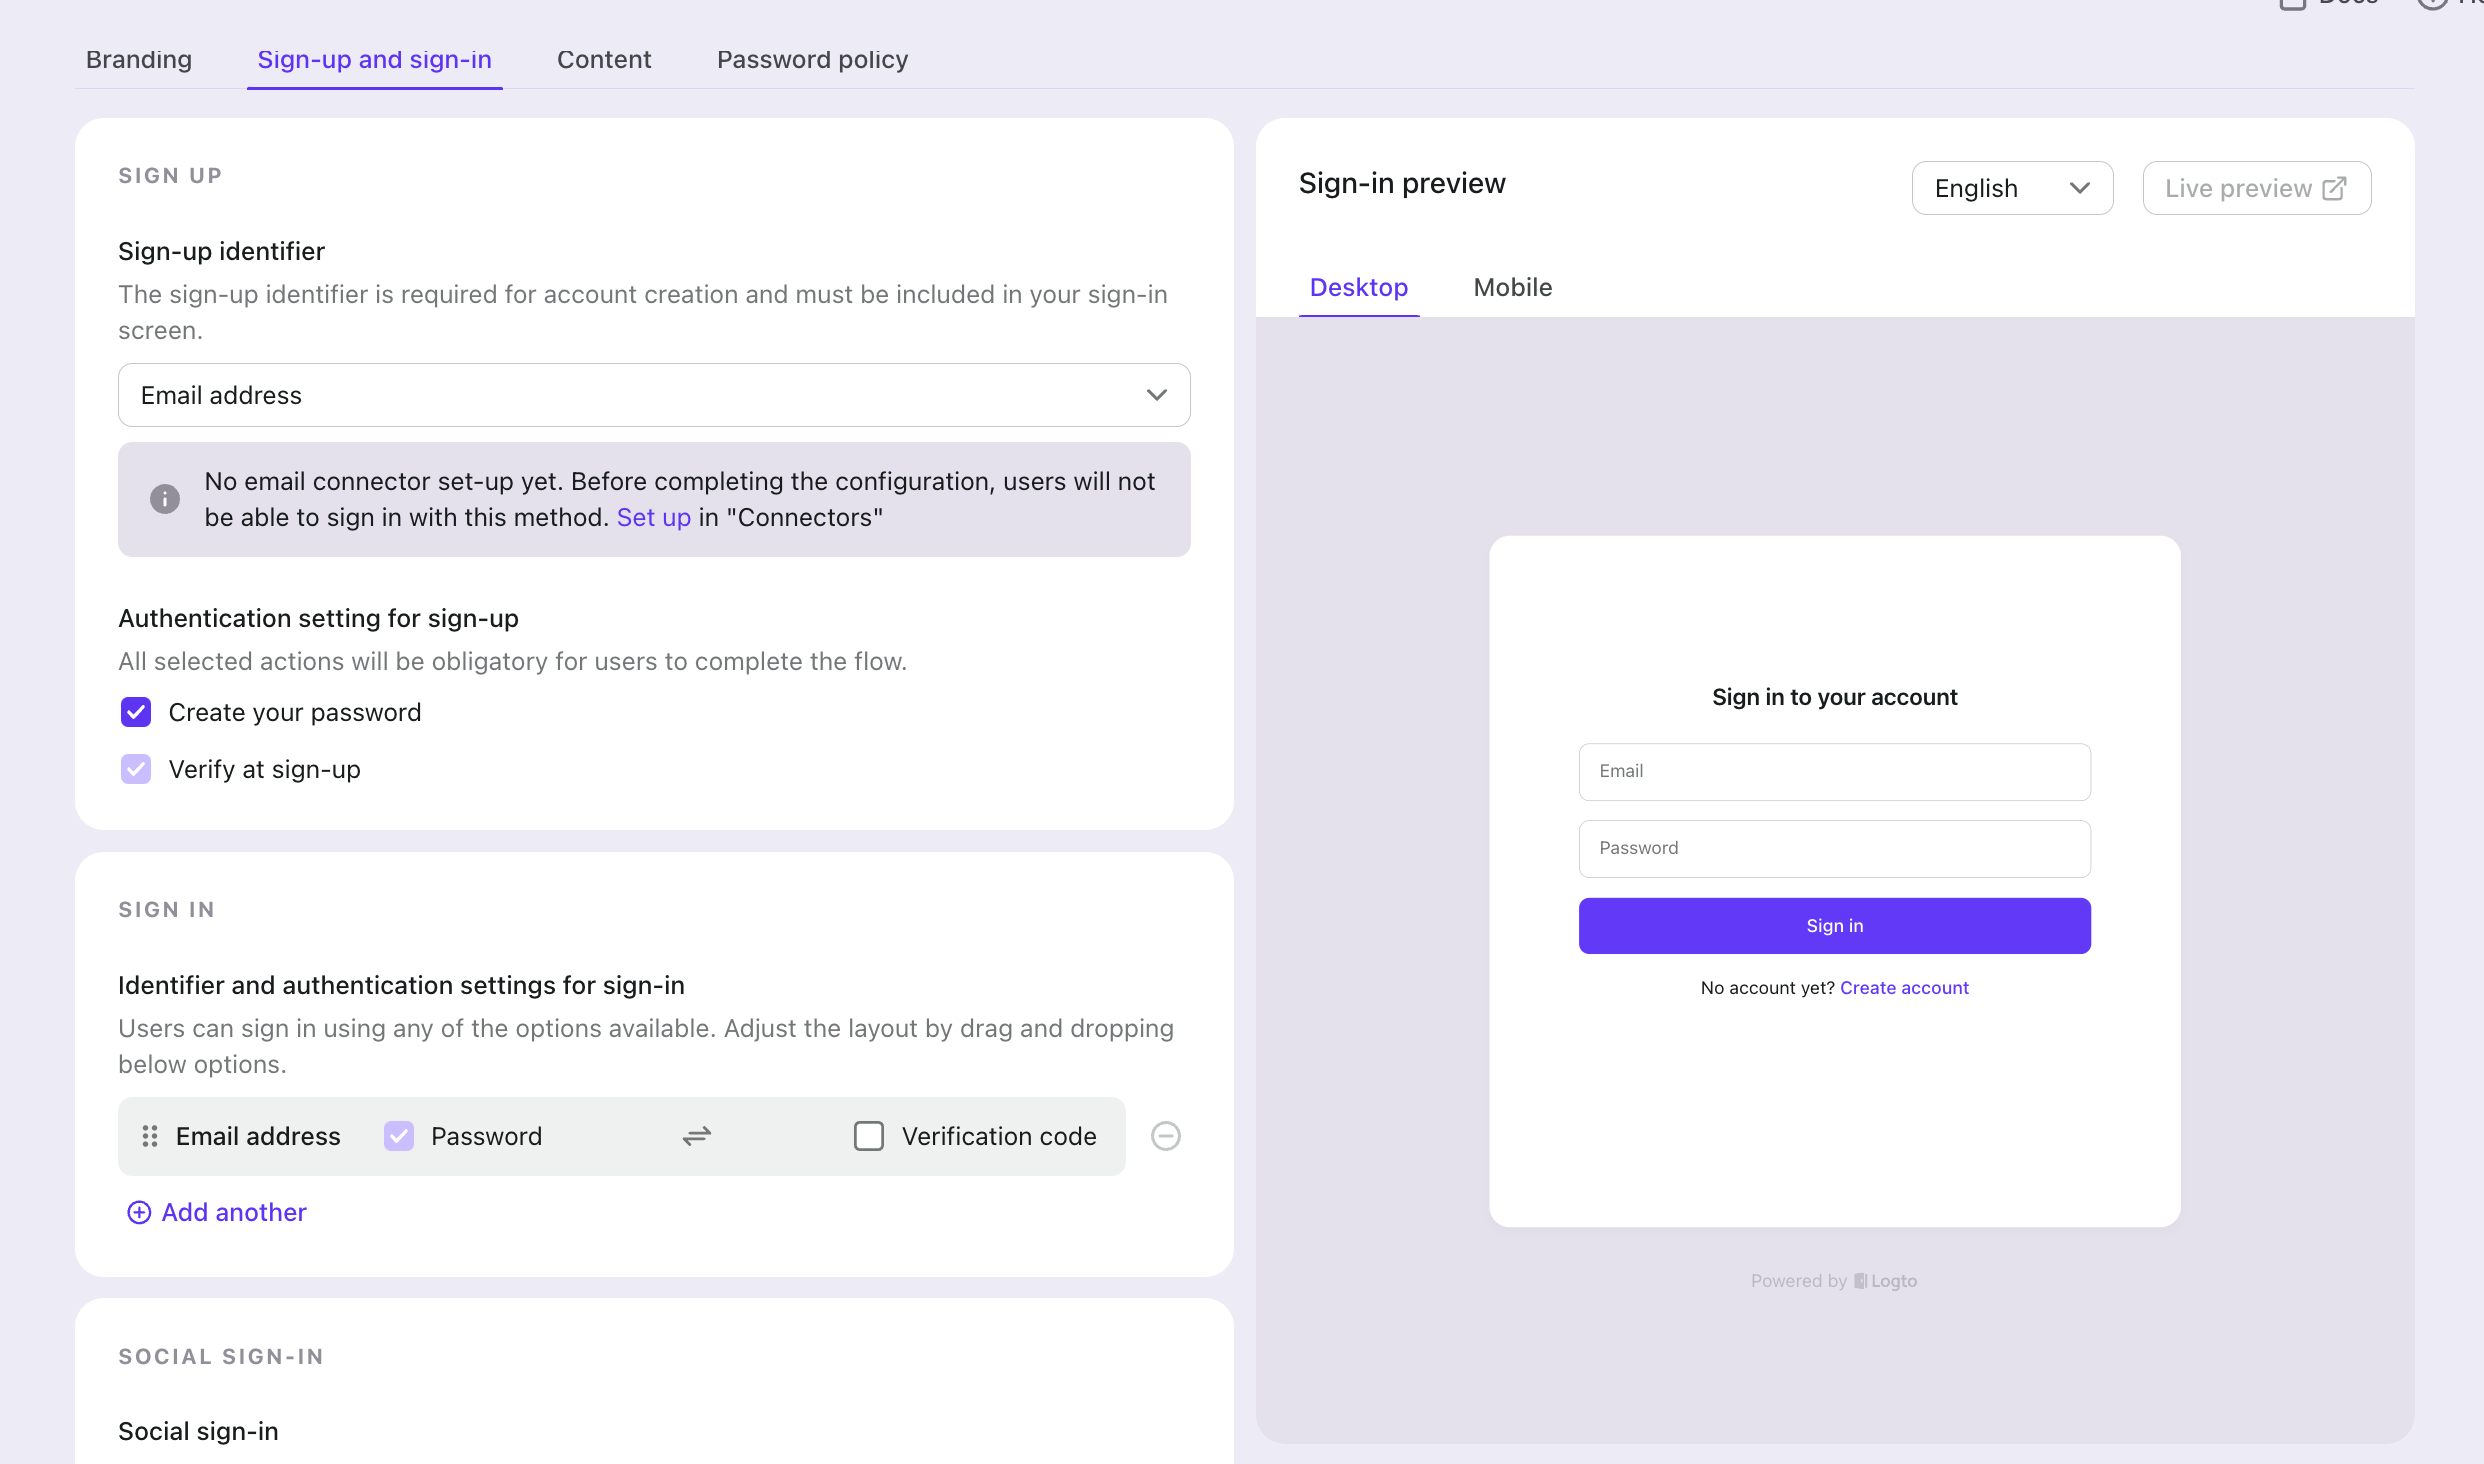
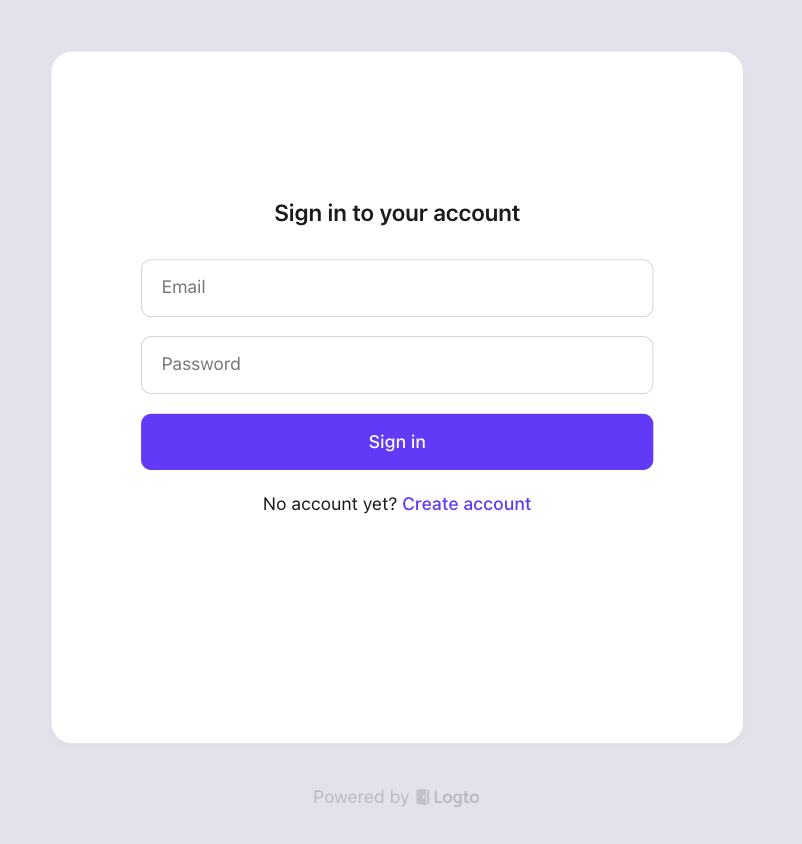
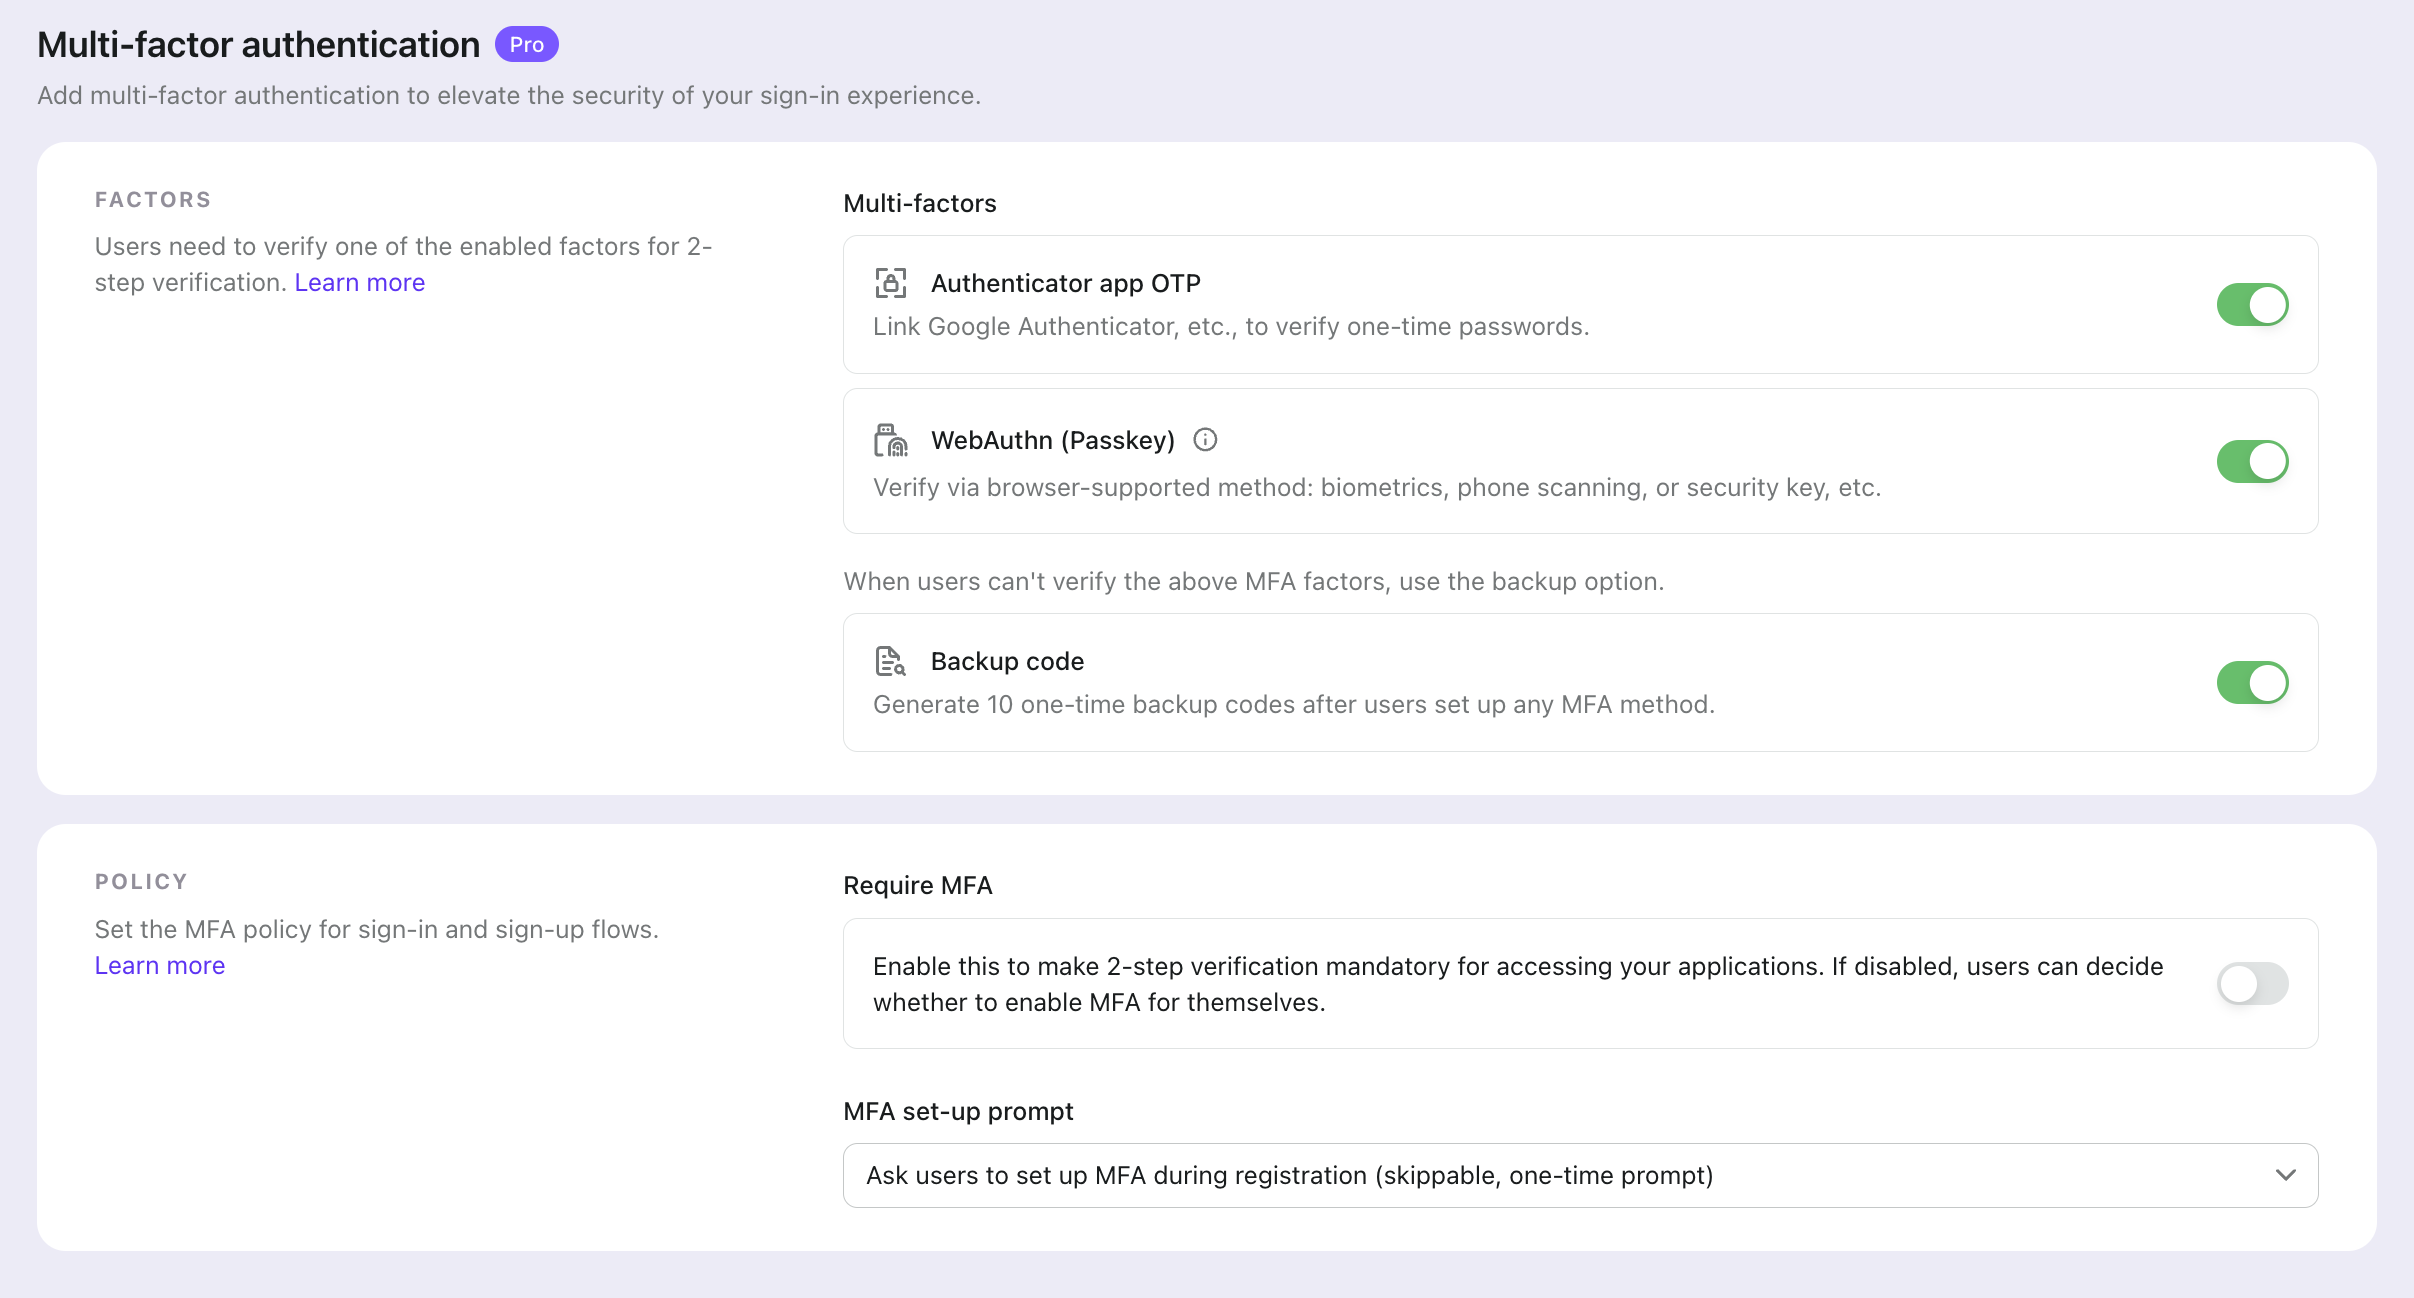
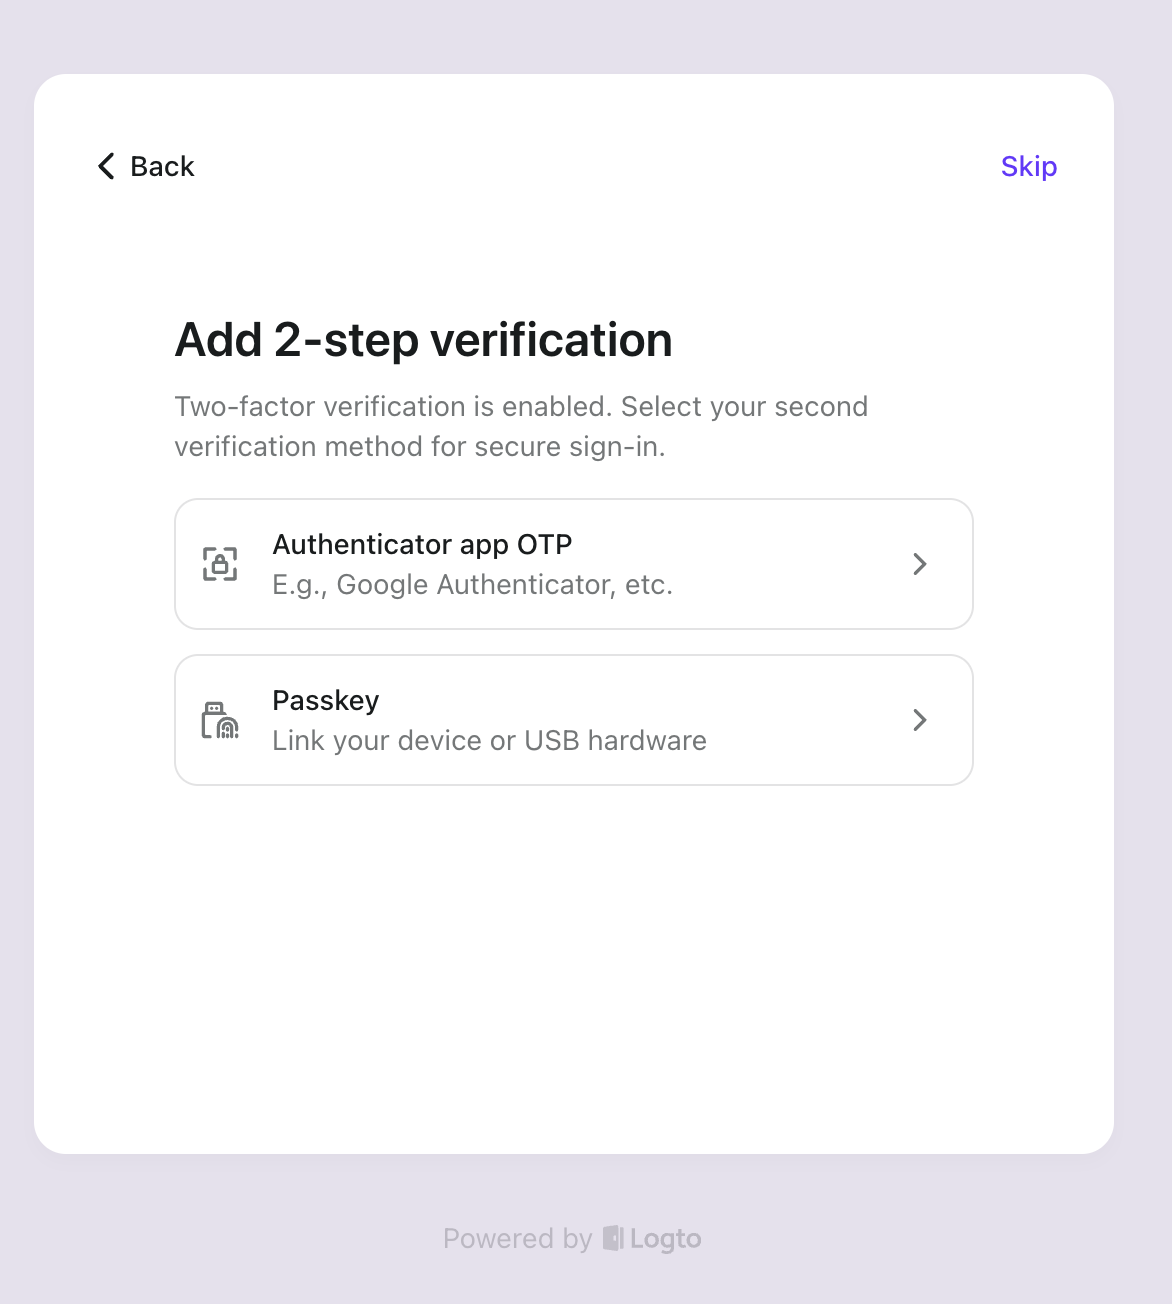
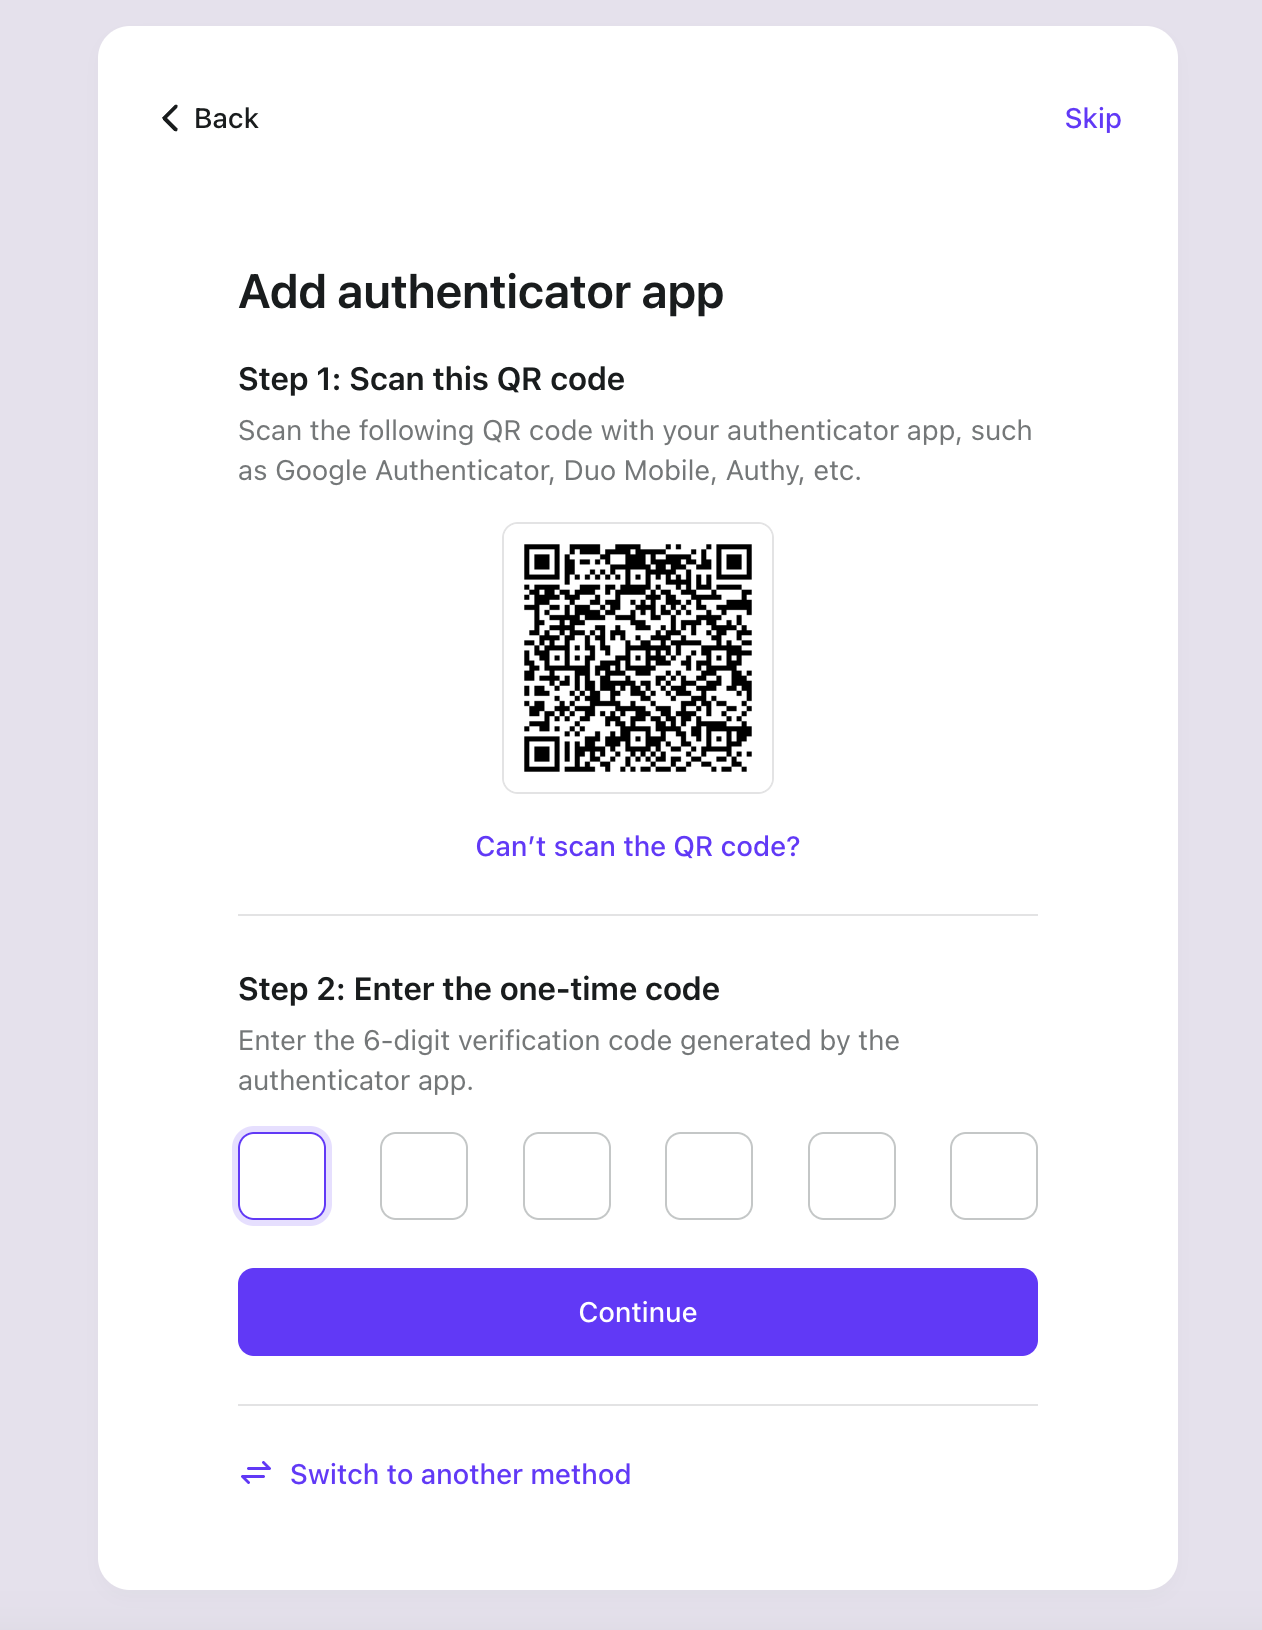
%3btext-align:center%3b%7d%23mermaid-5 .edgeLabel p%7bbackground-color:rgba(232%2c232%2c232%2c 0.8)%3b%7d%23mermaid-5 .edgeLabel rect%7bopacity:0.5%3bbackground-color:rgba(232%2c232%2c232%2c 0.8)%3bfill:rgba(232%2c232%2c232%2c 0.8)%3b%7d%23mermaid-5 .labelBkg%7bbackground-color:rgba(232%2c 232%2c 232%2c 0.5)%3b%7d%23mermaid-5 .cluster rect%7bfill:%23ffffde%3bstroke:%23aaaa33%3bstroke-width:1px%3b%7d%23mermaid-5 .cluster text%7bfill:%23333%3b%7d%23mermaid-5 .cluster span%7bcolor:%23333%3b%7d%23mermaid-5 div.mermaidTooltip%7bposition:absolute%3btext-align:center%3bmax-width:200px%3bpadding:2px%3bfont-family:arial%2csans-serif%3bfont-size:12px%3bbackground:hsl(80%2c 100%25%2c 96.2745098039%25)%3bborder:1px solid %23aaaa33%3bborder-radius:2px%3bpointer-events:none%3bz-index:100%3b%7d%23mermaid-5 .flowchartTitleText%7btext-anchor:middle%3bfont-size:18px%3bfill:%23333%3b%7d%23mermaid-5 rect.text%7bfill:none%3bstroke-width:0%3b%7d%23mermaid-5 .icon-shape%2c%23mermaid-5 .image-shape%7bbackground-color:rgba(232%2c232%2c232%2c 0.8)%3btext-align:center%3b%7d%23mermaid-5 .icon-shape p%2c%23mermaid-5 .image-shape p%7bbackground-color:rgba(232%2c232%2c232%2c 0.8)%3bpadding:2px%3b%7d%23mermaid-5 .icon-shape rect%2c%23mermaid-5 .image-shape rect%7bopacity:0.5%3bbackground-color:rgba(232%2c232%2c232%2c 0.8)%3bfill:rgba(232%2c232%2c232%2c 0.8)%3b%7d%23mermaid-5 :root%7b--mermaid-font-family:arial%2csans-serif%3b%7d%3c/style%3e%3cg%3e%3cmarker orient='auto' markerHeight='8' markerWidth='8' markerUnits='userSpaceOnUse' refY='5' refX='5' viewBox='0 0 10 10' class='marker flowchart-v2' id='mermaid-5_flowchart-v2-pointEnd'%3e%3cpath style='stroke-width: 1%3b stroke-dasharray: 1%2c 0%3b' class='arrowMarkerPath' d='M 0 0 L 10 5 L 0 10 z'/%3e%3c/marker%3e%3cmarker orient='auto' markerHeight='8' markerWidth='8' markerUnits='userSpaceOnUse' refY='5' refX='4.5' viewBox='0 0 10 10' class='marker flowchart-v2' id='mermaid-5_flowchart-v2-pointStart'%3e%3cpath style='stroke-width: 1%3b stroke-dasharray: 1%2c 0%3b' class='arrowMarkerPath' d='M 0 5 L 10 10 L 10 0 z'/%3e%3c/marker%3e%3cmarker orient='auto' markerHeight='11' markerWidth='11' markerUnits='userSpaceOnUse' refY='5' refX='11' viewBox='0 0 10 10' class='marker flowchart-v2' id='mermaid-5_flowchart-v2-circleEnd'%3e%3ccircle style='stroke-width: 1%3b stroke-dasharray: 1%2c 0%3b' class='arrowMarkerPath' r='5' cy='5' cx='5'/%3e%3c/marker%3e%3cmarker orient='auto' markerHeight='11' markerWidth='11' markerUnits='userSpaceOnUse' refY='5' refX='-1' viewBox='0 0 10 10' class='marker flowchart-v2' id='mermaid-5_flowchart-v2-circleStart'%3e%3ccircle style='stroke-width: 1%3b stroke-dasharray: 1%2c 0%3b' class='arrowMarkerPath' r='5' cy='5' cx='5'/%3e%3c/marker%3e%3cmarker orient='auto' markerHeight='11' markerWidth='11' markerUnits='userSpaceOnUse' refY='5.2' refX='12' viewBox='0 0 11 11' class='marker cross flowchart-v2' id='mermaid-5_flowchart-v2-crossEnd'%3e%3cpath style='stroke-width: 2%3b stroke-dasharray: 1%2c 0%3b' class='arrowMarkerPath' d='M 1%2c1 l 9%2c9 M 10%2c1 l -9%2c9'/%3e%3c/marker%3e%3cmarker orient='auto' markerHeight='11' markerWidth='11' markerUnits='userSpaceOnUse' refY='5.2' refX='-1' viewBox='0 0 11 11' class='marker cross flowchart-v2' id='mermaid-5_flowchart-v2-crossStart'%3e%3cpath style='stroke-width: 2%3b stroke-dasharray: 1%2c 0%3b' class='arrowMarkerPath' d='M 1%2c1 l 9%2c9 M 10%2c1 l -9%2c9'/%3e%3c/marker%3e%3cg class='root'%3e%3cg class='clusters'/%3e%3cg class='edgePaths'%3e%3cpath marker-end='url(%23mermaid-5_flowchart-v2-pointEnd)' style='' class='edge-thickness-normal edge-pattern-solid edge-thickness-normal edge-pattern-solid flowchart-link' id='L_T_OrgA_0' d='M245.891%2c57.961L230.19%2c62.801C214.49%2c67.64%2c183.089%2c77.32%2c167.388%2c85.66C151.688%2c94%2c151.688%2c101%2c151.688%2c104.5L151.688%2c108'/%3e%3cpath marker-end='url(%23mermaid-5_flowchart-v2-pointEnd)' style='' class='edge-thickness-normal edge-pattern-solid edge-thickness-normal edge-pattern-solid flowchart-link' id='L_T_OrgB_1' d='M394.859%2c57.961L410.56%2c62.801C426.26%2c67.64%2c457.661%2c77.32%2c473.362%2c85.66C489.063%2c94%2c489.063%2c101%2c489.063%2c104.5L489.063%2c108'/%3e%3cpath marker-end='url(%23mermaid-5_flowchart-v2-pointEnd)' style='' class='edge-thickness-normal edge-pattern-solid edge-thickness-normal edge-pattern-solid flowchart-link' id='L_OrgA_MA1_2' d='M107.894%2c166L101.135%2c170.167C94.377%2c174.333%2c80.86%2c182.667%2c74.102%2c190.333C67.344%2c198%2c67.344%2c205%2c67.344%2c208.5L67.344%2c212'/%3e%3cpath marker-end='url(%23mermaid-5_flowchart-v2-pointEnd)' style='' class='edge-thickness-normal edge-pattern-solid edge-thickness-normal edge-pattern-solid flowchart-link' id='L_OrgA_MA2_3' d='M195.481%2c166L202.24%2c170.167C208.998%2c174.333%2c222.515%2c182.667%2c229.273%2c190.333C236.031%2c198%2c236.031%2c205%2c236.031%2c208.5L236.031%2c212'/%3e%3cpath marker-end='url(%23mermaid-5_flowchart-v2-pointEnd)' style='' class='edge-thickness-normal edge-pattern-solid edge-thickness-normal edge-pattern-solid flowchart-link' id='L_OrgB_MB1_4' d='M445.269%2c166L438.51%2c170.167C431.752%2c174.333%2c418.235%2c182.667%2c411.477%2c190.333C404.719%2c198%2c404.719%2c205%2c404.719%2c208.5L404.719%2c212'/%3e%3cpath marker-end='url(%23mermaid-5_flowchart-v2-pointEnd)' style='' class='edge-thickness-normal edge-pattern-solid edge-thickness-normal edge-pattern-solid flowchart-link' id='L_OrgB_MB2_5' d='M532.856%2c166L539.615%2c170.167C546.373%2c174.333%2c559.89%2c182.667%2c566.648%2c190.333C573.406%2c198%2c573.406%2c205%2c573.406%2c208.5L573.406%2c212'/%3e%3c/g%3e%3cg class='edgeLabels'%3e%3cg class='edgeLabel'%3e%3cg transform='translate(0%2c 0)' class='label'%3e%3cforeignObject height='0' width='0'%3e%3cdiv style='display: table-cell%3b white-space: nowrap%3b line-height: 1.5%3b max-width: 200px%3b text-align: center%3b' class='labelBkg' xmlns='http://www.w3.org/1999/xhtml'%3e%3cspan class='edgeLabel'%3e%3c/span%3e%3c/div%3e%3c/foreignObject%3e%3c/g%3e%3c/g%3e%3cg class='edgeLabel'%3e%3cg transform='translate(0%2c 0)' class='label'%3e%3cforeignObject height='0' width='0'%3e%3cdiv style='display: table-cell%3b white-space: nowrap%3b line-height: 1.5%3b max-width: 200px%3b text-align: center%3b' class='labelBkg' xmlns='http://www.w3.org/1999/xhtml'%3e%3cspan class='edgeLabel'%3e%3c/span%3e%3c/div%3e%3c/foreignObject%3e%3c/g%3e%3c/g%3e%3cg class='edgeLabel'%3e%3cg transform='translate(0%2c 0)' class='label'%3e%3cforeignObject height='0' width='0'%3e%3cdiv style='display: table-cell%3b white-space: nowrap%3b line-height: 1.5%3b max-width: 200px%3b text-align: center%3b' class='labelBkg' xmlns='http://www.w3.org/1999/xhtml'%3e%3cspan class='edgeLabel'%3e%3c/span%3e%3c/div%3e%3c/foreignObject%3e%3c/g%3e%3c/g%3e%3cg class='edgeLabel'%3e%3cg transform='translate(0%2c 0)' class='label'%3e%3cforeignObject height='0' width='0'%3e%3cdiv style='display: table-cell%3b white-space: nowrap%3b line-height: 1.5%3b max-width: 200px%3b text-align: center%3b' class='labelBkg' xmlns='http://www.w3.org/1999/xhtml'%3e%3cspan class='edgeLabel'%3e%3c/span%3e%3c/div%3e%3c/foreignObject%3e%3c/g%3e%3c/g%3e%3cg class='edgeLabel'%3e%3cg transform='translate(0%2c 0)' class='label'%3e%3cforeignObject height='0' width='0'%3e%3cdiv style='display: table-cell%3b white-space: nowrap%3b line-height: 1.5%3b max-width: 200px%3b text-align: center%3b' class='labelBkg' xmlns='http://www.w3.org/1999/xhtml'%3e%3cspan class='edgeLabel'%3e%3c/span%3e%3c/div%3e%3c/foreignObject%3e%3c/g%3e%3c/g%3e%3cg class='edgeLabel'%3e%3cg transform='translate(0%2c 0)' class='label'%3e%3cforeignObject height='0' width='0'%3e%3cdiv style='display: table-cell%3b white-space: nowrap%3b line-height: 1.5%3b max-width: 200px%3b text-align: center%3b' class='labelBkg' xmlns='http://www.w3.org/1999/xhtml'%3e%3cspan class='edgeLabel'%3e%3c/span%3e%3c/div%3e%3c/foreignObject%3e%3c/g%3e%3c/g%3e%3c/g%3e%3cg class='nodes'%3e%3cg transform='translate(320.375%2c 35)' id='flowchart-T-27' class='node default'%3e%3crect height='54' width='148.96875' y='-27' x='-74.484375' style='' class='basic label-container'/%3e%3cg transform='translate(-44.484375%2c -12)' style='' class='label'%3e%3crect/%3e%3cforeignObject height='24' width='88.96875'%3e%3cdiv style='display: table-cell%3b white-space: nowrap%3b line-height: 1.5%3b max-width: 200px%3b text-align: center%3b' xmlns='http://www.w3.org/1999/xhtml'%3e%3cspan class='nodeLabel'%3e%3cp%3eLogto tenant%3c/p%3e%3c/span%3e%3c/div%3e%3c/foreignObject%3e%3c/g%3e%3c/g%3e%3cg transform='translate(151.6875%2c 139)' id='flowchart-OrgA-28' class='node default'%3e%3crect height='54' width='164.953125' y='-27' x='-82.4765625' style='fill:%23e6ffe6 !important' class='basic label-container'/%3e%3cg transform='translate(-52.4765625%2c -12)' style='' class='label'%3e%3crect/%3e%3cforeignObject height='24' width='104.953125'%3e%3cdiv style='display: table-cell%3b white-space: nowrap%3b line-height: 1.5%3b max-width: 200px%3b text-align: center%3b' xmlns='http://www.w3.org/1999/xhtml'%3e%3cspan class='nodeLabel'%3e%3cp%3eOrganization A%3c/p%3e%3c/span%3e%3c/div%3e%3c/foreignObject%3e%3c/g%3e%3c/g%3e%3cg transform='translate(489.0625%2c 139)' id='flowchart-OrgB-30' class='node default'%3e%3crect height='54' width='165.84375' y='-27' x='-82.921875' style='fill:%23e6ffe6 !important' class='basic label-container'/%3e%3cg transform='translate(-52.921875%2c -12)' style='' class='label'%3e%3crect/%3e%3cforeignObject height='24' width='105.84375'%3e%3cdiv style='display: table-cell%3b white-space: nowrap%3b line-height: 1.5%3b max-width: 200px%3b text-align: center%3b' xmlns='http://www.w3.org/1999/xhtml'%3e%3cspan class='nodeLabel'%3e%3cp%3eOrganization B%3c/p%3e%3c/span%3e%3c/div%3e%3c/foreignObject%3e%3c/g%3e%3c/g%3e%3cg transform='translate(67.34375%2c 243)' id='flowchart-MA1-32' class='node default'%3e%3crect height='54' width='118.6875' y='-27' x='-59.34375' style='' class='basic label-container'/%3e%3cg transform='translate(-29.34375%2c -12)' style='' class='label'%3e%3crect/%3e%3cforeignObject height='24' width='58.6875'%3e%3cdiv style='display: table-cell%3b white-space: nowrap%3b line-height: 1.5%3b max-width: 200px%3b text-align: center%3b' xmlns='http://www.w3.org/1999/xhtml'%3e%3cspan class='nodeLabel'%3e%3cp%3eMember%3c/p%3e%3c/span%3e%3c/div%3e%3c/foreignObject%3e%3c/g%3e%3c/g%3e%3cg transform='translate(236.03125%2c 243)' id='flowchart-MA2-34' class='node default'%3e%3crect height='54' width='118.6875' y='-27' x='-59.34375' style='' class='basic label-container'/%3e%3cg transform='translate(-29.34375%2c -12)' style='' class='label'%3e%3crect/%3e%3cforeignObject height='24' width='58.6875'%3e%3cdiv style='display: table-cell%3b white-space: nowrap%3b line-height: 1.5%3b max-width: 200px%3b text-align: center%3b' xmlns='http://www.w3.org/1999/xhtml'%3e%3cspan class='nodeLabel'%3e%3cp%3eMember%3c/p%3e%3c/span%3e%3c/div%3e%3c/foreignObject%3e%3c/g%3e%3c/g%3e%3cg transform='translate(404.71875%2c 243)' id='flowchart-MB1-36' class='node default'%3e%3crect height='54' width='118.6875' y='-27' x='-59.34375' style='' class='basic label-container'/%3e%3cg transform='translate(-29.34375%2c -12)' style='' class='label'%3e%3crect/%3e%3cforeignObject height='24' width='58.6875'%3e%3cdiv style='display: table-cell%3b white-space: nowrap%3b line-height: 1.5%3b max-width: 200px%3b text-align: center%3b' xmlns='http://www.w3.org/1999/xhtml'%3e%3cspan class='nodeLabel'%3e%3cp%3eMember%3c/p%3e%3c/span%3e%3c/div%3e%3c/foreignObject%3e%3c/g%3e%3c/g%3e%3cg transform='translate(573.40625%2c 243)' id='flowchart-MB2-38' class='node default'%3e%3crect height='54' width='118.6875' y='-27' x='-59.34375' style='' class='basic label-container'/%3e%3cg transform='translate(-29.34375%2c -12)' style='' class='label'%3e%3crect/%3e%3cforeignObject height='24' width='58.6875'%3e%3cdiv style='display: table-cell%3b white-space: nowrap%3b line-height: 1.5%3b max-width: 200px%3b text-align: center%3b' xmlns='http://www.w3.org/1999/xhtml'%3e%3cspan class='nodeLabel'%3e%3cp%3eMember%3c/p%3e%3c/span%3e%3c/div%3e%3c/foreignObject%3e%3c/g%3e%3c/g%3e%3c/g%3e%3c/g%3e%3c/g%3e%3c/svg%3e)

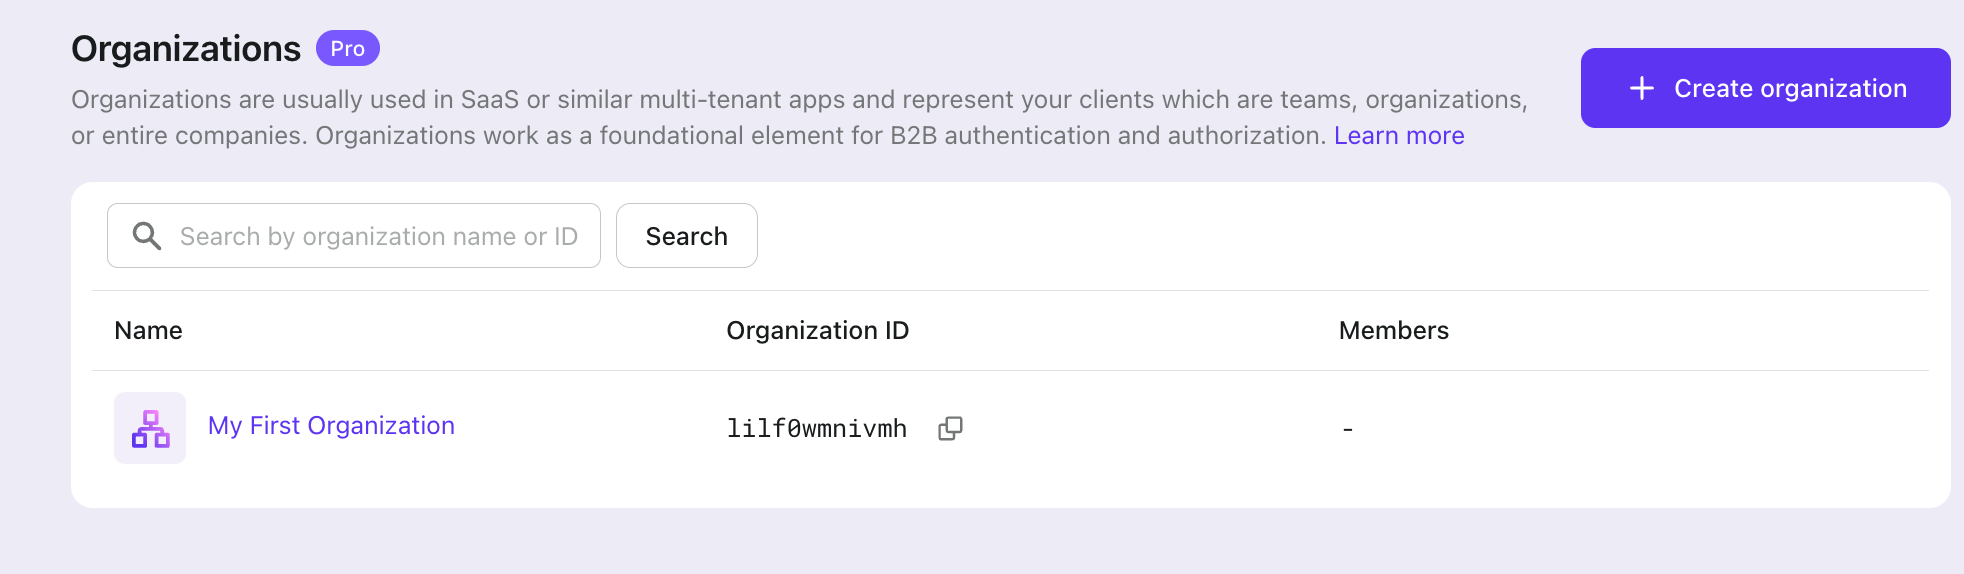
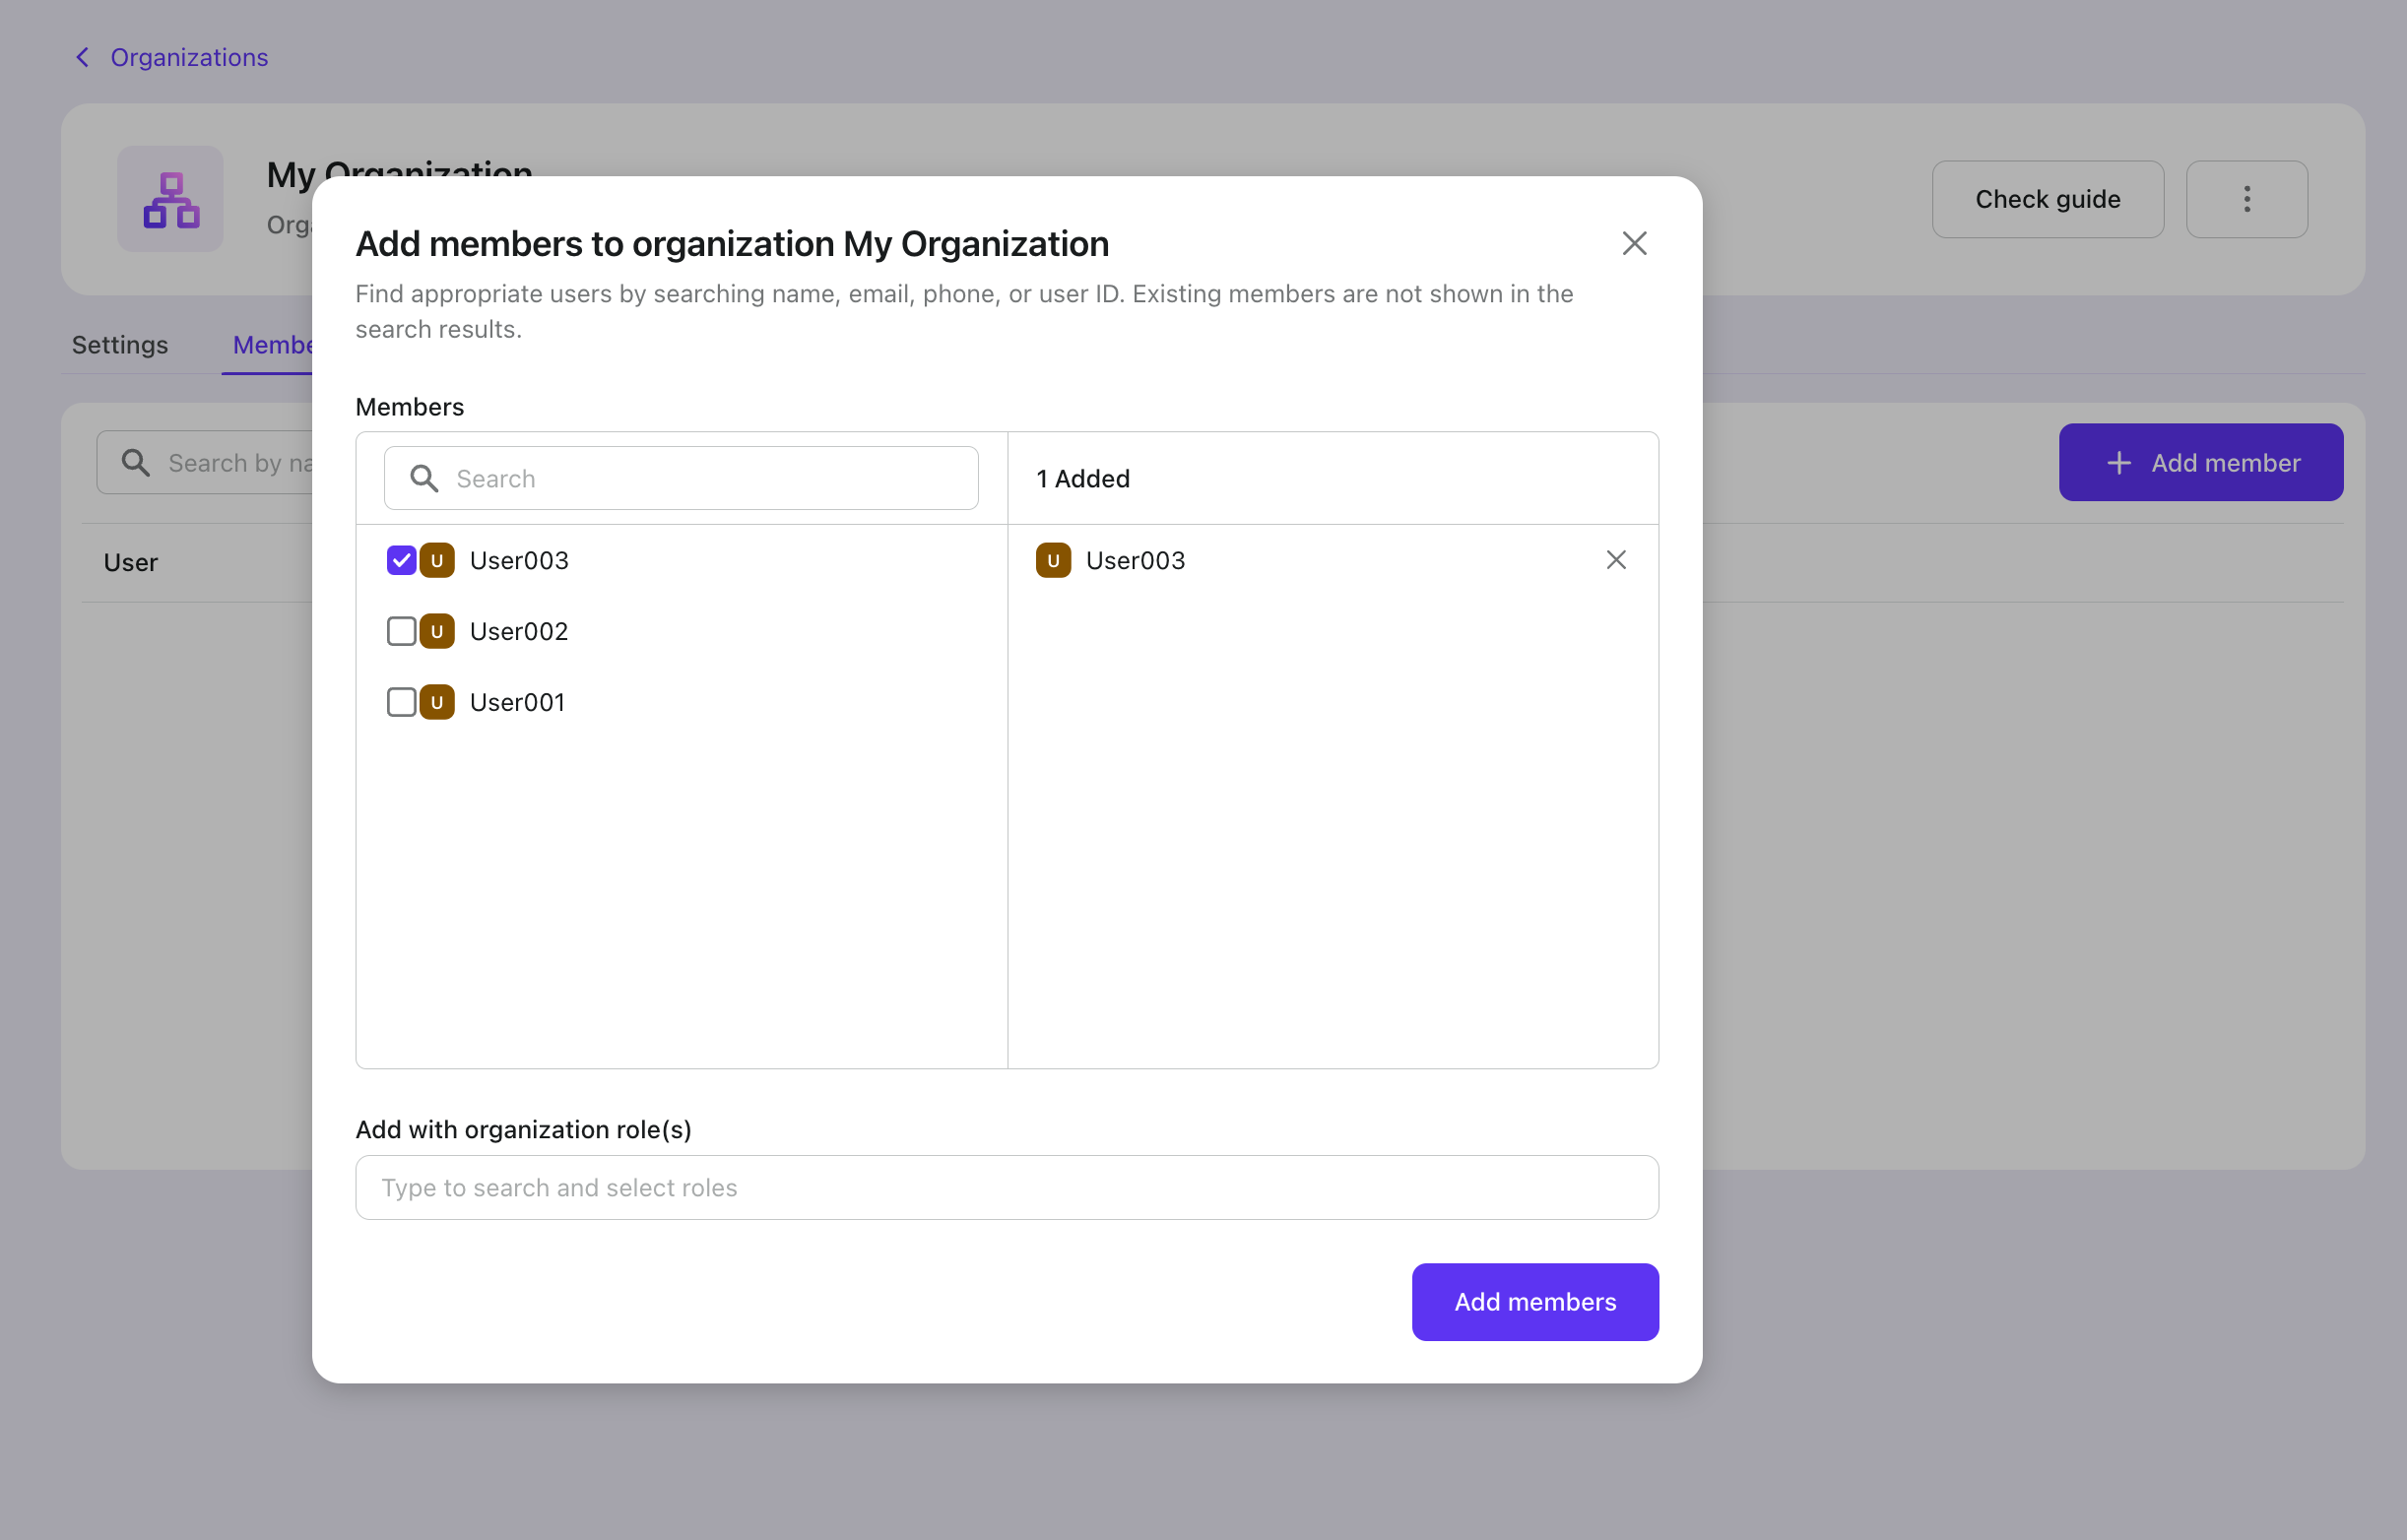

%3bfill:%23ECECFF%3b%7d%23mermaid-6 text.actor%26gt%3btspan%7bfill:black%3bstroke:none%3b%7d%23mermaid-6 .actor-line%7bstroke:hsl(259.6261682243%2c 59.7765363128%25%2c 87.9019607843%25)%3b%7d%23mermaid-6 .messageLine0%7bstroke-width:1.5%3bstroke-dasharray:none%3bstroke:%23333%3b%7d%23mermaid-6 .messageLine1%7bstroke-width:1.5%3bstroke-dasharray:2%2c2%3bstroke:%23333%3b%7d%23mermaid-6 %23arrowhead path%7bfill:%23333%3bstroke:%23333%3b%7d%23mermaid-6 .sequenceNumber%7bfill:white%3b%7d%23mermaid-6 %23sequencenumber%7bfill:%23333%3b%7d%23mermaid-6 %23crosshead path%7bfill:%23333%3bstroke:%23333%3b%7d%23mermaid-6 .messageText%7bfill:%23333%3bstroke:none%3b%7d%23mermaid-6 .labelBox%7bstroke:hsl(259.6261682243%2c 59.7765363128%25%2c 87.9019607843%25)%3bfill:%23ECECFF%3b%7d%23mermaid-6 .labelText%2c%23mermaid-6 .labelText%26gt%3btspan%7bfill:black%3bstroke:none%3b%7d%23mermaid-6 .loopText%2c%23mermaid-6 .loopText%26gt%3btspan%7bfill:black%3bstroke:none%3b%7d%23mermaid-6 .loopLine%7bstroke-width:2px%3bstroke-dasharray:2%2c2%3bstroke:hsl(259.6261682243%2c 59.7765363128%25%2c 87.9019607843%25)%3bfill:hsl(259.6261682243%2c 59.7765363128%25%2c 87.9019607843%25)%3b%7d%23mermaid-6 .note%7bstroke:%23aaaa33%3bfill:%23fff5ad%3b%7d%23mermaid-6 .noteText%2c%23mermaid-6 .noteText%26gt%3btspan%7bfill:black%3bstroke:none%3b%7d%23mermaid-6 .activation0%7bfill:%23f4f4f4%3bstroke:%23666%3b%7d%23mermaid-6 .activation1%7bfill:%23f4f4f4%3bstroke:%23666%3b%7d%23mermaid-6 .activation2%7bfill:%23f4f4f4%3bstroke:%23666%3b%7d%23mermaid-6 .actorPopupMenu%7bposition:absolute%3b%7d%23mermaid-6 .actorPopupMenuPanel%7bposition:absolute%3bfill:%23ECECFF%3bbox-shadow:0px 8px 16px 0px rgba(0%2c0%2c0%2c0.2)%3bfilter:drop-shadow(3px 5px 2px rgb(0 0 0 / 0.4))%3b%7d%23mermaid-6 .actor-man line%7bstroke:hsl(259.6261682243%2c 59.7765363128%25%2c 87.9019607843%25)%3bfill:%23ECECFF%3b%7d%23mermaid-6 .actor-man circle%2c%23mermaid-6 line%7bstroke:hsl(259.6261682243%2c 59.7765363128%25%2c 87.9019607843%25)%3bfill:%23ECECFF%3bstroke-width:2px%3b%7d%23mermaid-6 :root%7b--mermaid-font-family:arial%2csans-serif%3b%7d%3c/style%3e%3cg/%3e%3cdefs%3e%3csymbol height='24' width='24' id='computer'%3e%3cpath d='M2 2v13h20v-13h-20zm18 11h-16v-9h16v9zm-10.228 6l.466-1h3.524l.467 1h-4.457zm14.228 3h-24l2-6h2.104l-1.33 4h18.45l-1.297-4h2.073l2 6zm-5-10h-14v-7h14v7z' transform='scale(.5)'/%3e%3c/symbol%3e%3c/defs%3e%3cdefs%3e%3csymbol clip-rule='evenodd' fill-rule='evenodd' id='database'%3e%3cpath d='M12.258.001l.256.004.255.005.253.008.251.01.249.012.247.015.246.016.242.019.241.02.239.023.236.024.233.027.231.028.229.031.225.032.223.034.22.036.217.038.214.04.211.041.208.043.205.045.201.046.198.048.194.05.191.051.187.053.183.054.18.056.175.057.172.059.168.06.163.061.16.063.155.064.15.066.074.033.073.033.071.034.07.034.069.035.068.035.067.035.066.035.064.036.064.036.062.036.06.036.06.037.058.037.058.037.055.038.055.038.053.038.052.038.051.039.05.039.048.039.047.039.045.04.044.04.043.04.041.04.04.041.039.041.037.041.036.041.034.041.033.042.032.042.03.042.029.042.027.042.026.043.024.043.023.043.021.043.02.043.018.044.017.043.015.044.013.044.012.044.011.045.009.044.007.045.006.045.004.045.002.045.001.045v17l-.001.045-.002.045-.004.045-.006.045-.007.045-.009.044-.011.045-.012.044-.013.044-.015.044-.017.043-.018.044-.02.043-.021.043-.023.043-.024.043-.026.043-.027.042-.029.042-.03.042-.032.042-.033.042-.034.041-.036.041-.037.041-.039.041-.04.041-.041.04-.043.04-.044.04-.045.04-.047.039-.048.039-.05.039-.051.039-.052.038-.053.038-.055.038-.055.038-.058.037-.058.037-.06.037-.06.036-.062.036-.064.036-.064.036-.066.035-.067.035-.068.035-.069.035-.07.034-.071.034-.073.033-.074.033-.15.066-.155.064-.16.063-.163.061-.168.06-.172.059-.175.057-.18.056-.183.054-.187.053-.191.051-.194.05-.198.048-.201.046-.205.045-.208.043-.211.041-.214.04-.217.038-.22.036-.223.034-.225.032-.229.031-.231.028-.233.027-.236.024-.239.023-.241.02-.242.019-.246.016-.247.015-.249.012-.251.01-.253.008-.255.005-.256.004-.258.001-.258-.001-.256-.004-.255-.005-.253-.008-.251-.01-.249-.012-.247-.015-.245-.016-.243-.019-.241-.02-.238-.023-.236-.024-.234-.027-.231-.028-.228-.031-.226-.032-.223-.034-.22-.036-.217-.038-.214-.04-.211-.041-.208-.043-.204-.045-.201-.046-.198-.048-.195-.05-.19-.051-.187-.053-.184-.054-.179-.056-.176-.057-.172-.059-.167-.06-.164-.061-.159-.063-.155-.064-.151-.066-.074-.033-.072-.033-.072-.034-.07-.034-.069-.035-.068-.035-.067-.035-.066-.035-.064-.036-.063-.036-.062-.036-.061-.036-.06-.037-.058-.037-.057-.037-.056-.038-.055-.038-.053-.038-.052-.038-.051-.039-.049-.039-.049-.039-.046-.039-.046-.04-.044-.04-.043-.04-.041-.04-.04-.041-.039-.041-.037-.041-.036-.041-.034-.041-.033-.042-.032-.042-.03-.042-.029-.042-.027-.042-.026-.043-.024-.043-.023-.043-.021-.043-.02-.043-.018-.044-.017-.043-.015-.044-.013-.044-.012-.044-.011-.045-.009-.044-.007-.045-.006-.045-.004-.045-.002-.045-.001-.045v-17l.001-.045.002-.045.004-.045.006-.045.007-.045.009-.044.011-.045.012-.044.013-.044.015-.044.017-.043.018-.044.02-.043.021-.043.023-.043.024-.043.026-.043.027-.042.029-.042.03-.042.032-.042.033-.042.034-.041.036-.041.037-.041.039-.041.04-.041.041-.04.043-.04.044-.04.046-.04.046-.039.049-.039.049-.039.051-.039.052-.038.053-.038.055-.038.056-.038.057-.037.058-.037.06-.037.061-.036.062-.036.063-.036.064-.036.066-.035.067-.035.068-.035.069-.035.07-.034.072-.034.072-.033.074-.033.151-.066.155-.064.159-.063.164-.061.167-.06.172-.059.176-.057.179-.056.184-.054.187-.053.19-.051.195-.05.198-.048.201-.046.204-.045.208-.043.211-.041.214-.04.217-.038.22-.036.223-.034.226-.032.228-.031.231-.028.234-.027.236-.024.238-.023.241-.02.243-.019.245-.016.247-.015.249-.012.251-.01.253-.008.255-.005.256-.004.258-.001.258.001zm-9.258 20.499v.01l.001.021.003.021.004.022.005.021.006.022.007.022.009.023.01.022.011.023.012.023.013.023.015.023.016.024.017.023.018.024.019.024.021.024.022.025.023.024.024.025.052.049.056.05.061.051.066.051.07.051.075.051.079.052.084.052.088.052.092.052.097.052.102.051.105.052.11.052.114.051.119.051.123.051.127.05.131.05.135.05.139.048.144.049.147.047.152.047.155.047.16.045.163.045.167.043.171.043.176.041.178.041.183.039.187.039.19.037.194.035.197.035.202.033.204.031.209.03.212.029.216.027.219.025.222.024.226.021.23.02.233.018.236.016.24.015.243.012.246.01.249.008.253.005.256.004.259.001.26-.001.257-.004.254-.005.25-.008.247-.011.244-.012.241-.014.237-.016.233-.018.231-.021.226-.021.224-.024.22-.026.216-.027.212-.028.21-.031.205-.031.202-.034.198-.034.194-.036.191-.037.187-.039.183-.04.179-.04.175-.042.172-.043.168-.044.163-.045.16-.046.155-.046.152-.047.148-.048.143-.049.139-.049.136-.05.131-.05.126-.05.123-.051.118-.052.114-.051.11-.052.106-.052.101-.052.096-.052.092-.052.088-.053.083-.051.079-.052.074-.052.07-.051.065-.051.06-.051.056-.05.051-.05.023-.024.023-.025.021-.024.02-.024.019-.024.018-.024.017-.024.015-.023.014-.024.013-.023.012-.023.01-.023.01-.022.008-.022.006-.022.006-.022.004-.022.004-.021.001-.021.001-.021v-4.127l-.077.055-.08.053-.083.054-.085.053-.087.052-.09.052-.093.051-.095.05-.097.05-.1.049-.102.049-.105.048-.106.047-.109.047-.111.046-.114.045-.115.045-.118.044-.12.043-.122.042-.124.042-.126.041-.128.04-.13.04-.132.038-.134.038-.135.037-.138.037-.139.035-.142.035-.143.034-.144.033-.147.032-.148.031-.15.03-.151.03-.153.029-.154.027-.156.027-.158.026-.159.025-.161.024-.162.023-.163.022-.165.021-.166.02-.167.019-.169.018-.169.017-.171.016-.173.015-.173.014-.175.013-.175.012-.177.011-.178.01-.179.008-.179.008-.181.006-.182.005-.182.004-.184.003-.184.002h-.37l-.184-.002-.184-.003-.182-.004-.182-.005-.181-.006-.179-.008-.179-.008-.178-.01-.176-.011-.176-.012-.175-.013-.173-.014-.172-.015-.171-.016-.17-.017-.169-.018-.167-.019-.166-.02-.165-.021-.163-.022-.162-.023-.161-.024-.159-.025-.157-.026-.156-.027-.155-.027-.153-.029-.151-.03-.15-.03-.148-.031-.146-.032-.145-.033-.143-.034-.141-.035-.14-.035-.137-.037-.136-.037-.134-.038-.132-.038-.13-.04-.128-.04-.126-.041-.124-.042-.122-.042-.12-.044-.117-.043-.116-.045-.113-.045-.112-.046-.109-.047-.106-.047-.105-.048-.102-.049-.1-.049-.097-.05-.095-.05-.093-.052-.09-.051-.087-.052-.085-.053-.083-.054-.08-.054-.077-.054v4.127zm0-5.654v.011l.001.021.003.021.004.021.005.022.006.022.007.022.009.022.01.022.011.023.012.023.013.023.015.024.016.023.017.024.018.024.019.024.021.024.022.024.023.025.024.024.052.05.056.05.061.05.066.051.07.051.075.052.079.051.084.052.088.052.092.052.097.052.102.052.105.052.11.051.114.051.119.052.123.05.127.051.131.05.135.049.139.049.144.048.147.048.152.047.155.046.16.045.163.045.167.044.171.042.176.042.178.04.183.04.187.038.19.037.194.036.197.034.202.033.204.032.209.03.212.028.216.027.219.025.222.024.226.022.23.02.233.018.236.016.24.014.243.012.246.01.249.008.253.006.256.003.259.001.26-.001.257-.003.254-.006.25-.008.247-.01.244-.012.241-.015.237-.016.233-.018.231-.02.226-.022.224-.024.22-.025.216-.027.212-.029.21-.03.205-.032.202-.033.198-.035.194-.036.191-.037.187-.039.183-.039.179-.041.175-.042.172-.043.168-.044.163-.045.16-.045.155-.047.152-.047.148-.048.143-.048.139-.05.136-.049.131-.05.126-.051.123-.051.118-.051.114-.052.11-.052.106-.052.101-.052.096-.052.092-.052.088-.052.083-.052.079-.052.074-.051.07-.052.065-.051.06-.05.056-.051.051-.049.023-.025.023-.024.021-.025.02-.024.019-.024.018-.024.017-.024.015-.023.014-.023.013-.024.012-.022.01-.023.01-.023.008-.022.006-.022.006-.022.004-.021.004-.022.001-.021.001-.021v-4.139l-.077.054-.08.054-.083.054-.085.052-.087.053-.09.051-.093.051-.095.051-.097.05-.1.049-.102.049-.105.048-.106.047-.109.047-.111.046-.114.045-.115.044-.118.044-.12.044-.122.042-.124.042-.126.041-.128.04-.13.039-.132.039-.134.038-.135.037-.138.036-.139.036-.142.035-.143.033-.144.033-.147.033-.148.031-.15.03-.151.03-.153.028-.154.028-.156.027-.158.026-.159.025-.161.024-.162.023-.163.022-.165.021-.166.02-.167.019-.169.018-.169.017-.171.016-.173.015-.173.014-.175.013-.175.012-.177.011-.178.009-.179.009-.179.007-.181.007-.182.005-.182.004-.184.003-.184.002h-.37l-.184-.002-.184-.003-.182-.004-.182-.005-.181-.007-.179-.007-.179-.009-.178-.009-.176-.011-.176-.012-.175-.013-.173-.014-.172-.015-.171-.016-.17-.017-.169-.018-.167-.019-.166-.02-.165-.021-.163-.022-.162-.023-.161-.024-.159-.025-.157-.026-.156-.027-.155-.028-.153-.028-.151-.03-.15-.03-.148-.031-.146-.033-.145-.033-.143-.033-.141-.035-.14-.036-.137-.036-.136-.037-.134-.038-.132-.039-.13-.039-.128-.04-.126-.041-.124-.042-.122-.043-.12-.043-.117-.044-.116-.044-.113-.046-.112-.046-.109-.046-.106-.047-.105-.048-.102-.049-.1-.049-.097-.05-.095-.051-.093-.051-.09-.051-.087-.053-.085-.052-.083-.054-.08-.054-.077-.054v4.139zm0-5.666v.011l.001.02.003.022.004.021.005.022.006.021.007.022.009.023.01.022.011.023.012.023.013.023.015.023.016.024.017.024.018.023.019.024.021.025.022.024.023.024.024.025.052.05.056.05.061.05.066.051.07.051.075.052.079.051.084.052.088.052.092.052.097.052.102.052.105.051.11.052.114.051.119.051.123.051.127.05.131.05.135.05.139.049.144.048.147.048.152.047.155.046.16.045.163.045.167.043.171.043.176.042.178.04.183.04.187.038.19.037.194.036.197.034.202.033.204.032.209.03.212.028.216.027.219.025.222.024.226.021.23.02.233.018.236.017.24.014.243.012.246.01.249.008.253.006.256.003.259.001.26-.001.257-.003.254-.006.25-.008.247-.01.244-.013.241-.014.237-.016.233-.018.231-.02.226-.022.224-.024.22-.025.216-.027.212-.029.21-.03.205-.032.202-.033.198-.035.194-.036.191-.037.187-.039.183-.039.179-.041.175-.042.172-.043.168-.044.163-.045.16-.045.155-.047.152-.047.148-.048.143-.049.139-.049.136-.049.131-.051.126-.05.123-.051.118-.052.114-.051.11-.052.106-.052.101-.052.096-.052.092-.052.088-.052.083-.052.079-.052.074-.052.07-.051.065-.051.06-.051.056-.05.051-.049.023-.025.023-.025.021-.024.02-.024.019-.024.018-.024.017-.024.015-.023.014-.024.013-.023.012-.023.01-.022.01-.023.008-.022.006-.022.006-.022.004-.022.004-.021.001-.021.001-.021v-4.153l-.077.054-.08.054-.083.053-.085.053-.087.053-.09.051-.093.051-.095.051-.097.05-.1.049-.102.048-.105.048-.106.048-.109.046-.111.046-.114.046-.115.044-.118.044-.12.043-.122.043-.124.042-.126.041-.128.04-.13.039-.132.039-.134.038-.135.037-.138.036-.139.036-.142.034-.143.034-.144.033-.147.032-.148.032-.15.03-.151.03-.153.028-.154.028-.156.027-.158.026-.159.024-.161.024-.162.023-.163.023-.165.021-.166.02-.167.019-.169.018-.169.017-.171.016-.173.015-.173.014-.175.013-.175.012-.177.01-.178.01-.179.009-.179.007-.181.006-.182.006-.182.004-.184.003-.184.001-.185.001-.185-.001-.184-.001-.184-.003-.182-.004-.182-.006-.181-.006-.179-.007-.179-.009-.178-.01-.176-.01-.176-.012-.175-.013-.173-.014-.172-.015-.171-.016-.17-.017-.169-.018-.167-.019-.166-.02-.165-.021-.163-.023-.162-.023-.161-.024-.159-.024-.157-.026-.156-.027-.155-.028-.153-.028-.151-.03-.15-.03-.148-.032-.146-.032-.145-.033-.143-.034-.141-.034-.14-.036-.137-.036-.136-.037-.134-.038-.132-.039-.13-.039-.128-.041-.126-.041-.124-.041-.122-.043-.12-.043-.117-.044-.116-.044-.113-.046-.112-.046-.109-.046-.106-.048-.105-.048-.102-.048-.1-.05-.097-.049-.095-.051-.093-.051-.09-.052-.087-.052-.085-.053-.083-.053-.08-.054-.077-.054v4.153zm8.74-8.179l-.257.004-.254.005-.25.008-.247.011-.244.012-.241.014-.237.016-.233.018-.231.021-.226.022-.224.023-.22.026-.216.027-.212.028-.21.031-.205.032-.202.033-.198.034-.194.036-.191.038-.187.038-.183.04-.179.041-.175.042-.172.043-.168.043-.163.045-.16.046-.155.046-.152.048-.148.048-.143.048-.139.049-.136.05-.131.05-.126.051-.123.051-.118.051-.114.052-.11.052-.106.052-.101.052-.096.052-.092.052-.088.052-.083.052-.079.052-.074.051-.07.052-.065.051-.06.05-.056.05-.051.05-.023.025-.023.024-.021.024-.02.025-.019.024-.018.024-.017.023-.015.024-.014.023-.013.023-.012.023-.01.023-.01.022-.008.022-.006.023-.006.021-.004.022-.004.021-.001.021-.001.021.001.021.001.021.004.021.004.022.006.021.006.023.008.022.01.022.01.023.012.023.013.023.014.023.015.024.017.023.018.024.019.024.02.025.021.024.023.024.023.025.051.05.056.05.06.05.065.051.07.052.074.051.079.052.083.052.088.052.092.052.096.052.101.052.106.052.11.052.114.052.118.051.123.051.126.051.131.05.136.05.139.049.143.048.148.048.152.048.155.046.16.046.163.045.168.043.172.043.175.042.179.041.183.04.187.038.191.038.194.036.198.034.202.033.205.032.21.031.212.028.216.027.22.026.224.023.226.022.231.021.233.018.237.016.241.014.244.012.247.011.25.008.254.005.257.004.26.001.26-.001.257-.004.254-.005.25-.008.247-.011.244-.012.241-.014.237-.016.233-.018.231-.021.226-.022.224-.023.22-.026.216-.027.212-.028.21-.031.205-.032.202-.033.198-.034.194-.036.191-.038.187-.038.183-.04.179-.041.175-.042.172-.043.168-.043.163-.045.16-.046.155-.046.152-.048.148-.048.143-.048.139-.049.136-.05.131-.05.126-.051.123-.051.118-.051.114-.052.11-.052.106-.052.101-.052.096-.052.092-.052.088-.052.083-.052.079-.052.074-.051.07-.052.065-.051.06-.05.056-.05.051-.05.023-.025.023-.024.021-.024.02-.025.019-.024.018-.024.017-.023.015-.024.014-.023.013-.023.012-.023.01-.023.01-.022.008-.022.006-.023.006-.021.004-.022.004-.021.001-.021.001-.021-.001-.021-.001-.021-.004-.021-.004-.022-.006-.021-.006-.023-.008-.022-.01-.022-.01-.023-.012-.023-.013-.023-.014-.023-.015-.024-.017-.023-.018-.024-.019-.024-.02-.025-.021-.024-.023-.024-.023-.025-.051-.05-.056-.05-.06-.05-.065-.051-.07-.052-.074-.051-.079-.052-.083-.052-.088-.052-.092-.052-.096-.052-.101-.052-.106-.052-.11-.052-.114-.052-.118-.051-.123-.051-.126-.051-.131-.05-.136-.05-.139-.049-.143-.048-.148-.048-.152-.048-.155-.046-.16-.046-.163-.045-.168-.043-.172-.043-.175-.042-.179-.041-.183-.04-.187-.038-.191-.038-.194-.036-.198-.034-.202-.033-.205-.032-.21-.031-.212-.028-.216-.027-.22-.026-.224-.023-.226-.022-.231-.021-.233-.018-.237-.016-.241-.014-.244-.012-.247-.011-.25-.008-.254-.005-.257-.004-.26-.001-.26.001z' transform='scale(.5)'/%3e%3c/symbol%3e%3c/defs%3e%3cdefs%3e%3csymbol height='24' width='24' id='clock'%3e%3cpath d='M12 2c5.514 0 10 4.486 10 10s-4.486 10-10 10-10-4.486-10-10 4.486-10 10-10zm0-2c-6.627 0-12 5.373-12 12s5.373 12 12 12 12-5.373 12-12-5.373-12-12-12zm5.848 12.459c.202.038.202.333.001.372-1.907.361-6.045 1.111-6.547 1.111-.719 0-1.301-.582-1.301-1.301 0-.512.77-5.447 1.125-7.445.034-.192.312-.181.343.014l.985 6.238 5.394 1.011z' transform='scale(.5)'/%3e%3c/symbol%3e%3c/defs%3e%3cdefs%3e%3cmarker orient='auto-start-reverse' markerHeight='12' markerWidth='12' markerUnits='userSpaceOnUse' refY='5' refX='7.9' id='arrowhead'%3e%3cpath d='M -1 0 L 10 5 L 0 10 z'/%3e%3c/marker%3e%3c/defs%3e%3cdefs%3e%3cmarker refY='4.5' refX='4' orient='auto' markerHeight='8' markerWidth='15' id='crosshead'%3e%3cpath style='stroke-dasharray: 0%2c 0%3b' d='M 1%2c2 L 6%2c7 M 6%2c2 L 1%2c7' stroke-width='1pt' stroke='black' fill='none'/%3e%3c/marker%3e%3c/defs%3e%3cdefs%3e%3cmarker orient='auto' markerHeight='28' markerWidth='20' refY='7' refX='15.5' id='filled-head'%3e%3cpath d='M 18%2c7 L9%2c13 L14%2c7 L9%2c1 Z'/%3e%3c/marker%3e%3c/defs%3e%3cdefs%3e%3cmarker orient='auto' markerHeight='40' markerWidth='60' refY='15' refX='15' id='sequencenumber'%3e%3ccircle r='6' cy='15' cx='15'/%3e%3c/marker%3e%3c/defs%3e%3cg name='A' class='actor-man actor-top'%3e%3cline y2='45' x2='75' y1='25' x1='75' id='actor-man-torso3'/%3e%3cline y2='33' x2='93' y1='33' x1='57' id='actor-man-arms3'/%3e%3cline y2='45' x2='75' y1='60' x1='57'/%3e%3cline y2='60' x2='91' y1='45' x1='75'/%3e%3ccircle height='65' width='150' r='15' cy='10' cx='75'/%3e%3ctext style='text-anchor: middle%3b font-size: 16px%3b font-weight: 400%3b font-family: arial%2c sans-serif%3b' class='actor actor-man' alignment-baseline='central' dominant-baseline='central' y='67.5' x='75'%3e%3ctspan dy='0' x='75'%3eUser%3c/tspan%3e%3c/text%3e%3c/g%3e%3ctext style='font-family: arial%2c sans-serif%3b font-size: 16px%3b font-weight: 400%3b' dy='1em' class='messageText' alignment-baseline='middle' dominant-baseline='middle' text-anchor='middle' y='80' x='218'%3eRequest to create organization%3c/text%3e%3cline style='fill: none%3b' marker-end='url(%23arrowhead)' stroke='none' stroke-width='2' class='messageLine0' y2='109' x2='359' y1='109' x1='76'/%3e%3ctext style='font-family: arial%2c sans-serif%3b font-size: 16px%3b font-weight: 400%3b' dy='1em' class='messageText' alignment-baseline='middle' dominant-baseline='middle' text-anchor='middle' y='124' x='470'%3ePOST /organizations%3c/text%3e%3cline style='fill: none%3b' marker-end='url(%23arrowhead)' stroke='none' stroke-width='2' class='messageLine0' y2='153' x2='576' y1='153' x1='364'/%3e%3ctext style='font-family: arial%2c sans-serif%3b font-size: 16px%3b font-weight: 400%3b' dy='1em' class='messageText' alignment-baseline='middle' dominant-baseline='middle' text-anchor='middle' y='168' x='736'%3ePOST /api/organizations%3c/text%3e%3cline style='fill: none%3b' marker-end='url(%23arrowhead)' stroke='none' stroke-width='2' class='messageLine0' y2='197' x2='890' y1='197' x1='581'/%3e%3ctext style='font-family: arial%2c sans-serif%3b font-size: 16px%3b font-weight: 400%3b' dy='1em' class='messageText' alignment-baseline='middle' dominant-baseline='middle' text-anchor='middle' y='212' x='739'%3eOrganization created%3c/text%3e%3cline style='stroke-dasharray: 3%2c 3%3b fill: none%3b' marker-end='url(%23arrowhead)' stroke='none' stroke-width='2' class='messageLine1' y2='241' x2='584' y1='241' x1='893'/%3e%3ctext style='font-family: arial%2c sans-serif%3b font-size: 16px%3b font-weight: 400%3b' dy='1em' class='messageText' alignment-baseline='middle' dominant-baseline='middle' text-anchor='middle' y='256' x='736'%3ePOST /api/organizations/%7bid%7d/users%3c/text%3e%3cline style='fill: none%3b' marker-end='url(%23arrowhead)' stroke='none' stroke-width='2' class='messageLine0' y2='285' x2='890' y1='285' x1='581'/%3e%3ctext style='font-family: arial%2c sans-serif%3b font-size: 16px%3b font-weight: 400%3b' dy='1em' class='messageText' alignment-baseline='middle' dominant-baseline='middle' text-anchor='middle' y='300' x='739'%3eUser added to organization%3c/text%3e%3cline style='stroke-dasharray: 3%2c 3%3b fill: none%3b' marker-end='url(%23arrowhead)' stroke='none' stroke-width='2' class='messageLine1' y2='329' x2='584' y1='329' x1='893'/%3e%3ctext style='font-family: arial%2c sans-serif%3b font-size: 16px%3b font-weight: 400%3b' dy='1em' class='messageText' alignment-baseline='middle' dominant-baseline='middle' text-anchor='middle' y='344' x='473'%3eSuccess response%3c/text%3e%3cline style='stroke-dasharray: 3%2c 3%3b fill: none%3b' marker-end='url(%23arrowhead)' stroke='none' stroke-width='2' class='messageLine1' y2='373' x2='367' y1='373' x1='579'/%3e%3ctext style='font-family: arial%2c sans-serif%3b font-size: 16px%3b font-weight: 400%3b' dy='1em' class='messageText' alignment-baseline='middle' dominant-baseline='middle' text-anchor='middle' y='388' x='221'%3eShow success message%3c/text%3e%3cline style='stroke-dasharray: 3%2c 3%3b fill: none%3b' marker-end='url(%23arrowhead)' stroke='none' stroke-width='2' class='messageLine1' y2='417' x2='79' y1='417' x1='362'/%3e%3cg name='A' class='actor-man actor-bottom'%3e%3cline y2='482' x2='75' y1='462' x1='75' id='actor-man-torso6'/%3e%3cline y2='470' x2='93' y1='470' x1='57' id='actor-man-arms6'/%3e%3cline y2='482' x2='75' y1='497' x1='57'/%3e%3cline y2='497' x2='91' y1='482' x1='75'/%3e%3ccircle height='65' width='150' r='15' cy='447' cx='75'/%3e%3ctext style='text-anchor: middle%3b font-size: 16px%3b font-weight: 400%3b font-family: arial%2c sans-serif%3b' class='actor actor-man' alignment-baseline='central' dominant-baseline='central' y='504.5' x='75'%3e%3ctspan dy='0' x='75'%3eUser%3c/tspan%3e%3c/text%3e%3c/g%3e%3c/svg%3e)