Logto x Hasura: How to use open-source auth + GraphQL solution to boost your project
In this article, we’ll focus on connecting Logto and Hasura, which enables you to implement authentication, authorization, and GraphQL APIs without friction. Thus you can quickly jump into your business without rocket-science learning.
GaoFounder
Stop wasting weeks on user auth
Launch secure apps faster with Logto. Integrate user auth in minutes, and focus on your core product.
When it comes to a new project, you usually cannot skip several things: APIs, authentication + authorization, identity, and end-user sign-in flow. It used to be hard to kick off these things because there are many concepts and technologies that spread widely: RESTful/GraphQL, web frontend, native client, connect clients with APIs, auth best practices to balance security and user experience, etc.
Also, most of the works are “repeating”. I mean, they are needed and similar for almost every project, with some tweaks.
Sounds scary and tedious? Don’t panic. Today we have open source. With the two open-source projects below, things become not tricky :
Logto: Helps you build the sign-in, auth, and user identity within minutes.
Hasura: Blazing fast, instant real-time GraphQL APIs on your DB with fine-grained access control.
In this article, we’ll focus on connecting Logto and Hasura, which enables you to implement authentication, authorization, and GraphQL APIs without friction. Thus you can quickly jump into your business without rocket-science learning.
Since both Logto and Hasura have a decent get-started guide, we assume you have read them and have a basic feeling. Access to a running instance of both is needed.
We assume the accessible endpoints are:
Logto: http://localhost:3001
Hasura: http://localhost:8080
Also, we assume you have a preferred platform and framework to build the client app, say React or Next.js.
In the left navigation sidebar of your Logto Admin Console, click “API Resources”, and you’ll see the API Resource management page.
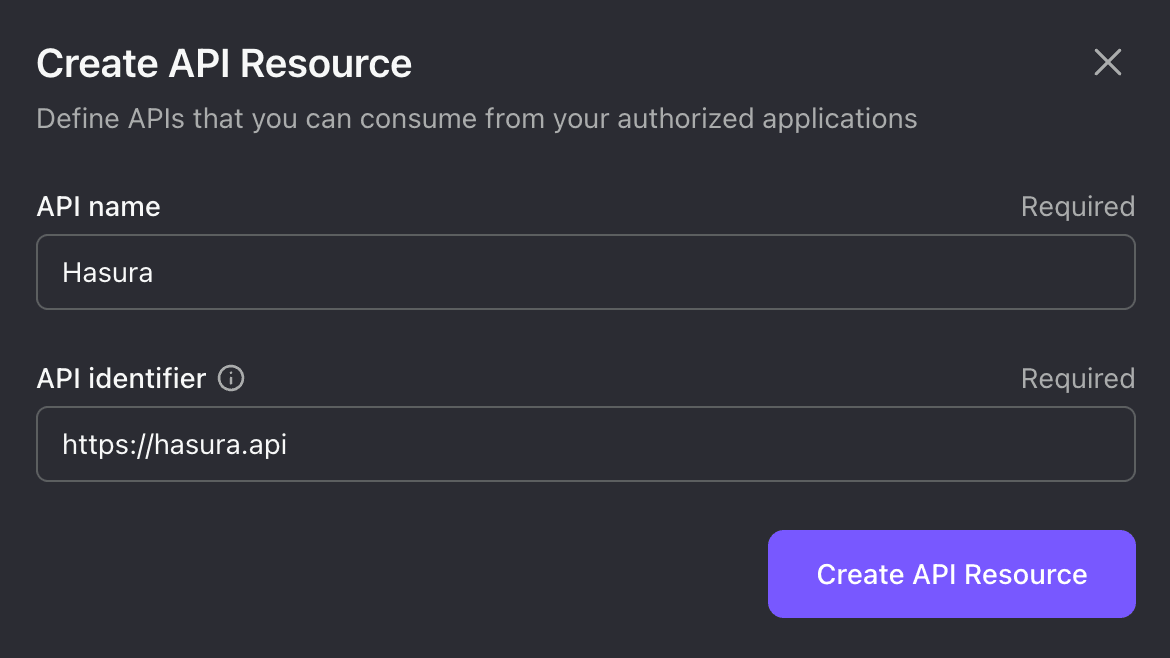
Then click the huge “+ Create API Resource” button in the top-right corner. In the opening modal, enter Hasura for API name and https://hasura.api for API identifier.
We’ll use this API identifier for the rest of our article. But feel free to change the values based on your preference.
Click “Create API Resource”, and it will show a message that indicates the resource has been successfully created. That’s all we need in Logto for now.
Hasura uses role-based access management, which handles authorization. So, we only need to figure out authentication. It supports two methods: Webhook and JWT. We choose webhook since it’s more flexible.
To enable webhook authentication, you must set the admin secret and auth hook endpoint.
The admin secret is the key to having Hasura admin access when sending requests. It is required before enabling webhook authentication. Remember to keep it somewhere safe, and don’t use it in production.
The auth hook endpoint is a URL to send authentication requests.
You may notice we use the API identifier filled in Logto to build the auth hook endpoint. It ensures that the user is passing the correct bearer token instead of a random one that may from malicious.
You need to update the auth hook endpoint if you have a different Logto endpoint or API indicator. Say you have https://logto.domain.com as the Logto endpoint and https://graphql.domain.com as the API identifier, then it will be:
From now, for every GraphQL request, Hasura will bring all request headers to the Logto auth hook endpoint, and Logto will respond properly.
Since we won’t use the Hasura admin secret in production, every GraphQL request is secured by the following headers:
Authorization The standard bearer token that Logto generates.
Expected-Role The role you want Logto to show in the auth hook response.
The Authorization header requires a valid Access Token in JWT format with the Hasura API indicator for audience. Hold on - it’s quite hard to remember and compose all these things. Fortunately we get Logto SDKs to simplify the geeky part.
Follow the integration guide to integrate a Logto SDK in your client app. It enables not only the ability to generate a valid Access Token for GraphQL requests, but also a smooth sign-in experience for your end-users.
Once you finish the guide, we need one tiny modification to the LogtoConfig: Add the API indicator you created in Logto Admin Console to resources. Taking React SDK as an example: