Chrome extensions are a great way to extend the functionality of the Chrome browser. When you have a popular extension, you might want to monetize it by offering pro features to users who pay for them. User authentication is must for this purpose:
User identification: You need to know who the user is to provide personalized features.
Access control: You need to control who can access the paid features.
Subscription management: You need to provide a way for users to subscribe and manage their subscriptions.
On the other hand, we don't want to stick on the Google account system, as your users might prefer to use other accounts, or, you may have multiple services that you want to integrate with the same identity system.
A quick summary of the benefits of using OpenID Connect (OIDC) for authentication:
No vendor lock-in: Your users can use various methods to sign in, rather than being forced to Google.
Single Sign-On (SSO): Users can sign in once and access multiple services or applications.
Standardized: OIDC is an open standard that is widely adopted and supported, also it's secure.
In this tutorial, we will use Logto as the OIDC provider, which is an Auth0 alternative for building identity infrastructures.
Assuming you put a "Sign in" button in your Chrome extension's popup, the authentication flow will look like this:
For other interactive pages in your extension, you just need to replace the Extension popup participant with the page's name. In this tutorial, we will focus on the popup page.
In your Chrome extension's background script, initialize the Logto SDK:
Replace <your-logto-endpoint> and <your-logto-app-id> with the actual values. You can find these values in the application page you just created in the Logto Console.
If you don't have a background script, you can follow the official guide to create one.
Then, we need to listen to the message from other extension pages and handle the authentication process:
You may notice there are two redirect URIs used in the code above. They are both created by chrome.identity.getRedirectURL, which is a built-in Chrome API to generate a redirect URL for auth flows. The two URIs will be:
https://<extension-id>.chromiumapp.org/callback for sign-in.
https://<extension-id>.chromiumapp.org/ for sign-out.
Note that these URIs are not accessible, and they are only used for Chrome to trigger specific actions for the authentication process.
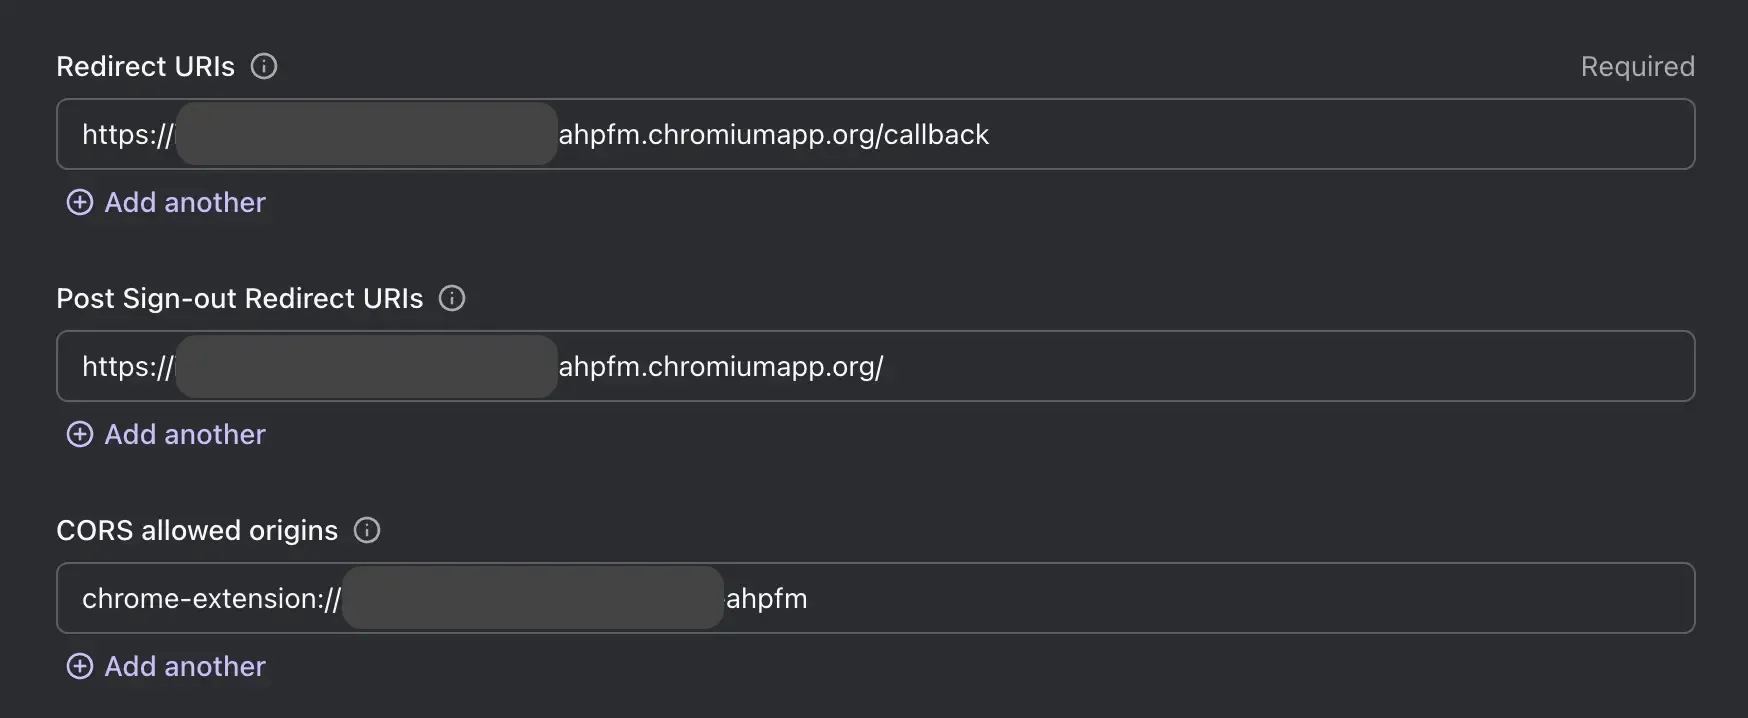
Now we need to update the Logto application settings to allow the redirect URIs we just created.
Go to the application page in the Logto Console.
In the "Redirect URIs" section, add the URI: https://<extension-id>.chromiumapp.org/callback.
In the "Post sign-out redirect URIs" section, add the URI: https://<extension-id>.chromiumapp.org/.
In the "CORS allowed origins" section, add the URI: chrome-extension://<extension-id>. The SDK in Chrome extension will use this origin to communicate with the Logto APIs.
Click on Save changes.
Remember to replace <extension-id> with your actual extension ID. You can find the extension ID in the chrome://extensions page.
After updating the settings, your Logto application settings should look like this:
Since Chrome provide unified storage APIs, rather than the sign-in and sign-out flow, all other Logto SDK methods can be used in the popup page directly.
In your popup.js, you can reuse the LogtoClient instance created in the background script, or create a new one with the same configuration:
Then you can create a function to load the authentication state and user's profile:
You can also combine the loadAuthenticationState function with the sign-in and sign-out logic:
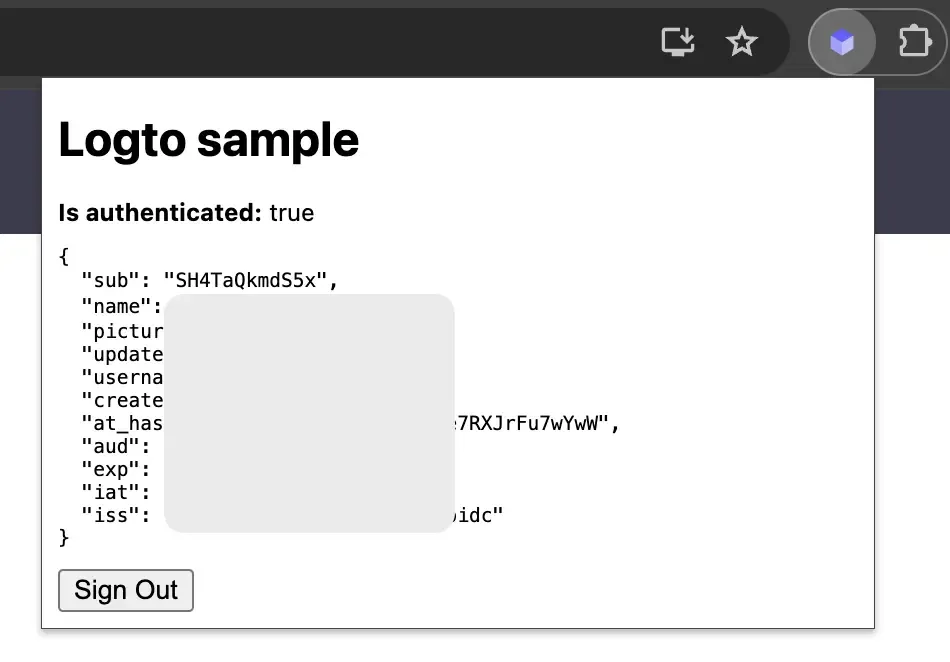
Here's an example of the popup page with the authentication state:
For more information about the SDK, you can refer to the official documentation of browser SDK. The browser SDK shares the same APIs with the Chrome extension SDK.
Service worker bundling: If you use a bundler like Webpack or Rollup, you need to explicitly set the target to browser or similar to avoid unnecessary bundling of Node.js modules.
Module resolution: Logto Chrome extension SDK is an ESM-only module.
See our sample project for a complete example with TypeScript, Rollup, and other configurations.
With users authenticated, you can now securely offer paid features in your Chrome extension. For instance, you can store the user's subscription status in the user profile, and check it when the user opens the extension.
Combining the power of Chrome extensions and Logto, you can build a more flexible and customizable extension that both you and your users will love.

%3bfill:%23ECECFF%3b%7d%23mermaid-0 text.actor%26gt%3btspan%7bfill:black%3bstroke:none%3b%7d%23mermaid-0 .actor-line%7bstroke:hsl(259.6261682243%2c 59.7765363128%25%2c 87.9019607843%25)%3b%7d%23mermaid-0 .messageLine0%7bstroke-width:1.5%3bstroke-dasharray:none%3bstroke:%23333%3b%7d%23mermaid-0 .messageLine1%7bstroke-width:1.5%3bstroke-dasharray:2%2c2%3bstroke:%23333%3b%7d%23mermaid-0 %23arrowhead path%7bfill:%23333%3bstroke:%23333%3b%7d%23mermaid-0 .sequenceNumber%7bfill:white%3b%7d%23mermaid-0 %23sequencenumber%7bfill:%23333%3b%7d%23mermaid-0 %23crosshead path%7bfill:%23333%3bstroke:%23333%3b%7d%23mermaid-0 .messageText%7bfill:%23333%3bstroke:none%3b%7d%23mermaid-0 .labelBox%7bstroke:hsl(259.6261682243%2c 59.7765363128%25%2c 87.9019607843%25)%3bfill:%23ECECFF%3b%7d%23mermaid-0 .labelText%2c%23mermaid-0 .labelText%26gt%3btspan%7bfill:black%3bstroke:none%3b%7d%23mermaid-0 .loopText%2c%23mermaid-0 .loopText%26gt%3btspan%7bfill:black%3bstroke:none%3b%7d%23mermaid-0 .loopLine%7bstroke-width:2px%3bstroke-dasharray:2%2c2%3bstroke:hsl(259.6261682243%2c 59.7765363128%25%2c 87.9019607843%25)%3bfill:hsl(259.6261682243%2c 59.7765363128%25%2c 87.9019607843%25)%3b%7d%23mermaid-0 .note%7bstroke:%23aaaa33%3bfill:%23fff5ad%3b%7d%23mermaid-0 .noteText%2c%23mermaid-0 .noteText%26gt%3btspan%7bfill:black%3bstroke:none%3b%7d%23mermaid-0 .activation0%7bfill:%23f4f4f4%3bstroke:%23666%3b%7d%23mermaid-0 .activation1%7bfill:%23f4f4f4%3bstroke:%23666%3b%7d%23mermaid-0 .activation2%7bfill:%23f4f4f4%3bstroke:%23666%3b%7d%23mermaid-0 .actorPopupMenu%7bposition:absolute%3b%7d%23mermaid-0 .actorPopupMenuPanel%7bposition:absolute%3bfill:%23ECECFF%3bbox-shadow:0px 8px 16px 0px rgba(0%2c0%2c0%2c0.2)%3bfilter:drop-shadow(3px 5px 2px rgb(0 0 0 / 0.4))%3b%7d%23mermaid-0 .actor-man line%7bstroke:hsl(259.6261682243%2c 59.7765363128%25%2c 87.9019607843%25)%3bfill:%23ECECFF%3b%7d%23mermaid-0 .actor-man circle%2c%23mermaid-0 line%7bstroke:hsl(259.6261682243%2c 59.7765363128%25%2c 87.9019607843%25)%3bfill:%23ECECFF%3bstroke-width:2px%3b%7d%23mermaid-0 :root%7b--mermaid-font-family:arial%2csans-serif%3b%7d%3c/style%3e%3cg/%3e%3cdefs%3e%3csymbol height='24' width='24' id='computer'%3e%3cpath d='M2 2v13h20v-13h-20zm18 11h-16v-9h16v9zm-10.228 6l.466-1h3.524l.467 1h-4.457zm14.228 3h-24l2-6h2.104l-1.33 4h18.45l-1.297-4h2.073l2 6zm-5-10h-14v-7h14v7z' transform='scale(.5)'/%3e%3c/symbol%3e%3c/defs%3e%3cdefs%3e%3csymbol clip-rule='evenodd' fill-rule='evenodd' id='database'%3e%3cpath d='M12.258.001l.256.004.255.005.253.008.251.01.249.012.247.015.246.016.242.019.241.02.239.023.236.024.233.027.231.028.229.031.225.032.223.034.22.036.217.038.214.04.211.041.208.043.205.045.201.046.198.048.194.05.191.051.187.053.183.054.18.056.175.057.172.059.168.06.163.061.16.063.155.064.15.066.074.033.073.033.071.034.07.034.069.035.068.035.067.035.066.035.064.036.064.036.062.036.06.036.06.037.058.037.058.037.055.038.055.038.053.038.052.038.051.039.05.039.048.039.047.039.045.04.044.04.043.04.041.04.04.041.039.041.037.041.036.041.034.041.033.042.032.042.03.042.029.042.027.042.026.043.024.043.023.043.021.043.02.043.018.044.017.043.015.044.013.044.012.044.011.045.009.044.007.045.006.045.004.045.002.045.001.045v17l-.001.045-.002.045-.004.045-.006.045-.007.045-.009.044-.011.045-.012.044-.013.044-.015.044-.017.043-.018.044-.02.043-.021.043-.023.043-.024.043-.026.043-.027.042-.029.042-.03.042-.032.042-.033.042-.034.041-.036.041-.037.041-.039.041-.04.041-.041.04-.043.04-.044.04-.045.04-.047.039-.048.039-.05.039-.051.039-.052.038-.053.038-.055.038-.055.038-.058.037-.058.037-.06.037-.06.036-.062.036-.064.036-.064.036-.066.035-.067.035-.068.035-.069.035-.07.034-.071.034-.073.033-.074.033-.15.066-.155.064-.16.063-.163.061-.168.06-.172.059-.175.057-.18.056-.183.054-.187.053-.191.051-.194.05-.198.048-.201.046-.205.045-.208.043-.211.041-.214.04-.217.038-.22.036-.223.034-.225.032-.229.031-.231.028-.233.027-.236.024-.239.023-.241.02-.242.019-.246.016-.247.015-.249.012-.251.01-.253.008-.255.005-.256.004-.258.001-.258-.001-.256-.004-.255-.005-.253-.008-.251-.01-.249-.012-.247-.015-.245-.016-.243-.019-.241-.02-.238-.023-.236-.024-.234-.027-.231-.028-.228-.031-.226-.032-.223-.034-.22-.036-.217-.038-.214-.04-.211-.041-.208-.043-.204-.045-.201-.046-.198-.048-.195-.05-.19-.051-.187-.053-.184-.054-.179-.056-.176-.057-.172-.059-.167-.06-.164-.061-.159-.063-.155-.064-.151-.066-.074-.033-.072-.033-.072-.034-.07-.034-.069-.035-.068-.035-.067-.035-.066-.035-.064-.036-.063-.036-.062-.036-.061-.036-.06-.037-.058-.037-.057-.037-.056-.038-.055-.038-.053-.038-.052-.038-.051-.039-.049-.039-.049-.039-.046-.039-.046-.04-.044-.04-.043-.04-.041-.04-.04-.041-.039-.041-.037-.041-.036-.041-.034-.041-.033-.042-.032-.042-.03-.042-.029-.042-.027-.042-.026-.043-.024-.043-.023-.043-.021-.043-.02-.043-.018-.044-.017-.043-.015-.044-.013-.044-.012-.044-.011-.045-.009-.044-.007-.045-.006-.045-.004-.045-.002-.045-.001-.045v-17l.001-.045.002-.045.004-.045.006-.045.007-.045.009-.044.011-.045.012-.044.013-.044.015-.044.017-.043.018-.044.02-.043.021-.043.023-.043.024-.043.026-.043.027-.042.029-.042.03-.042.032-.042.033-.042.034-.041.036-.041.037-.041.039-.041.04-.041.041-.04.043-.04.044-.04.046-.04.046-.039.049-.039.049-.039.051-.039.052-.038.053-.038.055-.038.056-.038.057-.037.058-.037.06-.037.061-.036.062-.036.063-.036.064-.036.066-.035.067-.035.068-.035.069-.035.07-.034.072-.034.072-.033.074-.033.151-.066.155-.064.159-.063.164-.061.167-.06.172-.059.176-.057.179-.056.184-.054.187-.053.19-.051.195-.05.198-.048.201-.046.204-.045.208-.043.211-.041.214-.04.217-.038.22-.036.223-.034.226-.032.228-.031.231-.028.234-.027.236-.024.238-.023.241-.02.243-.019.245-.016.247-.015.249-.012.251-.01.253-.008.255-.005.256-.004.258-.001.258.001zm-9.258 20.499v.01l.001.021.003.021.004.022.005.021.006.022.007.022.009.023.01.022.011.023.012.023.013.023.015.023.016.024.017.023.018.024.019.024.021.024.022.025.023.024.024.025.052.049.056.05.061.051.066.051.07.051.075.051.079.052.084.052.088.052.092.052.097.052.102.051.105.052.11.052.114.051.119.051.123.051.127.05.131.05.135.05.139.048.144.049.147.047.152.047.155.047.16.045.163.045.167.043.171.043.176.041.178.041.183.039.187.039.19.037.194.035.197.035.202.033.204.031.209.03.212.029.216.027.219.025.222.024.226.021.23.02.233.018.236.016.24.015.243.012.246.01.249.008.253.005.256.004.259.001.26-.001.257-.004.254-.005.25-.008.247-.011.244-.012.241-.014.237-.016.233-.018.231-.021.226-.021.224-.024.22-.026.216-.027.212-.028.21-.031.205-.031.202-.034.198-.034.194-.036.191-.037.187-.039.183-.04.179-.04.175-.042.172-.043.168-.044.163-.045.16-.046.155-.046.152-.047.148-.048.143-.049.139-.049.136-.05.131-.05.126-.05.123-.051.118-.052.114-.051.11-.052.106-.052.101-.052.096-.052.092-.052.088-.053.083-.051.079-.052.074-.052.07-.051.065-.051.06-.051.056-.05.051-.05.023-.024.023-.025.021-.024.02-.024.019-.024.018-.024.017-.024.015-.023.014-.024.013-.023.012-.023.01-.023.01-.022.008-.022.006-.022.006-.022.004-.022.004-.021.001-.021.001-.021v-4.127l-.077.055-.08.053-.083.054-.085.053-.087.052-.09.052-.093.051-.095.05-.097.05-.1.049-.102.049-.105.048-.106.047-.109.047-.111.046-.114.045-.115.045-.118.044-.12.043-.122.042-.124.042-.126.041-.128.04-.13.04-.132.038-.134.038-.135.037-.138.037-.139.035-.142.035-.143.034-.144.033-.147.032-.148.031-.15.03-.151.03-.153.029-.154.027-.156.027-.158.026-.159.025-.161.024-.162.023-.163.022-.165.021-.166.02-.167.019-.169.018-.169.017-.171.016-.173.015-.173.014-.175.013-.175.012-.177.011-.178.01-.179.008-.179.008-.181.006-.182.005-.182.004-.184.003-.184.002h-.37l-.184-.002-.184-.003-.182-.004-.182-.005-.181-.006-.179-.008-.179-.008-.178-.01-.176-.011-.176-.012-.175-.013-.173-.014-.172-.015-.171-.016-.17-.017-.169-.018-.167-.019-.166-.02-.165-.021-.163-.022-.162-.023-.161-.024-.159-.025-.157-.026-.156-.027-.155-.027-.153-.029-.151-.03-.15-.03-.148-.031-.146-.032-.145-.033-.143-.034-.141-.035-.14-.035-.137-.037-.136-.037-.134-.038-.132-.038-.13-.04-.128-.04-.126-.041-.124-.042-.122-.042-.12-.044-.117-.043-.116-.045-.113-.045-.112-.046-.109-.047-.106-.047-.105-.048-.102-.049-.1-.049-.097-.05-.095-.05-.093-.052-.09-.051-.087-.052-.085-.053-.083-.054-.08-.054-.077-.054v4.127zm0-5.654v.011l.001.021.003.021.004.021.005.022.006.022.007.022.009.022.01.022.011.023.012.023.013.023.015.024.016.023.017.024.018.024.019.024.021.024.022.024.023.025.024.024.052.05.056.05.061.05.066.051.07.051.075.052.079.051.084.052.088.052.092.052.097.052.102.052.105.052.11.051.114.051.119.052.123.05.127.051.131.05.135.049.139.049.144.048.147.048.152.047.155.046.16.045.163.045.167.044.171.042.176.042.178.04.183.04.187.038.19.037.194.036.197.034.202.033.204.032.209.03.212.028.216.027.219.025.222.024.226.022.23.02.233.018.236.016.24.014.243.012.246.01.249.008.253.006.256.003.259.001.26-.001.257-.003.254-.006.25-.008.247-.01.244-.012.241-.015.237-.016.233-.018.231-.02.226-.022.224-.024.22-.025.216-.027.212-.029.21-.03.205-.032.202-.033.198-.035.194-.036.191-.037.187-.039.183-.039.179-.041.175-.042.172-.043.168-.044.163-.045.16-.045.155-.047.152-.047.148-.048.143-.048.139-.05.136-.049.131-.05.126-.051.123-.051.118-.051.114-.052.11-.052.106-.052.101-.052.096-.052.092-.052.088-.052.083-.052.079-.052.074-.051.07-.052.065-.051.06-.05.056-.051.051-.049.023-.025.023-.024.021-.025.02-.024.019-.024.018-.024.017-.024.015-.023.014-.023.013-.024.012-.022.01-.023.01-.023.008-.022.006-.022.006-.022.004-.021.004-.022.001-.021.001-.021v-4.139l-.077.054-.08.054-.083.054-.085.052-.087.053-.09.051-.093.051-.095.051-.097.05-.1.049-.102.049-.105.048-.106.047-.109.047-.111.046-.114.045-.115.044-.118.044-.12.044-.122.042-.124.042-.126.041-.128.04-.13.039-.132.039-.134.038-.135.037-.138.036-.139.036-.142.035-.143.033-.144.033-.147.033-.148.031-.15.03-.151.03-.153.028-.154.028-.156.027-.158.026-.159.025-.161.024-.162.023-.163.022-.165.021-.166.02-.167.019-.169.018-.169.017-.171.016-.173.015-.173.014-.175.013-.175.012-.177.011-.178.009-.179.009-.179.007-.181.007-.182.005-.182.004-.184.003-.184.002h-.37l-.184-.002-.184-.003-.182-.004-.182-.005-.181-.007-.179-.007-.179-.009-.178-.009-.176-.011-.176-.012-.175-.013-.173-.014-.172-.015-.171-.016-.17-.017-.169-.018-.167-.019-.166-.02-.165-.021-.163-.022-.162-.023-.161-.024-.159-.025-.157-.026-.156-.027-.155-.028-.153-.028-.151-.03-.15-.03-.148-.031-.146-.033-.145-.033-.143-.033-.141-.035-.14-.036-.137-.036-.136-.037-.134-.038-.132-.039-.13-.039-.128-.04-.126-.041-.124-.042-.122-.043-.12-.043-.117-.044-.116-.044-.113-.046-.112-.046-.109-.046-.106-.047-.105-.048-.102-.049-.1-.049-.097-.05-.095-.051-.093-.051-.09-.051-.087-.053-.085-.052-.083-.054-.08-.054-.077-.054v4.139zm0-5.666v.011l.001.02.003.022.004.021.005.022.006.021.007.022.009.023.01.022.011.023.012.023.013.023.015.023.016.024.017.024.018.023.019.024.021.025.022.024.023.024.024.025.052.05.056.05.061.05.066.051.07.051.075.052.079.051.084.052.088.052.092.052.097.052.102.052.105.051.11.052.114.051.119.051.123.051.127.05.131.05.135.05.139.049.144.048.147.048.152.047.155.046.16.045.163.045.167.043.171.043.176.042.178.04.183.04.187.038.19.037.194.036.197.034.202.033.204.032.209.03.212.028.216.027.219.025.222.024.226.021.23.02.233.018.236.017.24.014.243.012.246.01.249.008.253.006.256.003.259.001.26-.001.257-.003.254-.006.25-.008.247-.01.244-.013.241-.014.237-.016.233-.018.231-.02.226-.022.224-.024.22-.025.216-.027.212-.029.21-.03.205-.032.202-.033.198-.035.194-.036.191-.037.187-.039.183-.039.179-.041.175-.042.172-.043.168-.044.163-.045.16-.045.155-.047.152-.047.148-.048.143-.049.139-.049.136-.049.131-.051.126-.05.123-.051.118-.052.114-.051.11-.052.106-.052.101-.052.096-.052.092-.052.088-.052.083-.052.079-.052.074-.052.07-.051.065-.051.06-.051.056-.05.051-.049.023-.025.023-.025.021-.024.02-.024.019-.024.018-.024.017-.024.015-.023.014-.024.013-.023.012-.023.01-.022.01-.023.008-.022.006-.022.006-.022.004-.022.004-.021.001-.021.001-.021v-4.153l-.077.054-.08.054-.083.053-.085.053-.087.053-.09.051-.093.051-.095.051-.097.05-.1.049-.102.048-.105.048-.106.048-.109.046-.111.046-.114.046-.115.044-.118.044-.12.043-.122.043-.124.042-.126.041-.128.04-.13.039-.132.039-.134.038-.135.037-.138.036-.139.036-.142.034-.143.034-.144.033-.147.032-.148.032-.15.03-.151.03-.153.028-.154.028-.156.027-.158.026-.159.024-.161.024-.162.023-.163.023-.165.021-.166.02-.167.019-.169.018-.169.017-.171.016-.173.015-.173.014-.175.013-.175.012-.177.01-.178.01-.179.009-.179.007-.181.006-.182.006-.182.004-.184.003-.184.001-.185.001-.185-.001-.184-.001-.184-.003-.182-.004-.182-.006-.181-.006-.179-.007-.179-.009-.178-.01-.176-.01-.176-.012-.175-.013-.173-.014-.172-.015-.171-.016-.17-.017-.169-.018-.167-.019-.166-.02-.165-.021-.163-.023-.162-.023-.161-.024-.159-.024-.157-.026-.156-.027-.155-.028-.153-.028-.151-.03-.15-.03-.148-.032-.146-.032-.145-.033-.143-.034-.141-.034-.14-.036-.137-.036-.136-.037-.134-.038-.132-.039-.13-.039-.128-.041-.126-.041-.124-.041-.122-.043-.12-.043-.117-.044-.116-.044-.113-.046-.112-.046-.109-.046-.106-.048-.105-.048-.102-.048-.1-.05-.097-.049-.095-.051-.093-.051-.09-.052-.087-.052-.085-.053-.083-.053-.08-.054-.077-.054v4.153zm8.74-8.179l-.257.004-.254.005-.25.008-.247.011-.244.012-.241.014-.237.016-.233.018-.231.021-.226.022-.224.023-.22.026-.216.027-.212.028-.21.031-.205.032-.202.033-.198.034-.194.036-.191.038-.187.038-.183.04-.179.041-.175.042-.172.043-.168.043-.163.045-.16.046-.155.046-.152.048-.148.048-.143.048-.139.049-.136.05-.131.05-.126.051-.123.051-.118.051-.114.052-.11.052-.106.052-.101.052-.096.052-.092.052-.088.052-.083.052-.079.052-.074.051-.07.052-.065.051-.06.05-.056.05-.051.05-.023.025-.023.024-.021.024-.02.025-.019.024-.018.024-.017.023-.015.024-.014.023-.013.023-.012.023-.01.023-.01.022-.008.022-.006.023-.006.021-.004.022-.004.021-.001.021-.001.021.001.021.001.021.004.021.004.022.006.021.006.023.008.022.01.022.01.023.012.023.013.023.014.023.015.024.017.023.018.024.019.024.02.025.021.024.023.024.023.025.051.05.056.05.06.05.065.051.07.052.074.051.079.052.083.052.088.052.092.052.096.052.101.052.106.052.11.052.114.052.118.051.123.051.126.051.131.05.136.05.139.049.143.048.148.048.152.048.155.046.16.046.163.045.168.043.172.043.175.042.179.041.183.04.187.038.191.038.194.036.198.034.202.033.205.032.21.031.212.028.216.027.22.026.224.023.226.022.231.021.233.018.237.016.241.014.244.012.247.011.25.008.254.005.257.004.26.001.26-.001.257-.004.254-.005.25-.008.247-.011.244-.012.241-.014.237-.016.233-.018.231-.021.226-.022.224-.023.22-.026.216-.027.212-.028.21-.031.205-.032.202-.033.198-.034.194-.036.191-.038.187-.038.183-.04.179-.041.175-.042.172-.043.168-.043.163-.045.16-.046.155-.046.152-.048.148-.048.143-.048.139-.049.136-.05.131-.05.126-.051.123-.051.118-.051.114-.052.11-.052.106-.052.101-.052.096-.052.092-.052.088-.052.083-.052.079-.052.074-.051.07-.052.065-.051.06-.05.056-.05.051-.05.023-.025.023-.024.021-.024.02-.025.019-.024.018-.024.017-.023.015-.024.014-.023.013-.023.012-.023.01-.023.01-.022.008-.022.006-.023.006-.021.004-.022.004-.021.001-.021.001-.021-.001-.021-.001-.021-.004-.021-.004-.022-.006-.021-.006-.023-.008-.022-.01-.022-.01-.023-.012-.023-.013-.023-.014-.023-.015-.024-.017-.023-.018-.024-.019-.024-.02-.025-.021-.024-.023-.024-.023-.025-.051-.05-.056-.05-.06-.05-.065-.051-.07-.052-.074-.051-.079-.052-.083-.052-.088-.052-.092-.052-.096-.052-.101-.052-.106-.052-.11-.052-.114-.052-.118-.051-.123-.051-.126-.051-.131-.05-.136-.05-.139-.049-.143-.048-.148-.048-.152-.048-.155-.046-.16-.046-.163-.045-.168-.043-.172-.043-.175-.042-.179-.041-.183-.04-.187-.038-.191-.038-.194-.036-.198-.034-.202-.033-.205-.032-.21-.031-.212-.028-.216-.027-.22-.026-.224-.023-.226-.022-.231-.021-.233-.018-.237-.016-.241-.014-.244-.012-.247-.011-.25-.008-.254-.005-.257-.004-.26-.001-.26.001z' transform='scale(.5)'/%3e%3c/symbol%3e%3c/defs%3e%3cdefs%3e%3csymbol height='24' width='24' id='clock'%3e%3cpath d='M12 2c5.514 0 10 4.486 10 10s-4.486 10-10 10-10-4.486-10-10 4.486-10 10-10zm0-2c-6.627 0-12 5.373-12 12s5.373 12 12 12 12-5.373 12-12-5.373-12-12-12zm5.848 12.459c.202.038.202.333.001.372-1.907.361-6.045 1.111-6.547 1.111-.719 0-1.301-.582-1.301-1.301 0-.512.77-5.447 1.125-7.445.034-.192.312-.181.343.014l.985 6.238 5.394 1.011z' transform='scale(.5)'/%3e%3c/symbol%3e%3c/defs%3e%3cdefs%3e%3cmarker orient='auto-start-reverse' markerHeight='12' markerWidth='12' markerUnits='userSpaceOnUse' refY='5' refX='7.9' id='arrowhead'%3e%3cpath d='M -1 0 L 10 5 L 0 10 z'/%3e%3c/marker%3e%3c/defs%3e%3cdefs%3e%3cmarker refY='4.5' refX='4' orient='auto' markerHeight='8' markerWidth='15' id='crosshead'%3e%3cpath style='stroke-dasharray: 0%2c 0%3b' d='M 1%2c2 L 6%2c7 M 6%2c2 L 1%2c7' stroke-width='1pt' stroke='black' fill='none'/%3e%3c/marker%3e%3c/defs%3e%3cdefs%3e%3cmarker orient='auto' markerHeight='28' markerWidth='20' refY='7' refX='15.5' id='filled-head'%3e%3cpath d='M 18%2c7 L9%2c13 L14%2c7 L9%2c1 Z'/%3e%3c/marker%3e%3c/defs%3e%3cdefs%3e%3cmarker orient='auto' markerHeight='40' markerWidth='60' refY='15' refX='15' id='sequencenumber'%3e%3ccircle r='6' cy='15' cx='15'/%3e%3c/marker%3e%3c/defs%3e%3ctext style='font-family: arial%2c sans-serif%3b font-size: 16px%3b font-weight: 400%3b' dy='1em' class='messageText' alignment-baseline='middle' dominant-baseline='middle' text-anchor='middle' y='80' x='186'%3eInvokes sign-in%3c/text%3e%3cline style='fill: none%3b' marker-end='url(%23arrowhead)' stroke='none' stroke-width='2' class='messageLine0' y2='109' x2='295.5' y1='109' x1='76'/%3e%3ctext style='font-family: arial%2c sans-serif%3b font-size: 16px%3b font-weight: 400%3b' dy='1em' class='messageText' alignment-baseline='middle' dominant-baseline='middle' text-anchor='middle' y='124' x='432'%3eRedirects to Logto%3c/text%3e%3cline style='fill: none%3b' marker-end='url(%23arrowhead)' stroke='none' stroke-width='2' class='messageLine0' y2='153' x2='562.5' y1='153' x1='300.5'/%3e%3ctext style='font-family: arial%2c sans-serif%3b font-size: 16px%3b font-weight: 400%3b' dy='1em' class='messageText' alignment-baseline='middle' dominant-baseline='middle' text-anchor='middle' y='168' x='568'%3eUser signs in%3c/text%3e%3cpath style='fill: none%3b' marker-end='url(%23arrowhead)' stroke='none' stroke-width='2' class='messageLine0' d='M 567.5%2c197 C 627.5%2c187 627.5%2c227 567.5%2c217'/%3e%3ctext style='font-family: arial%2c sans-serif%3b font-size: 16px%3b font-weight: 400%3b' dy='1em' class='messageText' alignment-baseline='middle' dominant-baseline='middle' text-anchor='middle' y='242' x='435'%3eRedirects back to extension%3c/text%3e%3cline style='fill: none%3b' marker-end='url(%23arrowhead)' stroke='none' stroke-width='2' class='messageLine0' y2='271' x2='303.5' y1='271' x1='565.5'/%3e%3ctext style='font-family: arial%2c sans-serif%3b font-size: 16px%3b font-weight: 400%3b' dy='1em' class='messageText' alignment-baseline='middle' dominant-baseline='middle' text-anchor='middle' y='286' x='189'%3eNotifies the popup%3c/text%3e%3cline style='fill: none%3b' marker-end='url(%23arrowhead)' stroke='none' stroke-width='2' class='messageLine0' y2='315' x2='79' y1='315' x1='298.5'/%3e%3c/svg%3e)