Secure your API resources for machine-to-machine communication
Learn how to leverage OAuth 2.0 and JWT to secure your API resources for machine-to-machine communication.

Founder

When building a project that involves multiple services, the security of the API resources is a critical concern. In this article, I'll show you how to leverage OAuth 2.0 and JWT to secure the communication between services (machine-to-machine), and how to apply role-based access control (RBAC) to follow the minimum privilege principle.
Get started
To follow along, I assume you have the following prerequisites:
- A Logto Cloud account, or a self-hosted Logto instance
- At least two services that need to communicate with each other
For demonstration purposes, let's assume we have the following services:
- A shopping cart service that provides APIs to manage shopping carts
- Endpoint:
https://cart.example.com/api
- Endpoint:
- A payment service that provides APIs to process payments
- Endpoint:
https://payment.example.com/api
- Endpoint:
Authentication flow
Now, our cart service needs to call the payment service to process payments. The authentication flow is as follows:
%3bfill:%23ECECFF%3b%7d%23mermaid-0 text.actor%26gt%3btspan%7bfill:black%3bstroke:none%3b%7d%23mermaid-0 .actor-line%7bstroke:hsl(259.6261682243%2c 59.7765363128%25%2c 87.9019607843%25)%3b%7d%23mermaid-0 .messageLine0%7bstroke-width:1.5%3bstroke-dasharray:none%3bstroke:%23333%3b%7d%23mermaid-0 .messageLine1%7bstroke-width:1.5%3bstroke-dasharray:2%2c2%3bstroke:%23333%3b%7d%23mermaid-0 %23arrowhead path%7bfill:%23333%3bstroke:%23333%3b%7d%23mermaid-0 .sequenceNumber%7bfill:white%3b%7d%23mermaid-0 %23sequencenumber%7bfill:%23333%3b%7d%23mermaid-0 %23crosshead path%7bfill:%23333%3bstroke:%23333%3b%7d%23mermaid-0 .messageText%7bfill:%23333%3bstroke:none%3b%7d%23mermaid-0 .labelBox%7bstroke:hsl(259.6261682243%2c 59.7765363128%25%2c 87.9019607843%25)%3bfill:%23ECECFF%3b%7d%23mermaid-0 .labelText%2c%23mermaid-0 .labelText%26gt%3btspan%7bfill:black%3bstroke:none%3b%7d%23mermaid-0 .loopText%2c%23mermaid-0 .loopText%26gt%3btspan%7bfill:black%3bstroke:none%3b%7d%23mermaid-0 .loopLine%7bstroke-width:2px%3bstroke-dasharray:2%2c2%3bstroke:hsl(259.6261682243%2c 59.7765363128%25%2c 87.9019607843%25)%3bfill:hsl(259.6261682243%2c 59.7765363128%25%2c 87.9019607843%25)%3b%7d%23mermaid-0 .note%7bstroke:%23aaaa33%3bfill:%23fff5ad%3b%7d%23mermaid-0 .noteText%2c%23mermaid-0 .noteText%26gt%3btspan%7bfill:black%3bstroke:none%3b%7d%23mermaid-0 .activation0%7bfill:%23f4f4f4%3bstroke:%23666%3b%7d%23mermaid-0 .activation1%7bfill:%23f4f4f4%3bstroke:%23666%3b%7d%23mermaid-0 .activation2%7bfill:%23f4f4f4%3bstroke:%23666%3b%7d%23mermaid-0 .actorPopupMenu%7bposition:absolute%3b%7d%23mermaid-0 .actorPopupMenuPanel%7bposition:absolute%3bfill:%23ECECFF%3bbox-shadow:0px 8px 16px 0px rgba(0%2c0%2c0%2c0.2)%3bfilter:drop-shadow(3px 5px 2px rgb(0 0 0 / 0.4))%3b%7d%23mermaid-0 .actor-man line%7bstroke:hsl(259.6261682243%2c 59.7765363128%25%2c 87.9019607843%25)%3bfill:%23ECECFF%3b%7d%23mermaid-0 .actor-man circle%2c%23mermaid-0 line%7bstroke:hsl(259.6261682243%2c 59.7765363128%25%2c 87.9019607843%25)%3bfill:%23ECECFF%3bstroke-width:2px%3b%7d%23mermaid-0 :root%7b--mermaid-font-family:arial%2csans-serif%3b%7d%3c/style%3e%3cg/%3e%3cdefs%3e%3csymbol height='24' width='24' id='computer'%3e%3cpath d='M2 2v13h20v-13h-20zm18 11h-16v-9h16v9zm-10.228 6l.466-1h3.524l.467 1h-4.457zm14.228 3h-24l2-6h2.104l-1.33 4h18.45l-1.297-4h2.073l2 6zm-5-10h-14v-7h14v7z' transform='scale(.5)'/%3e%3c/symbol%3e%3c/defs%3e%3cdefs%3e%3csymbol clip-rule='evenodd' fill-rule='evenodd' id='database'%3e%3cpath d='M12.258.001l.256.004.255.005.253.008.251.01.249.012.247.015.246.016.242.019.241.02.239.023.236.024.233.027.231.028.229.031.225.032.223.034.22.036.217.038.214.04.211.041.208.043.205.045.201.046.198.048.194.05.191.051.187.053.183.054.18.056.175.057.172.059.168.06.163.061.16.063.155.064.15.066.074.033.073.033.071.034.07.034.069.035.068.035.067.035.066.035.064.036.064.036.062.036.06.036.06.037.058.037.058.037.055.038.055.038.053.038.052.038.051.039.05.039.048.039.047.039.045.04.044.04.043.04.041.04.04.041.039.041.037.041.036.041.034.041.033.042.032.042.03.042.029.042.027.042.026.043.024.043.023.043.021.043.02.043.018.044.017.043.015.044.013.044.012.044.011.045.009.044.007.045.006.045.004.045.002.045.001.045v17l-.001.045-.002.045-.004.045-.006.045-.007.045-.009.044-.011.045-.012.044-.013.044-.015.044-.017.043-.018.044-.02.043-.021.043-.023.043-.024.043-.026.043-.027.042-.029.042-.03.042-.032.042-.033.042-.034.041-.036.041-.037.041-.039.041-.04.041-.041.04-.043.04-.044.04-.045.04-.047.039-.048.039-.05.039-.051.039-.052.038-.053.038-.055.038-.055.038-.058.037-.058.037-.06.037-.06.036-.062.036-.064.036-.064.036-.066.035-.067.035-.068.035-.069.035-.07.034-.071.034-.073.033-.074.033-.15.066-.155.064-.16.063-.163.061-.168.06-.172.059-.175.057-.18.056-.183.054-.187.053-.191.051-.194.05-.198.048-.201.046-.205.045-.208.043-.211.041-.214.04-.217.038-.22.036-.223.034-.225.032-.229.031-.231.028-.233.027-.236.024-.239.023-.241.02-.242.019-.246.016-.247.015-.249.012-.251.01-.253.008-.255.005-.256.004-.258.001-.258-.001-.256-.004-.255-.005-.253-.008-.251-.01-.249-.012-.247-.015-.245-.016-.243-.019-.241-.02-.238-.023-.236-.024-.234-.027-.231-.028-.228-.031-.226-.032-.223-.034-.22-.036-.217-.038-.214-.04-.211-.041-.208-.043-.204-.045-.201-.046-.198-.048-.195-.05-.19-.051-.187-.053-.184-.054-.179-.056-.176-.057-.172-.059-.167-.06-.164-.061-.159-.063-.155-.064-.151-.066-.074-.033-.072-.033-.072-.034-.07-.034-.069-.035-.068-.035-.067-.035-.066-.035-.064-.036-.063-.036-.062-.036-.061-.036-.06-.037-.058-.037-.057-.037-.056-.038-.055-.038-.053-.038-.052-.038-.051-.039-.049-.039-.049-.039-.046-.039-.046-.04-.044-.04-.043-.04-.041-.04-.04-.041-.039-.041-.037-.041-.036-.041-.034-.041-.033-.042-.032-.042-.03-.042-.029-.042-.027-.042-.026-.043-.024-.043-.023-.043-.021-.043-.02-.043-.018-.044-.017-.043-.015-.044-.013-.044-.012-.044-.011-.045-.009-.044-.007-.045-.006-.045-.004-.045-.002-.045-.001-.045v-17l.001-.045.002-.045.004-.045.006-.045.007-.045.009-.044.011-.045.012-.044.013-.044.015-.044.017-.043.018-.044.02-.043.021-.043.023-.043.024-.043.026-.043.027-.042.029-.042.03-.042.032-.042.033-.042.034-.041.036-.041.037-.041.039-.041.04-.041.041-.04.043-.04.044-.04.046-.04.046-.039.049-.039.049-.039.051-.039.052-.038.053-.038.055-.038.056-.038.057-.037.058-.037.06-.037.061-.036.062-.036.063-.036.064-.036.066-.035.067-.035.068-.035.069-.035.07-.034.072-.034.072-.033.074-.033.151-.066.155-.064.159-.063.164-.061.167-.06.172-.059.176-.057.179-.056.184-.054.187-.053.19-.051.195-.05.198-.048.201-.046.204-.045.208-.043.211-.041.214-.04.217-.038.22-.036.223-.034.226-.032.228-.031.231-.028.234-.027.236-.024.238-.023.241-.02.243-.019.245-.016.247-.015.249-.012.251-.01.253-.008.255-.005.256-.004.258-.001.258.001zm-9.258 20.499v.01l.001.021.003.021.004.022.005.021.006.022.007.022.009.023.01.022.011.023.012.023.013.023.015.023.016.024.017.023.018.024.019.024.021.024.022.025.023.024.024.025.052.049.056.05.061.051.066.051.07.051.075.051.079.052.084.052.088.052.092.052.097.052.102.051.105.052.11.052.114.051.119.051.123.051.127.05.131.05.135.05.139.048.144.049.147.047.152.047.155.047.16.045.163.045.167.043.171.043.176.041.178.041.183.039.187.039.19.037.194.035.197.035.202.033.204.031.209.03.212.029.216.027.219.025.222.024.226.021.23.02.233.018.236.016.24.015.243.012.246.01.249.008.253.005.256.004.259.001.26-.001.257-.004.254-.005.25-.008.247-.011.244-.012.241-.014.237-.016.233-.018.231-.021.226-.021.224-.024.22-.026.216-.027.212-.028.21-.031.205-.031.202-.034.198-.034.194-.036.191-.037.187-.039.183-.04.179-.04.175-.042.172-.043.168-.044.163-.045.16-.046.155-.046.152-.047.148-.048.143-.049.139-.049.136-.05.131-.05.126-.05.123-.051.118-.052.114-.051.11-.052.106-.052.101-.052.096-.052.092-.052.088-.053.083-.051.079-.052.074-.052.07-.051.065-.051.06-.051.056-.05.051-.05.023-.024.023-.025.021-.024.02-.024.019-.024.018-.024.017-.024.015-.023.014-.024.013-.023.012-.023.01-.023.01-.022.008-.022.006-.022.006-.022.004-.022.004-.021.001-.021.001-.021v-4.127l-.077.055-.08.053-.083.054-.085.053-.087.052-.09.052-.093.051-.095.05-.097.05-.1.049-.102.049-.105.048-.106.047-.109.047-.111.046-.114.045-.115.045-.118.044-.12.043-.122.042-.124.042-.126.041-.128.04-.13.04-.132.038-.134.038-.135.037-.138.037-.139.035-.142.035-.143.034-.144.033-.147.032-.148.031-.15.03-.151.03-.153.029-.154.027-.156.027-.158.026-.159.025-.161.024-.162.023-.163.022-.165.021-.166.02-.167.019-.169.018-.169.017-.171.016-.173.015-.173.014-.175.013-.175.012-.177.011-.178.01-.179.008-.179.008-.181.006-.182.005-.182.004-.184.003-.184.002h-.37l-.184-.002-.184-.003-.182-.004-.182-.005-.181-.006-.179-.008-.179-.008-.178-.01-.176-.011-.176-.012-.175-.013-.173-.014-.172-.015-.171-.016-.17-.017-.169-.018-.167-.019-.166-.02-.165-.021-.163-.022-.162-.023-.161-.024-.159-.025-.157-.026-.156-.027-.155-.027-.153-.029-.151-.03-.15-.03-.148-.031-.146-.032-.145-.033-.143-.034-.141-.035-.14-.035-.137-.037-.136-.037-.134-.038-.132-.038-.13-.04-.128-.04-.126-.041-.124-.042-.122-.042-.12-.044-.117-.043-.116-.045-.113-.045-.112-.046-.109-.047-.106-.047-.105-.048-.102-.049-.1-.049-.097-.05-.095-.05-.093-.052-.09-.051-.087-.052-.085-.053-.083-.054-.08-.054-.077-.054v4.127zm0-5.654v.011l.001.021.003.021.004.021.005.022.006.022.007.022.009.022.01.022.011.023.012.023.013.023.015.024.016.023.017.024.018.024.019.024.021.024.022.024.023.025.024.024.052.05.056.05.061.05.066.051.07.051.075.052.079.051.084.052.088.052.092.052.097.052.102.052.105.052.11.051.114.051.119.052.123.05.127.051.131.05.135.049.139.049.144.048.147.048.152.047.155.046.16.045.163.045.167.044.171.042.176.042.178.04.183.04.187.038.19.037.194.036.197.034.202.033.204.032.209.03.212.028.216.027.219.025.222.024.226.022.23.02.233.018.236.016.24.014.243.012.246.01.249.008.253.006.256.003.259.001.26-.001.257-.003.254-.006.25-.008.247-.01.244-.012.241-.015.237-.016.233-.018.231-.02.226-.022.224-.024.22-.025.216-.027.212-.029.21-.03.205-.032.202-.033.198-.035.194-.036.191-.037.187-.039.183-.039.179-.041.175-.042.172-.043.168-.044.163-.045.16-.045.155-.047.152-.047.148-.048.143-.048.139-.05.136-.049.131-.05.126-.051.123-.051.118-.051.114-.052.11-.052.106-.052.101-.052.096-.052.092-.052.088-.052.083-.052.079-.052.074-.051.07-.052.065-.051.06-.05.056-.051.051-.049.023-.025.023-.024.021-.025.02-.024.019-.024.018-.024.017-.024.015-.023.014-.023.013-.024.012-.022.01-.023.01-.023.008-.022.006-.022.006-.022.004-.021.004-.022.001-.021.001-.021v-4.139l-.077.054-.08.054-.083.054-.085.052-.087.053-.09.051-.093.051-.095.051-.097.05-.1.049-.102.049-.105.048-.106.047-.109.047-.111.046-.114.045-.115.044-.118.044-.12.044-.122.042-.124.042-.126.041-.128.04-.13.039-.132.039-.134.038-.135.037-.138.036-.139.036-.142.035-.143.033-.144.033-.147.033-.148.031-.15.03-.151.03-.153.028-.154.028-.156.027-.158.026-.159.025-.161.024-.162.023-.163.022-.165.021-.166.02-.167.019-.169.018-.169.017-.171.016-.173.015-.173.014-.175.013-.175.012-.177.011-.178.009-.179.009-.179.007-.181.007-.182.005-.182.004-.184.003-.184.002h-.37l-.184-.002-.184-.003-.182-.004-.182-.005-.181-.007-.179-.007-.179-.009-.178-.009-.176-.011-.176-.012-.175-.013-.173-.014-.172-.015-.171-.016-.17-.017-.169-.018-.167-.019-.166-.02-.165-.021-.163-.022-.162-.023-.161-.024-.159-.025-.157-.026-.156-.027-.155-.028-.153-.028-.151-.03-.15-.03-.148-.031-.146-.033-.145-.033-.143-.033-.141-.035-.14-.036-.137-.036-.136-.037-.134-.038-.132-.039-.13-.039-.128-.04-.126-.041-.124-.042-.122-.043-.12-.043-.117-.044-.116-.044-.113-.046-.112-.046-.109-.046-.106-.047-.105-.048-.102-.049-.1-.049-.097-.05-.095-.051-.093-.051-.09-.051-.087-.053-.085-.052-.083-.054-.08-.054-.077-.054v4.139zm0-5.666v.011l.001.02.003.022.004.021.005.022.006.021.007.022.009.023.01.022.011.023.012.023.013.023.015.023.016.024.017.024.018.023.019.024.021.025.022.024.023.024.024.025.052.05.056.05.061.05.066.051.07.051.075.052.079.051.084.052.088.052.092.052.097.052.102.052.105.051.11.052.114.051.119.051.123.051.127.05.131.05.135.05.139.049.144.048.147.048.152.047.155.046.16.045.163.045.167.043.171.043.176.042.178.04.183.04.187.038.19.037.194.036.197.034.202.033.204.032.209.03.212.028.216.027.219.025.222.024.226.021.23.02.233.018.236.017.24.014.243.012.246.01.249.008.253.006.256.003.259.001.26-.001.257-.003.254-.006.25-.008.247-.01.244-.013.241-.014.237-.016.233-.018.231-.02.226-.022.224-.024.22-.025.216-.027.212-.029.21-.03.205-.032.202-.033.198-.035.194-.036.191-.037.187-.039.183-.039.179-.041.175-.042.172-.043.168-.044.163-.045.16-.045.155-.047.152-.047.148-.048.143-.049.139-.049.136-.049.131-.051.126-.05.123-.051.118-.052.114-.051.11-.052.106-.052.101-.052.096-.052.092-.052.088-.052.083-.052.079-.052.074-.052.07-.051.065-.051.06-.051.056-.05.051-.049.023-.025.023-.025.021-.024.02-.024.019-.024.018-.024.017-.024.015-.023.014-.024.013-.023.012-.023.01-.022.01-.023.008-.022.006-.022.006-.022.004-.022.004-.021.001-.021.001-.021v-4.153l-.077.054-.08.054-.083.053-.085.053-.087.053-.09.051-.093.051-.095.051-.097.05-.1.049-.102.048-.105.048-.106.048-.109.046-.111.046-.114.046-.115.044-.118.044-.12.043-.122.043-.124.042-.126.041-.128.04-.13.039-.132.039-.134.038-.135.037-.138.036-.139.036-.142.034-.143.034-.144.033-.147.032-.148.032-.15.03-.151.03-.153.028-.154.028-.156.027-.158.026-.159.024-.161.024-.162.023-.163.023-.165.021-.166.02-.167.019-.169.018-.169.017-.171.016-.173.015-.173.014-.175.013-.175.012-.177.01-.178.01-.179.009-.179.007-.181.006-.182.006-.182.004-.184.003-.184.001-.185.001-.185-.001-.184-.001-.184-.003-.182-.004-.182-.006-.181-.006-.179-.007-.179-.009-.178-.01-.176-.01-.176-.012-.175-.013-.173-.014-.172-.015-.171-.016-.17-.017-.169-.018-.167-.019-.166-.02-.165-.021-.163-.023-.162-.023-.161-.024-.159-.024-.157-.026-.156-.027-.155-.028-.153-.028-.151-.03-.15-.03-.148-.032-.146-.032-.145-.033-.143-.034-.141-.034-.14-.036-.137-.036-.136-.037-.134-.038-.132-.039-.13-.039-.128-.041-.126-.041-.124-.041-.122-.043-.12-.043-.117-.044-.116-.044-.113-.046-.112-.046-.109-.046-.106-.048-.105-.048-.102-.048-.1-.05-.097-.049-.095-.051-.093-.051-.09-.052-.087-.052-.085-.053-.083-.053-.08-.054-.077-.054v4.153zm8.74-8.179l-.257.004-.254.005-.25.008-.247.011-.244.012-.241.014-.237.016-.233.018-.231.021-.226.022-.224.023-.22.026-.216.027-.212.028-.21.031-.205.032-.202.033-.198.034-.194.036-.191.038-.187.038-.183.04-.179.041-.175.042-.172.043-.168.043-.163.045-.16.046-.155.046-.152.048-.148.048-.143.048-.139.049-.136.05-.131.05-.126.051-.123.051-.118.051-.114.052-.11.052-.106.052-.101.052-.096.052-.092.052-.088.052-.083.052-.079.052-.074.051-.07.052-.065.051-.06.05-.056.05-.051.05-.023.025-.023.024-.021.024-.02.025-.019.024-.018.024-.017.023-.015.024-.014.023-.013.023-.012.023-.01.023-.01.022-.008.022-.006.023-.006.021-.004.022-.004.021-.001.021-.001.021.001.021.001.021.004.021.004.022.006.021.006.023.008.022.01.022.01.023.012.023.013.023.014.023.015.024.017.023.018.024.019.024.02.025.021.024.023.024.023.025.051.05.056.05.06.05.065.051.07.052.074.051.079.052.083.052.088.052.092.052.096.052.101.052.106.052.11.052.114.052.118.051.123.051.126.051.131.05.136.05.139.049.143.048.148.048.152.048.155.046.16.046.163.045.168.043.172.043.175.042.179.041.183.04.187.038.191.038.194.036.198.034.202.033.205.032.21.031.212.028.216.027.22.026.224.023.226.022.231.021.233.018.237.016.241.014.244.012.247.011.25.008.254.005.257.004.26.001.26-.001.257-.004.254-.005.25-.008.247-.011.244-.012.241-.014.237-.016.233-.018.231-.021.226-.022.224-.023.22-.026.216-.027.212-.028.21-.031.205-.032.202-.033.198-.034.194-.036.191-.038.187-.038.183-.04.179-.041.175-.042.172-.043.168-.043.163-.045.16-.046.155-.046.152-.048.148-.048.143-.048.139-.049.136-.05.131-.05.126-.051.123-.051.118-.051.114-.052.11-.052.106-.052.101-.052.096-.052.092-.052.088-.052.083-.052.079-.052.074-.051.07-.052.065-.051.06-.05.056-.05.051-.05.023-.025.023-.024.021-.024.02-.025.019-.024.018-.024.017-.023.015-.024.014-.023.013-.023.012-.023.01-.023.01-.022.008-.022.006-.023.006-.021.004-.022.004-.021.001-.021.001-.021-.001-.021-.001-.021-.004-.021-.004-.022-.006-.021-.006-.023-.008-.022-.01-.022-.01-.023-.012-.023-.013-.023-.014-.023-.015-.024-.017-.023-.018-.024-.019-.024-.02-.025-.021-.024-.023-.024-.023-.025-.051-.05-.056-.05-.06-.05-.065-.051-.07-.052-.074-.051-.079-.052-.083-.052-.088-.052-.092-.052-.096-.052-.101-.052-.106-.052-.11-.052-.114-.052-.118-.051-.123-.051-.126-.051-.131-.05-.136-.05-.139-.049-.143-.048-.148-.048-.152-.048-.155-.046-.16-.046-.163-.045-.168-.043-.172-.043-.175-.042-.179-.041-.183-.04-.187-.038-.191-.038-.194-.036-.198-.034-.202-.033-.205-.032-.21-.031-.212-.028-.216-.027-.22-.026-.224-.023-.226-.022-.231-.021-.233-.018-.237-.016-.241-.014-.244-.012-.247-.011-.25-.008-.254-.005-.257-.004-.26-.001-.26.001z' transform='scale(.5)'/%3e%3c/symbol%3e%3c/defs%3e%3cdefs%3e%3csymbol height='24' width='24' id='clock'%3e%3cpath d='M12 2c5.514 0 10 4.486 10 10s-4.486 10-10 10-10-4.486-10-10 4.486-10 10-10zm0-2c-6.627 0-12 5.373-12 12s5.373 12 12 12 12-5.373 12-12-5.373-12-12-12zm5.848 12.459c.202.038.202.333.001.372-1.907.361-6.045 1.111-6.547 1.111-.719 0-1.301-.582-1.301-1.301 0-.512.77-5.447 1.125-7.445.034-.192.312-.181.343.014l.985 6.238 5.394 1.011z' transform='scale(.5)'/%3e%3c/symbol%3e%3c/defs%3e%3cdefs%3e%3cmarker orient='auto-start-reverse' markerHeight='12' markerWidth='12' markerUnits='userSpaceOnUse' refY='5' refX='7.9' id='arrowhead'%3e%3cpath d='M -1 0 L 10 5 L 0 10 z'/%3e%3c/marker%3e%3c/defs%3e%3cdefs%3e%3cmarker refY='4.5' refX='4' orient='auto' markerHeight='8' markerWidth='15' id='crosshead'%3e%3cpath style='stroke-dasharray: 0%2c 0%3b' d='M 1%2c2 L 6%2c7 M 6%2c2 L 1%2c7' stroke-width='1pt' stroke='black' fill='none'/%3e%3c/marker%3e%3c/defs%3e%3cdefs%3e%3cmarker orient='auto' markerHeight='28' markerWidth='20' refY='7' refX='15.5' id='filled-head'%3e%3cpath d='M 18%2c7 L9%2c13 L14%2c7 L9%2c1 Z'/%3e%3c/marker%3e%3c/defs%3e%3cdefs%3e%3cmarker orient='auto' markerHeight='40' markerWidth='60' refY='15' refX='15' id='sequencenumber'%3e%3ccircle r='6' cy='15' cx='15'/%3e%3c/marker%3e%3c/defs%3e%3cg%3e%3cline class='loopLine' y2='209' x2='762' y1='209' x1='482'/%3e%3cline class='loopLine' y2='356' x2='762' y1='209' x1='762'/%3e%3cline class='loopLine' y2='356' x2='762' y1='356' x1='482'/%3e%3cline class='loopLine' y2='356' x2='482' y1='209' x1='482'/%3e%3cpolygon class='labelBox' points='482%2c209 532%2c209 532%2c222 523.6%2c229 482%2c229'/%3e%3ctext style='font-family: arial%2c sans-serif%3b font-size: 16px%3b font-weight: 400%3b' class='labelText' alignment-baseline='middle' dominant-baseline='middle' text-anchor='middle' y='222' x='507'%3ealt%3c/text%3e%3ctext style='font-family: arial%2c sans-serif%3b font-size: 16px%3b font-weight: 400%3b' class='loopText' text-anchor='middle' y='227' x='647'%3e%3ctspan x='647'%3e%5bLocal JWK set cache not%3c/tspan%3e%3c/text%3e%3ctext style='font-family: arial%2c sans-serif%3b font-size: 16px%3b font-weight: 400%3b' class='loopText' text-anchor='middle' y='244' x='647'%3e%3ctspan x='647'%3efound%5d%3c/tspan%3e%3c/text%3e%3c/g%3e%3ctext style='font-family: arial%2c sans-serif%3b font-size: 16px%3b font-weight: 400%3b' dy='1em' class='messageText' alignment-baseline='middle' dominant-baseline='middle' text-anchor='middle' y='80' x='283'%3eRequest access token (%60client_credentials%60 grant)%3c/text%3e%3cline style='fill: none%3b' marker-start='url(%23sequencenumber)' marker-end='url(%23arrowhead)' stroke='none' stroke-width='2' class='messageLine0' y2='111' x2='489' y1='111' x1='76'/%3e%3ctext class='sequenceNumber' text-anchor='middle' font-size='12px' font-family='sans-serif' y='115' x='76'%3e1%3c/text%3e%3ctext style='font-family: arial%2c sans-serif%3b font-size: 16px%3b font-weight: 400%3b' dy='1em' class='messageText' alignment-baseline='middle' dominant-baseline='middle' text-anchor='middle' y='126' x='286'%3eReturn access token (JWT)%3c/text%3e%3cline style='fill: none%3b' marker-start='url(%23sequencenumber)' marker-end='url(%23arrowhead)' stroke='none' stroke-width='2' class='messageLine0' y2='155' x2='79' y1='155' x1='492'/%3e%3ctext class='sequenceNumber' text-anchor='middle' font-size='12px' font-family='sans-serif' y='159' x='492'%3e2%3c/text%3e%3ctext style='font-family: arial%2c sans-serif%3b font-size: 16px%3b font-weight: 400%3b' dy='1em' class='messageText' alignment-baseline='middle' dominant-baseline='middle' text-anchor='middle' y='170' x='412'%3eSend request with authorization header (access token)%3c/text%3e%3cline style='fill: none%3b' marker-start='url(%23sequencenumber)' marker-end='url(%23arrowhead)' stroke='none' stroke-width='2' class='messageLine0' y2='199' x2='747' y1='199' x1='76'/%3e%3ctext class='sequenceNumber' text-anchor='middle' font-size='12px' font-family='sans-serif' y='203' x='76'%3e3%3c/text%3e%3ctext style='font-family: arial%2c sans-serif%3b font-size: 16px%3b font-weight: 400%3b' dy='1em' class='messageText' alignment-baseline='middle' dominant-baseline='middle' text-anchor='middle' y='273' x='624'%3eFetch well-known JWK set%3c/text%3e%3cline style='fill: none%3b' marker-start='url(%23sequencenumber)' marker-end='url(%23arrowhead)' stroke='none' stroke-width='2' class='messageLine0' y2='302' x2='497' y1='302' x1='750'/%3e%3ctext class='sequenceNumber' text-anchor='middle' font-size='12px' font-family='sans-serif' y='306' x='750'%3e4%3c/text%3e%3ctext style='font-family: arial%2c sans-serif%3b font-size: 16px%3b font-weight: 400%3b' dy='1em' class='messageText' alignment-baseline='middle' dominant-baseline='middle' text-anchor='middle' y='317' x='621'%3eReturn JWK set%3c/text%3e%3cline style='fill: none%3b' marker-start='url(%23sequencenumber)' marker-end='url(%23arrowhead)' stroke='none' stroke-width='2' class='messageLine0' y2='346' x2='747' y1='346' x1='494'/%3e%3ctext class='sequenceNumber' text-anchor='middle' font-size='12px' font-family='sans-serif' y='350' x='494'%3e5%3c/text%3e%3ctext style='font-family: arial%2c sans-serif%3b font-size: 16px%3b font-weight: 400%3b' dy='1em' class='messageText' alignment-baseline='middle' dominant-baseline='middle' text-anchor='middle' y='371' x='752'%3eValidate JWT using JWK set%3c/text%3e%3cpath style='fill: none%3b' marker-start='url(%23sequencenumber)' marker-end='url(%23arrowhead)' stroke='none' stroke-width='2' class='messageLine0' d='M 752%2c400 C 812%2c390 812%2c430 752%2c420'/%3e%3ctext class='sequenceNumber' text-anchor='middle' font-size='12px' font-family='sans-serif' y='404' x='752'%3e6%3c/text%3e%3ctext style='font-family: arial%2c sans-serif%3b font-size: 16px%3b font-weight: 400%3b' dy='1em' class='messageText' alignment-baseline='middle' dominant-baseline='middle' text-anchor='middle' y='445' x='415'%3eReturn response%3c/text%3e%3cline style='fill: none%3b' marker-start='url(%23sequencenumber)' marker-end='url(%23arrowhead)' stroke='none' stroke-width='2' class='messageLine0' y2='474' x2='79' y1='474' x1='750'/%3e%3ctext class='sequenceNumber' text-anchor='middle' font-size='12px' font-family='sans-serif' y='478' x='750'%3e7%3c/text%3e%3c/svg%3e)
Some key concepts in the above diagram:
- JWT (RFC 7519): JSON Web Token. See our previous article for an introduction to JWT.
- JWK (RFC 7517): JSON Web Key which is used to verify the signature of a JWT. A JWK set is a set of JWKs.
- "client_credentials" grant (RFC 6749): A grant type in OAuth 2.0. It uses the client's credentials to obtain an access token. We'll demonstrate the details in the upcoming sections.
Each participant in the above diagram has a role to play in the authentication flow:
- Cart service: The client that needs to call the payment service. Although it's a service, it's still a client in the OAuth 2.0 context, and we call such clients "machine-to-machine applications" in Logto.
- Logto: The OAuth 2.0 authorization server that issues access tokens.
- Payment service: The API resource that provides APIs to process payments.
Let's go through the authentication flow step by step.
Initial setup
To perform the authentication flow, we need to create a machine-to-machine app (cart service) and an API resource (payment service) in Logto.
Create API resource
Since our cart service needs to be aware of the payment service's API when performing authentication, we need to create an API resource first. Go to Logto Console, click API resources in the left sidebar, and click Create API resource. In the opened dialog, we offer some tutorials to help you get started. You can also click Continue without tutorial to skip it.
Enter the API name and identifier, for example, Payment service and https://payment.example.com/api, then click Create API resource.
After creating the API resource, you'll be redirected to the details page. We can leave it as is for now.
Create machine-to-machine app
Click Applications in the left sidebar, and click Create application. In the opened dialog, find the Machine-to-machine card, then click Start building.
Enter the application name, for example, Cart service, and click Create application. An interactive guide will be shown to help you set up the application. You can follow the guide to understand the basic usage, or click Finish and done to skip it.
Request access token
Since machine-to-machine applications are assumed to be secure (e.g., they are deployed in a private network), we can use the OAuth 2.0 "client_credentials" grant to obtain an access token. It uses basic authentication to authenticate the client:
- The request URL is the token endpoint of your Logto instance. You can find and copy it in the Advanced settings tab of the machine-to-machine app details page.
- The request method is
POST. - The request
Content-Typeheader isapplication/x-www-form-urlencoded. - For the
Authorizationheader, the value isBasic <base64(app_id:app_secret)>, whereapp_idandapp_secretare the app ID and app secret of the machine-to-machine app respectively. You can find them in the application details page. - The request body needs to specify the grant type and the API identifier. For example,
grant_type=client_credentials&resource=https://payment.example.com/api.grant_type=client_credentials: The constant value for the "client_credentials" grant.resource=https://payment.example.com/api: The API identifier of the API resource that the client wants to access.- If the application needs to be authorized with scopes (permissions), you can also specify the scopes in the request body. For example,
scope=read:payment write:payment. We'll cover scopes later.
Here's an example of the request using curl:
A successful response body would be like:
Send request with authorization header
Now we have the access token, and we can append it to the Authorization header of the request to the API resource. For example, if we want to call the POST /payments API of the payment service, we can send the following request:
Validate JWT
You may notice that the payment service needs to validate the JWT using the JWK set, and may have a local JWK set cache to avoid fetching the JWK set from Logto every time. Fortunately, due to the popularity of JWT, there are many libraries that can help you to achieve the goal with several lines of code.
These libraries are usually called "jose" (JavaScript Object Signing and Encryption) or "jsonwebtoken". For instance, in Node.js we can use jose to validate the JWT:
If the validation succeeds, the payload variable will be the decoded JWT payload. Otherwise, an error will be thrown.
Apply role-based access control
Now we have successfully secured the communication between the cart service and the payment service. However, the authentication flow only ensures that the client is the real cart service, but doesn't ensure that the cart service has any permission to perform actions on the payment service.
Let's say we want to allow the cart service to create payments, but not to read payments.
Define permissions
In Logto, "scopes" and "permissions" are interchangeable. Go to the API resource details page of the payment service, and navigate to the Permissions tab. It should be empty now. Click Create permission, enter read:payment as the permission name, and enter Read payments as the permission description. Then click Create permission.
Repeat the above steps to create another permission with the name write:payment and the description Create payments.
Create machine-to-machine role
A role is a group of permissions. In Logto, machine-to-machine apps can be assigned roles to grant permissions. Click "Roles" in the left sidebar, and click Create role.
- Enter
checkoutas the role name, and enterCheckout serviceas the role description. - Click Show more options. Choose "Machine-to-machine app role" as the role type.
- In the "Assigned permissions" section, click the arrow icon on the left of the API resource name (Payment service), and select the
write:paymentpermission.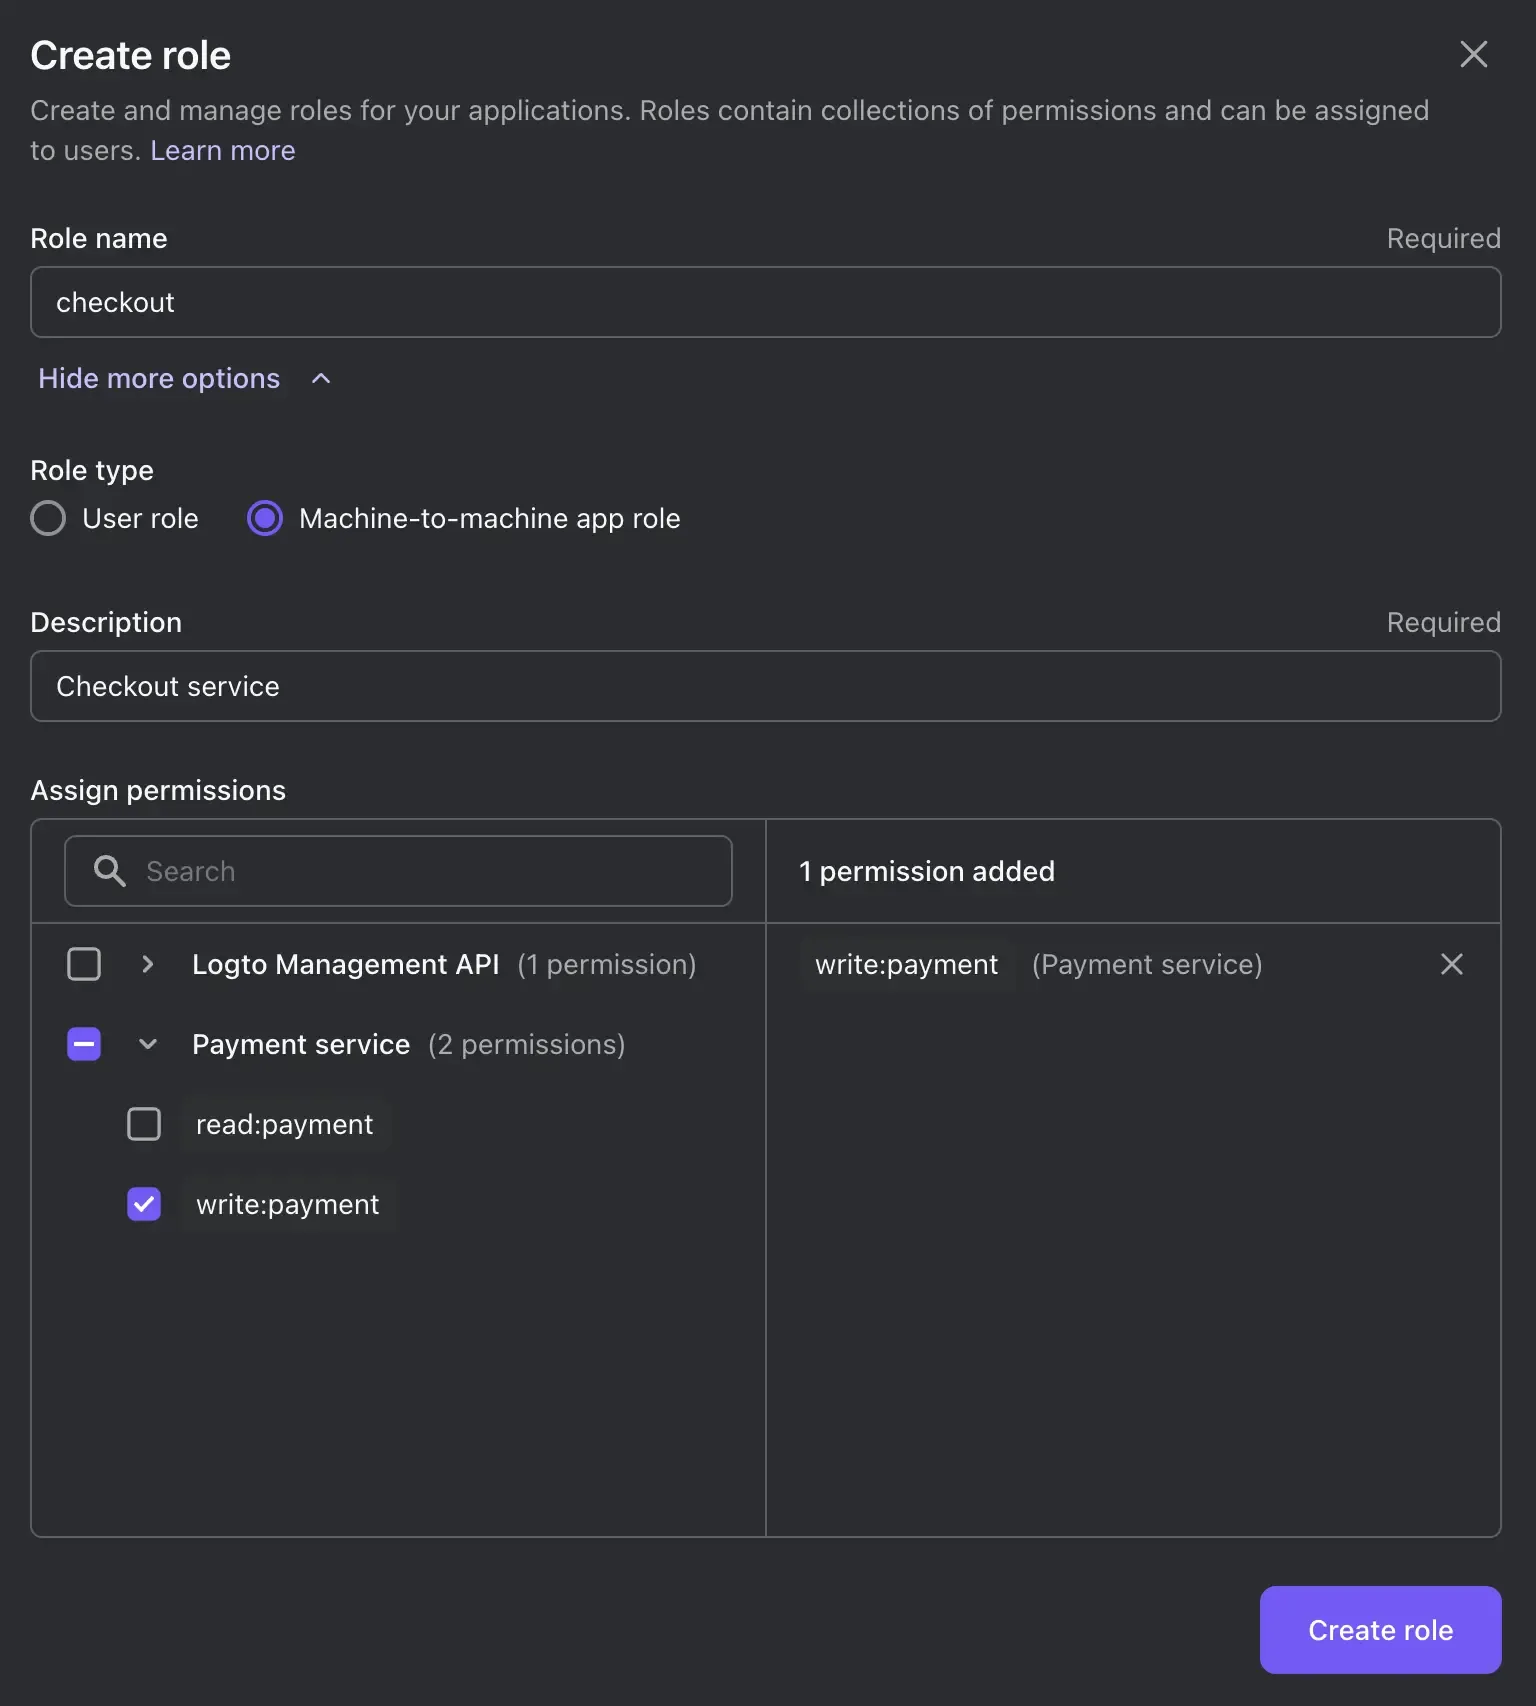
- Click Create role.
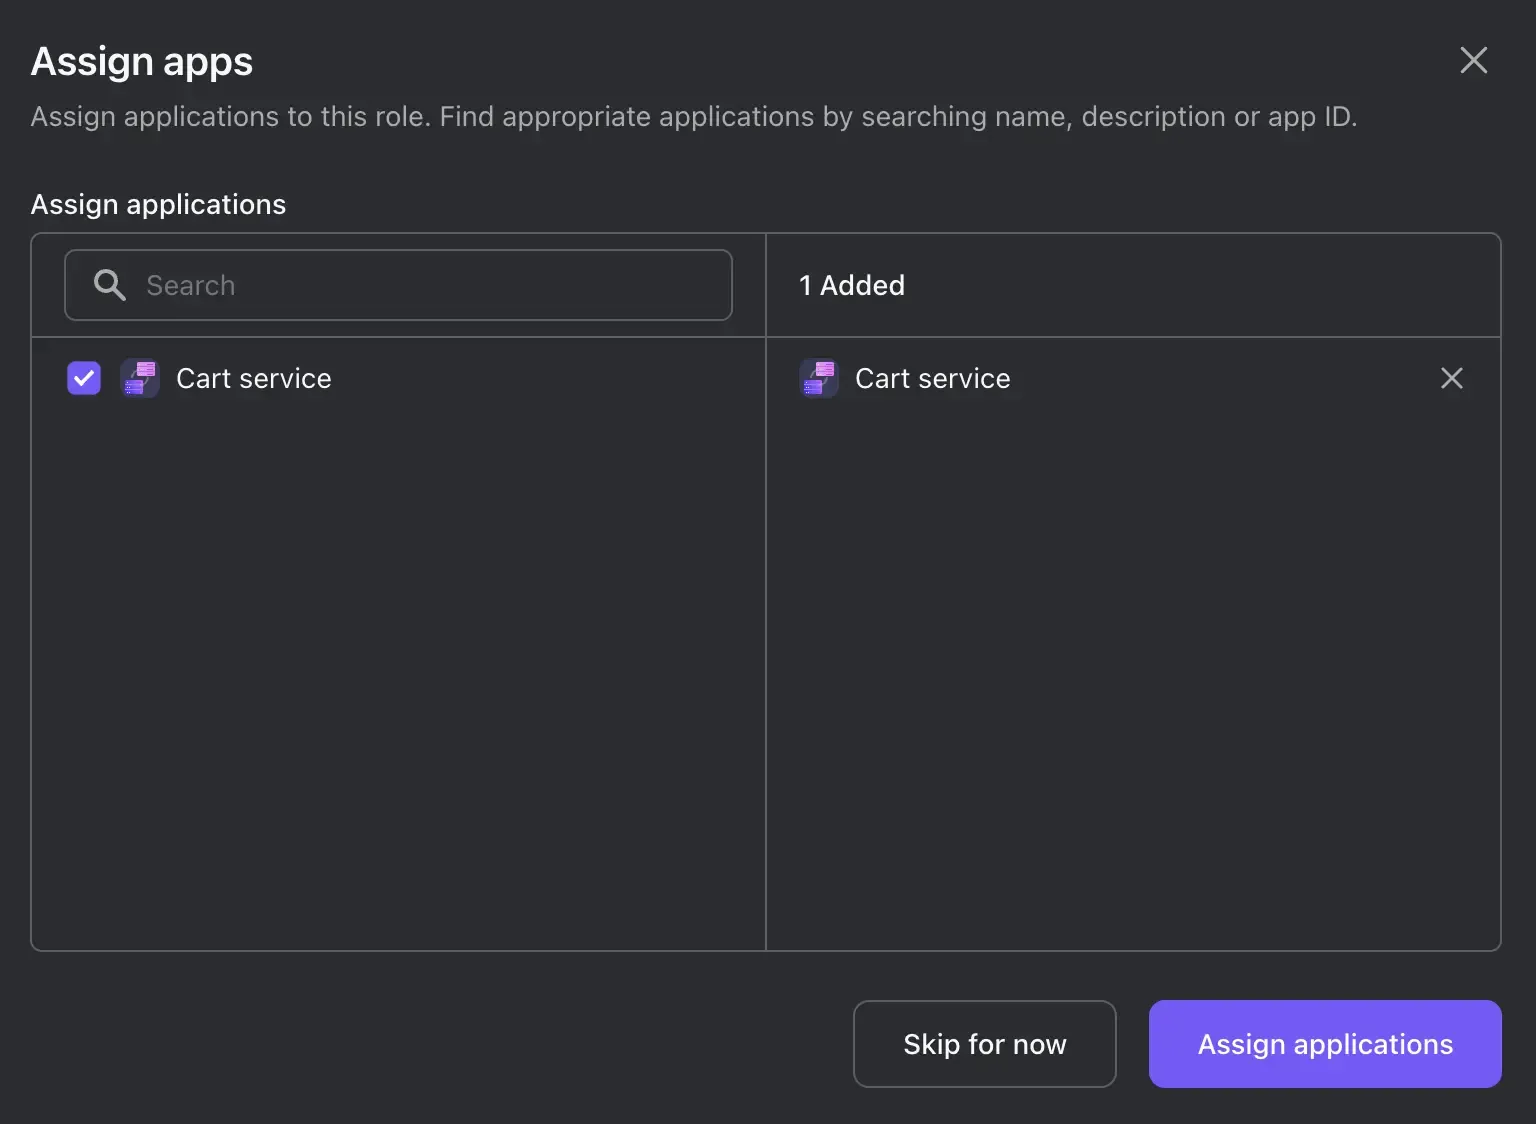
- Since we already have a machine-to-machine app (Cart service), we can directly assign the role to it in the next step. Check the checkbox on the left of the app name (Cart service), and click Assign applications.
Request access token with scopes
In addition to the request body parameters we mentioned in Request access token, we can also specify the scopes in the request body. For example, if we want to request the write:payment permission, we can send the following request:
To request multiple scopes, you can separate them with spaces. For example, scope=write:payment read:payment.
Validate scopes
If an action needs the write:payment permission in the payment service, we can validate the scopes by asserting that the scope claim of the JWT payload:
Conclusion
If you want to protect the access to the cart service, you can also apply the same authentication flow. This time, the cart service is the API resource, and the client is another service that needs to access.
With Logto, your API resources are secured with OAuth 2.0 and JWT, and the you can follow the minimum privilege principle by applying role-based access control. Besides, you can also use Logto to manage your users and their permissions, and even integrate with third-party identity providers.