RBAC in practice: Implementing secure authorization for your application
Complete guide to Role-Based Access Control (RBAC): Master permission design, role management, and secure authorization with practical CMS implementation.

Developer

Are you struggling with implementing a secure and scalable authorization system for your application? Role-Based Access Control (RBAC) is the industry standard for managing user permissions, but implementing it correctly can be challenging. This tutorial will show you how to build a robust RBAC system using a real-world Content Management System (CMS) example.
By following this guide, you'll learn:
- ✨ How to design and implement fine-grained permissions that give you precise control
- 🔒 Best practices for organizing permissions into meaningful roles
- 👤 Techniques for handling resource ownership effectively
- 🚀 Ways to make your authorization system scalable and maintainable
- 💡 Practical implementation using a real-world CMS example
The complete source code for this tutorial is available on GitHub.
Understanding RBAC fundamentals
Role-Based Access Control is more than just assigning permissions to users. It's about creating a structured approach to authorization that balances security with maintainability.
You can learn more about What is RBAC in the Auth Wiki.
Here are the key principles we'll follow in our implementation:
Fine-grained permission design
Fine-grained permissions give you precise control over what users can do in your system. Instead of broad access levels like "admin" or "user", we define specific actions users can perform on resources. For example:
read:articles- View any article in the systemcreate:articles- Create new articlesupdate:articles- Modify existing articlespublish:articles- Change the publication status of articles
Resource ownership and access control
Resource ownership is a fundamental concept in our CMS's authorization design. While RBAC defines what actions different roles can perform, ownership adds a personal dimension to access control:
- Authors automatically have access to articles they created
- This natural ownership model means authors can always view and edit their own content
- The system checks both role permissions OR ownership when handling article operations
- For example, even without the
update:articlespermission, an author can still edit their own articles - This design reduces the need for extra role permissions while maintaining security
This dual-layer approach (roles + ownership) creates a more intuitive and secure system. Publishers and admins can still manage all content through their role permissions, while authors maintain control over their own work.
Designing a secure APIs
Let's start by designing our CMS's core functionality through its API endpoints:
Implement access control for your API
For each endpoint, we need to consider two aspects of access control:
- Resource ownership - Does the user own this resource?
- Role-based permissions - Does the user's role allow this operation?
Here's how we'll handle access for each endpoint:
| Endpoint | Access control logic |
|---|---|
| GET /api/articles | - Anyone with list:articles permission, OR authors can see their own articles |
| GET /api/articles/:id | - Anyone with read:articles permission, OR author of the article |
| POST /api/articles | - Anyone with create:articles permission |
| PATCH /api/articles/:id | - Anyone with update:articles permission, OR author of the article |
| DELETE /api/articles/:id | - Anyone with delete:articles permission, OR author of the article |
| PATCH /api/articles/:id/published | - Only users with publish:articles permission |
Creating a permission system that scales
Based on our API access requirements, we can define these permissions:
| Permission | Description |
|---|---|
| list:articles | View the list of all articles in the system |
| read:articles | Read any article's full content |
| create:articles | Create new articles |
| update:articles | Modify any article |
| delete:articles | Delete any article |
| publish:articles | Change publication status |
Note that these permissions are only needed when accessing resources you don't own. Article owners can automatically:
- View their own articles (no
read:articlesneeded) - Edit their own articles (no
update:articlesneeded) - Delete their own articles (no
delete:articlesneeded)
Building effective roles
Now that we have our API and permissions defined, we can create roles that group these permissions logically:
| Permission/Role | 👑 Admin | 📝 Publisher | ✍️ Author |
|---|---|---|---|
| Description | Full system access for complete content management | Can view all articles and control publication status | Can create new articles in the system |
| list:articles | ✅ | ✅ | ❌ |
| read:articles | ✅ | ✅ | ❌ |
| create:articles | ✅ | ❌ | ✅ |
| update:articles | ✅ | ❌ | ❌ |
| delete:articles | ✅ | ❌ | ❌ |
| publish:articles | ✅ | ✅ | ❌ |
Note: Authors automatically have read/update/delete permissions for their own articles, regardless of role permissions.
Each role is designed with specific responsibilities in mind:
- Admin: Has complete control over the CMS, including all article operations
- Publisher: Focuses on content review and publication management
- Author: Specializes in content creation
This role structure creates a clear separation of concerns:
- Authors focus on creating content
- Publishers manage content quality and visibility
- Admins maintain overall system control
Config RBAC in Logto
Before you start, you need to create a account in Logto Cloud, or you can also use an self-hosted Logto instance by using the Logto OSS version.
But for this tutorial, we will use Logto Cloud for simplicity.
Setting up your application
- Go to "Applications" in Logto Console to create a new react application
- Application name: Content Management System
- Application type: Traditional Web Application
- Redirect URIs: http://localhost:5173/callback

Configuring API resources and permissions
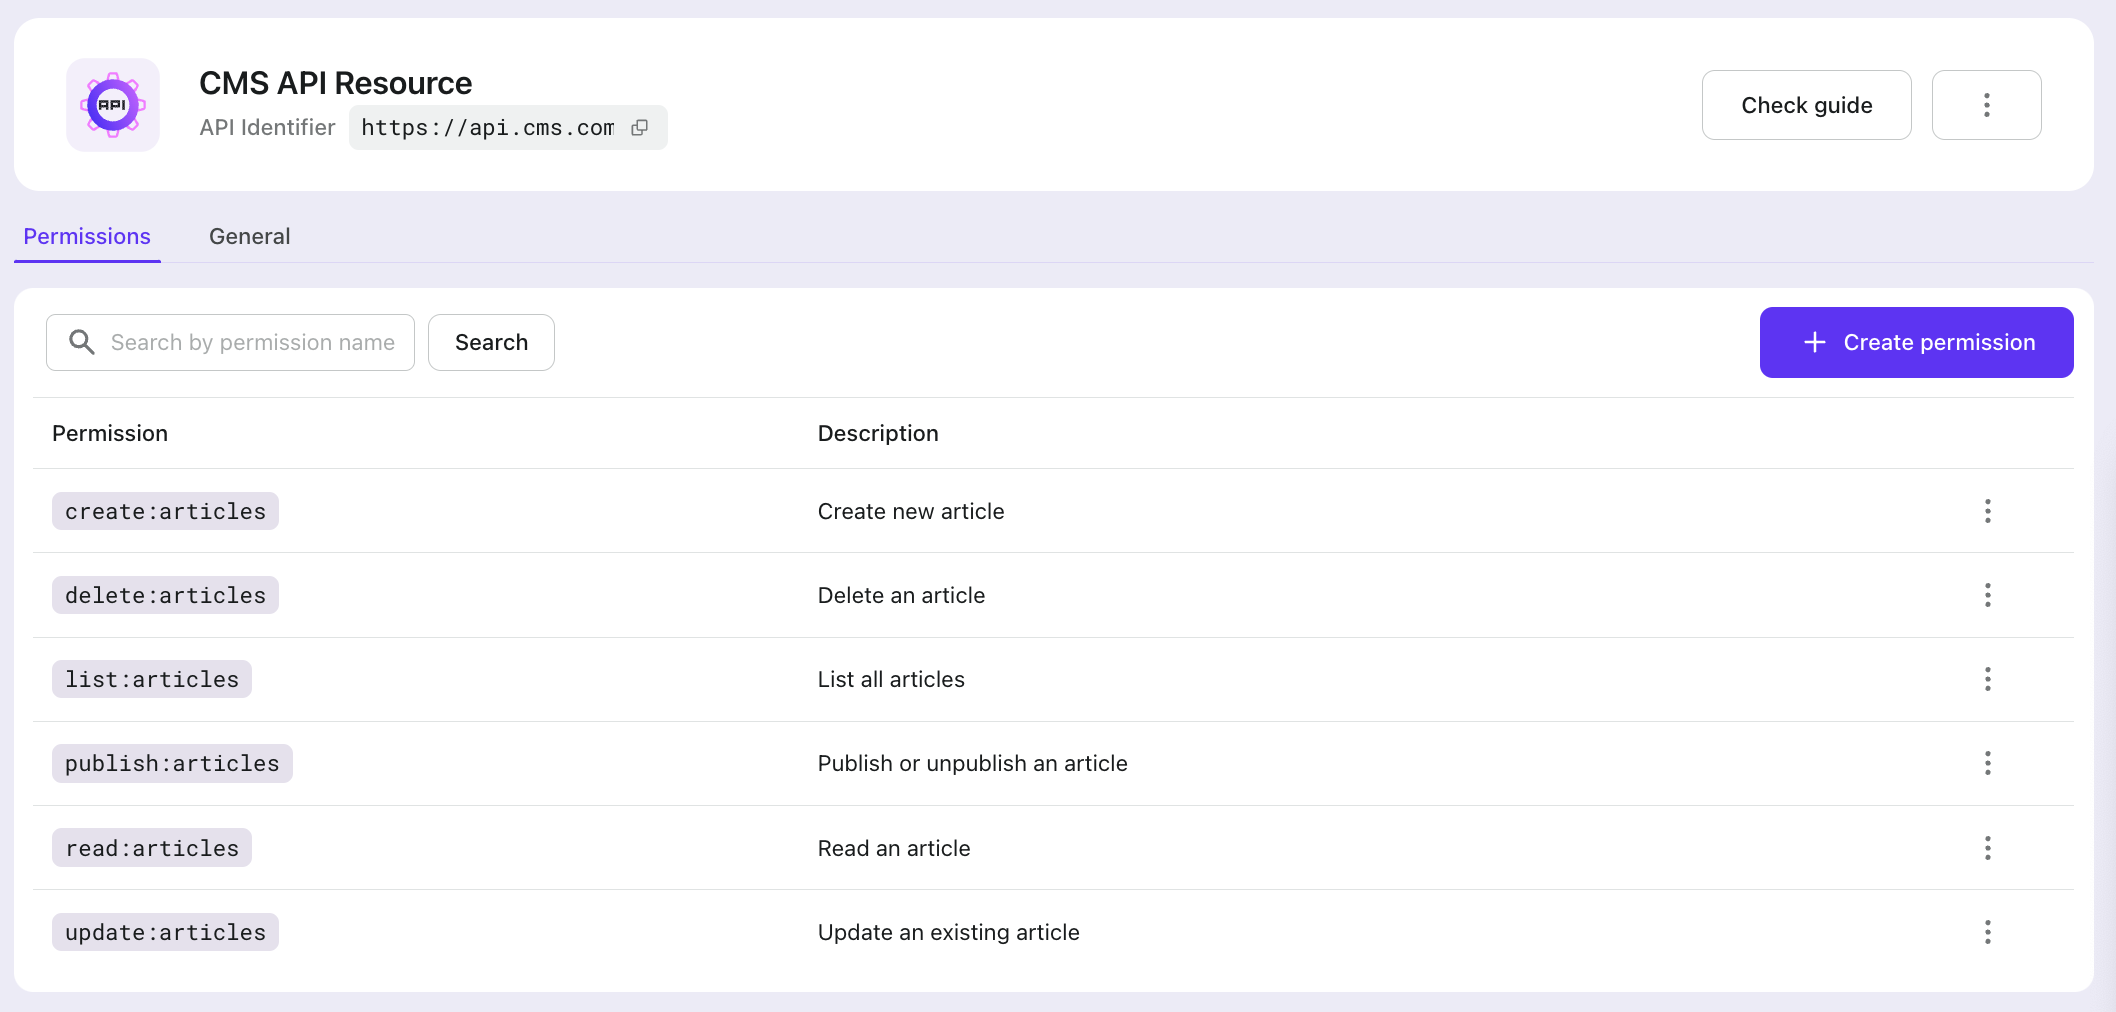
- Go to "API Resources" in Logto Console to create a new API resource
- API name: CMS API
- API identifier: https://api.cms.com
- Add permissions to the API resource
list:articlesread:articlescreate:articlesupdate:articlespublish:articlesdelete:articles
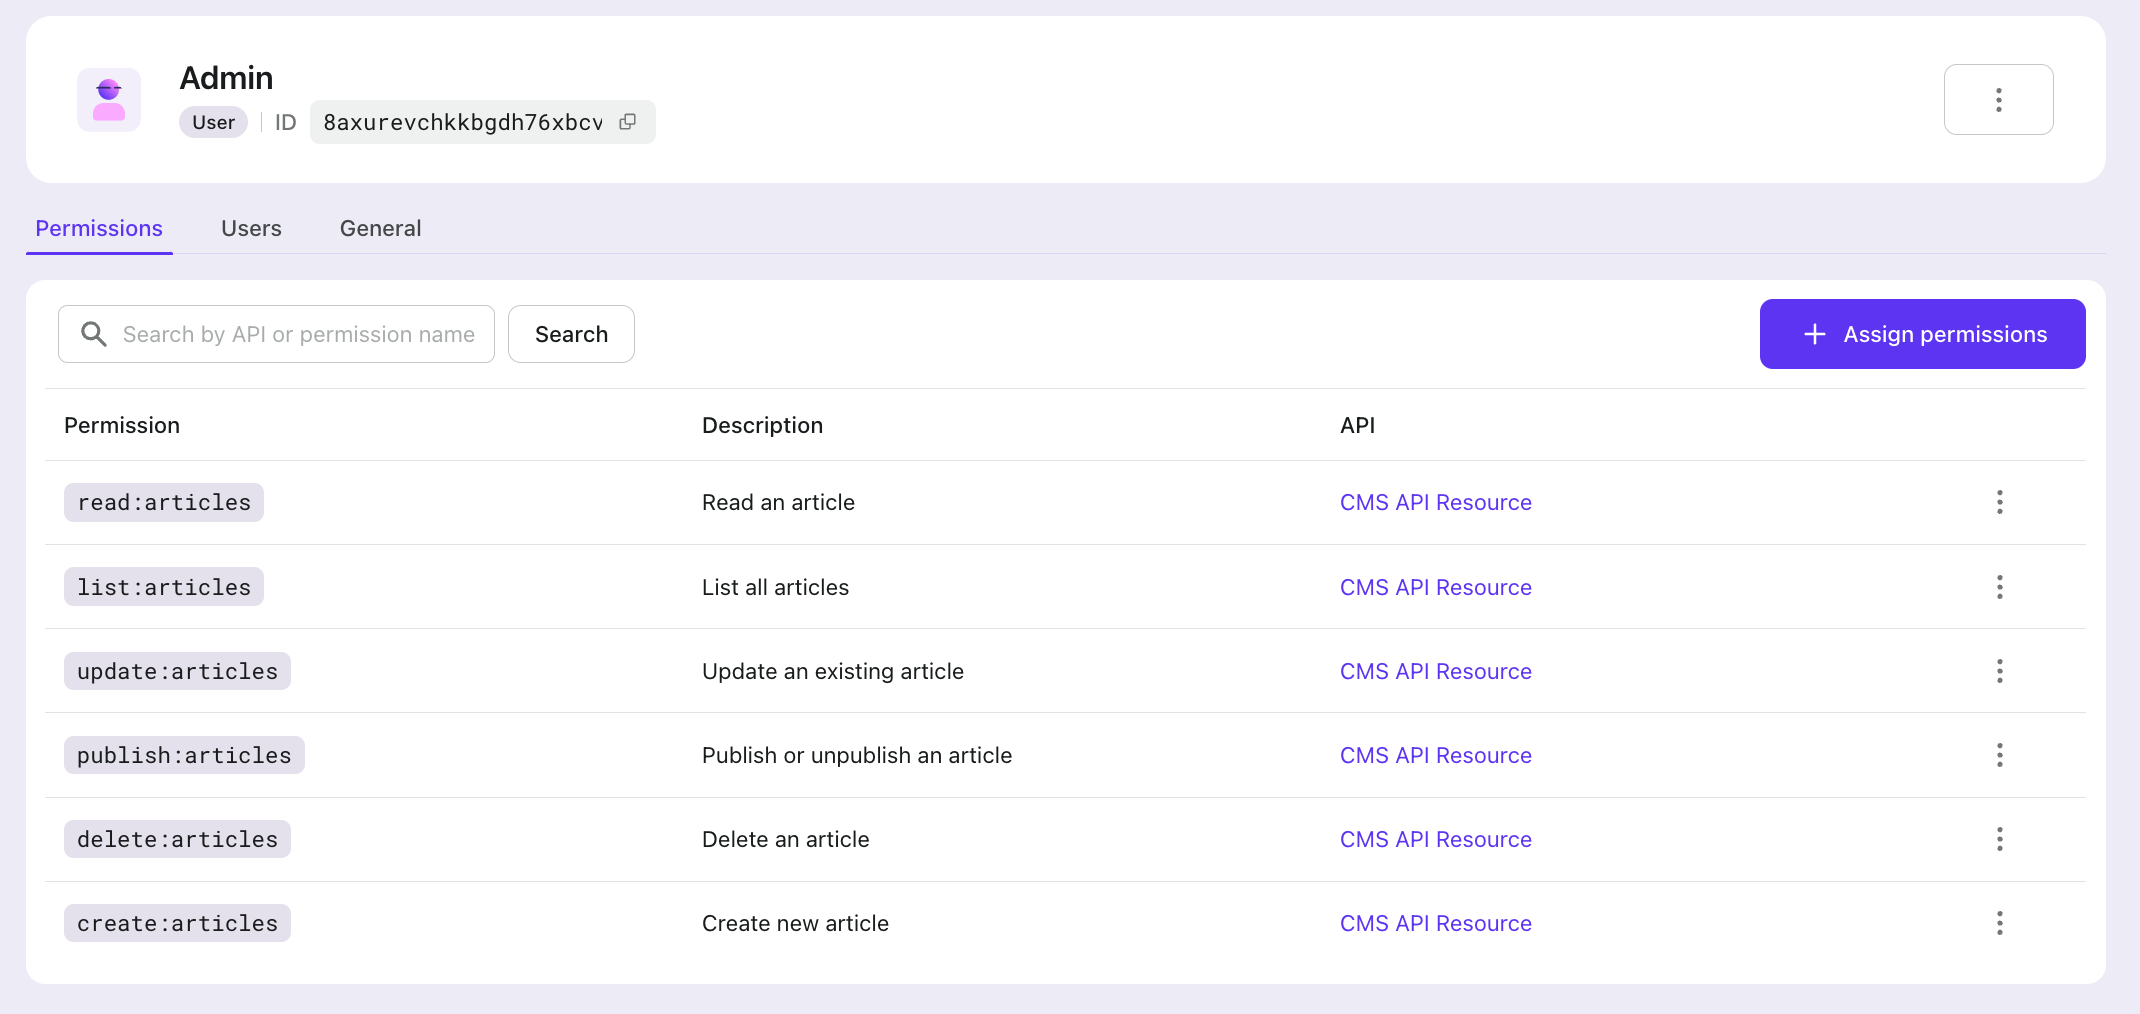
Creating roles
Go to Roles in Logto Console to create the following roles for the CMS
- Admin
- with all permissions
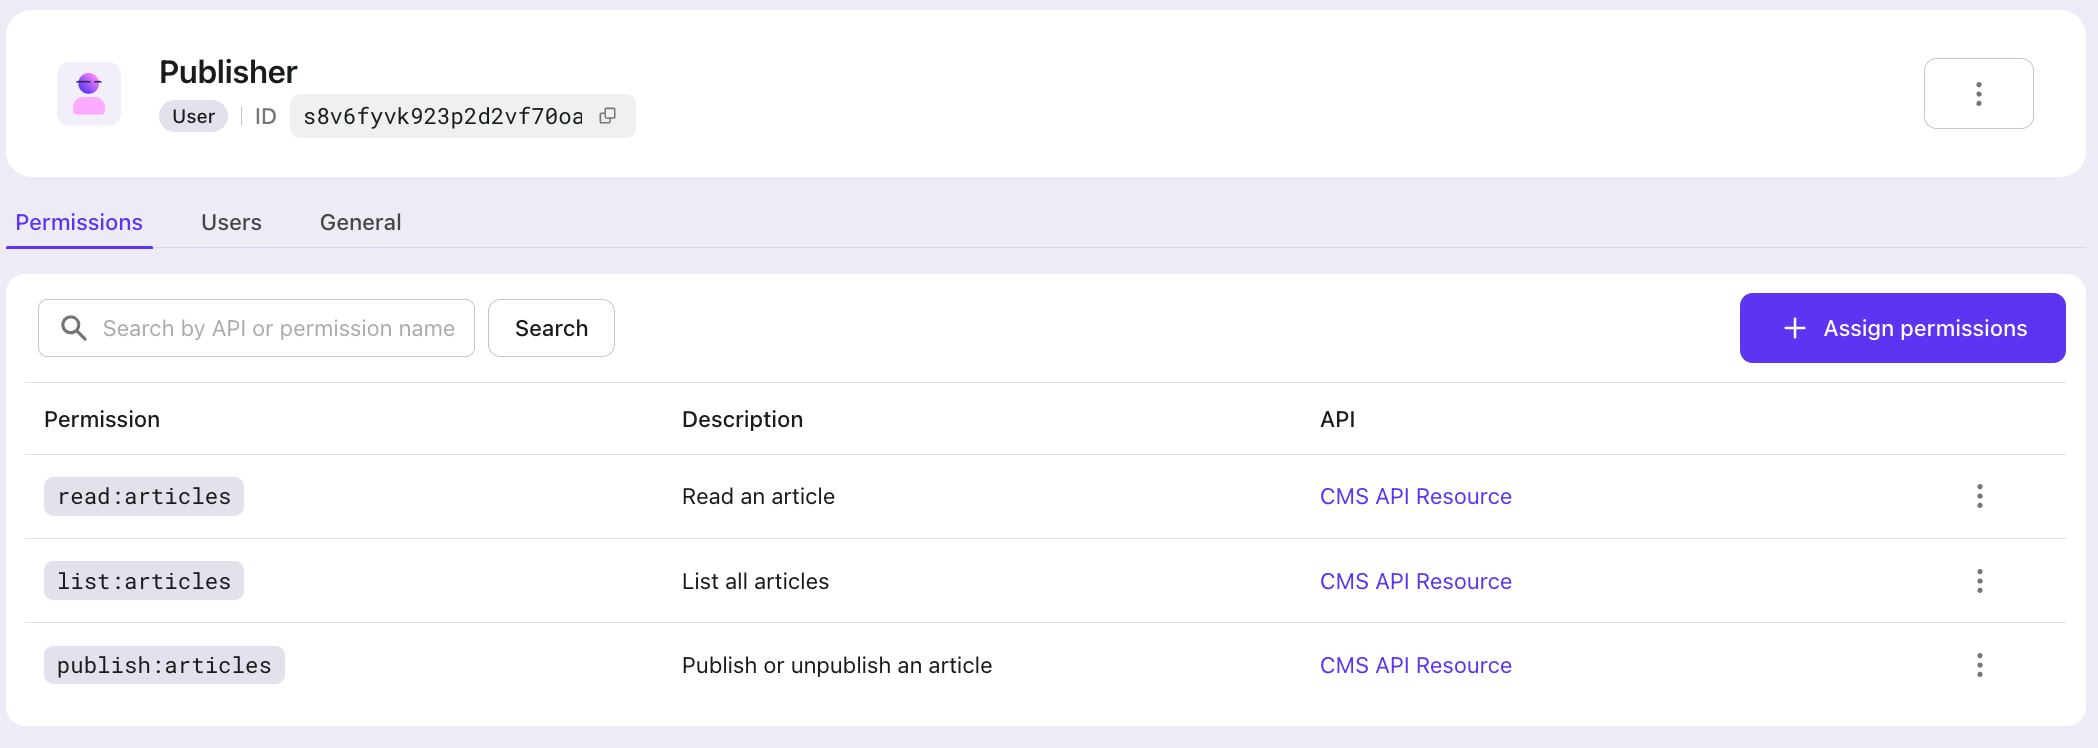
- Publisher
- with
read:articles,list:articles,publish:articles
- with
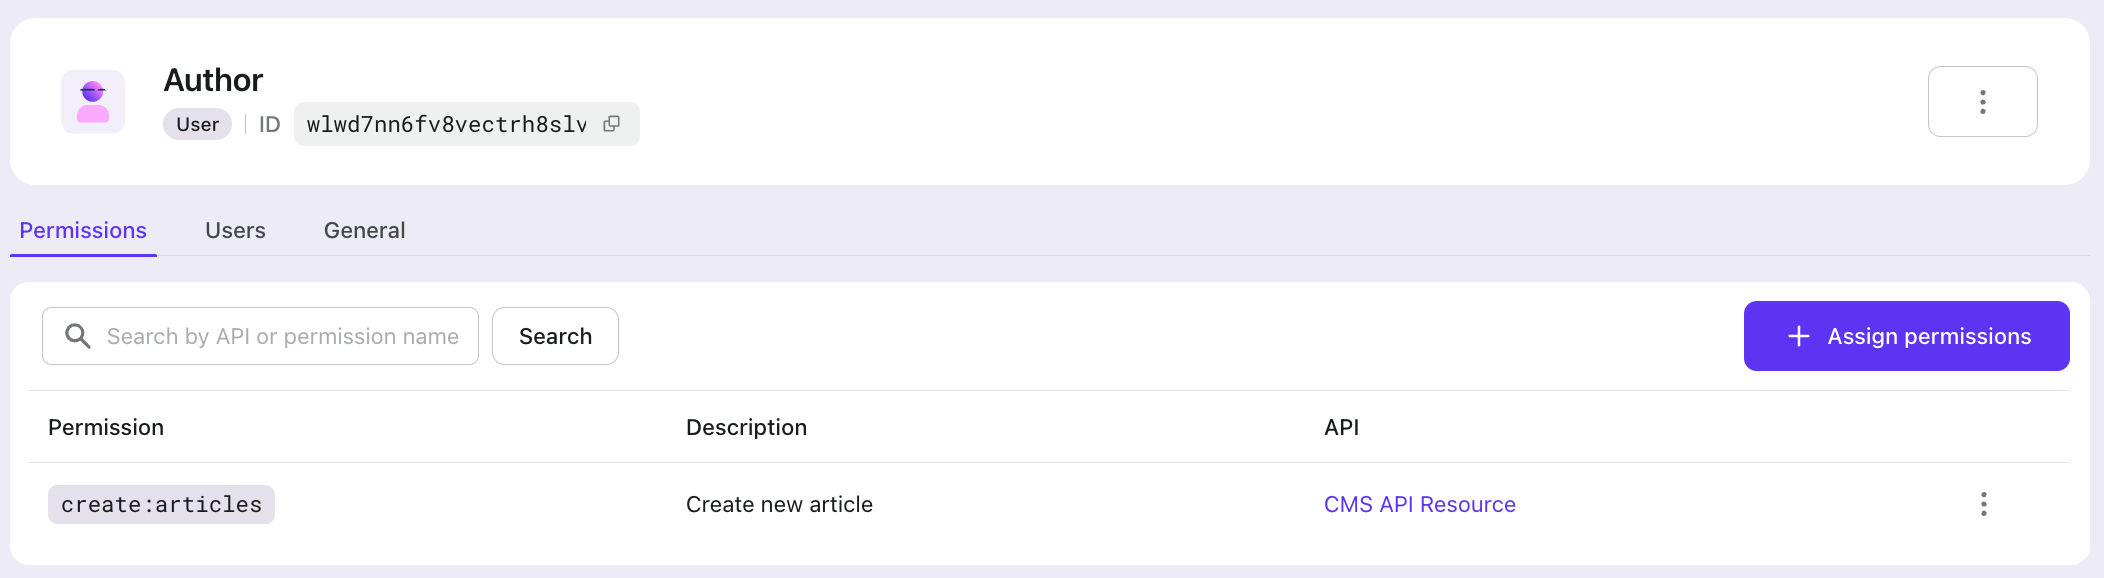
- Author
- with
create:articles
- with
Assigning roles to users
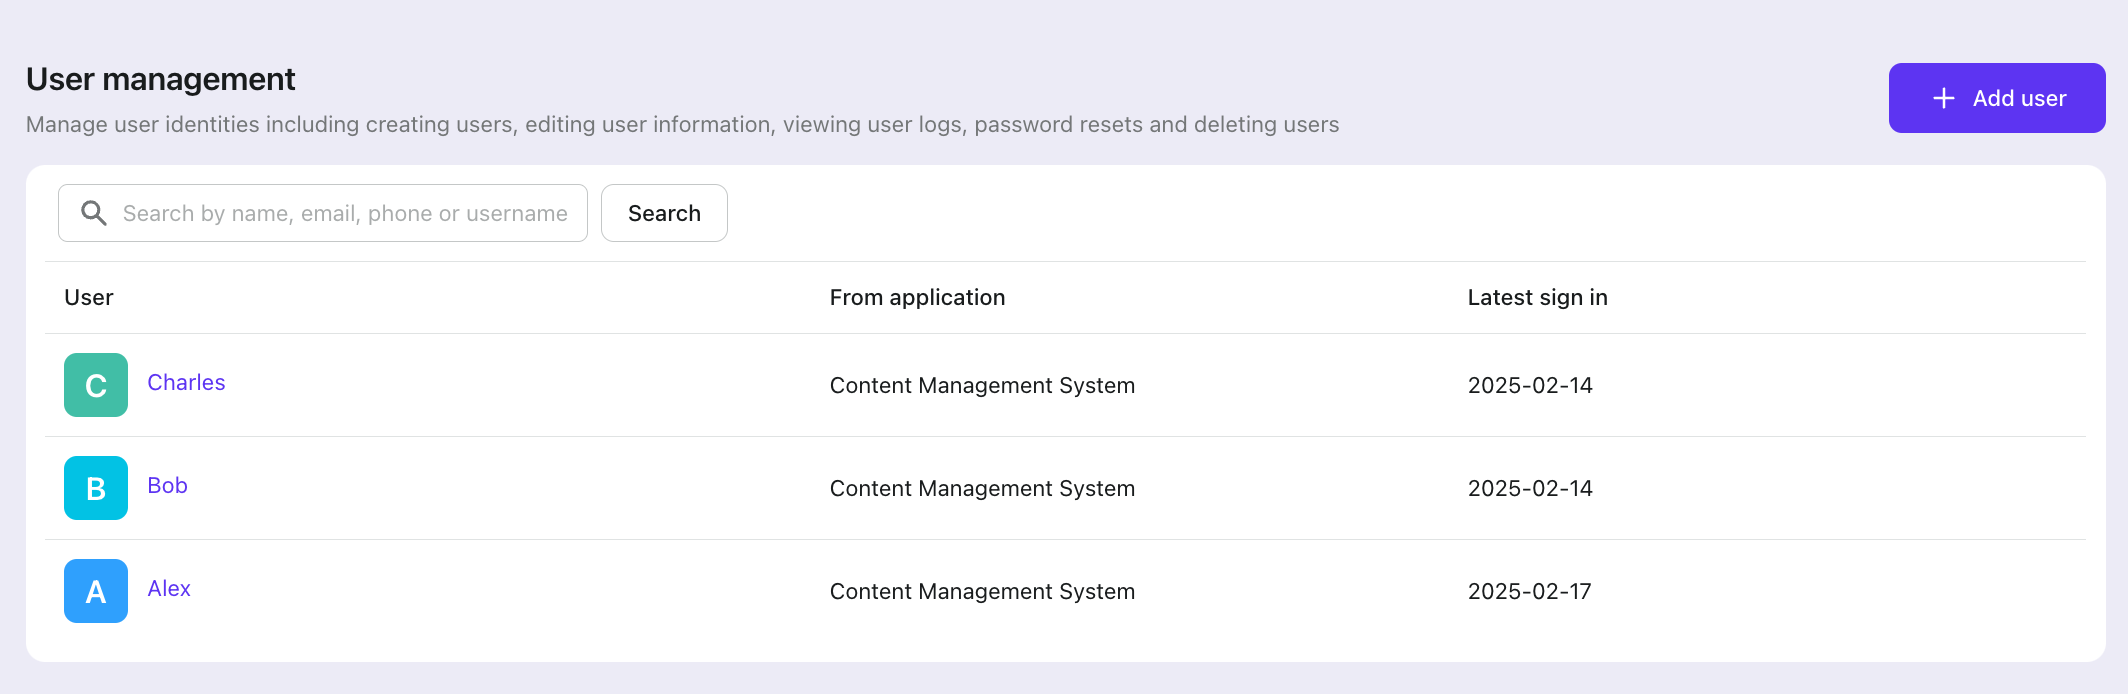
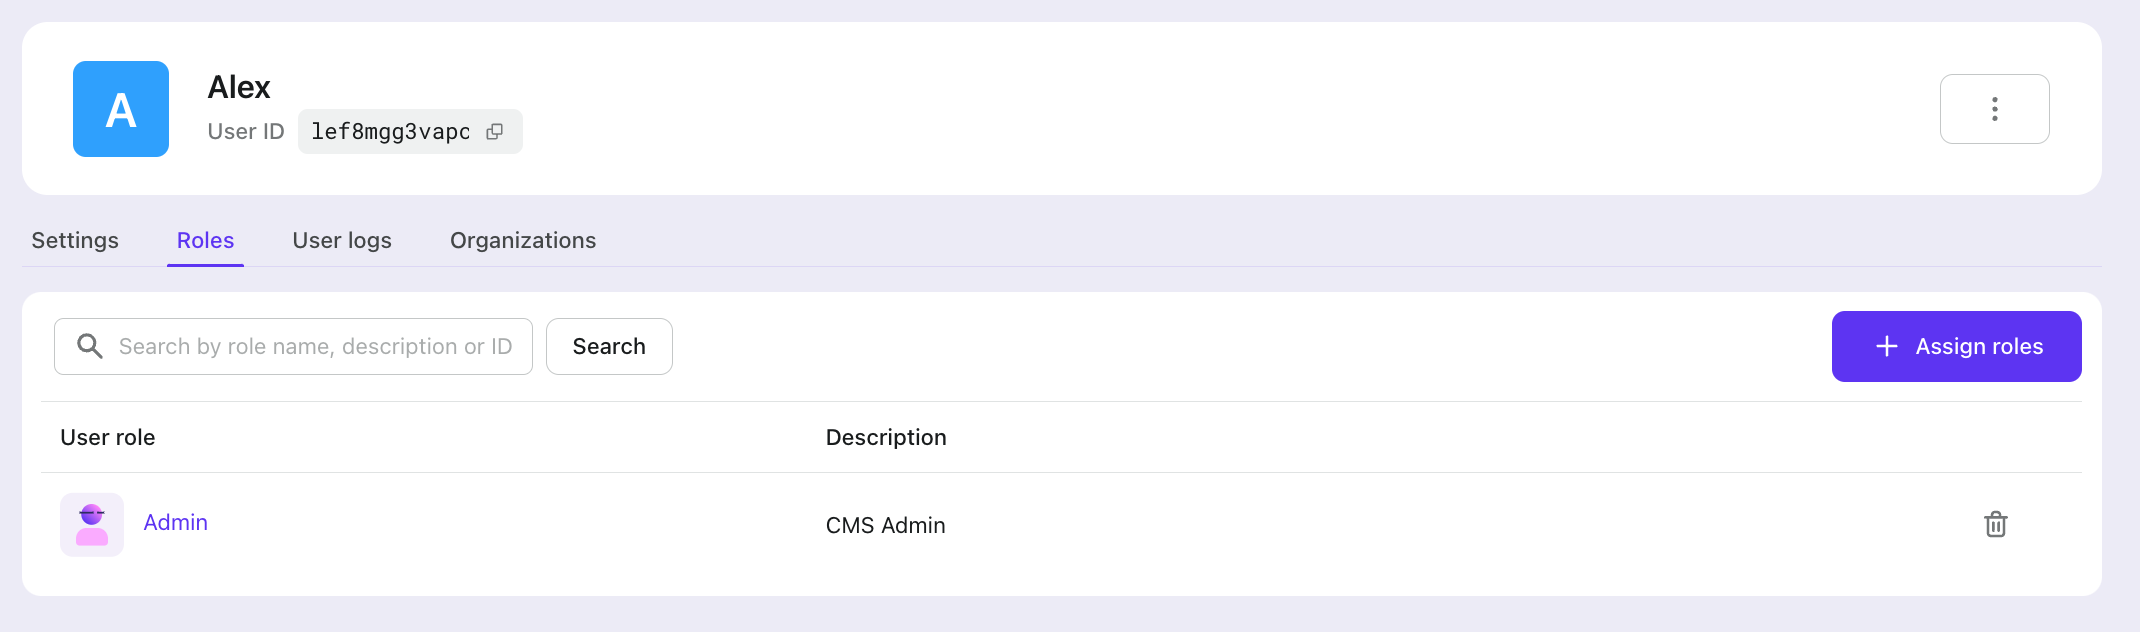
Go to the "User management" section in Logto Console to create users.
In the user details's "Roles" tab, you can assign roles to the user.
In our example, we create 3 users with the following roles:
- Alex: Admin
- Bob: Publisher
- Charlie: Author
Integrate your frontend with Logto RBAC
Now, we have setup RBAC in Logto, we can start to integrate it into our frontend.
First, follow the Logto Quick Starts to integrate Logto into your application.
In our example, we use React for demonstration.
After you have setup Logto in your application, we need to add the RBAC configurations for Logto to work.
Remember to sign out and sign in again to make this change take effect if you are already signed in.
When the user sign-in with Logto and request an access token for the API resources specified above, Logto will add scopes (permissions) related to the user's role to the access token.
You can use getAccessTokenClaims from useLogto hook to get the scopes from the access token.
And you can use the userScopes to check if the user has the permission to access the resource.
Integrate your backend with Logto RBAC
Now, it's time to integrate Logto RBAC into your backend.
Backend authorization middleware
First, we need to add a middleware in the backend to check user permissions, verify if the user is logged in, and determine whether they have the necessary permissions to access certain APIs.
As you can see, in this middleware, we verify whether the frontend request contains a valid access token and check if the access token's audience matches the API resource we created in the Logto Console.
The reason for verifying the API resource is that our API resource actually represents the resources of our CMS backend, and all our CMS permissions are associated with this API resource.
Since this API resource represents the CMS resources in Logto, in our frontend code, we include the corresponding Access token when making API requests to the backend:
Now we can use the requireAuth middleware to protect our API endpoints.
Protecting API endpoints
For APIs that should only be accessible to users with specific permissions, we can add restrictions directly in the middleware. For example, the article creation API should only be accessible to users with the create:articles permission:
For APIs that need to check both permissions and resource ownership, we can use the hasScopes function. For example, in the article listing API, users with the list:articles permission can access all articles, while authors can access their own created articles:
At this point, we have completed the RBAC implementation. You can checkout the complete source code to see the full implementation.
Test the CMS RBAC implementation
Now, let's test our CMS RBAC implementation using the three users we just created.
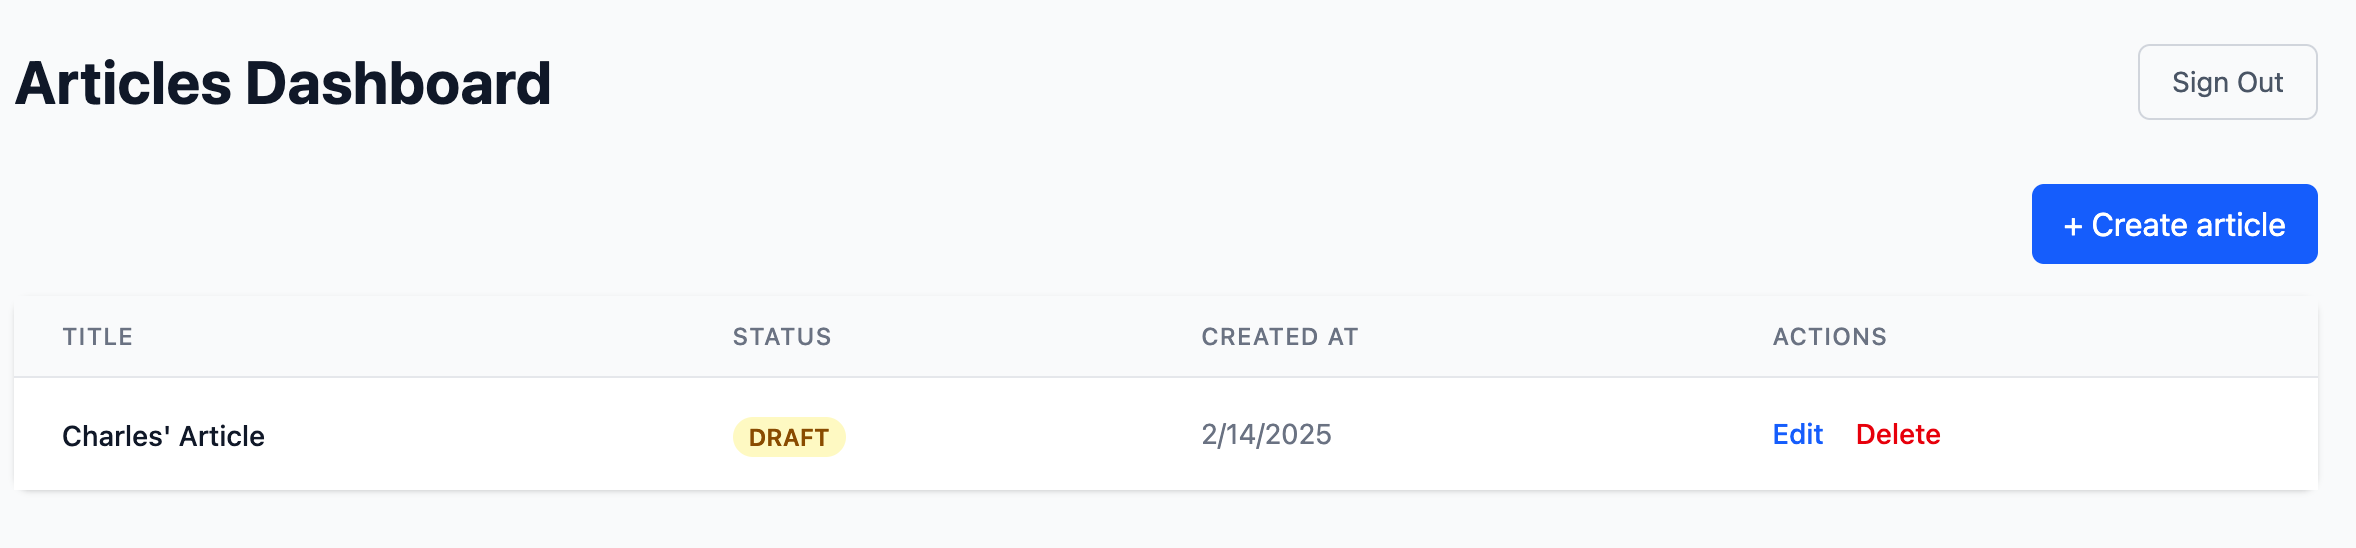
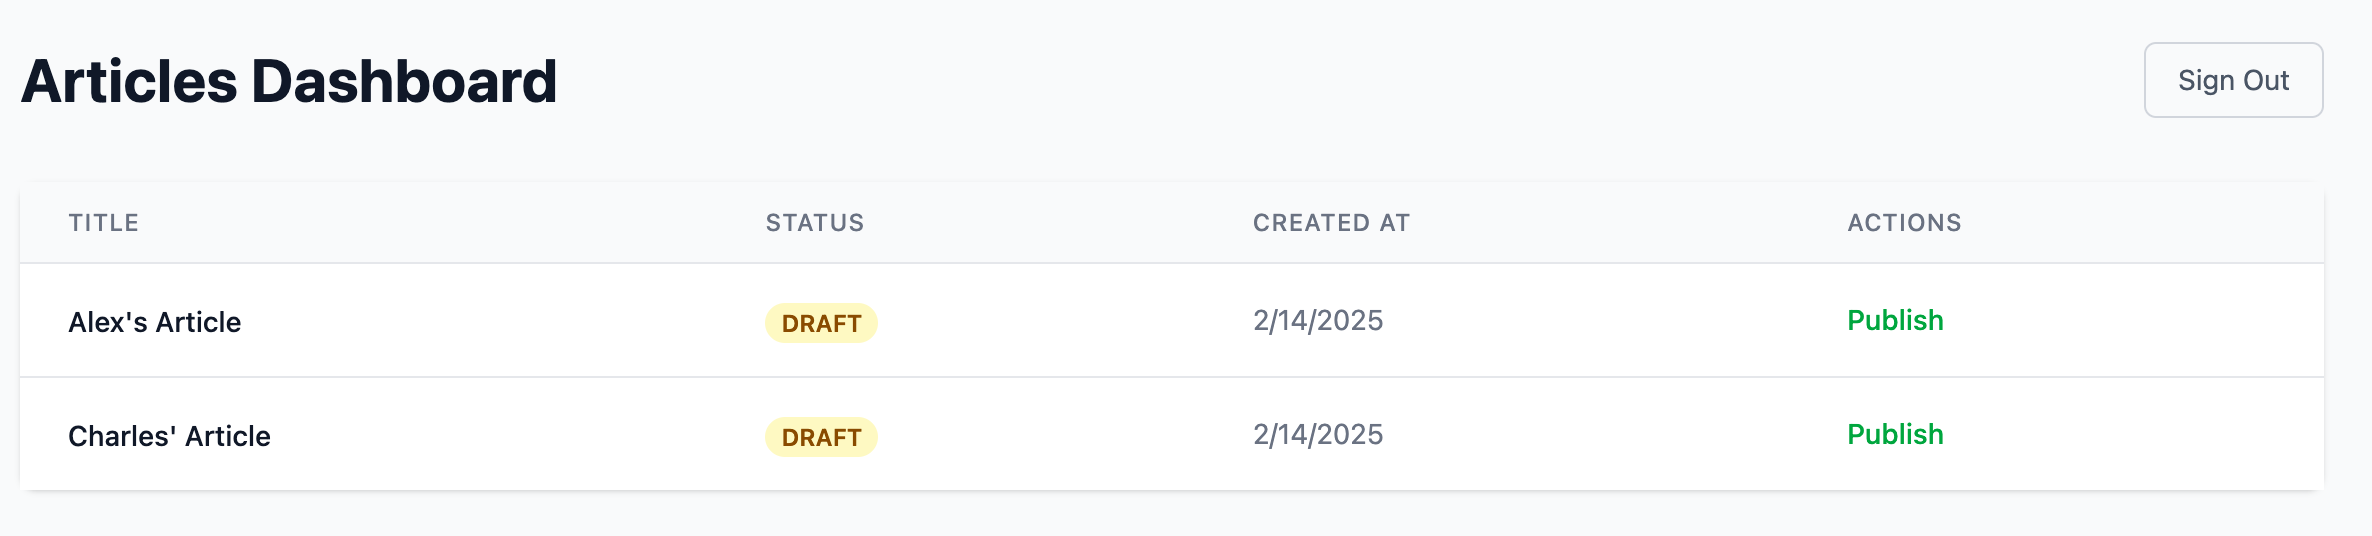
First, let's sign in as Alex and Charles respectively and create some articles.
Since Alex has the Admin role, they can create, delete, update, publish, and view all articles.

Charles, having the Author role, can only create their own articles and can only view, update, and delete articles they own.
Bob, with the Publisher role, can view and publish all articles but cannot create, update, or delete them.
Conclusion
Congratulations! You've learned how to implement a robust RBAC system in your application.
For more complex scenarios, such as building multi-tenant applications, Logto provides comprehensive organization support. Check out our guide Build a multi-tenant SaaS application: A complete guide from design to implementation to learn more about implementing organization-wide access control.
Happy coding! 🚀