Simplify SAML authentication integration for developers
Learn what SAML is, how to implement SSO, and quick steps to integrate SAML authentication as an Identity Provider (IdP) or Service Provider (SP).

Product & Design

Single Sign-On (SSO) is key for modern apps, and SAML enables secure, friendly authentication across business identity systems. This guide simplifies SAML for developers and designers with clear steps and practical examples to help you implement it efficiently.
What are SAML authentication and SAML apps?
Security Assertion Markup Language (SAML) is an XML-based standard used to exchange authentication and authorization data between two key players: the Identity Provider (IdP) and the Service Provider (SP). It’s a common solution for Single Sign-On (SSO) in organizations, making life easier for enterprise users by allowing them to sign in once and access multiple applications.
Identity Provider (IdP) is responsible for managing and verifying user credentials, such as usernames and passwords. When a user tries to access a protected service, the IdP confirms their identity and sends this confirmation to the service.
- Example: Imagine you work for a large company that uses Microsoft Azure AD for managing employee accounts. When you want to log in to Salesforce, Azure AD acts as the IdP. It checks your credentials and informs Salesforce that you are authorized to use it.
Service Provider (SP) is the application or service that users are actually trying to access. It depends on the IdP to handle the heavy lifting of authentication.
- Example: Continuing our scenario above, Salesforce is the SP. It relies on Microsoft Azure AD (the IdP) to confirm your identity. Once Azure AD vouches for you, Salesforce lets you in.
When talking about a “SAML app,” people are usually referring to the SP.
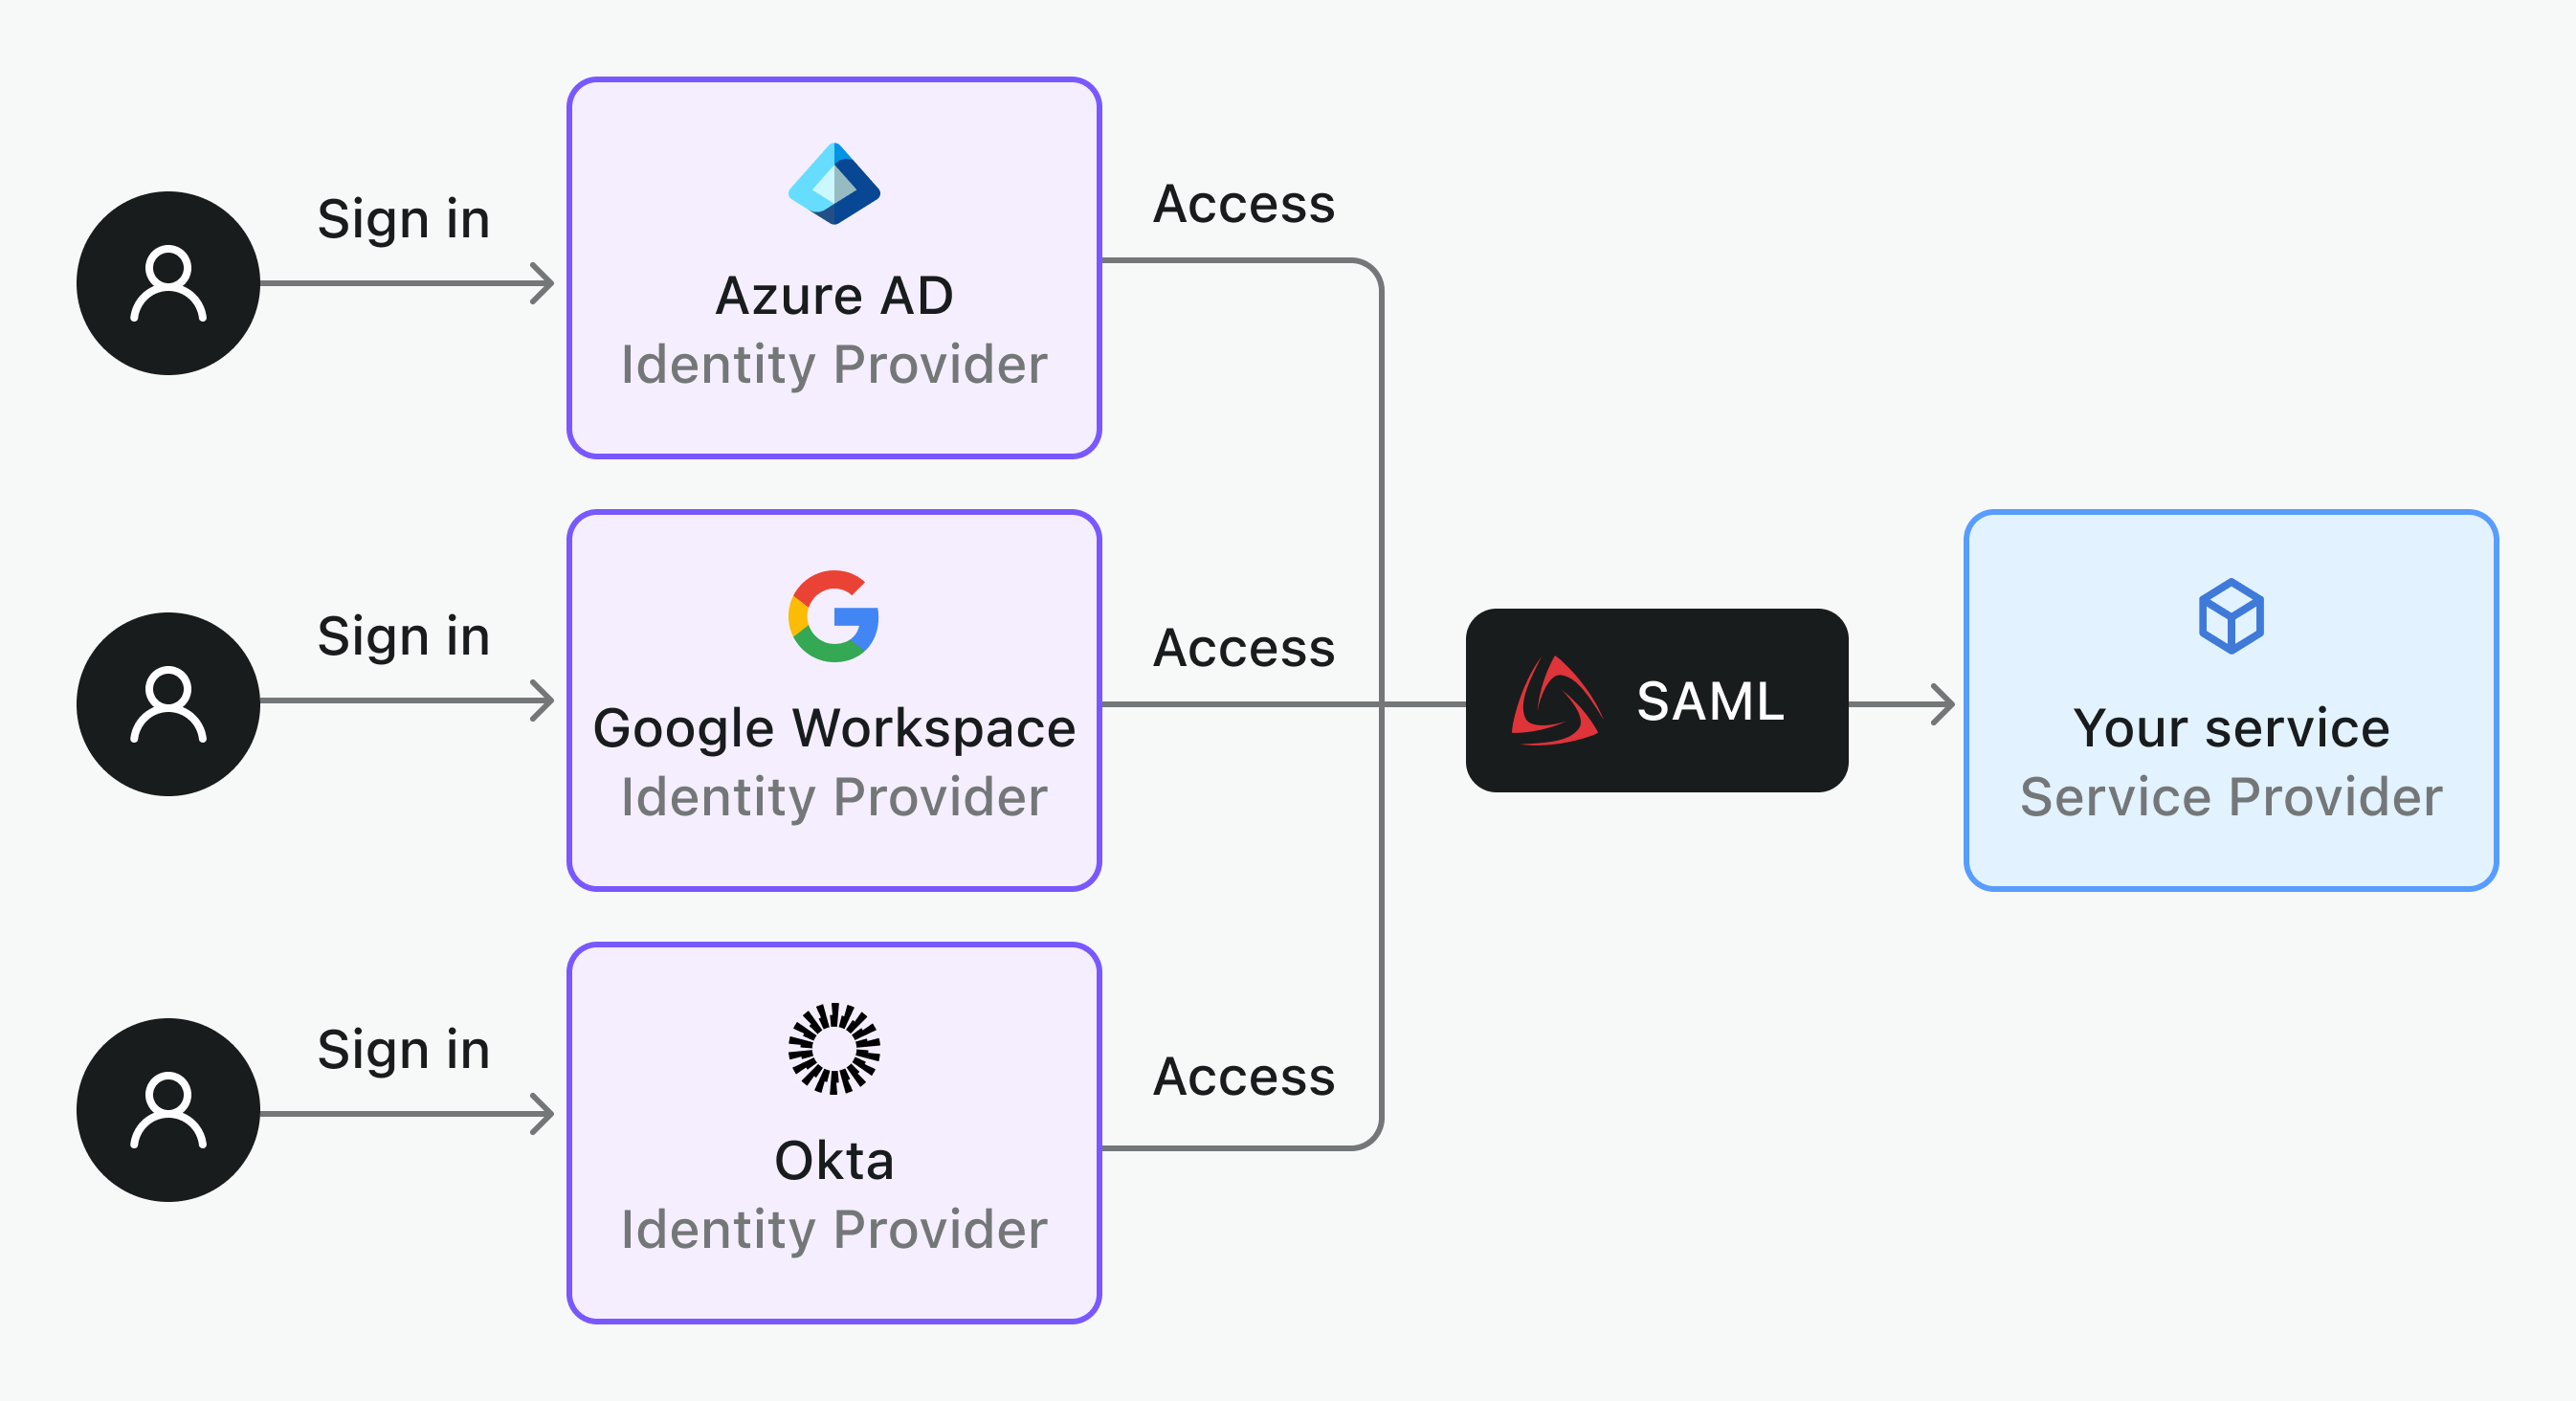
Using the SAML protocol, you can set up your service as an IdP to support application integrations (like Azure Ad / Google Workspace); or as an SP (like Salesforce / Slack) to support SSO for users.
A SAML Assertion is the heart of the SAML protocol. It’s a digital “note” created by the IdP and sent to an SP that says, “I’ve confirmed this user’s identity.” Next, we’ll cover how the process works for both IdP and SP.
When acting as a SAML Identity Provider
When your service functions as the IdP, you enable SAML authentication across multiple applications. This allows users to access various services through a single enterprise identity.
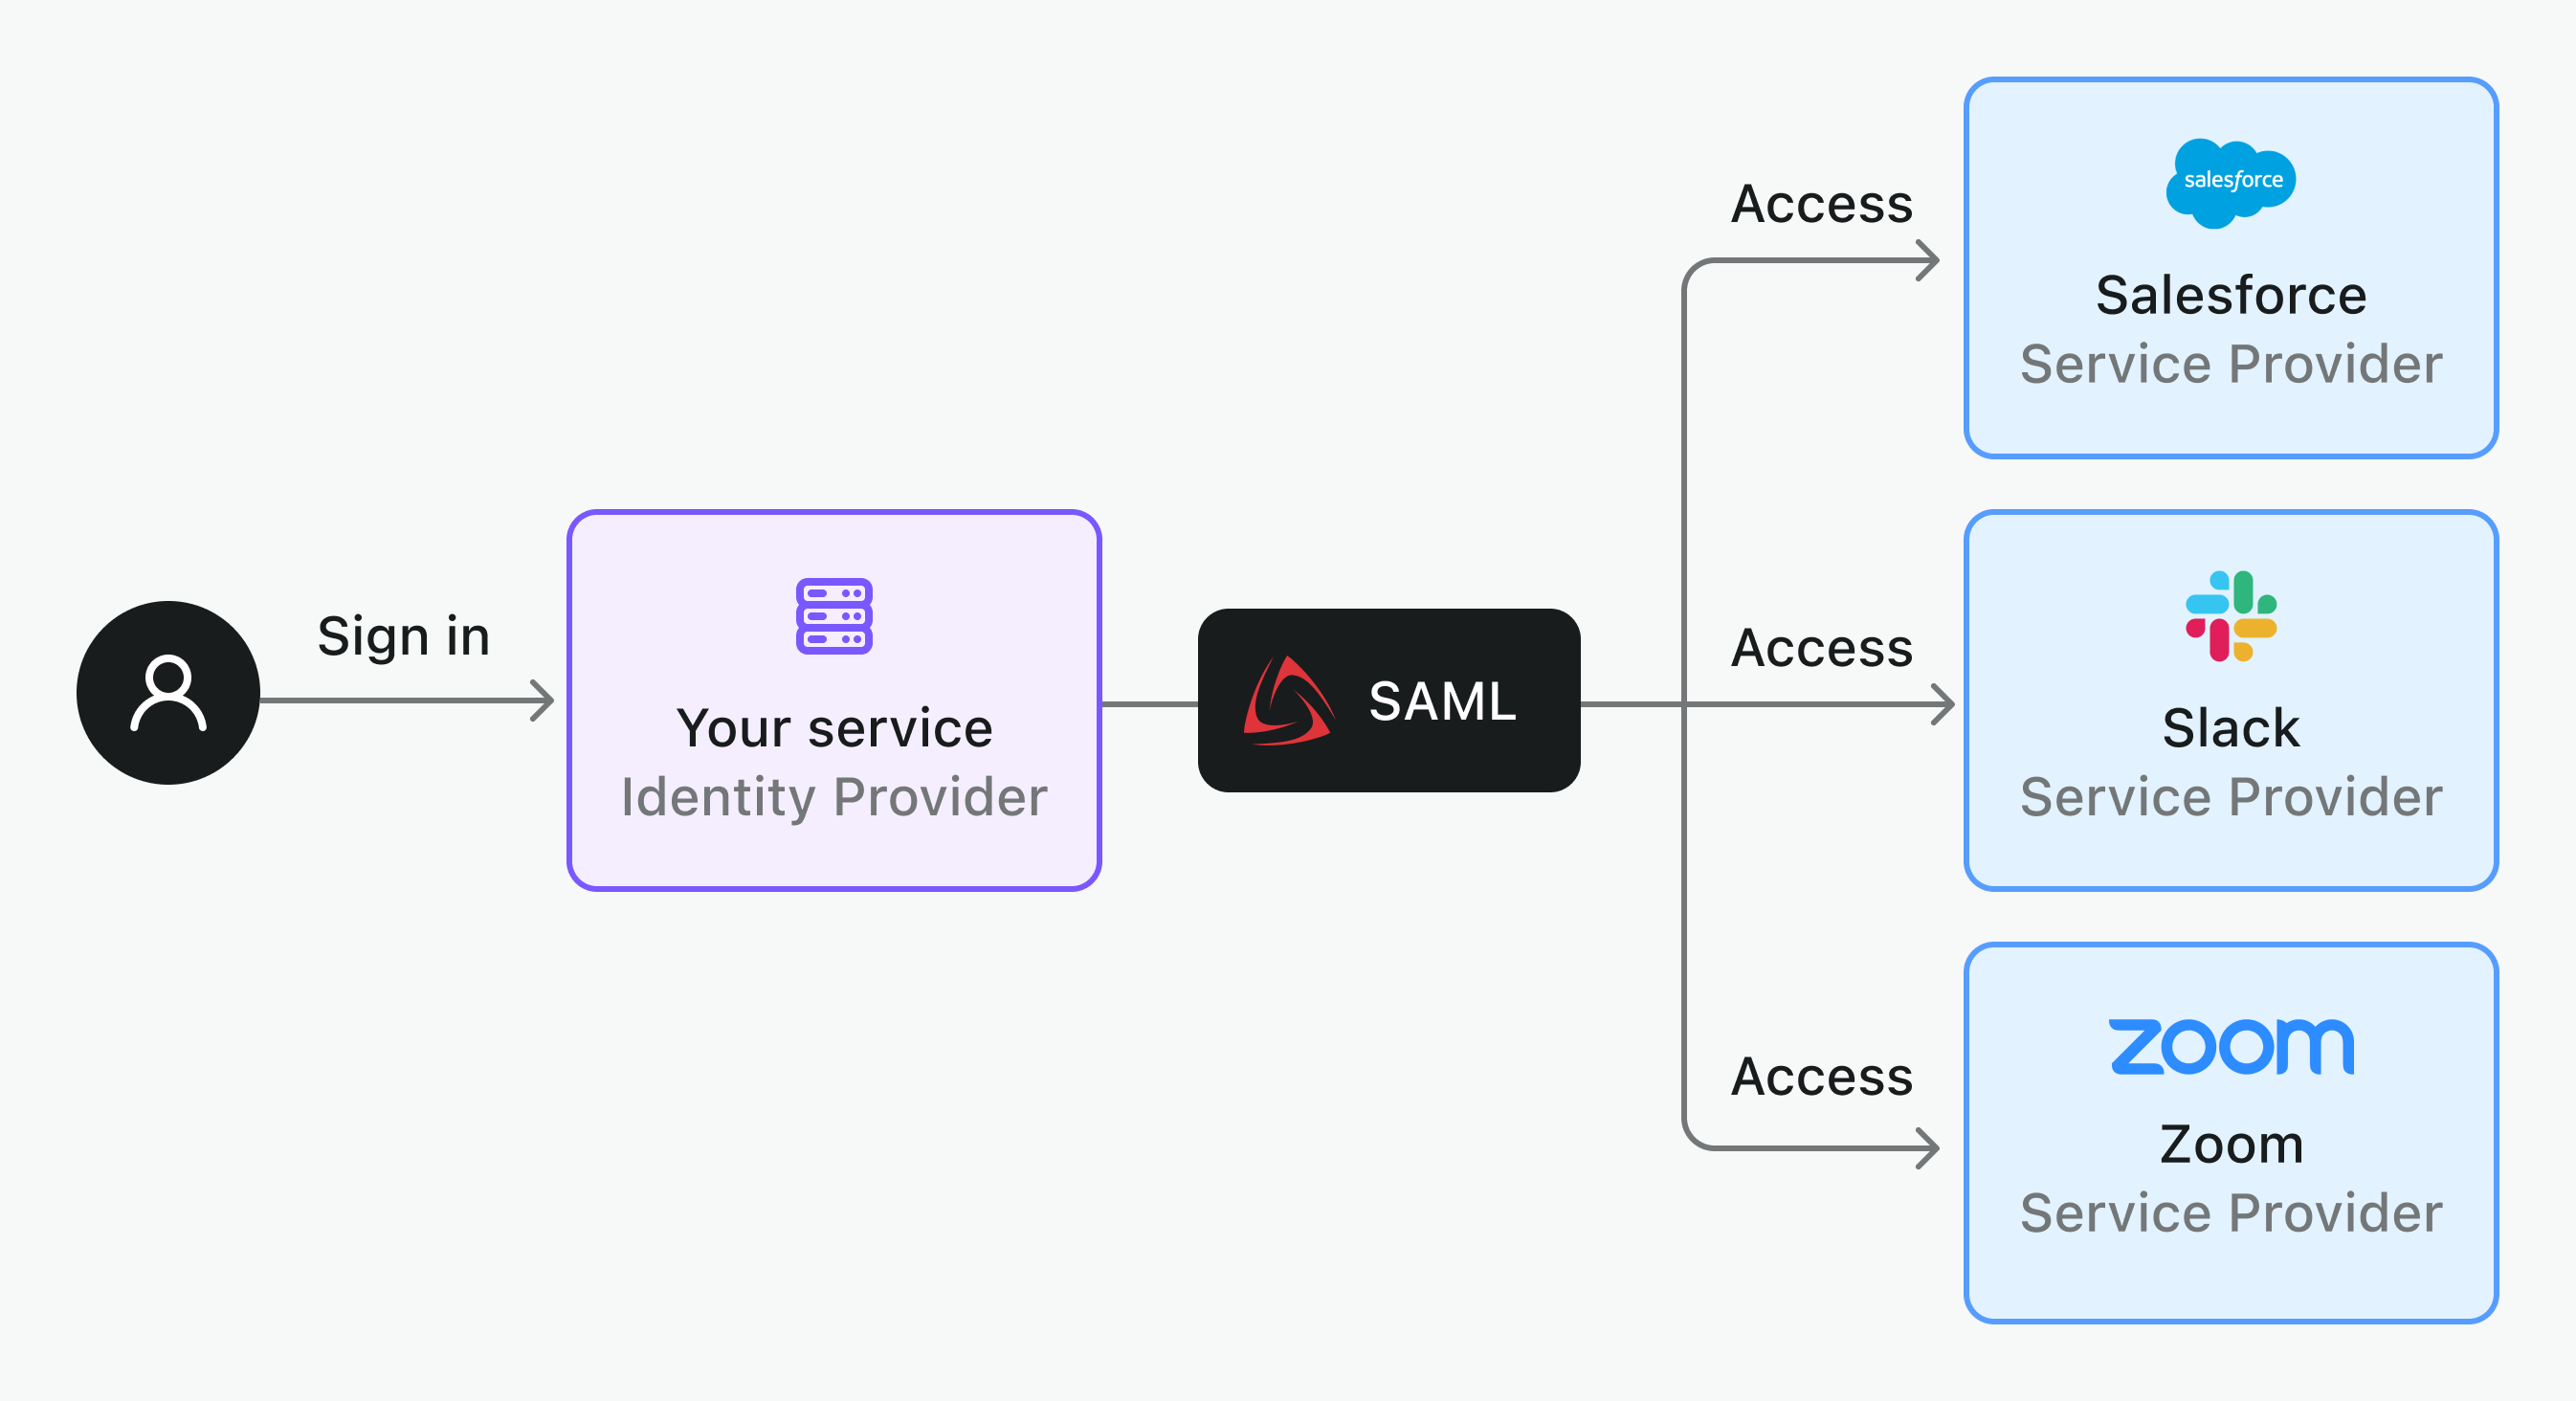
Here’s a typical SAML SSO workflow for an IdP:
- The user tries to access an application (SP), such as Salesforce.
- The application redirects the user to your IdP for authentication.
- The user enters their credentials on your IdP's sign-in page.
- IdP checks the credentials.
- If the credentials are verified, the IdP sends a SAML assertion back to the SP.
- The SP processes the assertion, confirms its validity, and grants the user access.
When acting as a SAML Service Provider
If your service is the SP, you’ll integrate with various identity providers to provide your users with SSO capability. This allows enterprise users from different organizations or tenants to securely and efficiently access your application.
Here’s a workflow for SP-initiated SSO:
- The user tries to sign in to your application.
- Your application generates a SAML request and redirects the user to the IdP’s sign-in page.
- The user signs in at the IdP (or skips this step if they’re already signed in).
- The IdP verifies the user’s identity and, once confirmed, packs the user’s details into a SAML assertion.
- The IdP sends the assertion back to your application.
- Your service verifies the assertion. If it’s valid, the user gets access to your application.
Key parameters in SAML SSO
For successful SAML SSO integration, both IdPs and SPs must share specific parameters. Here’s a look at the essentials:
Parameters from the IdP
- IdP Entity ID: A unique identifier for the IdP in SAML communications, like a digital name tag.
- SSO URL: The login endpoint (URL) where the SP redirects users for authentication.
- X.509 Certificate: A public key used to sign the SAML assertion, ensuring it’s secure. This is the “seal” verifying authenticity.
Tip: If your IdP offers a SAML Metadata URL, things get easier. This URL contains all the necessary info (like certificates, SSO URLs, and IdP Entity ID) in one place. It minimizes the risk of errors from manual copy-pasting and eliminates the hassle of manually updating certificate files.
Parameters from the SP
- SP Entity ID: The SP’s unique identifier, similar to the IdP Entity ID.
- Assertion Consumer Service (ACS) URL: This is the SP endpoint where the SP expects to receive the SAML assertion from the IdP.
- RelayState (Optional): Used to pass data during the SAML process, like the URL the user was originally trying to visit.
SAML attribute mapping and encryption
- NameID Format: Defines the user identifier format (e.g., email address or username).
- SAML Attributes: These are additional user details, such as roles, email, or department, that the IdP sends to the SP.
- Example: If the SAML assertion signed by the IdP includes
email([email protected]),role(admin), anddepartment(engineering). The SP can useroleto assign admin privileges ordepartmentto group the user within the right team.So to get this essential user data, both the IdP and SP need to decide how to map attributes. For instance, the IdP might define “department” as team, while the SP expects it as group. Proper mapping ensures smooth communication.
- Example: If the SAML assertion signed by the IdP includes
- Encrypted Assertions (Optional): To protect sensitive authentication data, SAML assertions can be encrypted.
- IdP’s role: Encrypts the assertion using the SP’s public key.
- SP’s role: Decrypts the assertion with its private key to read user details.
By now, you should have the necessary information to set up a SAML connection. To integrate Salesforce (Service Provider) with Azure AD (Identity Provider), follow these steps:
- Get the IdP Entity ID, SSO URL, and certificate from Azure AD and configure them in Salesforce.
- Provide Salesforce’s SP Entity ID and ACS URL to Azure AD.
Logto makes SAML integration simple
Logto can act as either an IdP or an SP to support SAML SSO for your applications.
Using Logto as a SAML IdP
Logto allows other applications to rely on it for federated identity authentication and supports multi-factor authentication (MFA) for enhanced security.
- Create a Logto App Go to Logto Console > Applications and create a new SAML app.
- Configure SAML Parameters Set up the app with the Service Provider’s (SP) Assertion Consumer Service URL and SP Entity ID.
- Provide metadata URL Logto provides an IdP Metadata URL that SPs can use to automatically retrieve essential details, such as SSO URLs and certificates.
- Advanced Configuration (Optional)
- You can create multiple new certificates with fingerprints and set expiration dates, but only one certificate can be active at a time.
- Modify the Name ID format to suit your business requirements.
- Enable SAML assertion encryption by copying and pasting the x509 certificate from your service provider to encrypt the assertions.
- Map Attributes (Optional) Easily customize how user attributes are shared with Service Providers (SPs).

For detailed guidance, visit the official documentation here: SAML App
Using Logto as a SAML SP
Logto also integrates with any enterprise IdPs via SAML or OIDC protocols. Whether you're enabling SP-initiated SSO for your unified sign-in pages or configuring IdP-initiated SSO, the process is straightforward.
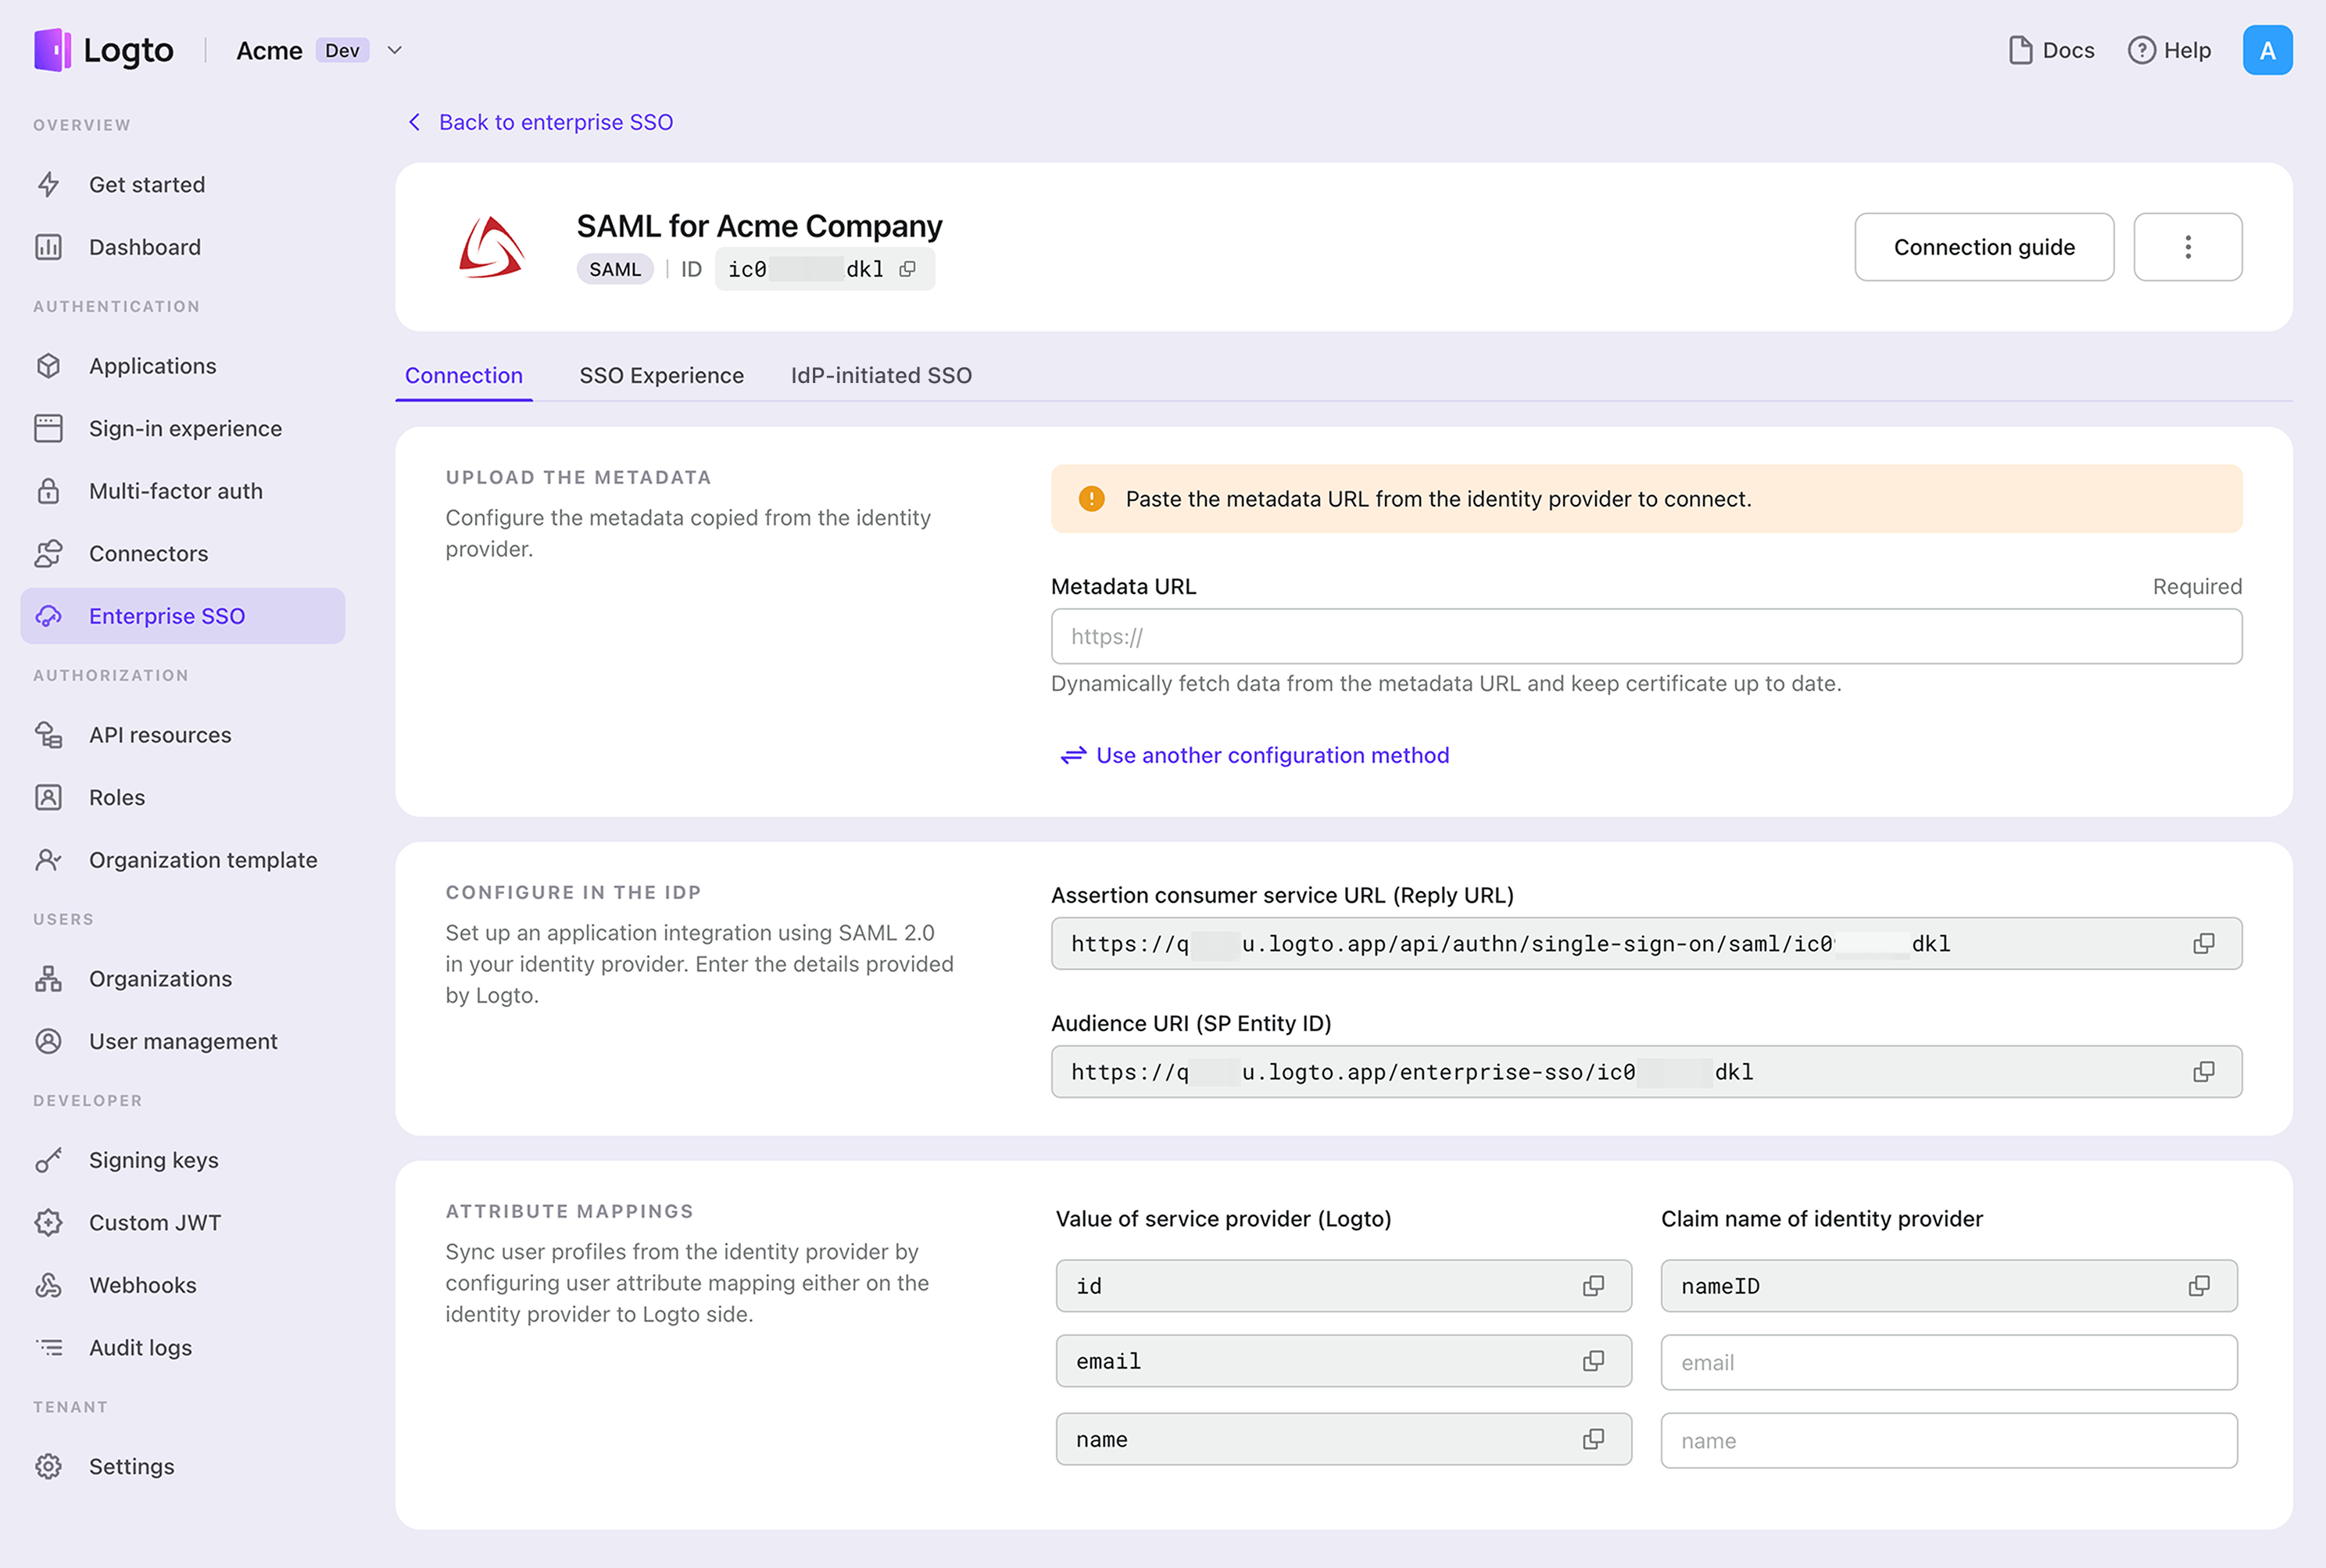
- Create an enterprise connector Go to the Logto Console > Enterprise SSO and create a new Enterprise Connector. Select SAML as the protocol standard.
- Configure SAML parameters Provide either the metadata URL or metadata XML file from your IdP. If the metadata isn’t available, switch to manual configuration by entering the IdP Entity ID, SSO URL, and uploading the Signing certificate.
- Share the ACS URL and SP Entity ID Provide Logto’s ACS URL and SP Entity ID to your IdP to complete the integration setup.
- Map attributes (Optional) Configure user data mappings, such as email or names, to ensure information is passed correctly between the IdP and Logto.
- Add enterprise email domains In the “SSO Experience” tab for the enterprise connector, add one or more email domains. This ensures that only users with the specified domains can authenticate via SSO.
- Enable IdP-initiated SSO (Optional) Enable IdP-initiated SSO only if required by your enterprise clients. This feature allows users to sign in to your applications directly from the IdP dashboard.
For detailed guidance, visit the official documentation here: Enterprise SSO documentation.
Closing thoughts
SAML offers a standardized, secure method for SSO, making authentication smoother. Logto simplifies the process whether you’re setting it up as an IdP or SP. With its user-friendly interface and support for both cloud and open-source versions, Logto takes the complexities out of SAML integration. By just configuring a few parameters, you can connect your services to any SAML IdP or SP and focus on building great experiences for your users.