Empower your business: Connect AI tools to your existing service with access control
Learn how to empower your business by securely connecting AI tools to your existing services using Personal Access Tokens and Model Context Protocol (MCP), with complete source code and practical examples.

Developer

Welcome to the guide on connecting AI tools to your existing services with access control!
We'll explore how to make your existing services ready for AI tools, especially through integration with LLM (using Model Context Protocol)) and various AI agents, while addressing access control challenges.
Through this guide, you'll gain:
- Seamless AI integration: Learn how to connect AI tools to your services, making your data and functionality available in AI environments
- Enhanced API security: Improve your API interfaces to protect data and user privacy with effective access control
- Personalized AI experience for your user: Create unique AI-assisted experiences for each user through Personal Access Tokens
We provide complete tutorial resources, COMPLETE DEMO PROJECT SOURCE CODE (FRONTEND, BACKEND, and MCP SERVER INCLUDED), and even practical guides to help you build AI-ready services from scratch.
Here's how this guide can improve your business:
- Competitive advantage: Enhance your service's technical capabilities and user experience to stand out in a competitive market
- User value enhancement: Enable users to discover deeper value in your product through AI tools, increasing retention rates and satisfaction
- Future-ready services: Seamlessly integrate your services with the AI ecosystem, preparing for the upcoming AI-driven business landscape and opening innovative growth paths
Let's get started!
What is MCP and how does it connect AI tools to your service
MCP (Model Context Protocol) is an open, universal protocol that standardizes how applications provide context information to large language models (LLMs).
MCP consists of several key components working together to enable AI tools to access your services:
%3btext-align:center%3b%7d%23mermaid-0 .edgeLabel p%7bbackground-color:rgba(232%2c232%2c232%2c 0.8)%3b%7d%23mermaid-0 .edgeLabel rect%7bopacity:0.5%3bbackground-color:rgba(232%2c232%2c232%2c 0.8)%3bfill:rgba(232%2c232%2c232%2c 0.8)%3b%7d%23mermaid-0 .labelBkg%7bbackground-color:rgba(232%2c 232%2c 232%2c 0.5)%3b%7d%23mermaid-0 .cluster rect%7bfill:%23ffffde%3bstroke:%23aaaa33%3bstroke-width:1px%3b%7d%23mermaid-0 .cluster text%7bfill:%23333%3b%7d%23mermaid-0 .cluster span%7bcolor:%23333%3b%7d%23mermaid-0 div.mermaidTooltip%7bposition:absolute%3btext-align:center%3bmax-width:200px%3bpadding:2px%3bfont-family:arial%2csans-serif%3bfont-size:12px%3bbackground:hsl(80%2c 100%25%2c 96.2745098039%25)%3bborder:1px solid %23aaaa33%3bborder-radius:2px%3bpointer-events:none%3bz-index:100%3b%7d%23mermaid-0 .flowchartTitleText%7btext-anchor:middle%3bfont-size:18px%3bfill:%23333%3b%7d%23mermaid-0 rect.text%7bfill:none%3bstroke-width:0%3b%7d%23mermaid-0 .icon-shape%2c%23mermaid-0 .image-shape%7bbackground-color:rgba(232%2c232%2c232%2c 0.8)%3btext-align:center%3b%7d%23mermaid-0 .icon-shape p%2c%23mermaid-0 .image-shape p%7bbackground-color:rgba(232%2c232%2c232%2c 0.8)%3bpadding:2px%3b%7d%23mermaid-0 .icon-shape rect%2c%23mermaid-0 .image-shape rect%7bopacity:0.5%3bbackground-color:rgba(232%2c232%2c232%2c 0.8)%3bfill:rgba(232%2c232%2c232%2c 0.8)%3b%7d%23mermaid-0 :root%7b--mermaid-font-family:arial%2csans-serif%3b%7d%3c/style%3e%3cg%3e%3cmarker orient='auto' markerHeight='8' markerWidth='8' markerUnits='userSpaceOnUse' refY='5' refX='5' viewBox='0 0 10 10' class='marker flowchart-v2' id='mermaid-0_flowchart-v2-pointEnd'%3e%3cpath style='stroke-width: 1%3b stroke-dasharray: 1%2c 0%3b' class='arrowMarkerPath' d='M 0 0 L 10 5 L 0 10 z'/%3e%3c/marker%3e%3cmarker orient='auto' markerHeight='8' markerWidth='8' markerUnits='userSpaceOnUse' refY='5' refX='4.5' viewBox='0 0 10 10' class='marker flowchart-v2' id='mermaid-0_flowchart-v2-pointStart'%3e%3cpath style='stroke-width: 1%3b stroke-dasharray: 1%2c 0%3b' class='arrowMarkerPath' d='M 0 5 L 10 10 L 10 0 z'/%3e%3c/marker%3e%3cmarker orient='auto' markerHeight='11' markerWidth='11' markerUnits='userSpaceOnUse' refY='5' refX='11' viewBox='0 0 10 10' class='marker flowchart-v2' id='mermaid-0_flowchart-v2-circleEnd'%3e%3ccircle style='stroke-width: 1%3b stroke-dasharray: 1%2c 0%3b' class='arrowMarkerPath' r='5' cy='5' cx='5'/%3e%3c/marker%3e%3cmarker orient='auto' markerHeight='11' markerWidth='11' markerUnits='userSpaceOnUse' refY='5' refX='-1' viewBox='0 0 10 10' class='marker flowchart-v2' id='mermaid-0_flowchart-v2-circleStart'%3e%3ccircle style='stroke-width: 1%3b stroke-dasharray: 1%2c 0%3b' class='arrowMarkerPath' r='5' cy='5' cx='5'/%3e%3c/marker%3e%3cmarker orient='auto' markerHeight='11' markerWidth='11' markerUnits='userSpaceOnUse' refY='5.2' refX='12' viewBox='0 0 11 11' class='marker cross flowchart-v2' id='mermaid-0_flowchart-v2-crossEnd'%3e%3cpath style='stroke-width: 2%3b stroke-dasharray: 1%2c 0%3b' class='arrowMarkerPath' d='M 1%2c1 l 9%2c9 M 10%2c1 l -9%2c9'/%3e%3c/marker%3e%3cmarker orient='auto' markerHeight='11' markerWidth='11' markerUnits='userSpaceOnUse' refY='5.2' refX='-1' viewBox='0 0 11 11' class='marker cross flowchart-v2' id='mermaid-0_flowchart-v2-crossStart'%3e%3cpath style='stroke-width: 2%3b stroke-dasharray: 1%2c 0%3b' class='arrowMarkerPath' d='M 1%2c1 l 9%2c9 M 10%2c1 l -9%2c9'/%3e%3c/marker%3e%3cg class='root'%3e%3cg class='clusters'%3e%3cg data-look='classic' id='MCPServer' class='cluster'%3e%3crect height='124' width='282.546875' y='28' x='783.6875' style=''/%3e%3cg transform='translate(883.6171875%2c 28)' class='cluster-label'%3e%3cforeignObject height='24' width='82.6875'%3e%3cdiv style='display: table-cell%3b white-space: nowrap%3b line-height: 1.5%3b max-width: 200px%3b text-align: center%3b' xmlns='http://www.w3.org/1999/xhtml'%3e%3cspan class='nodeLabel'%3e%3cp%3eMCPServer%3c/p%3e%3c/span%3e%3c/div%3e%3c/foreignObject%3e%3c/g%3e%3c/g%3e%3cg data-look='classic' id='subGraph1' class='cluster'%3e%3crect height='164' width='725.6875' y='8' x='8' style=''/%3e%3cg transform='translate(270.84375%2c 8)' class='cluster-label'%3e%3cforeignObject height='48' width='200'%3e%3cdiv style='display: table%3b white-space: break-spaces%3b line-height: 1.5%3b max-width: 200px%3b text-align: center%3b width: 200px%3b' xmlns='http://www.w3.org/1999/xhtml'%3e%3cspan class='nodeLabel'%3e%3cp%3eMCP Host(Claude Desktop%2c Cursor%2c etc.)%3c/p%3e%3c/span%3e%3c/div%3e%3c/foreignObject%3e%3c/g%3e%3c/g%3e%3cg data-look='classic' id='subGraph0' class='cluster'%3e%3crect height='124' width='465.203125' y='28' x='243.484375' style=''/%3e%3cg transform='translate(384.1875%2c 28)' class='cluster-label'%3e%3cforeignObject height='24' width='183.796875'%3e%3cdiv style='display: table-cell%3b white-space: nowrap%3b line-height: 1.5%3b max-width: 200px%3b text-align: center%3b' xmlns='http://www.w3.org/1999/xhtml'%3e%3cspan class='nodeLabel'%3e%3cp%3eLLM with MCP Integration%3c/p%3e%3c/span%3e%3c/div%3e%3c/foreignObject%3e%3c/g%3e%3c/g%3e%3c/g%3e%3cg class='edgePaths'%3e%3cpath marker-end='url(%23mermaid-0_flowchart-v2-pointEnd)' marker-start='url(%23mermaid-0_flowchart-v2-pointStart)' style='' class='edge-thickness-normal edge-pattern-solid edge-thickness-normal edge-pattern-solid flowchart-link' id='L_IntegratedLLM_IntegratedClient_0' d='M497.063%2c90L500.563%2c90C504.063%2c90%2c511.063%2c90%2c518.063%2c90C525.063%2c90%2c532.063%2c90%2c535.563%2c90L539.063%2c90'/%3e%3cpath marker-end='url(%23mermaid-0_flowchart-v2-pointEnd)' marker-start='url(%23mermaid-0_flowchart-v2-pointStart)' style='' class='edge-thickness-normal edge-pattern-solid edge-thickness-normal edge-pattern-solid flowchart-link' id='L_UI_IntegratedLLM_1' d='M197.484%2c90L200.984%2c90C204.484%2c90%2c211.484%2c90%2c219.151%2c90C226.818%2c90%2c235.151%2c90%2c242.818%2c90C250.484%2c90%2c257.484%2c90%2c260.984%2c90L264.484%2c90'/%3e%3cpath marker-end='url(%23mermaid-0_flowchart-v2-pointEnd)' marker-start='url(%23mermaid-0_flowchart-v2-pointStart)' style='' class='edge-thickness-normal edge-pattern-solid edge-thickness-normal edge-pattern-solid flowchart-link' id='L_Tool_YourService_3' d='M1045.234%2c90L1048.734%2c90C1052.234%2c90%2c1059.234%2c90%2c1066.901%2c90C1074.568%2c90%2c1082.901%2c90%2c1090.568%2c90C1098.234%2c90%2c1105.234%2c90%2c1108.734%2c90L1112.234%2c90'/%3e%3cpath marker-end='url(%23mermaid-0_flowchart-v2-pointEnd)' marker-start='url(%23mermaid-0_flowchart-v2-pointStart)' style='' class='edge-thickness-normal edge-pattern-solid edge-thickness-normal edge-pattern-solid flowchart-link' id='L_IntegratedClient_MCPServer_2' d='M687.688%2c90L691.188%2c90C694.688%2c90%2c701.688%2c90%2c709.354%2c90C717.021%2c90%2c725.354%2c90%2c733.688%2c90C742.021%2c90%2c750.354%2c90%2c758.021%2c90C765.688%2c90%2c772.688%2c90%2c776.188%2c90L779.688%2c90'/%3e%3c/g%3e%3cg class='edgeLabels'%3e%3cg class='edgeLabel'%3e%3cg transform='translate(0%2c 0)' class='label'%3e%3cforeignObject height='0' width='0'%3e%3cdiv style='display: table-cell%3b white-space: nowrap%3b line-height: 1.5%3b max-width: 200px%3b text-align: center%3b' class='labelBkg' xmlns='http://www.w3.org/1999/xhtml'%3e%3cspan class='edgeLabel'%3e%3c/span%3e%3c/div%3e%3c/foreignObject%3e%3c/g%3e%3c/g%3e%3cg class='edgeLabel'%3e%3cg transform='translate(0%2c 0)' class='label'%3e%3cforeignObject height='0' width='0'%3e%3cdiv style='display: table-cell%3b white-space: nowrap%3b line-height: 1.5%3b max-width: 200px%3b text-align: center%3b' class='labelBkg' xmlns='http://www.w3.org/1999/xhtml'%3e%3cspan class='edgeLabel'%3e%3c/span%3e%3c/div%3e%3c/foreignObject%3e%3c/g%3e%3c/g%3e%3cg class='edgeLabel'%3e%3cg transform='translate(0%2c 0)' class='label'%3e%3cforeignObject height='0' width='0'%3e%3cdiv style='display: table-cell%3b white-space: nowrap%3b line-height: 1.5%3b max-width: 200px%3b text-align: center%3b' class='labelBkg' xmlns='http://www.w3.org/1999/xhtml'%3e%3cspan class='edgeLabel'%3e%3c/span%3e%3c/div%3e%3c/foreignObject%3e%3c/g%3e%3c/g%3e%3cg class='edgeLabel'%3e%3cg transform='translate(0%2c 0)' class='label'%3e%3cforeignObject height='0' width='0'%3e%3cdiv style='display: table-cell%3b white-space: nowrap%3b line-height: 1.5%3b max-width: 200px%3b text-align: center%3b' class='labelBkg' xmlns='http://www.w3.org/1999/xhtml'%3e%3cspan class='edgeLabel'%3e%3c/span%3e%3c/div%3e%3c/foreignObject%3e%3c/g%3e%3c/g%3e%3c/g%3e%3cg class='nodes'%3e%3cg transform='translate(113.2421875%2c 90)' id='flowchart-UI-0' class='node default'%3e%3crect height='54' width='160.484375' y='-27' x='-80.2421875' style='' class='basic label-container'/%3e%3cg transform='translate(-50.2421875%2c -12)' style='' class='label'%3e%3crect/%3e%3cforeignObject height='24' width='100.484375'%3e%3cdiv style='display: table-cell%3b white-space: nowrap%3b line-height: 1.5%3b max-width: 200px%3b text-align: center%3b' xmlns='http://www.w3.org/1999/xhtml'%3e%3cspan class='nodeLabel'%3e%3cp%3eUser Interface%3c/p%3e%3c/span%3e%3c/div%3e%3c/foreignObject%3e%3c/g%3e%3c/g%3e%3cg transform='translate(380.7734375%2c 90)' id='flowchart-IntegratedLLM-1' class='node default'%3e%3crect height='54' width='224.578125' y='-27' x='-112.2890625' style='' class='basic label-container'/%3e%3cg transform='translate(-82.2890625%2c -12)' style='' class='label'%3e%3crect/%3e%3cforeignObject height='24' width='164.578125'%3e%3cdiv style='display: table-cell%3b white-space: nowrap%3b line-height: 1.5%3b max-width: 200px%3b text-align: center%3b' xmlns='http://www.w3.org/1999/xhtml'%3e%3cspan class='nodeLabel'%3e%3cp%3eLarge Language Model%3c/p%3e%3c/span%3e%3c/div%3e%3c/foreignObject%3e%3c/g%3e%3c/g%3e%3cg transform='translate(613.375%2c 90)' id='flowchart-IntegratedClient-2' class='node default'%3e%3crect height='54' width='140.625' y='-27' x='-70.3125' style='' class='basic label-container'/%3e%3cg transform='translate(-40.3125%2c -12)' style='' class='label'%3e%3crect/%3e%3cforeignObject height='24' width='80.625'%3e%3cdiv style='display: table-cell%3b white-space: nowrap%3b line-height: 1.5%3b max-width: 200px%3b text-align: center%3b' xmlns='http://www.w3.org/1999/xhtml'%3e%3cspan class='nodeLabel'%3e%3cp%3eMCP Client%3c/p%3e%3c/span%3e%3c/div%3e%3c/foreignObject%3e%3c/g%3e%3c/g%3e%3cg transform='translate(924.9609375%2c 90)' id='flowchart-Tool-7' class='node default'%3e%3crect height='54' width='232.546875' y='-27' x='-116.2734375' style='' class='basic label-container'/%3e%3cg transform='translate(-86.2734375%2c -12)' style='' class='label'%3e%3crect/%3e%3cforeignObject height='24' width='172.546875'%3e%3cdiv style='display: table-cell%3b white-space: nowrap%3b line-height: 1.5%3b max-width: 200px%3b text-align: center%3b' xmlns='http://www.w3.org/1999/xhtml'%3e%3cspan class='nodeLabel'%3e%3cp%3eTool: fetch_service_data%3c/p%3e%3c/span%3e%3c/div%3e%3c/foreignObject%3e%3c/g%3e%3c/g%3e%3cg transform='translate(1191.296875%2c 90)' id='flowchart-YourService-11' class='node default'%3e%3crect height='54' width='150.125' y='-27' x='-75.0625' style='' class='basic label-container'/%3e%3cg transform='translate(-45.0625%2c -12)' style='' class='label'%3e%3crect/%3e%3cforeignObject height='24' width='90.125'%3e%3cdiv style='display: table-cell%3b white-space: nowrap%3b line-height: 1.5%3b max-width: 200px%3b text-align: center%3b' xmlns='http://www.w3.org/1999/xhtml'%3e%3cspan class='nodeLabel'%3e%3cp%3eYour Service%3c/p%3e%3c/span%3e%3c/div%3e%3c/foreignObject%3e%3c/g%3e%3c/g%3e%3c/g%3e%3c/g%3e%3c/g%3e%3c/svg%3e)
In this guide, you only need to know that the MCP Server is the key connection point between your service and AI tools. It's responsible for providing a series of tools for the LLM to use, and these tools will interact with your own services. For more details about MCP, you can refer to What is MCP (Model Context Protocol) and how it works. Here, we'll focus only on the MCP Server.
We'll use a Content Management System (CMS) that has integrated Role-Based Access Control (RBAC) policies as our example. We'll create an MCP Server for it and define a get-available-article-count tool that allows the LLM to retrieve the number of articles available to the current user in the CMS:
This is the key code for connecting the MCP Server to your service. In this tool implementation, it sends a request to the service's api/articles endpoint and returns the result.
However, this is far from sufficient, because your service's API may not be public. Each endpoint needs access control, and different users can access different resources and data.
So next, we'll discuss how to add access control to your service.
How to implement access control for MCP server
It's important to understand that the users accessing your system through AI tools are the same individuals who might directly use your system - the MCP Server acts as their representative when they interact through AI tools.
So when users access your services through AI tools, two practical access control challenges arise:
- How does the MCP Server login to your system like a user?
- Should your system redesign its entire access control mechanism just to accommodate the MCP Server? This would be a significant cost and effort, especially when your original system already has its own authentication mechanism
The key to solving these problems is:
How users can let MCP Server to grant access from your service without using their credentials and interactive sign-in?
If you can solve this problem, you can directly interact with your service through the MCP Server, and your service can continue using the access control mechanism previously designed for users, without needing to redesign a new system just for the MCP Server!
But is this possible?
Of course it is! We can perfectly solve this problem by using Personal Access Tokens!
Personal access tokens (PATs) provide a secure way for users to grant access token without using their credentials and interactive sign-in. This is useful for CI/CD, scripts, or applications that need to access resources programmatically.
This is how the workflow looks like:
%3bfill:%23ECECFF%3b%7d%23mermaid-1 text.actor%26gt%3btspan%7bfill:black%3bstroke:none%3b%7d%23mermaid-1 .actor-line%7bstroke:hsl(259.6261682243%2c 59.7765363128%25%2c 87.9019607843%25)%3b%7d%23mermaid-1 .messageLine0%7bstroke-width:1.5%3bstroke-dasharray:none%3bstroke:%23333%3b%7d%23mermaid-1 .messageLine1%7bstroke-width:1.5%3bstroke-dasharray:2%2c2%3bstroke:%23333%3b%7d%23mermaid-1 %23arrowhead path%7bfill:%23333%3bstroke:%23333%3b%7d%23mermaid-1 .sequenceNumber%7bfill:white%3b%7d%23mermaid-1 %23sequencenumber%7bfill:%23333%3b%7d%23mermaid-1 %23crosshead path%7bfill:%23333%3bstroke:%23333%3b%7d%23mermaid-1 .messageText%7bfill:%23333%3bstroke:none%3b%7d%23mermaid-1 .labelBox%7bstroke:hsl(259.6261682243%2c 59.7765363128%25%2c 87.9019607843%25)%3bfill:%23ECECFF%3b%7d%23mermaid-1 .labelText%2c%23mermaid-1 .labelText%26gt%3btspan%7bfill:black%3bstroke:none%3b%7d%23mermaid-1 .loopText%2c%23mermaid-1 .loopText%26gt%3btspan%7bfill:black%3bstroke:none%3b%7d%23mermaid-1 .loopLine%7bstroke-width:2px%3bstroke-dasharray:2%2c2%3bstroke:hsl(259.6261682243%2c 59.7765363128%25%2c 87.9019607843%25)%3bfill:hsl(259.6261682243%2c 59.7765363128%25%2c 87.9019607843%25)%3b%7d%23mermaid-1 .note%7bstroke:%23aaaa33%3bfill:%23fff5ad%3b%7d%23mermaid-1 .noteText%2c%23mermaid-1 .noteText%26gt%3btspan%7bfill:black%3bstroke:none%3b%7d%23mermaid-1 .activation0%7bfill:%23f4f4f4%3bstroke:%23666%3b%7d%23mermaid-1 .activation1%7bfill:%23f4f4f4%3bstroke:%23666%3b%7d%23mermaid-1 .activation2%7bfill:%23f4f4f4%3bstroke:%23666%3b%7d%23mermaid-1 .actorPopupMenu%7bposition:absolute%3b%7d%23mermaid-1 .actorPopupMenuPanel%7bposition:absolute%3bfill:%23ECECFF%3bbox-shadow:0px 8px 16px 0px rgba(0%2c0%2c0%2c0.2)%3bfilter:drop-shadow(3px 5px 2px rgb(0 0 0 / 0.4))%3b%7d%23mermaid-1 .actor-man line%7bstroke:hsl(259.6261682243%2c 59.7765363128%25%2c 87.9019607843%25)%3bfill:%23ECECFF%3b%7d%23mermaid-1 .actor-man circle%2c%23mermaid-1 line%7bstroke:hsl(259.6261682243%2c 59.7765363128%25%2c 87.9019607843%25)%3bfill:%23ECECFF%3bstroke-width:2px%3b%7d%23mermaid-1 :root%7b--mermaid-font-family:arial%2csans-serif%3b%7d%3c/style%3e%3cg/%3e%3cdefs%3e%3csymbol height='24' width='24' id='computer'%3e%3cpath d='M2 2v13h20v-13h-20zm18 11h-16v-9h16v9zm-10.228 6l.466-1h3.524l.467 1h-4.457zm14.228 3h-24l2-6h2.104l-1.33 4h18.45l-1.297-4h2.073l2 6zm-5-10h-14v-7h14v7z' transform='scale(.5)'/%3e%3c/symbol%3e%3c/defs%3e%3cdefs%3e%3csymbol clip-rule='evenodd' fill-rule='evenodd' id='database'%3e%3cpath d='M12.258.001l.256.004.255.005.253.008.251.01.249.012.247.015.246.016.242.019.241.02.239.023.236.024.233.027.231.028.229.031.225.032.223.034.22.036.217.038.214.04.211.041.208.043.205.045.201.046.198.048.194.05.191.051.187.053.183.054.18.056.175.057.172.059.168.06.163.061.16.063.155.064.15.066.074.033.073.033.071.034.07.034.069.035.068.035.067.035.066.035.064.036.064.036.062.036.06.036.06.037.058.037.058.037.055.038.055.038.053.038.052.038.051.039.05.039.048.039.047.039.045.04.044.04.043.04.041.04.04.041.039.041.037.041.036.041.034.041.033.042.032.042.03.042.029.042.027.042.026.043.024.043.023.043.021.043.02.043.018.044.017.043.015.044.013.044.012.044.011.045.009.044.007.045.006.045.004.045.002.045.001.045v17l-.001.045-.002.045-.004.045-.006.045-.007.045-.009.044-.011.045-.012.044-.013.044-.015.044-.017.043-.018.044-.02.043-.021.043-.023.043-.024.043-.026.043-.027.042-.029.042-.03.042-.032.042-.033.042-.034.041-.036.041-.037.041-.039.041-.04.041-.041.04-.043.04-.044.04-.045.04-.047.039-.048.039-.05.039-.051.039-.052.038-.053.038-.055.038-.055.038-.058.037-.058.037-.06.037-.06.036-.062.036-.064.036-.064.036-.066.035-.067.035-.068.035-.069.035-.07.034-.071.034-.073.033-.074.033-.15.066-.155.064-.16.063-.163.061-.168.06-.172.059-.175.057-.18.056-.183.054-.187.053-.191.051-.194.05-.198.048-.201.046-.205.045-.208.043-.211.041-.214.04-.217.038-.22.036-.223.034-.225.032-.229.031-.231.028-.233.027-.236.024-.239.023-.241.02-.242.019-.246.016-.247.015-.249.012-.251.01-.253.008-.255.005-.256.004-.258.001-.258-.001-.256-.004-.255-.005-.253-.008-.251-.01-.249-.012-.247-.015-.245-.016-.243-.019-.241-.02-.238-.023-.236-.024-.234-.027-.231-.028-.228-.031-.226-.032-.223-.034-.22-.036-.217-.038-.214-.04-.211-.041-.208-.043-.204-.045-.201-.046-.198-.048-.195-.05-.19-.051-.187-.053-.184-.054-.179-.056-.176-.057-.172-.059-.167-.06-.164-.061-.159-.063-.155-.064-.151-.066-.074-.033-.072-.033-.072-.034-.07-.034-.069-.035-.068-.035-.067-.035-.066-.035-.064-.036-.063-.036-.062-.036-.061-.036-.06-.037-.058-.037-.057-.037-.056-.038-.055-.038-.053-.038-.052-.038-.051-.039-.049-.039-.049-.039-.046-.039-.046-.04-.044-.04-.043-.04-.041-.04-.04-.041-.039-.041-.037-.041-.036-.041-.034-.041-.033-.042-.032-.042-.03-.042-.029-.042-.027-.042-.026-.043-.024-.043-.023-.043-.021-.043-.02-.043-.018-.044-.017-.043-.015-.044-.013-.044-.012-.044-.011-.045-.009-.044-.007-.045-.006-.045-.004-.045-.002-.045-.001-.045v-17l.001-.045.002-.045.004-.045.006-.045.007-.045.009-.044.011-.045.012-.044.013-.044.015-.044.017-.043.018-.044.02-.043.021-.043.023-.043.024-.043.026-.043.027-.042.029-.042.03-.042.032-.042.033-.042.034-.041.036-.041.037-.041.039-.041.04-.041.041-.04.043-.04.044-.04.046-.04.046-.039.049-.039.049-.039.051-.039.052-.038.053-.038.055-.038.056-.038.057-.037.058-.037.06-.037.061-.036.062-.036.063-.036.064-.036.066-.035.067-.035.068-.035.069-.035.07-.034.072-.034.072-.033.074-.033.151-.066.155-.064.159-.063.164-.061.167-.06.172-.059.176-.057.179-.056.184-.054.187-.053.19-.051.195-.05.198-.048.201-.046.204-.045.208-.043.211-.041.214-.04.217-.038.22-.036.223-.034.226-.032.228-.031.231-.028.234-.027.236-.024.238-.023.241-.02.243-.019.245-.016.247-.015.249-.012.251-.01.253-.008.255-.005.256-.004.258-.001.258.001zm-9.258 20.499v.01l.001.021.003.021.004.022.005.021.006.022.007.022.009.023.01.022.011.023.012.023.013.023.015.023.016.024.017.023.018.024.019.024.021.024.022.025.023.024.024.025.052.049.056.05.061.051.066.051.07.051.075.051.079.052.084.052.088.052.092.052.097.052.102.051.105.052.11.052.114.051.119.051.123.051.127.05.131.05.135.05.139.048.144.049.147.047.152.047.155.047.16.045.163.045.167.043.171.043.176.041.178.041.183.039.187.039.19.037.194.035.197.035.202.033.204.031.209.03.212.029.216.027.219.025.222.024.226.021.23.02.233.018.236.016.24.015.243.012.246.01.249.008.253.005.256.004.259.001.26-.001.257-.004.254-.005.25-.008.247-.011.244-.012.241-.014.237-.016.233-.018.231-.021.226-.021.224-.024.22-.026.216-.027.212-.028.21-.031.205-.031.202-.034.198-.034.194-.036.191-.037.187-.039.183-.04.179-.04.175-.042.172-.043.168-.044.163-.045.16-.046.155-.046.152-.047.148-.048.143-.049.139-.049.136-.05.131-.05.126-.05.123-.051.118-.052.114-.051.11-.052.106-.052.101-.052.096-.052.092-.052.088-.053.083-.051.079-.052.074-.052.07-.051.065-.051.06-.051.056-.05.051-.05.023-.024.023-.025.021-.024.02-.024.019-.024.018-.024.017-.024.015-.023.014-.024.013-.023.012-.023.01-.023.01-.022.008-.022.006-.022.006-.022.004-.022.004-.021.001-.021.001-.021v-4.127l-.077.055-.08.053-.083.054-.085.053-.087.052-.09.052-.093.051-.095.05-.097.05-.1.049-.102.049-.105.048-.106.047-.109.047-.111.046-.114.045-.115.045-.118.044-.12.043-.122.042-.124.042-.126.041-.128.04-.13.04-.132.038-.134.038-.135.037-.138.037-.139.035-.142.035-.143.034-.144.033-.147.032-.148.031-.15.03-.151.03-.153.029-.154.027-.156.027-.158.026-.159.025-.161.024-.162.023-.163.022-.165.021-.166.02-.167.019-.169.018-.169.017-.171.016-.173.015-.173.014-.175.013-.175.012-.177.011-.178.01-.179.008-.179.008-.181.006-.182.005-.182.004-.184.003-.184.002h-.37l-.184-.002-.184-.003-.182-.004-.182-.005-.181-.006-.179-.008-.179-.008-.178-.01-.176-.011-.176-.012-.175-.013-.173-.014-.172-.015-.171-.016-.17-.017-.169-.018-.167-.019-.166-.02-.165-.021-.163-.022-.162-.023-.161-.024-.159-.025-.157-.026-.156-.027-.155-.027-.153-.029-.151-.03-.15-.03-.148-.031-.146-.032-.145-.033-.143-.034-.141-.035-.14-.035-.137-.037-.136-.037-.134-.038-.132-.038-.13-.04-.128-.04-.126-.041-.124-.042-.122-.042-.12-.044-.117-.043-.116-.045-.113-.045-.112-.046-.109-.047-.106-.047-.105-.048-.102-.049-.1-.049-.097-.05-.095-.05-.093-.052-.09-.051-.087-.052-.085-.053-.083-.054-.08-.054-.077-.054v4.127zm0-5.654v.011l.001.021.003.021.004.021.005.022.006.022.007.022.009.022.01.022.011.023.012.023.013.023.015.024.016.023.017.024.018.024.019.024.021.024.022.024.023.025.024.024.052.05.056.05.061.05.066.051.07.051.075.052.079.051.084.052.088.052.092.052.097.052.102.052.105.052.11.051.114.051.119.052.123.05.127.051.131.05.135.049.139.049.144.048.147.048.152.047.155.046.16.045.163.045.167.044.171.042.176.042.178.04.183.04.187.038.19.037.194.036.197.034.202.033.204.032.209.03.212.028.216.027.219.025.222.024.226.022.23.02.233.018.236.016.24.014.243.012.246.01.249.008.253.006.256.003.259.001.26-.001.257-.003.254-.006.25-.008.247-.01.244-.012.241-.015.237-.016.233-.018.231-.02.226-.022.224-.024.22-.025.216-.027.212-.029.21-.03.205-.032.202-.033.198-.035.194-.036.191-.037.187-.039.183-.039.179-.041.175-.042.172-.043.168-.044.163-.045.16-.045.155-.047.152-.047.148-.048.143-.048.139-.05.136-.049.131-.05.126-.051.123-.051.118-.051.114-.052.11-.052.106-.052.101-.052.096-.052.092-.052.088-.052.083-.052.079-.052.074-.051.07-.052.065-.051.06-.05.056-.051.051-.049.023-.025.023-.024.021-.025.02-.024.019-.024.018-.024.017-.024.015-.023.014-.023.013-.024.012-.022.01-.023.01-.023.008-.022.006-.022.006-.022.004-.021.004-.022.001-.021.001-.021v-4.139l-.077.054-.08.054-.083.054-.085.052-.087.053-.09.051-.093.051-.095.051-.097.05-.1.049-.102.049-.105.048-.106.047-.109.047-.111.046-.114.045-.115.044-.118.044-.12.044-.122.042-.124.042-.126.041-.128.04-.13.039-.132.039-.134.038-.135.037-.138.036-.139.036-.142.035-.143.033-.144.033-.147.033-.148.031-.15.03-.151.03-.153.028-.154.028-.156.027-.158.026-.159.025-.161.024-.162.023-.163.022-.165.021-.166.02-.167.019-.169.018-.169.017-.171.016-.173.015-.173.014-.175.013-.175.012-.177.011-.178.009-.179.009-.179.007-.181.007-.182.005-.182.004-.184.003-.184.002h-.37l-.184-.002-.184-.003-.182-.004-.182-.005-.181-.007-.179-.007-.179-.009-.178-.009-.176-.011-.176-.012-.175-.013-.173-.014-.172-.015-.171-.016-.17-.017-.169-.018-.167-.019-.166-.02-.165-.021-.163-.022-.162-.023-.161-.024-.159-.025-.157-.026-.156-.027-.155-.028-.153-.028-.151-.03-.15-.03-.148-.031-.146-.033-.145-.033-.143-.033-.141-.035-.14-.036-.137-.036-.136-.037-.134-.038-.132-.039-.13-.039-.128-.04-.126-.041-.124-.042-.122-.043-.12-.043-.117-.044-.116-.044-.113-.046-.112-.046-.109-.046-.106-.047-.105-.048-.102-.049-.1-.049-.097-.05-.095-.051-.093-.051-.09-.051-.087-.053-.085-.052-.083-.054-.08-.054-.077-.054v4.139zm0-5.666v.011l.001.02.003.022.004.021.005.022.006.021.007.022.009.023.01.022.011.023.012.023.013.023.015.023.016.024.017.024.018.023.019.024.021.025.022.024.023.024.024.025.052.05.056.05.061.05.066.051.07.051.075.052.079.051.084.052.088.052.092.052.097.052.102.052.105.051.11.052.114.051.119.051.123.051.127.05.131.05.135.05.139.049.144.048.147.048.152.047.155.046.16.045.163.045.167.043.171.043.176.042.178.04.183.04.187.038.19.037.194.036.197.034.202.033.204.032.209.03.212.028.216.027.219.025.222.024.226.021.23.02.233.018.236.017.24.014.243.012.246.01.249.008.253.006.256.003.259.001.26-.001.257-.003.254-.006.25-.008.247-.01.244-.013.241-.014.237-.016.233-.018.231-.02.226-.022.224-.024.22-.025.216-.027.212-.029.21-.03.205-.032.202-.033.198-.035.194-.036.191-.037.187-.039.183-.039.179-.041.175-.042.172-.043.168-.044.163-.045.16-.045.155-.047.152-.047.148-.048.143-.049.139-.049.136-.049.131-.051.126-.05.123-.051.118-.052.114-.051.11-.052.106-.052.101-.052.096-.052.092-.052.088-.052.083-.052.079-.052.074-.052.07-.051.065-.051.06-.051.056-.05.051-.049.023-.025.023-.025.021-.024.02-.024.019-.024.018-.024.017-.024.015-.023.014-.024.013-.023.012-.023.01-.022.01-.023.008-.022.006-.022.006-.022.004-.022.004-.021.001-.021.001-.021v-4.153l-.077.054-.08.054-.083.053-.085.053-.087.053-.09.051-.093.051-.095.051-.097.05-.1.049-.102.048-.105.048-.106.048-.109.046-.111.046-.114.046-.115.044-.118.044-.12.043-.122.043-.124.042-.126.041-.128.04-.13.039-.132.039-.134.038-.135.037-.138.036-.139.036-.142.034-.143.034-.144.033-.147.032-.148.032-.15.03-.151.03-.153.028-.154.028-.156.027-.158.026-.159.024-.161.024-.162.023-.163.023-.165.021-.166.02-.167.019-.169.018-.169.017-.171.016-.173.015-.173.014-.175.013-.175.012-.177.01-.178.01-.179.009-.179.007-.181.006-.182.006-.182.004-.184.003-.184.001-.185.001-.185-.001-.184-.001-.184-.003-.182-.004-.182-.006-.181-.006-.179-.007-.179-.009-.178-.01-.176-.01-.176-.012-.175-.013-.173-.014-.172-.015-.171-.016-.17-.017-.169-.018-.167-.019-.166-.02-.165-.021-.163-.023-.162-.023-.161-.024-.159-.024-.157-.026-.156-.027-.155-.028-.153-.028-.151-.03-.15-.03-.148-.032-.146-.032-.145-.033-.143-.034-.141-.034-.14-.036-.137-.036-.136-.037-.134-.038-.132-.039-.13-.039-.128-.041-.126-.041-.124-.041-.122-.043-.12-.043-.117-.044-.116-.044-.113-.046-.112-.046-.109-.046-.106-.048-.105-.048-.102-.048-.1-.05-.097-.049-.095-.051-.093-.051-.09-.052-.087-.052-.085-.053-.083-.053-.08-.054-.077-.054v4.153zm8.74-8.179l-.257.004-.254.005-.25.008-.247.011-.244.012-.241.014-.237.016-.233.018-.231.021-.226.022-.224.023-.22.026-.216.027-.212.028-.21.031-.205.032-.202.033-.198.034-.194.036-.191.038-.187.038-.183.04-.179.041-.175.042-.172.043-.168.043-.163.045-.16.046-.155.046-.152.048-.148.048-.143.048-.139.049-.136.05-.131.05-.126.051-.123.051-.118.051-.114.052-.11.052-.106.052-.101.052-.096.052-.092.052-.088.052-.083.052-.079.052-.074.051-.07.052-.065.051-.06.05-.056.05-.051.05-.023.025-.023.024-.021.024-.02.025-.019.024-.018.024-.017.023-.015.024-.014.023-.013.023-.012.023-.01.023-.01.022-.008.022-.006.023-.006.021-.004.022-.004.021-.001.021-.001.021.001.021.001.021.004.021.004.022.006.021.006.023.008.022.01.022.01.023.012.023.013.023.014.023.015.024.017.023.018.024.019.024.02.025.021.024.023.024.023.025.051.05.056.05.06.05.065.051.07.052.074.051.079.052.083.052.088.052.092.052.096.052.101.052.106.052.11.052.114.052.118.051.123.051.126.051.131.05.136.05.139.049.143.048.148.048.152.048.155.046.16.046.163.045.168.043.172.043.175.042.179.041.183.04.187.038.191.038.194.036.198.034.202.033.205.032.21.031.212.028.216.027.22.026.224.023.226.022.231.021.233.018.237.016.241.014.244.012.247.011.25.008.254.005.257.004.26.001.26-.001.257-.004.254-.005.25-.008.247-.011.244-.012.241-.014.237-.016.233-.018.231-.021.226-.022.224-.023.22-.026.216-.027.212-.028.21-.031.205-.032.202-.033.198-.034.194-.036.191-.038.187-.038.183-.04.179-.041.175-.042.172-.043.168-.043.163-.045.16-.046.155-.046.152-.048.148-.048.143-.048.139-.049.136-.05.131-.05.126-.051.123-.051.118-.051.114-.052.11-.052.106-.052.101-.052.096-.052.092-.052.088-.052.083-.052.079-.052.074-.051.07-.052.065-.051.06-.05.056-.05.051-.05.023-.025.023-.024.021-.024.02-.025.019-.024.018-.024.017-.023.015-.024.014-.023.013-.023.012-.023.01-.023.01-.022.008-.022.006-.023.006-.021.004-.022.004-.021.001-.021.001-.021-.001-.021-.001-.021-.004-.021-.004-.022-.006-.021-.006-.023-.008-.022-.01-.022-.01-.023-.012-.023-.013-.023-.014-.023-.015-.024-.017-.023-.018-.024-.019-.024-.02-.025-.021-.024-.023-.024-.023-.025-.051-.05-.056-.05-.06-.05-.065-.051-.07-.052-.074-.051-.079-.052-.083-.052-.088-.052-.092-.052-.096-.052-.101-.052-.106-.052-.11-.052-.114-.052-.118-.051-.123-.051-.126-.051-.131-.05-.136-.05-.139-.049-.143-.048-.148-.048-.152-.048-.155-.046-.16-.046-.163-.045-.168-.043-.172-.043-.175-.042-.179-.041-.183-.04-.187-.038-.191-.038-.194-.036-.198-.034-.202-.033-.205-.032-.21-.031-.212-.028-.216-.027-.22-.026-.224-.023-.226-.022-.231-.021-.233-.018-.237-.016-.241-.014-.244-.012-.247-.011-.25-.008-.254-.005-.257-.004-.26-.001-.26.001z' transform='scale(.5)'/%3e%3c/symbol%3e%3c/defs%3e%3cdefs%3e%3csymbol height='24' width='24' id='clock'%3e%3cpath d='M12 2c5.514 0 10 4.486 10 10s-4.486 10-10 10-10-4.486-10-10 4.486-10 10-10zm0-2c-6.627 0-12 5.373-12 12s5.373 12 12 12 12-5.373 12-12-5.373-12-12-12zm5.848 12.459c.202.038.202.333.001.372-1.907.361-6.045 1.111-6.547 1.111-.719 0-1.301-.582-1.301-1.301 0-.512.77-5.447 1.125-7.445.034-.192.312-.181.343.014l.985 6.238 5.394 1.011z' transform='scale(.5)'/%3e%3c/symbol%3e%3c/defs%3e%3cdefs%3e%3cmarker orient='auto-start-reverse' markerHeight='12' markerWidth='12' markerUnits='userSpaceOnUse' refY='5' refX='7.9' id='arrowhead'%3e%3cpath d='M -1 0 L 10 5 L 0 10 z'/%3e%3c/marker%3e%3c/defs%3e%3cdefs%3e%3cmarker refY='4.5' refX='4' orient='auto' markerHeight='8' markerWidth='15' id='crosshead'%3e%3cpath style='stroke-dasharray: 0%2c 0%3b' d='M 1%2c2 L 6%2c7 M 6%2c2 L 1%2c7' stroke-width='1pt' stroke='black' fill='none'/%3e%3c/marker%3e%3c/defs%3e%3cdefs%3e%3cmarker orient='auto' markerHeight='28' markerWidth='20' refY='7' refX='15.5' id='filled-head'%3e%3cpath d='M 18%2c7 L9%2c13 L14%2c7 L9%2c1 Z'/%3e%3c/marker%3e%3c/defs%3e%3cdefs%3e%3cmarker orient='auto' markerHeight='40' markerWidth='60' refY='15' refX='15' id='sequencenumber'%3e%3ccircle r='6' cy='15' cx='15'/%3e%3c/marker%3e%3c/defs%3e%3cg%3e%3crect class='note' height='37' width='863' stroke='%23666' fill='%23EDF2AE' y='207' x='50'/%3e%3ctext style='font-family: arial%2c sans-serif%3b font-size: 16px%3b font-weight: 400%3b' dy='1em' class='noteText' alignment-baseline='middle' dominant-baseline='middle' text-anchor='middle' y='212' x='482'%3e%3ctspan x='482'%3eNormal usage flow%3c/tspan%3e%3c/text%3e%3c/g%3e%3cg name='User' class='actor-man actor-top'%3e%3cline y2='45' x2='75' y1='25' x1='75' id='actor-man-torso0'/%3e%3cline y2='33' x2='93' y1='33' x1='57' id='actor-man-arms0'/%3e%3cline y2='45' x2='75' y1='60' x1='57'/%3e%3cline y2='60' x2='91' y1='45' x1='75'/%3e%3ccircle height='65' width='150' r='15' cy='10' cx='75'/%3e%3ctext style='text-anchor: middle%3b font-size: 16px%3b font-weight: 400%3b font-family: arial%2c sans-serif%3b' class='actor actor-man' alignment-baseline='central' dominant-baseline='central' y='67.5' x='75'%3e%3ctspan dy='0' x='75'%3eUser%3c/tspan%3e%3c/text%3e%3c/g%3e%3ctext style='font-family: arial%2c sans-serif%3b font-size: 16px%3b font-weight: 400%3b' dy='1em' class='messageText' alignment-baseline='middle' dominant-baseline='middle' text-anchor='middle' y='80' x='480'%3eCreate Personal Access Token (PAT)%3c/text%3e%3cline style='fill: none%3b' marker-start='url(%23sequencenumber)' marker-end='url(%23arrowhead)' stroke='none' stroke-width='2' class='messageLine0' y2='109' x2='884' y1='109' x1='76'/%3e%3ctext class='sequenceNumber' text-anchor='middle' font-size='12px' font-family='sans-serif' y='113' x='76'%3e1%3c/text%3e%3ctext style='font-family: arial%2c sans-serif%3b font-size: 16px%3b font-weight: 400%3b' dy='1em' class='messageText' alignment-baseline='middle' dominant-baseline='middle' text-anchor='middle' y='124' x='483'%3eReturn generated PAT%3c/text%3e%3cline style='stroke-dasharray: 3%2c 3%3b fill: none%3b' marker-start='url(%23sequencenumber)' marker-end='url(%23arrowhead)' stroke='none' stroke-width='2' class='messageLine1' y2='153' x2='79' y1='153' x1='887'/%3e%3ctext class='sequenceNumber' text-anchor='middle' font-size='12px' font-family='sans-serif' y='157' x='887'%3e2%3c/text%3e%3ctext style='font-family: arial%2c sans-serif%3b font-size: 16px%3b font-weight: 400%3b' dy='1em' class='messageText' alignment-baseline='middle' dominant-baseline='middle' text-anchor='middle' y='168' x='306'%3eConfigure PAT%3c/text%3e%3cline style='fill: none%3b' marker-start='url(%23sequencenumber)' marker-end='url(%23arrowhead)' stroke='none' stroke-width='2' class='messageLine0' y2='197' x2='535' y1='197' x1='76'/%3e%3ctext class='sequenceNumber' text-anchor='middle' font-size='12px' font-family='sans-serif' y='201' x='76'%3e3%3c/text%3e%3ctext style='font-family: arial%2c sans-serif%3b font-size: 16px%3b font-weight: 400%3b' dy='1em' class='messageText' alignment-baseline='middle' dominant-baseline='middle' text-anchor='middle' y='259' x='174'%3eMake request%3c/text%3e%3cline style='fill: none%3b' marker-start='url(%23sequencenumber)' marker-end='url(%23arrowhead)' stroke='none' stroke-width='2' class='messageLine0' y2='288' x2='271' y1='288' x1='76'/%3e%3ctext class='sequenceNumber' text-anchor='middle' font-size='12px' font-family='sans-serif' y='292' x='76'%3e4%3c/text%3e%3ctext style='font-family: arial%2c sans-serif%3b font-size: 16px%3b font-weight: 400%3b' dy='1em' class='messageText' alignment-baseline='middle' dominant-baseline='middle' text-anchor='middle' y='303' x='406'%3eCall tools from MCP Server%3c/text%3e%3cline style='fill: none%3b' marker-start='url(%23sequencenumber)' marker-end='url(%23arrowhead)' stroke='none' stroke-width='2' class='messageLine0' y2='332' x2='535' y1='332' x1='276'/%3e%3ctext class='sequenceNumber' text-anchor='middle' font-size='12px' font-family='sans-serif' y='336' x='276'%3e5%3c/text%3e%3ctext style='font-family: arial%2c sans-serif%3b font-size: 16px%3b font-weight: 400%3b' dy='1em' class='messageText' alignment-baseline='middle' dominant-baseline='middle' text-anchor='middle' y='347' x='712'%3eAPI call with PAT%3c/text%3e%3cline style='fill: none%3b' marker-start='url(%23sequencenumber)' marker-end='url(%23arrowhead)' stroke='none' stroke-width='2' class='messageLine0' y2='376' x2='884' y1='376' x1='540'/%3e%3ctext class='sequenceNumber' text-anchor='middle' font-size='12px' font-family='sans-serif' y='380' x='540'%3e6%3c/text%3e%3ctext style='font-family: arial%2c sans-serif%3b font-size: 16px%3b font-weight: 400%3b' dy='1em' class='messageText' alignment-baseline='middle' dominant-baseline='middle' text-anchor='middle' y='391' x='889'%3eValidate PAT %26amp%3b check permissions%3c/text%3e%3cpath style='fill: none%3b' marker-start='url(%23sequencenumber)' marker-end='url(%23arrowhead)' stroke='none' stroke-width='2' class='messageLine0' d='M 889%2c420 C 949%2c410 949%2c450 889%2c440'/%3e%3ctext class='sequenceNumber' text-anchor='middle' font-size='12px' font-family='sans-serif' y='424' x='889'%3e7%3c/text%3e%3ctext style='font-family: arial%2c sans-serif%3b font-size: 16px%3b font-weight: 400%3b' dy='1em' class='messageText' alignment-baseline='middle' dominant-baseline='middle' text-anchor='middle' y='465' x='715'%3eReturn data based on user permissions%3c/text%3e%3cline style='stroke-dasharray: 3%2c 3%3b fill: none%3b' marker-start='url(%23sequencenumber)' marker-end='url(%23arrowhead)' stroke='none' stroke-width='2' class='messageLine1' y2='494' x2='543' y1='494' x1='887'/%3e%3ctext class='sequenceNumber' text-anchor='middle' font-size='12px' font-family='sans-serif' y='498' x='887'%3e8%3c/text%3e%3ctext style='font-family: arial%2c sans-serif%3b font-size: 16px%3b font-weight: 400%3b' dy='1em' class='messageText' alignment-baseline='middle' dominant-baseline='middle' text-anchor='middle' y='509' x='409'%3eProcess %26amp%3b return results%3c/text%3e%3cline style='stroke-dasharray: 3%2c 3%3b fill: none%3b' marker-start='url(%23sequencenumber)' marker-end='url(%23arrowhead)' stroke='none' stroke-width='2' class='messageLine1' y2='538' x2='279' y1='538' x1='538'/%3e%3ctext class='sequenceNumber' text-anchor='middle' font-size='12px' font-family='sans-serif' y='542' x='538'%3e9%3c/text%3e%3ctext style='font-family: arial%2c sans-serif%3b font-size: 16px%3b font-weight: 400%3b' dy='1em' class='messageText' alignment-baseline='middle' dominant-baseline='middle' text-anchor='middle' y='553' x='177'%3eDisplay results%3c/text%3e%3cline style='stroke-dasharray: 3%2c 3%3b fill: none%3b' marker-start='url(%23sequencenumber)' marker-end='url(%23arrowhead)' stroke='none' stroke-width='2' class='messageLine1' y2='582' x2='79' y1='582' x1='274'/%3e%3ctext class='sequenceNumber' text-anchor='middle' font-size='12px' font-family='sans-serif' y='586' x='274'%3e10%3c/text%3e%3cg name='User' class='actor-man actor-bottom'%3e%3cline y2='647' x2='75' y1='627' x1='75' id='actor-man-torso3'/%3e%3cline y2='635' x2='93' y1='635' x1='57' id='actor-man-arms3'/%3e%3cline y2='647' x2='75' y1='662' x1='57'/%3e%3cline y2='662' x2='91' y1='647' x1='75'/%3e%3ccircle height='65' width='150' r='15' cy='612' cx='75'/%3e%3ctext style='text-anchor: middle%3b font-size: 16px%3b font-weight: 400%3b font-family: arial%2c sans-serif%3b' class='actor actor-man' alignment-baseline='central' dominant-baseline='central' y='669.5' x='75'%3e%3ctspan dy='0' x='75'%3eUser%3c/tspan%3e%3c/text%3e%3c/g%3e%3c/svg%3e)
So, as long as your system supports Personal Access Tokens (PAT), you can perfectly solve the access control challenges between AI tools and your existing services without redesigning your authentication mechanisms, while ensuring data security and privacy protection for your users.
Now, let's see how to implement this in practice.
MCP server access control implementation
In this section, we'll implement access control for an MCP server using an existing CMS system as our foundation.
You can checkout the complete CMS sample tutorial and source code in RBAC in practice: Implementing secure authorization for your application, but this is not mandatory, we'll cover all the essential principles here.
The CMS sample is based on Logto, a popular open-source identity platform that provides a comprehensive authentication and authorization solution, but the technical implementation is not the focus of this article.
Design permission and access control policy for your service
The first step in implementing access control is designing permissions and access control policies for your system.
In our CMS example, we've designed the following API endpoints based on RBAC (Role-Based Access Control) and specified the permissions required to access each endpoint:
| Endpoint | Access control logic |
|---|---|
| GET /api/articles | - Anyone with list:articles permission, OR authors can see their own articles |
| GET /api/articles/:id | - Anyone with read:articles permission, OR author of the article |
| POST /api/articles | - Anyone with create:articles permission |
| PATCH /api/articles/:id | - Anyone with update:articles permission, OR author of the article |
| DELETE /api/articles/:id | - Anyone with delete:articles permission, OR author of the article |
| PATCH /api/articles/:id/published | - Only users with publish:articles permission |
The system's permission design is as follows:
| Permission | Description |
|---|---|
| list:articles | View the list of all articles in the system |
| read:articles | Read any article's full content |
| create:articles | Create new articles |
| update:articles | Modify any article |
| delete:articles | Delete any article |
| publish:articles | Change publication status |
Based on these permissions, we've defined the following roles for our CMS system:
| Permission/Role | 👑 Admin | 📝 Publisher | ✍️ Author |
|---|---|---|---|
| Description | Full system access for complete content management | Can view all articles and control publication status | Can create new articles in the system |
| list:articles | ✅ | ✅ | ❌ |
| read:articles | ✅ | ✅ | ❌ |
| create:articles | ✅ | ❌ | ✅ |
| update:articles | ✅ | ❌ | ❌ |
| delete:articles | ✅ | ❌ | ❌ |
| publish:articles | ✅ | ✅ | ❌ |
Note: Authors automatically have read/update/delete permissions for their own articles, regardless of role permissions.
Next, we'll assign roles to users in our system (using the CMS demo as an example):
| User | Role |
|---|---|
| Alex | Admin |
| Bob | Publisher |
| Charlie | Author |
And in Logto, as mentioned in the RBAC in practice article above, we've set up roles for our users.

Apply the access control policy to your service API
Here's how users log in to our CMS sample:
%3bfill:%23ECECFF%3b%7d%23mermaid-2 text.actor%26gt%3btspan%7bfill:black%3bstroke:none%3b%7d%23mermaid-2 .actor-line%7bstroke:hsl(259.6261682243%2c 59.7765363128%25%2c 87.9019607843%25)%3b%7d%23mermaid-2 .messageLine0%7bstroke-width:1.5%3bstroke-dasharray:none%3bstroke:%23333%3b%7d%23mermaid-2 .messageLine1%7bstroke-width:1.5%3bstroke-dasharray:2%2c2%3bstroke:%23333%3b%7d%23mermaid-2 %23arrowhead path%7bfill:%23333%3bstroke:%23333%3b%7d%23mermaid-2 .sequenceNumber%7bfill:white%3b%7d%23mermaid-2 %23sequencenumber%7bfill:%23333%3b%7d%23mermaid-2 %23crosshead path%7bfill:%23333%3bstroke:%23333%3b%7d%23mermaid-2 .messageText%7bfill:%23333%3bstroke:none%3b%7d%23mermaid-2 .labelBox%7bstroke:hsl(259.6261682243%2c 59.7765363128%25%2c 87.9019607843%25)%3bfill:%23ECECFF%3b%7d%23mermaid-2 .labelText%2c%23mermaid-2 .labelText%26gt%3btspan%7bfill:black%3bstroke:none%3b%7d%23mermaid-2 .loopText%2c%23mermaid-2 .loopText%26gt%3btspan%7bfill:black%3bstroke:none%3b%7d%23mermaid-2 .loopLine%7bstroke-width:2px%3bstroke-dasharray:2%2c2%3bstroke:hsl(259.6261682243%2c 59.7765363128%25%2c 87.9019607843%25)%3bfill:hsl(259.6261682243%2c 59.7765363128%25%2c 87.9019607843%25)%3b%7d%23mermaid-2 .note%7bstroke:%23aaaa33%3bfill:%23fff5ad%3b%7d%23mermaid-2 .noteText%2c%23mermaid-2 .noteText%26gt%3btspan%7bfill:black%3bstroke:none%3b%7d%23mermaid-2 .activation0%7bfill:%23f4f4f4%3bstroke:%23666%3b%7d%23mermaid-2 .activation1%7bfill:%23f4f4f4%3bstroke:%23666%3b%7d%23mermaid-2 .activation2%7bfill:%23f4f4f4%3bstroke:%23666%3b%7d%23mermaid-2 .actorPopupMenu%7bposition:absolute%3b%7d%23mermaid-2 .actorPopupMenuPanel%7bposition:absolute%3bfill:%23ECECFF%3bbox-shadow:0px 8px 16px 0px rgba(0%2c0%2c0%2c0.2)%3bfilter:drop-shadow(3px 5px 2px rgb(0 0 0 / 0.4))%3b%7d%23mermaid-2 .actor-man line%7bstroke:hsl(259.6261682243%2c 59.7765363128%25%2c 87.9019607843%25)%3bfill:%23ECECFF%3b%7d%23mermaid-2 .actor-man circle%2c%23mermaid-2 line%7bstroke:hsl(259.6261682243%2c 59.7765363128%25%2c 87.9019607843%25)%3bfill:%23ECECFF%3bstroke-width:2px%3b%7d%23mermaid-2 :root%7b--mermaid-font-family:arial%2csans-serif%3b%7d%3c/style%3e%3cg/%3e%3cdefs%3e%3csymbol height='24' width='24' id='computer'%3e%3cpath d='M2 2v13h20v-13h-20zm18 11h-16v-9h16v9zm-10.228 6l.466-1h3.524l.467 1h-4.457zm14.228 3h-24l2-6h2.104l-1.33 4h18.45l-1.297-4h2.073l2 6zm-5-10h-14v-7h14v7z' transform='scale(.5)'/%3e%3c/symbol%3e%3c/defs%3e%3cdefs%3e%3csymbol clip-rule='evenodd' fill-rule='evenodd' id='database'%3e%3cpath d='M12.258.001l.256.004.255.005.253.008.251.01.249.012.247.015.246.016.242.019.241.02.239.023.236.024.233.027.231.028.229.031.225.032.223.034.22.036.217.038.214.04.211.041.208.043.205.045.201.046.198.048.194.05.191.051.187.053.183.054.18.056.175.057.172.059.168.06.163.061.16.063.155.064.15.066.074.033.073.033.071.034.07.034.069.035.068.035.067.035.066.035.064.036.064.036.062.036.06.036.06.037.058.037.058.037.055.038.055.038.053.038.052.038.051.039.05.039.048.039.047.039.045.04.044.04.043.04.041.04.04.041.039.041.037.041.036.041.034.041.033.042.032.042.03.042.029.042.027.042.026.043.024.043.023.043.021.043.02.043.018.044.017.043.015.044.013.044.012.044.011.045.009.044.007.045.006.045.004.045.002.045.001.045v17l-.001.045-.002.045-.004.045-.006.045-.007.045-.009.044-.011.045-.012.044-.013.044-.015.044-.017.043-.018.044-.02.043-.021.043-.023.043-.024.043-.026.043-.027.042-.029.042-.03.042-.032.042-.033.042-.034.041-.036.041-.037.041-.039.041-.04.041-.041.04-.043.04-.044.04-.045.04-.047.039-.048.039-.05.039-.051.039-.052.038-.053.038-.055.038-.055.038-.058.037-.058.037-.06.037-.06.036-.062.036-.064.036-.064.036-.066.035-.067.035-.068.035-.069.035-.07.034-.071.034-.073.033-.074.033-.15.066-.155.064-.16.063-.163.061-.168.06-.172.059-.175.057-.18.056-.183.054-.187.053-.191.051-.194.05-.198.048-.201.046-.205.045-.208.043-.211.041-.214.04-.217.038-.22.036-.223.034-.225.032-.229.031-.231.028-.233.027-.236.024-.239.023-.241.02-.242.019-.246.016-.247.015-.249.012-.251.01-.253.008-.255.005-.256.004-.258.001-.258-.001-.256-.004-.255-.005-.253-.008-.251-.01-.249-.012-.247-.015-.245-.016-.243-.019-.241-.02-.238-.023-.236-.024-.234-.027-.231-.028-.228-.031-.226-.032-.223-.034-.22-.036-.217-.038-.214-.04-.211-.041-.208-.043-.204-.045-.201-.046-.198-.048-.195-.05-.19-.051-.187-.053-.184-.054-.179-.056-.176-.057-.172-.059-.167-.06-.164-.061-.159-.063-.155-.064-.151-.066-.074-.033-.072-.033-.072-.034-.07-.034-.069-.035-.068-.035-.067-.035-.066-.035-.064-.036-.063-.036-.062-.036-.061-.036-.06-.037-.058-.037-.057-.037-.056-.038-.055-.038-.053-.038-.052-.038-.051-.039-.049-.039-.049-.039-.046-.039-.046-.04-.044-.04-.043-.04-.041-.04-.04-.041-.039-.041-.037-.041-.036-.041-.034-.041-.033-.042-.032-.042-.03-.042-.029-.042-.027-.042-.026-.043-.024-.043-.023-.043-.021-.043-.02-.043-.018-.044-.017-.043-.015-.044-.013-.044-.012-.044-.011-.045-.009-.044-.007-.045-.006-.045-.004-.045-.002-.045-.001-.045v-17l.001-.045.002-.045.004-.045.006-.045.007-.045.009-.044.011-.045.012-.044.013-.044.015-.044.017-.043.018-.044.02-.043.021-.043.023-.043.024-.043.026-.043.027-.042.029-.042.03-.042.032-.042.033-.042.034-.041.036-.041.037-.041.039-.041.04-.041.041-.04.043-.04.044-.04.046-.04.046-.039.049-.039.049-.039.051-.039.052-.038.053-.038.055-.038.056-.038.057-.037.058-.037.06-.037.061-.036.062-.036.063-.036.064-.036.066-.035.067-.035.068-.035.069-.035.07-.034.072-.034.072-.033.074-.033.151-.066.155-.064.159-.063.164-.061.167-.06.172-.059.176-.057.179-.056.184-.054.187-.053.19-.051.195-.05.198-.048.201-.046.204-.045.208-.043.211-.041.214-.04.217-.038.22-.036.223-.034.226-.032.228-.031.231-.028.234-.027.236-.024.238-.023.241-.02.243-.019.245-.016.247-.015.249-.012.251-.01.253-.008.255-.005.256-.004.258-.001.258.001zm-9.258 20.499v.01l.001.021.003.021.004.022.005.021.006.022.007.022.009.023.01.022.011.023.012.023.013.023.015.023.016.024.017.023.018.024.019.024.021.024.022.025.023.024.024.025.052.049.056.05.061.051.066.051.07.051.075.051.079.052.084.052.088.052.092.052.097.052.102.051.105.052.11.052.114.051.119.051.123.051.127.05.131.05.135.05.139.048.144.049.147.047.152.047.155.047.16.045.163.045.167.043.171.043.176.041.178.041.183.039.187.039.19.037.194.035.197.035.202.033.204.031.209.03.212.029.216.027.219.025.222.024.226.021.23.02.233.018.236.016.24.015.243.012.246.01.249.008.253.005.256.004.259.001.26-.001.257-.004.254-.005.25-.008.247-.011.244-.012.241-.014.237-.016.233-.018.231-.021.226-.021.224-.024.22-.026.216-.027.212-.028.21-.031.205-.031.202-.034.198-.034.194-.036.191-.037.187-.039.183-.04.179-.04.175-.042.172-.043.168-.044.163-.045.16-.046.155-.046.152-.047.148-.048.143-.049.139-.049.136-.05.131-.05.126-.05.123-.051.118-.052.114-.051.11-.052.106-.052.101-.052.096-.052.092-.052.088-.053.083-.051.079-.052.074-.052.07-.051.065-.051.06-.051.056-.05.051-.05.023-.024.023-.025.021-.024.02-.024.019-.024.018-.024.017-.024.015-.023.014-.024.013-.023.012-.023.01-.023.01-.022.008-.022.006-.022.006-.022.004-.022.004-.021.001-.021.001-.021v-4.127l-.077.055-.08.053-.083.054-.085.053-.087.052-.09.052-.093.051-.095.05-.097.05-.1.049-.102.049-.105.048-.106.047-.109.047-.111.046-.114.045-.115.045-.118.044-.12.043-.122.042-.124.042-.126.041-.128.04-.13.04-.132.038-.134.038-.135.037-.138.037-.139.035-.142.035-.143.034-.144.033-.147.032-.148.031-.15.03-.151.03-.153.029-.154.027-.156.027-.158.026-.159.025-.161.024-.162.023-.163.022-.165.021-.166.02-.167.019-.169.018-.169.017-.171.016-.173.015-.173.014-.175.013-.175.012-.177.011-.178.01-.179.008-.179.008-.181.006-.182.005-.182.004-.184.003-.184.002h-.37l-.184-.002-.184-.003-.182-.004-.182-.005-.181-.006-.179-.008-.179-.008-.178-.01-.176-.011-.176-.012-.175-.013-.173-.014-.172-.015-.171-.016-.17-.017-.169-.018-.167-.019-.166-.02-.165-.021-.163-.022-.162-.023-.161-.024-.159-.025-.157-.026-.156-.027-.155-.027-.153-.029-.151-.03-.15-.03-.148-.031-.146-.032-.145-.033-.143-.034-.141-.035-.14-.035-.137-.037-.136-.037-.134-.038-.132-.038-.13-.04-.128-.04-.126-.041-.124-.042-.122-.042-.12-.044-.117-.043-.116-.045-.113-.045-.112-.046-.109-.047-.106-.047-.105-.048-.102-.049-.1-.049-.097-.05-.095-.05-.093-.052-.09-.051-.087-.052-.085-.053-.083-.054-.08-.054-.077-.054v4.127zm0-5.654v.011l.001.021.003.021.004.021.005.022.006.022.007.022.009.022.01.022.011.023.012.023.013.023.015.024.016.023.017.024.018.024.019.024.021.024.022.024.023.025.024.024.052.05.056.05.061.05.066.051.07.051.075.052.079.051.084.052.088.052.092.052.097.052.102.052.105.052.11.051.114.051.119.052.123.05.127.051.131.05.135.049.139.049.144.048.147.048.152.047.155.046.16.045.163.045.167.044.171.042.176.042.178.04.183.04.187.038.19.037.194.036.197.034.202.033.204.032.209.03.212.028.216.027.219.025.222.024.226.022.23.02.233.018.236.016.24.014.243.012.246.01.249.008.253.006.256.003.259.001.26-.001.257-.003.254-.006.25-.008.247-.01.244-.012.241-.015.237-.016.233-.018.231-.02.226-.022.224-.024.22-.025.216-.027.212-.029.21-.03.205-.032.202-.033.198-.035.194-.036.191-.037.187-.039.183-.039.179-.041.175-.042.172-.043.168-.044.163-.045.16-.045.155-.047.152-.047.148-.048.143-.048.139-.05.136-.049.131-.05.126-.051.123-.051.118-.051.114-.052.11-.052.106-.052.101-.052.096-.052.092-.052.088-.052.083-.052.079-.052.074-.051.07-.052.065-.051.06-.05.056-.051.051-.049.023-.025.023-.024.021-.025.02-.024.019-.024.018-.024.017-.024.015-.023.014-.023.013-.024.012-.022.01-.023.01-.023.008-.022.006-.022.006-.022.004-.021.004-.022.001-.021.001-.021v-4.139l-.077.054-.08.054-.083.054-.085.052-.087.053-.09.051-.093.051-.095.051-.097.05-.1.049-.102.049-.105.048-.106.047-.109.047-.111.046-.114.045-.115.044-.118.044-.12.044-.122.042-.124.042-.126.041-.128.04-.13.039-.132.039-.134.038-.135.037-.138.036-.139.036-.142.035-.143.033-.144.033-.147.033-.148.031-.15.03-.151.03-.153.028-.154.028-.156.027-.158.026-.159.025-.161.024-.162.023-.163.022-.165.021-.166.02-.167.019-.169.018-.169.017-.171.016-.173.015-.173.014-.175.013-.175.012-.177.011-.178.009-.179.009-.179.007-.181.007-.182.005-.182.004-.184.003-.184.002h-.37l-.184-.002-.184-.003-.182-.004-.182-.005-.181-.007-.179-.007-.179-.009-.178-.009-.176-.011-.176-.012-.175-.013-.173-.014-.172-.015-.171-.016-.17-.017-.169-.018-.167-.019-.166-.02-.165-.021-.163-.022-.162-.023-.161-.024-.159-.025-.157-.026-.156-.027-.155-.028-.153-.028-.151-.03-.15-.03-.148-.031-.146-.033-.145-.033-.143-.033-.141-.035-.14-.036-.137-.036-.136-.037-.134-.038-.132-.039-.13-.039-.128-.04-.126-.041-.124-.042-.122-.043-.12-.043-.117-.044-.116-.044-.113-.046-.112-.046-.109-.046-.106-.047-.105-.048-.102-.049-.1-.049-.097-.05-.095-.051-.093-.051-.09-.051-.087-.053-.085-.052-.083-.054-.08-.054-.077-.054v4.139zm0-5.666v.011l.001.02.003.022.004.021.005.022.006.021.007.022.009.023.01.022.011.023.012.023.013.023.015.023.016.024.017.024.018.023.019.024.021.025.022.024.023.024.024.025.052.05.056.05.061.05.066.051.07.051.075.052.079.051.084.052.088.052.092.052.097.052.102.052.105.051.11.052.114.051.119.051.123.051.127.05.131.05.135.05.139.049.144.048.147.048.152.047.155.046.16.045.163.045.167.043.171.043.176.042.178.04.183.04.187.038.19.037.194.036.197.034.202.033.204.032.209.03.212.028.216.027.219.025.222.024.226.021.23.02.233.018.236.017.24.014.243.012.246.01.249.008.253.006.256.003.259.001.26-.001.257-.003.254-.006.25-.008.247-.01.244-.013.241-.014.237-.016.233-.018.231-.02.226-.022.224-.024.22-.025.216-.027.212-.029.21-.03.205-.032.202-.033.198-.035.194-.036.191-.037.187-.039.183-.039.179-.041.175-.042.172-.043.168-.044.163-.045.16-.045.155-.047.152-.047.148-.048.143-.049.139-.049.136-.049.131-.051.126-.05.123-.051.118-.052.114-.051.11-.052.106-.052.101-.052.096-.052.092-.052.088-.052.083-.052.079-.052.074-.052.07-.051.065-.051.06-.051.056-.05.051-.049.023-.025.023-.025.021-.024.02-.024.019-.024.018-.024.017-.024.015-.023.014-.024.013-.023.012-.023.01-.022.01-.023.008-.022.006-.022.006-.022.004-.022.004-.021.001-.021.001-.021v-4.153l-.077.054-.08.054-.083.053-.085.053-.087.053-.09.051-.093.051-.095.051-.097.05-.1.049-.102.048-.105.048-.106.048-.109.046-.111.046-.114.046-.115.044-.118.044-.12.043-.122.043-.124.042-.126.041-.128.04-.13.039-.132.039-.134.038-.135.037-.138.036-.139.036-.142.034-.143.034-.144.033-.147.032-.148.032-.15.03-.151.03-.153.028-.154.028-.156.027-.158.026-.159.024-.161.024-.162.023-.163.023-.165.021-.166.02-.167.019-.169.018-.169.017-.171.016-.173.015-.173.014-.175.013-.175.012-.177.01-.178.01-.179.009-.179.007-.181.006-.182.006-.182.004-.184.003-.184.001-.185.001-.185-.001-.184-.001-.184-.003-.182-.004-.182-.006-.181-.006-.179-.007-.179-.009-.178-.01-.176-.01-.176-.012-.175-.013-.173-.014-.172-.015-.171-.016-.17-.017-.169-.018-.167-.019-.166-.02-.165-.021-.163-.023-.162-.023-.161-.024-.159-.024-.157-.026-.156-.027-.155-.028-.153-.028-.151-.03-.15-.03-.148-.032-.146-.032-.145-.033-.143-.034-.141-.034-.14-.036-.137-.036-.136-.037-.134-.038-.132-.039-.13-.039-.128-.041-.126-.041-.124-.041-.122-.043-.12-.043-.117-.044-.116-.044-.113-.046-.112-.046-.109-.046-.106-.048-.105-.048-.102-.048-.1-.05-.097-.049-.095-.051-.093-.051-.09-.052-.087-.052-.085-.053-.083-.053-.08-.054-.077-.054v4.153zm8.74-8.179l-.257.004-.254.005-.25.008-.247.011-.244.012-.241.014-.237.016-.233.018-.231.021-.226.022-.224.023-.22.026-.216.027-.212.028-.21.031-.205.032-.202.033-.198.034-.194.036-.191.038-.187.038-.183.04-.179.041-.175.042-.172.043-.168.043-.163.045-.16.046-.155.046-.152.048-.148.048-.143.048-.139.049-.136.05-.131.05-.126.051-.123.051-.118.051-.114.052-.11.052-.106.052-.101.052-.096.052-.092.052-.088.052-.083.052-.079.052-.074.051-.07.052-.065.051-.06.05-.056.05-.051.05-.023.025-.023.024-.021.024-.02.025-.019.024-.018.024-.017.023-.015.024-.014.023-.013.023-.012.023-.01.023-.01.022-.008.022-.006.023-.006.021-.004.022-.004.021-.001.021-.001.021.001.021.001.021.004.021.004.022.006.021.006.023.008.022.01.022.01.023.012.023.013.023.014.023.015.024.017.023.018.024.019.024.02.025.021.024.023.024.023.025.051.05.056.05.06.05.065.051.07.052.074.051.079.052.083.052.088.052.092.052.096.052.101.052.106.052.11.052.114.052.118.051.123.051.126.051.131.05.136.05.139.049.143.048.148.048.152.048.155.046.16.046.163.045.168.043.172.043.175.042.179.041.183.04.187.038.191.038.194.036.198.034.202.033.205.032.21.031.212.028.216.027.22.026.224.023.226.022.231.021.233.018.237.016.241.014.244.012.247.011.25.008.254.005.257.004.26.001.26-.001.257-.004.254-.005.25-.008.247-.011.244-.012.241-.014.237-.016.233-.018.231-.021.226-.022.224-.023.22-.026.216-.027.212-.028.21-.031.205-.032.202-.033.198-.034.194-.036.191-.038.187-.038.183-.04.179-.041.175-.042.172-.043.168-.043.163-.045.16-.046.155-.046.152-.048.148-.048.143-.048.139-.049.136-.05.131-.05.126-.051.123-.051.118-.051.114-.052.11-.052.106-.052.101-.052.096-.052.092-.052.088-.052.083-.052.079-.052.074-.051.07-.052.065-.051.06-.05.056-.05.051-.05.023-.025.023-.024.021-.024.02-.025.019-.024.018-.024.017-.023.015-.024.014-.023.013-.023.012-.023.01-.023.01-.022.008-.022.006-.023.006-.021.004-.022.004-.021.001-.021.001-.021-.001-.021-.001-.021-.004-.021-.004-.022-.006-.021-.006-.023-.008-.022-.01-.022-.01-.023-.012-.023-.013-.023-.014-.023-.015-.024-.017-.023-.018-.024-.019-.024-.02-.025-.021-.024-.023-.024-.023-.025-.051-.05-.056-.05-.06-.05-.065-.051-.07-.052-.074-.051-.079-.052-.083-.052-.088-.052-.092-.052-.096-.052-.101-.052-.106-.052-.11-.052-.114-.052-.118-.051-.123-.051-.126-.051-.131-.05-.136-.05-.139-.049-.143-.048-.148-.048-.152-.048-.155-.046-.16-.046-.163-.045-.168-.043-.172-.043-.175-.042-.179-.041-.183-.04-.187-.038-.191-.038-.194-.036-.198-.034-.202-.033-.205-.032-.21-.031-.212-.028-.216-.027-.22-.026-.224-.023-.226-.022-.231-.021-.233-.018-.237-.016-.241-.014-.244-.012-.247-.011-.25-.008-.254-.005-.257-.004-.26-.001-.26.001z' transform='scale(.5)'/%3e%3c/symbol%3e%3c/defs%3e%3cdefs%3e%3csymbol height='24' width='24' id='clock'%3e%3cpath d='M12 2c5.514 0 10 4.486 10 10s-4.486 10-10 10-10-4.486-10-10 4.486-10 10-10zm0-2c-6.627 0-12 5.373-12 12s5.373 12 12 12 12-5.373 12-12-5.373-12-12-12zm5.848 12.459c.202.038.202.333.001.372-1.907.361-6.045 1.111-6.547 1.111-.719 0-1.301-.582-1.301-1.301 0-.512.77-5.447 1.125-7.445.034-.192.312-.181.343.014l.985 6.238 5.394 1.011z' transform='scale(.5)'/%3e%3c/symbol%3e%3c/defs%3e%3cdefs%3e%3cmarker orient='auto-start-reverse' markerHeight='12' markerWidth='12' markerUnits='userSpaceOnUse' refY='5' refX='7.9' id='arrowhead'%3e%3cpath d='M -1 0 L 10 5 L 0 10 z'/%3e%3c/marker%3e%3c/defs%3e%3cdefs%3e%3cmarker refY='4.5' refX='4' orient='auto' markerHeight='8' markerWidth='15' id='crosshead'%3e%3cpath style='stroke-dasharray: 0%2c 0%3b' d='M 1%2c2 L 6%2c7 M 6%2c2 L 1%2c7' stroke-width='1pt' stroke='black' fill='none'/%3e%3c/marker%3e%3c/defs%3e%3cdefs%3e%3cmarker orient='auto' markerHeight='28' markerWidth='20' refY='7' refX='15.5' id='filled-head'%3e%3cpath d='M 18%2c7 L9%2c13 L14%2c7 L9%2c1 Z'/%3e%3c/marker%3e%3c/defs%3e%3cdefs%3e%3cmarker orient='auto' markerHeight='40' markerWidth='60' refY='15' refX='15' id='sequencenumber'%3e%3ccircle r='6' cy='15' cx='15'/%3e%3c/marker%3e%3c/defs%3e%3cg name='User' class='actor-man actor-top'%3e%3cline y2='45' x2='75' y1='25' x1='75' id='actor-man-torso4'/%3e%3cline y2='33' x2='93' y1='33' x1='57' id='actor-man-arms4'/%3e%3cline y2='45' x2='75' y1='60' x1='57'/%3e%3cline y2='60' x2='91' y1='45' x1='75'/%3e%3ccircle height='65' width='150' r='15' cy='10' cx='75'/%3e%3ctext style='text-anchor: middle%3b font-size: 16px%3b font-weight: 400%3b font-family: arial%2c sans-serif%3b' class='actor actor-man' alignment-baseline='central' dominant-baseline='central' y='67.5' x='75'%3e%3ctspan dy='0' x='75'%3eUser%3c/tspan%3e%3c/text%3e%3c/g%3e%3ctext style='font-family: arial%2c sans-serif%3b font-size: 16px%3b font-weight: 400%3b' dy='1em' class='messageText' alignment-baseline='middle' dominant-baseline='middle' text-anchor='middle' y='80' x='207'%3eInitiates login%3c/text%3e%3cline style='fill: none%3b' marker-start='url(%23sequencenumber)' marker-end='url(%23arrowhead)' stroke='none' stroke-width='2' class='messageLine0' y2='109' x2='338' y1='109' x1='76'/%3e%3ctext class='sequenceNumber' text-anchor='middle' font-size='12px' font-family='sans-serif' y='113' x='76'%3e1%3c/text%3e%3ctext style='font-family: arial%2c sans-serif%3b font-size: 16px%3b font-weight: 400%3b' dy='1em' class='messageText' alignment-baseline='middle' dominant-baseline='middle' text-anchor='middle' y='124' x='549'%3eRedirects to login page%3c/text%3e%3cline style='fill: none%3b' marker-start='url(%23sequencenumber)' marker-end='url(%23arrowhead)' stroke='none' stroke-width='2' class='messageLine0' y2='153' x2='754' y1='153' x1='343'/%3e%3ctext class='sequenceNumber' text-anchor='middle' font-size='12px' font-family='sans-serif' y='157' x='343'%3e2%3c/text%3e%3ctext style='font-family: arial%2c sans-serif%3b font-size: 16px%3b font-weight: 400%3b' dy='1em' class='messageText' alignment-baseline='middle' dominant-baseline='middle' text-anchor='middle' y='168' x='415'%3eEnters credentials%3c/text%3e%3cline style='fill: none%3b' marker-start='url(%23sequencenumber)' marker-end='url(%23arrowhead)' stroke='none' stroke-width='2' class='messageLine0' y2='197' x2='754' y1='197' x1='76'/%3e%3ctext class='sequenceNumber' text-anchor='middle' font-size='12px' font-family='sans-serif' y='201' x='76'%3e3%3c/text%3e%3ctext style='font-family: arial%2c sans-serif%3b font-size: 16px%3b font-weight: 400%3b' dy='1em' class='messageText' alignment-baseline='middle' dominant-baseline='middle' text-anchor='middle' y='212' x='552'%3eRedirects back after login%3c/text%3e%3cline style='fill: none%3b' marker-start='url(%23sequencenumber)' marker-end='url(%23arrowhead)' stroke='none' stroke-width='2' class='messageLine0' y2='241' x2='346' y1='241' x1='757'/%3e%3ctext class='sequenceNumber' text-anchor='middle' font-size='12px' font-family='sans-serif' y='245' x='757'%3e4%3c/text%3e%3ctext style='font-family: arial%2c sans-serif%3b font-size: 16px%3b font-weight: 400%3b' dy='1em' class='messageText' alignment-baseline='middle' dominant-baseline='middle' text-anchor='middle' y='256' x='549'%3eRequests Access Token for accessing CMS APIs%3c/text%3e%3cline style='fill: none%3b' marker-start='url(%23sequencenumber)' marker-end='url(%23arrowhead)' stroke='none' stroke-width='2' class='messageLine0' y2='285' x2='754' y1='285' x1='343'/%3e%3ctext class='sequenceNumber' text-anchor='middle' font-size='12px' font-family='sans-serif' y='289' x='343'%3e5%3c/text%3e%3ctext style='font-family: arial%2c sans-serif%3b font-size: 16px%3b font-weight: 400%3b' dy='1em' class='messageText' alignment-baseline='middle' dominant-baseline='middle' text-anchor='middle' y='300' x='552'%3eReturns Access Token%3c/text%3e%3cline style='fill: none%3b' marker-start='url(%23sequencenumber)' marker-end='url(%23arrowhead)' stroke='none' stroke-width='2' class='messageLine0' y2='329' x2='346' y1='329' x1='757'/%3e%3ctext class='sequenceNumber' text-anchor='middle' font-size='12px' font-family='sans-serif' y='333' x='757'%3e6%3c/text%3e%3ctext style='font-family: arial%2c sans-serif%3b font-size: 16px%3b font-weight: 400%3b' dy='1em' class='messageText' alignment-baseline='middle' dominant-baseline='middle' text-anchor='middle' y='344' x='207'%3eRequests CMS functionality%3c/text%3e%3cline style='fill: none%3b' marker-start='url(%23sequencenumber)' marker-end='url(%23arrowhead)' stroke='none' stroke-width='2' class='messageLine0' y2='373' x2='338' y1='373' x1='76'/%3e%3ctext class='sequenceNumber' text-anchor='middle' font-size='12px' font-family='sans-serif' y='377' x='76'%3e7%3c/text%3e%3ctext style='font-family: arial%2c sans-serif%3b font-size: 16px%3b font-weight: 400%3b' dy='1em' class='messageText' alignment-baseline='middle' dominant-baseline='middle' text-anchor='middle' y='388' x='649'%3eCalls API with Access Token%3c/text%3e%3cline style='fill: none%3b' marker-start='url(%23sequencenumber)' marker-end='url(%23arrowhead)' stroke='none' stroke-width='2' class='messageLine0' y2='417' x2='954' y1='417' x1='343'/%3e%3ctext class='sequenceNumber' text-anchor='middle' font-size='12px' font-family='sans-serif' y='421' x='343'%3e8%3c/text%3e%3ctext style='font-family: arial%2c sans-serif%3b font-size: 16px%3b font-weight: 400%3b' dy='1em' class='messageText' alignment-baseline='middle' dominant-baseline='middle' text-anchor='middle' y='432' x='959'%3eValidates token %26amp%3b permissions%3c/text%3e%3cpath style='fill: none%3b' marker-start='url(%23sequencenumber)' marker-end='url(%23arrowhead)' stroke='none' stroke-width='2' class='messageLine0' d='M 959%2c461 C 1019%2c451 1019%2c491 959%2c481'/%3e%3ctext class='sequenceNumber' text-anchor='middle' font-size='12px' font-family='sans-serif' y='465' x='959'%3e9%3c/text%3e%3ctext style='font-family: arial%2c sans-serif%3b font-size: 16px%3b font-weight: 400%3b' dy='1em' class='messageText' alignment-baseline='middle' dominant-baseline='middle' text-anchor='middle' y='506' x='652'%3eReturns requested data%3c/text%3e%3cline style='fill: none%3b' marker-start='url(%23sequencenumber)' marker-end='url(%23arrowhead)' stroke='none' stroke-width='2' class='messageLine0' y2='535' x2='346' y1='535' x1='957'/%3e%3ctext class='sequenceNumber' text-anchor='middle' font-size='12px' font-family='sans-serif' y='539' x='957'%3e10%3c/text%3e%3ctext style='font-family: arial%2c sans-serif%3b font-size: 16px%3b font-weight: 400%3b' dy='1em' class='messageText' alignment-baseline='middle' dominant-baseline='middle' text-anchor='middle' y='550' x='210'%3eDisplays data/content%3c/text%3e%3cline style='fill: none%3b' marker-start='url(%23sequencenumber)' marker-end='url(%23arrowhead)' stroke='none' stroke-width='2' class='messageLine0' y2='579' x2='79' y1='579' x1='341'/%3e%3ctext class='sequenceNumber' text-anchor='middle' font-size='12px' font-family='sans-serif' y='583' x='341'%3e11%3c/text%3e%3cg name='User' class='actor-man actor-bottom'%3e%3cline y2='644' x2='75' y1='624' x1='75' id='actor-man-torso7'/%3e%3cline y2='632' x2='93' y1='632' x1='57' id='actor-man-arms7'/%3e%3cline y2='644' x2='75' y1='659' x1='57'/%3e%3cline y2='659' x2='91' y1='644' x1='75'/%3e%3ccircle height='65' width='150' r='15' cy='609' cx='75'/%3e%3ctext style='text-anchor: middle%3b font-size: 16px%3b font-weight: 400%3b font-family: arial%2c sans-serif%3b' class='actor actor-man' alignment-baseline='central' dominant-baseline='central' y='666.5' x='75'%3e%3ctspan dy='0' x='75'%3eUser%3c/tspan%3e%3c/text%3e%3c/g%3e%3c/svg%3e)
So, applying access control to your service API is as simple as adding a middleware to validate the access token and check the permissions in the step 9.
The core implementation is as follows (checkout the complete implementation in RBAC sample - backend):
And apply the middleware to the API endpoints that require authentication:
We have now added access control to our CMS system and assigned roles to our users.
After users log in and get their Access Token for the CMS API, they can use this token to access the CMS API. The Access Token contains the user's permission information. This lets us control what data to return based on user permissions.
Our next step is to implement the MCP Server to use Personal Access Tokens.
Understanding how Personal Access Token represents users
Refer to the CMS auth flow above, users get an Access Token for the CMS API after logging in. This Access Token is their credential for accessing the CMS API.
We just need to get an Access Token similar to what users get after login. Then we can use it to access the CMS API.
This is where Personal Access Tokens come in. They help us get the same kind of Access Token that users normally get after logging in.
Here's what we need to do:
- Create a Personal Access Token for a user
- Use this Personal Access Token to request an exchange token from the Auth Service's token endpoint. This gives us an Access Token like the one users get after logging in
- Use this Access Token in our MCP Service tool to access the CMS API
In this example, we use Logto for demonstration, since Logto supports Personal Access Tokens and token exchange. If you're not using Logto, you can follow this approach to implement your own Personal Access Token support.
Create Personal Access Token for your user
In Logto Console > User management, you can create a Personal Access Token for a user from their details page:
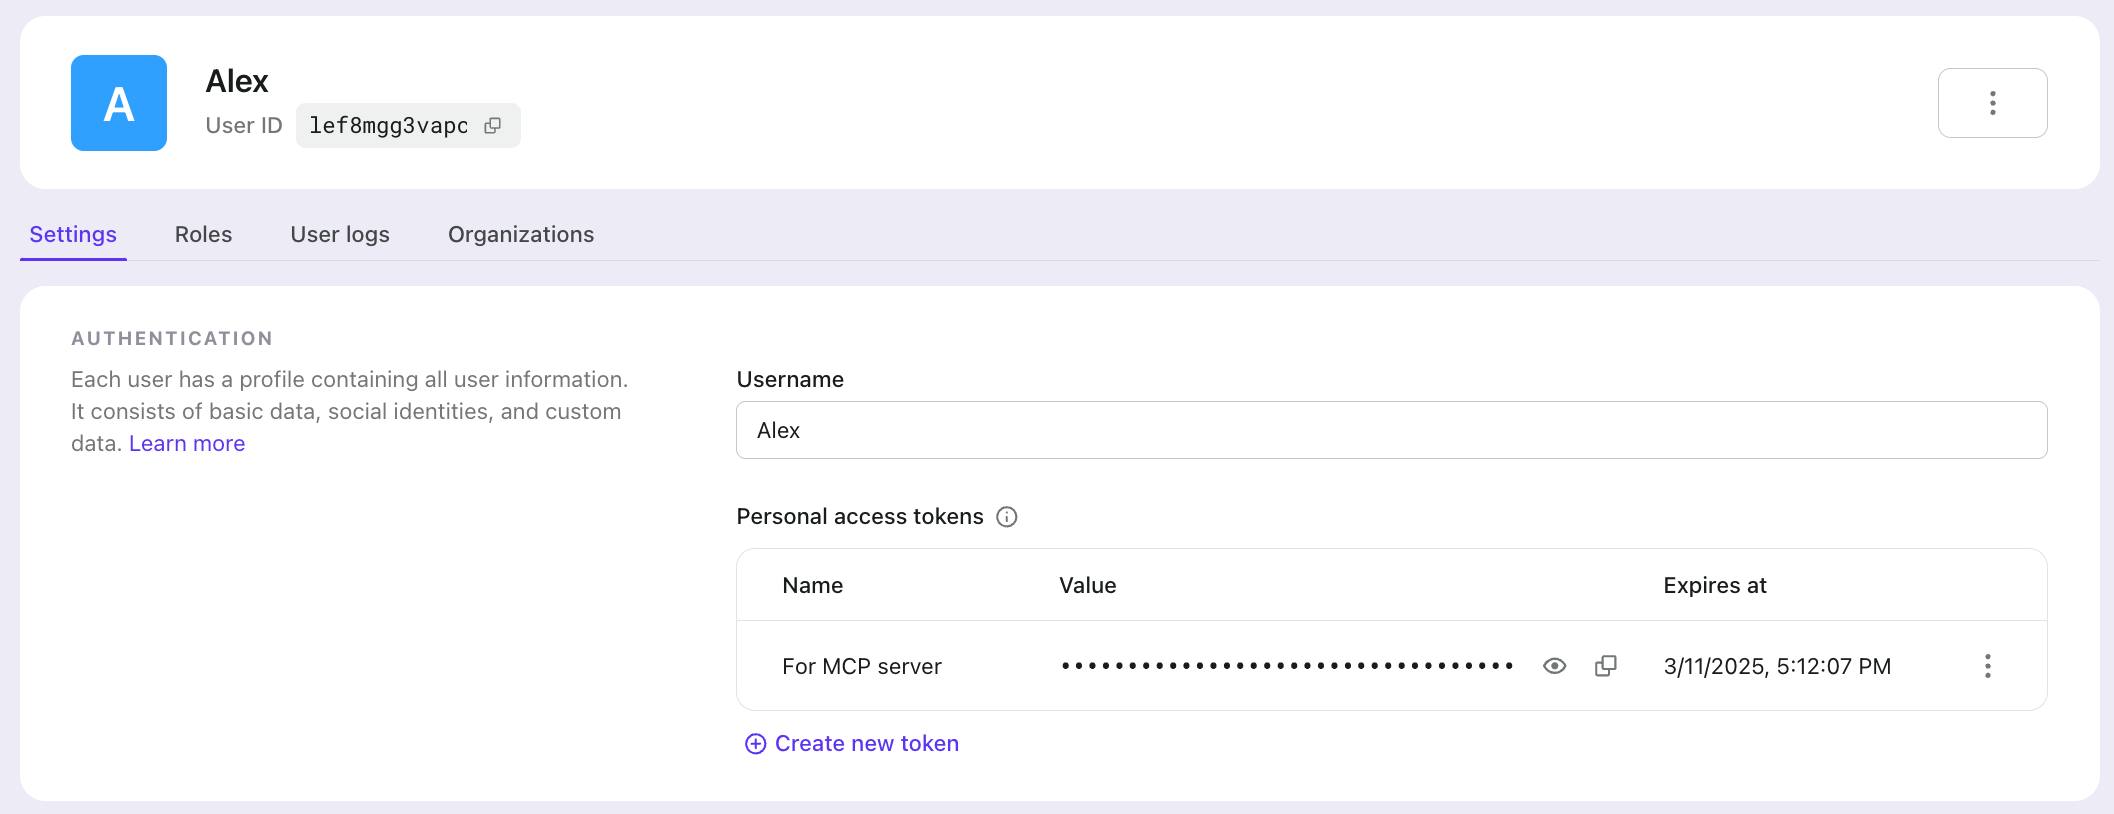
When creating a Personal Access Token, you can set its expiration time as needed.
Using Personal Access Token in MCP server
Now that we have the user's Personal Access Token, we can use it in our MCP Server.
First, let's follow Logto's Personal Access Token documentation, we'll get an Access Token for accessing the CMS API from Logto's token endpoint. You can checkout the complete source code here.
In the MCP Server, we use the Access Token from the exchangeAccessToken function to get data from the CMS API.
This way, the MCP Server doesn't need user login credentials to access the CMS API. Instead, it uses the user's Personal Access Token.
You can find the complete code in RBAC sample - mcp-server。
To learn how to deploy this MCP Server locally with Claude Desktop, check out the:MCP Server deployment guide。
You can also deploy this Server to various AI IDEs like Cursor, Cline, Windsurf, etc.
Test the access control
Let's test this implementation in Claude Desktop.
In our CMS, both Alex and Charles have created one article each.
Since Alex has the Admin role, they can see all articles. Charles, being an Author, can only see their own articles.
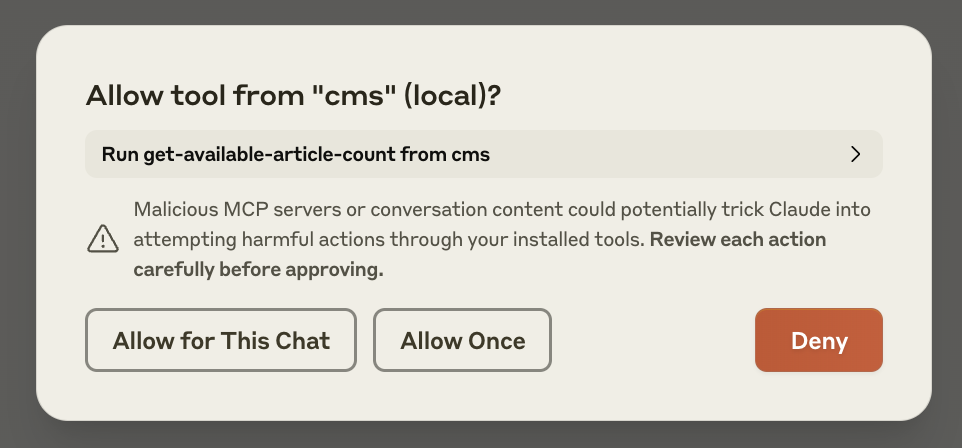
When we ask Claude how many available articles there are, Claude will use the get-available-article-count tool and ask for our permission:
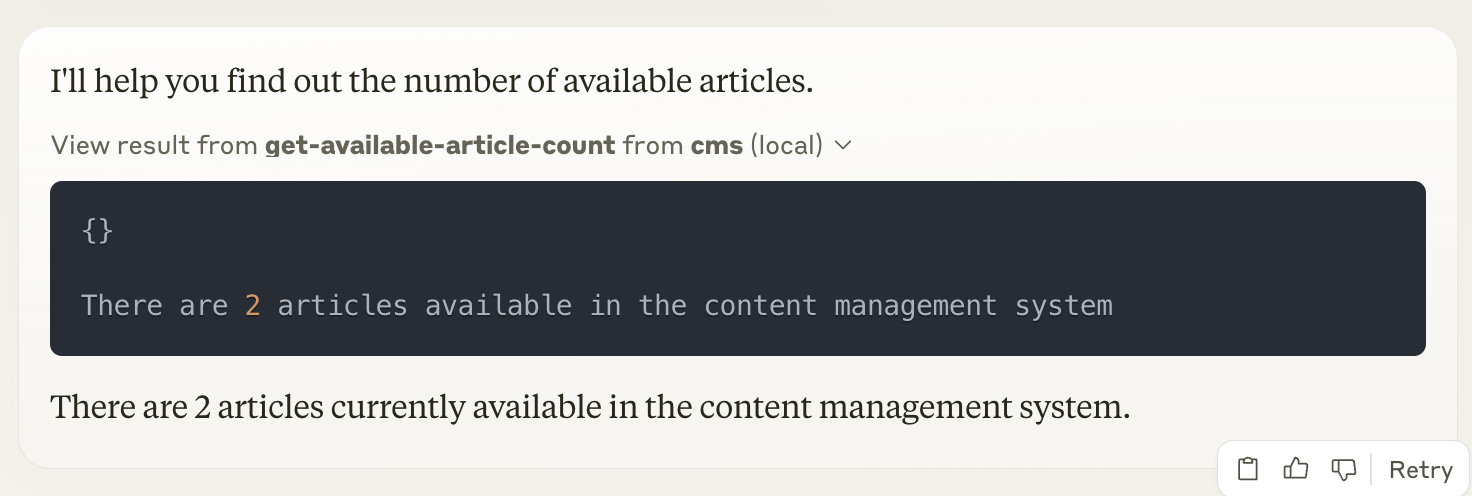
When we use Alex's Personal Access Token in MCP and ask Claude about the number of available articles, Claude calls the get-available-article-count tool and tells us there are 2 articles.
When we switch to Charles's Personal Access Token and ask the same question, Claude tells us there is only 1 article.

Awesome! We've successfully used Personal Access Tokens to access the CMS API and get the correct data.
This is exactly what we wanted: we create a Personal Access Token for each user, and when users configure their MCP Server with their token, we create a personalized AI experience for them.
Let me help you write the Summary section:
Summary
In this guide, we've explored how to connect AI tools to your existing services while maintaining proper access control. We demonstrated this using a CMS system with RBAC implementation, showing how Personal Access Tokens (PATs) can elegantly solve the authentication challenges.
You can find the complete source code for this implementation in our RBAC sample repository, which includes the CMS backend, frontend, and MCP server implementation.
When distributing your MCP server to users, remember to make the Personal Access Token configurable. This allows each user to:
- Configure their own PAT in the MCP server
- Access resources based on their specific permissions
- Get personalized AI experiences that reflect their role and access levels
This approach ensures that your AI integration remains secure while providing a customized experience for each user based on their permissions and role in your system.
Wishing you tremendous success in your business as you embark on this AI integration journey! May your services thrive and grow with these new AI capabilities! 🚀